Some links on this page are affiliate links: if you buy through them we may earn a commission, at no extra cost to you.
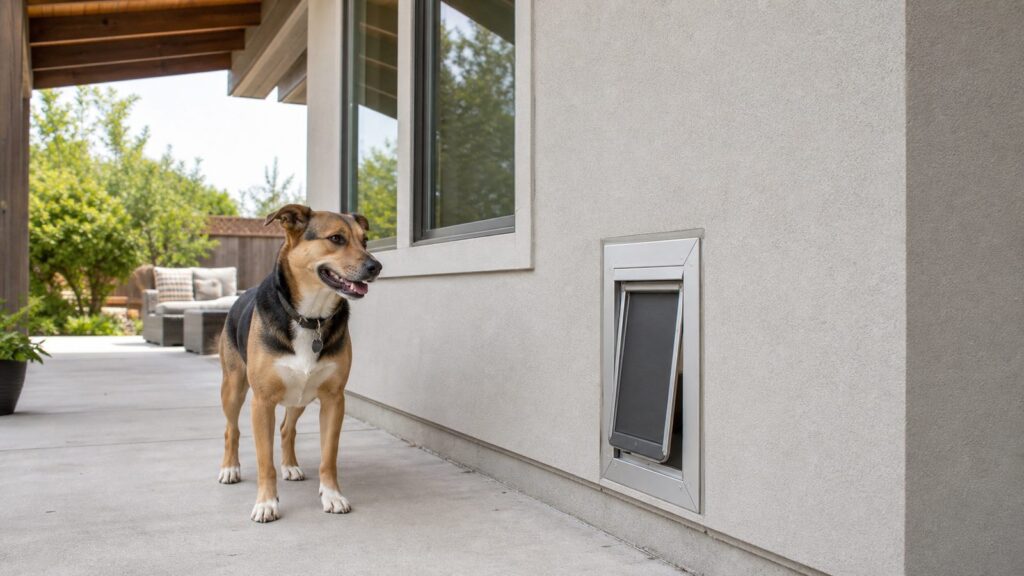
For most stucco homes, the best dog door is a wall-mount pet door with an integrated tunnel, insulated or rigid flaps, a secure lockout panel, corrosion-resistant fasteners, and a flashing approach that protects the water-resistive barrier behind the stucco. The wrong choice is a lightweight door insert treated like a weekend accessory. A stucco wall opening is a building-envelope penetration, closer to a small window or exterior door than a simple pet product.
On our job sites, the pet door itself is rarely the hard part. The risk is what happens after the stucco is cut: broken lath, torn building paper, exposed sheathing, an unsloped tunnel, missing sealant joint, or a patch that traps water. A $150 door can turn into a drywall repair, mold investigation, or stucco remediation project if the opening is not detailed correctly.
As an Amazon Associate I earn from qualifying purchases.
Recommended Free Tools
For 2026 budgeting in the United States, expect a quality wall-mounted dog door through stucco to cost about $500 to $2,000 or more installed. Simple wood-framed stucco walls sit toward the lower end. Masonry, block, thick stucco assemblies, premium insulated doors, and electronic access doors push the project above $2,000, and some electronic systems can exceed $3,000 installed.
This guide covers the best dog door types for stucco walls, what separates a durable installation from a risky one, how to size the opening, what it should cost, when DIY makes sense, and what to ask before anyone cuts into your wall.
Popular on Amazon

- Install Into Your Wall: This pet door is best for homes where it might not be possible to install a pet door into your human door
- Durable Frame Won'T Rust: Our pet door is made out of durable plastic that won’t rust like other steel options while also providing great insulation
- Telescoping Design for Wall Installation: Telescoping tunnel lets you use the door in walls that are 4 3/4 - 7 1/4 in thick; compatible extension kits sold separately for walls thicker than 7 1/4 in
- Diy Installation: This do-it-yourself project easily installs in all types of interior and exterior walls; cutting template and step-by-step instructions are included
- Energy Efficient: The double-flap provides weatherproofing and energy efficiency, and a slide-in closing panel adds extra insulation when your pet is not using it; PVC frame withstands UV exposure
Best Dog Door Type for a Stucco Wall
The best fit for most stucco homes is a true wall-mount dog door, not a standard door-mount model forced into a wall. A wall unit is built to bridge the full wall thickness and finish both the interior and exterior sides cleanly. That matters because a stucco wall is not a thin panel. A common exterior wall may include interior drywall, framing, insulation, exterior sheathing, one or more layers of water-resistive barrier, metal lath, cement plaster, finish coat, and sometimes foam, furring, or masonry.
Many wall-mount pet doors are designed for wall thicknesses in the 4.5-inch to 8-inch range. That covers a lot of wood-framed homes, but it does not cover every stucco condition. Older three-coat stucco, masonry or block walls, stone veneer over stucco, furred interiors, and thick retrofit assemblies may require extension tunnels or custom fabrication. Before buying, measure the full wall depth at the planned location or verify it from a nearby outlet, door jamb, pipe penetration, or exploratory inspection.
Quick wins for a faster PC:
Repair Windows errors before they cause bigger problemsFix Now →Fix the driver behind crashes, sound loss and screen glitchesFind Drivers →Clear out junk files and repair common Windows errorsFree Scan →For a stucco installation, look for these features first:
- Wall-mount design: The kit should include a tunnel or tunnel sections, not just an interior flap frame.
- Insulated flap or rigid panel: Double-flap, magnetic, insulated, or rigid-panel models control air leakage better than thin vinyl flaps.
- Lockout panel: A removable or sliding security panel should be standard, especially for medium and large dogs.
- Weatherable exterior frame: Aluminum, composite, or high-quality polymer frames hold up better than flimsy plastic in sun, rain, and temperature swings.
- Corrosion-resistant fasteners: Exterior-wall work should use fasteners suitable for moisture exposure and compatible materials.
- Serviceable parts: Replacement flaps, magnets, panels, and hardware should be available without replacing the entire unit.
Our practical recommendation is simple: choose the door based on the wall and climate first, then the pet. A small dog in a conditioned living room in Arizona, Texas, Florida, or Colorado needs better air sealing than many homeowners expect. In hot states, keeping cooled air inside can matter as much as stopping winter drafts.
Best Dog Doors for Stucco Walls by Use Case
There is no single best dog door for every stucco home. A mild-climate laundry room, a high-end living area, a windy hillside wall, and a wildlife-prone backyard all call for different priorities. The table below gives a practical contractor-level comparison.
| Use Case | Best Door Type | Typical Product Cost | Installed Stucco-Wall Budget | Why It Fits |
|---|---|---|---|---|
| Best overall for most homes | Insulated double-flap wall-mount door | $380-$800+ | $900-$2,000+ | Good balance of air sealing, durability, and long-term value. |
| Premium insulation and wind resistance | Endura Flap Wall Mount or similar insulated flap system | From about $379.99 | $900-$2,000+ | Strong choice for conditioned spaces, wind exposure, and high energy use. |
| Flexible sizing and configurations | Hale Wall Model or similar configurable wall unit | From about $269 | $800-$1,800+ | Useful when the dog size, wall thickness, or mounting condition needs more options. |
| Security and rigid-panel feel | PlexiDor Wall Series or similar rigid saloon-style panel | About $768-$1,206 | $1,300-$2,500+ | Rigid panels and robust frames appeal to homeowners concerned about durability and lockup. |
| Wildlife or controlled access | Electronic wall pet door | $400-$2,780+ | $1,200-$3,500+ | Controls which pets can enter and can reduce stray animal or wildlife access. |
| Budget secondary space | Basic wall kit from PetSafe, Ideal Pet, or similar | $150-$400 | $500-$1,200 | Works best in garages, mudrooms, mild climates, and low-exposure walls. |
Best Overall: Insulated Wall-Mount Dog Door
For most stucco homes, an insulated wall-mount dog door is the right starting point. Products such as the Endura Flap Wall Mount represent this category well because they focus on weather performance, flap seal, and wall installation rather than just low purchase price. The product cost often begins around the high $300s and can climb with size, double-flap configuration, and accessories.
Do these 3 things before closing this tab:
1Clear out junk files and repair common Windows errors2Scan for outdated or missing drivers - takes under a minute3Repair Windows errors before they cause bigger problemsThis is the category we would usually recommend for a dog door that opens from a kitchen, family room, laundry room, or finished mudroom into a fenced yard. It costs more than a basic vinyl flap, but it is better suited to a conditioned wall. In many homes, the extra $200 to $500 spent on a better unit is cheap compared with repairing water-damaged trim, drywall, flooring, or stucco.
Best for Custom Sizing: Configurable Wall Models
Hale-style wall models are a good fit when the opening size, wall thickness, pet height, or interior/exterior finish needs more flexibility. Some premium brands offer more sizes, frame colors, tunnel options, and flap arrangements than big-box budget kits. That flexibility matters with stucco because moving the opening later is not a small change. You want the first cut to be the right cut.
If you have two dogs of different sizes, do not automatically size for the largest breed name. Measure the tallest dog at the shoulder and the widest part of the body, then confirm the smaller dog can still push the flap and step through comfortably. A practical rule of thumb is to choose a pet opening about 2 inches taller and 2 inches wider than the dog’s key measurements, while keeping the step-over low enough for daily use.
Best for Security: Rigid-Panel Wall Doors
Rigid-panel doors such as the PlexiDor Wall Series cost more, with listed product pricing around $768 to $1,206 before installation, but they solve problems that flexible flaps do not. The saloon-style panels can feel sturdier, they resist curling, and they are often paired with more substantial locking panels. For a visible exterior wall, a rigid-panel unit can also look more finished than a lightweight flap.
Security is not only about the door product. Placement matters. Avoid installing a large dog door near a deadbolt, lever handle, low window, or interior latch where someone could reach through. For large dogs, also think about whether the opening could allow a person to crawl in. A lockout panel should be used when the house is empty, at night, or when the door is not actively needed.
Best for Wildlife and Multi-Pet Control: Electronic Doors
Electronic doors make sense when you need controlled access. That may mean keeping raccoons, stray cats, or neighborhood animals out; allowing one pet but not another; or locking the door on a programmed schedule. High Tech Pet, Power Pet, and PlexiDor Electronic-style systems are common examples in this category.
Also popular on Amazon

- FREEDOM AND INDEPENDENCE: Give your cats and dogs freedom to go in and out without your help, arrangement for potty breaks or play time by themselves.
- DIMENSION AND TELESCOPING WIDTH: The telescoping tunnel accommodates walls that are 4 3/4 - 7 1/4 in thick.Flap Opening: 8 1/4"W x 12 1/4"H. Frame: 12 1/4"W x 17 1/8"H. Cutout in wall:9 7/8"W x 13 3/4"H.
- EASY INSTALLATION: This pet door easily installed in all types of interior and exterior walls; cut-out template and step-by-step instructions are included, simple to follow instructions walk you through the install.
- DURABLE, SAFE :This Pet Door frame is made of metal laser welding process and high-quality steel aluminum alloy oxidation to ensure durability,security and thermal insulation. Come with one metal closing panel.
- 3-FLAP DESIGN: Seal out the elements and maintain indoor comfort with the advanced three-flap design featured. This triple layer not only provides weatherproofing but also ensures optimal energy efficiency, keeping your home shielded from extreme weather conditions and drafts.
The tradeoff is cost and complexity. Premium electronic models can list from roughly $2,409 to $2,780 before installation, and the finished stucco-wall project may exceed $3,000 once electrical needs, wall work, weather detailing, and finish repairs are included. Electronic doors also add maintenance: collars, batteries, sensors, motors, and troubleshooting. For many homeowners, a high-quality manual insulated door with a lockout panel is simpler and more reliable. For wildlife-heavy areas or strict access control, electronic can be worth it.
Best Budget Option: Basic Wall Kit
Budget wall kits from PetSafe, Ideal Pet, and similar brands can work when expectations are realistic. They are usually best for secondary spaces: garage exterior walls where allowed, utility rooms, storage rooms, or mild-climate areas with limited wind-driven rain. Product prices often start around $150 to $400.
The trap is spending carefully on the door and casually on the wall work. Even a budget pet door needs a clean rough opening, sealed tunnel, correct exterior flange, corrosion-resistant fasteners, and a stucco repair that sheds water. A low-cost unit installed poorly through stucco is not a bargain.
Why Stucco Dog Door Installations Are Higher Risk
Stucco looks solid from the outside, but it is part of a layered drainage system. Traditional cement stucco absorbs some moisture, then relies on drainage and drying behind the plaster. Behind the finish you may have metal lath, building paper or housewrap, weep screed, sheathing, and framing. When someone cuts a rectangular hole for a pet door, that cut interrupts every layer.
The common failure is not dramatic on day one. It is hidden water intrusion over months or years. Water gets behind the exterior flange, follows the tunnel, wets the sheathing, stains the drywall, swells trim, rusts lath, or shows up as odor after storms. By the time the homeowner sees the damage, the repair area is often much larger than the pet door.
The International Residential Code treats exterior wall coverings as part of the weather-resisting exterior wall envelope. IRC Section R703 requires exterior walls to resist water intrusion and requires approved corrosion-resistant flashing to prevent water from entering wall cavities or reaching structural framing. A dog door is not named like a window or patio door, but the building science is the same: if you cut a hole through the envelope, you need to restore water control, air control, and structural continuity around that opening.
Outdated Drivers Are Slowing You Down
One free scan finds every outdated or missing driver and matches the right update for your exact hardware.Free scan · exact hardware matchPC Slower Than It Used to Be?
A free scan shows the junk files, broken settings and background clutter dragging Windows down - then fixes them in one click.Free scan · Windows 10 & 11That is why we specify stucco pet doors as small exterior openings with flashing, not as accessory installs. The installer should be able to explain how they will tie into the water-resistive barrier, how the sill or tunnel will be sloped, how the exterior flange will be sealed, how the lath will be repaired, and how the stucco patch will be blended.
What a Proper Stucco Wall Installation Should Include
A good installation starts before the saw comes out. We locate studs, check both sides of the wall, verify the dog’s height, confirm the wall thickness, and look for electrical, plumbing, irrigation controls, hose bibs, outlets, low-voltage lines, gas lines, and structural elements. We also look outside for roof runoff, splashback from concrete, planter beds, poor grading, or areas where water already stains the stucco.
The best location is often under roof cover, such as a covered patio or porch, but not where water concentrates. A covered patio can reduce direct rain exposure, but a low opening near a wet slab can still see splashback during storms. The bottom of the pet door should also be high enough to avoid standing water, mulch, soil contact, and pest pathways.
Typical Installation Sequence
A proper stucco-wall dog door installation usually follows this order:
- Confirm the pet opening size with a physical mockup.
- Mark the interior opening and verify clearances from studs, outlets, plumbing, and exterior features.
- Cut the drywall first and inspect the wall cavity before cutting the exterior.
- Frame or reinforce the rough opening if required by size and stud layout.
- Cut the sheathing, water-resistive barrier, lath, and stucco carefully to avoid unnecessary damage.
- Repair and integrate the WRB around the opening using compatible flashing tape, fluid-applied flashing, or manufacturer-approved details.
- Slope the sill or tunnel slightly to the exterior so incidental water drains out, not in.
- Install the pet door tunnel and frame with corrosion-resistant fasteners.
- Use backer rod and high-quality exterior sealant where appropriate, maintaining a serviceable sealant joint.
- Repair lath and stucco around the frame, then texture and paint as needed.
For premium installs, ask for photos before the exterior flange goes on. The useful photos are the rough opening, WRB repair, sill flashing, lath repair, sealant/backer rod, and finished stucco patch. Those photos give you a record of the hidden work, which is the part that actually protects the wall.
Flashing and Drainage Details That Matter
The sill is the most important part of the opening. Water runs downhill, and the bottom of the pet door is where small leaks tend to sit. A flat, unsealed, raw wood sill is asking for trouble. The tunnel should be flashed or sealed as a miniature pan, with a slight outward slope. The side and head details should direct water around the opening instead of trapping it behind the flange.
Also popular on Amazon

- FREEDOM AND INDEPENDENCE: Give your cats and dogs freedom to go in and out without your help, arrangement for potty breaks or play time by themselves.
- DIMENSION AND TELESCOPING WIDTH: The telescoping tunnel accommodates walls that are 4 3/4 - 7 1/4 in thick.Flap Opening: 10 1/4"W x 16 1/4"H. Frame: 14 1/4"W x 21 1/16"H. Cutout in wall:12"W x 17 3/4"H.
- EASY INSTALLATION: This pet door easily installed in all types of interior and exterior walls; cut-out template and step-by-step instructions are included, simple to follow instructions walk you through the install.
- DURABLE, SAFE :This Pet Door frame is made of metal laser welding process and high-quality steel aluminum alloy oxidation to ensure durability,security and thermal insulation. Come with one metal closing panel.
- 3-FLAP DESIGN: Seal out the elements and maintain indoor comfort with the advanced three-flap design featured. This triple layer not only provides weatherproofing but also ensures optimal energy efficiency, keeping your home shielded from extreme weather conditions and drafts.
Sealant is not a substitute for flashing. Sealant is a maintenance item. It moves, ages, cracks, and eventually needs inspection or replacement. The better approach is layered protection: WRB integration behind the flange, a sloped sill, compatible sealant joints, and a finished stucco patch that does not block drainage.
Sizing the Dog Door Correctly Before Cutting Stucco
Sizing mistakes are expensive in stucco because the opening cannot be casually adjusted. Measure the dog, not the breed. Dogs with the same breed label can vary by several inches in shoulder height and body width, and older dogs may need a lower step-over than young dogs.
Measure from the floor to the top of the shoulders, also called the withers. Then measure the widest part of the chest or body. The pet opening should generally be about 2 inches taller and 2 inches wider than those measurements. For example, if the dog measures 21 inches at the shoulder and 9 inches wide through the body, an opening around 23 inches tall and 11 inches wide is a reasonable starting point, assuming the step-over height is comfortable.
Do a mockup before buying the door. Tape the proposed opening on the wall at the planned height. Then cut a cardboard version of the opening and have the dog pass through it several times. Watch the dog’s back, hips, paws, and confidence. If the dog crouches sharply, clips the hips, hesitates, or has to jump through, adjust before the wall is opened.
For large dogs, bring structure into the conversation early. A large pet door can require a rough opening wide enough to conflict with studs, braced wall panels, shear-wall details, or hold-downs. In some homes, especially in seismic or high-wind regions, that wall may be doing more structural work than it appears. Cutting a large opening without review can weaken the assembly or violate the intent of the original framing.
2026 Cost Guide for Dog Doors in Stucco Walls
For a stucco wall, a realistic installed budget is about $500 to $2,000 or more for product and labor. That range includes the pet door, wall cutting, tunnel installation, sealing, basic finish work, and cleanup. Premium rigid-panel and electronic doors can push the total well above $3,000, especially if electrical work, masonry cutting, or extensive stucco patching is involved.
What’s actually slowing this PC down?
Pick the symptom - the matching free tool is one click away.
General dog door installation pricing often looks lower because many published prices include simple wood doors, hollow-core doors, or patio inserts. Those are not the same project. A wall installation through stucco is slower and riskier. DogDoors.com has cited common wall-installation labor ranges around $400 to $1,600 depending on wall material, with wood-stud walls lower than concrete. Adeo Pets cites professional wall-mount installation around $300 to $800 and total wall pet door projects around $500 to $2,000 or more. CountBricks cites general professional installation around $325 to $850 depending on type and complexity, with a sample stucco-wall project around $845 including materials, labor, permit, and cleanup. Task-market quotes can be much lower, sometimes around $111 to $256 for pet-door installation, but those figures usually reflect simpler door installs, not a fully detailed stucco wall penetration.
| Project Type | Typical 2026 Cost | Best For | Watchouts |
|---|---|---|---|
| Basic door-mount pet door | $150-$600 installed | Interior doors, simple exterior doors, low-risk locations | Usually not appropriate for stucco walls without a wall kit. |
| Basic wall kit through stucco | $500-$1,200 installed | Secondary spaces and mild climates | Finish quality, air leakage, and water detailing vary heavily. |
| Insulated wall-mount door | $900-$2,000+ installed | Most conditioned living spaces | Requires careful flashing and correct wall thickness. |
| Rigid-panel premium wall door | $1,300-$2,500+ installed | Security, durability, high-use openings | Higher product cost and more precise installation. |
| Electronic wall pet door | $1,200-$3,500+ installed | Wildlife control and selective pet access | Power, sensors, maintenance, and replacement parts matter. |
| Stucco, block, masonry, or thick wall custom install | $1,500-$3,500+ | Complex exterior wall assemblies | May require masonry tools, custom tunnel, permits, or structural review. |
The biggest cost drivers are wall material, wall thickness, pet door size, single versus double flap, manual versus electronic operation, interior trim repairs, exterior stucco texture matching, paint blending, and whether framing has to be modified. The cheapest quote is not necessarily the cheapest project. If a low bid leaves out flashing, WRB repair, stucco patching, or paint, you are just buying those risks separately.
Where Not to Install a Dog Door
Some locations should be avoided even if they seem convenient. Do not place a dog door in a garage-to-house fire separation wall without code review. The wall between an attached garage and the living area is not an ordinary partition, and cutting an unprotected pet opening through it can compromise the required separation.
Avoid braced wall panels, shear walls, areas near hold-downs, and narrow wall segments beside large openings unless a qualified contractor or engineer confirms the opening is acceptable. Also avoid locations below concentrated roof runoff, under scuppers, against planter beds, close to irrigation spray, or where the stucco already shows staining or cracking.
The Tool Desk
Outbyte Driver Updater FREEFix the driver behind crashes, sound loss and screen glitchesFind Drivers →Outbyte PC Repair FREEClear out junk files and repair common Windows errorsFree Scan →Inside the wall, stay alert for electrical and plumbing. Exterior walls can contain outlets, low-voltage wiring, hose bib supply lines, condensate drains, gas lines, security wiring, and irrigation controls. The first cut should usually be an exploratory interior cut, not a full-depth plunge through both sides of the wall.
Security also affects placement. A large dog door near a door handle can let someone reach in and unlock the door. A pet door below a low window may create a weak point. A side yard hidden from the street may be convenient for the dog but less desirable from a security standpoint. If the door must go in a less visible area, use a stronger lockout panel and consider an electronic or locking model.
Also popular on Amazon

- Install Into Your Wall: This pet door is best for homes where it might not be possible to install a pet door into your human door
- Durable Frame Won'T Rust: Our pet door is made out of durable plastic that won’t rust like other steel options while also providing great insulation
- Telescoping Design for Wall Installation: Telescoping tunnel lets you use the door in walls that are 4 3/4 - 7 1/4 in thick; compatible extension kits sold separately for walls thicker than 7 1/4 in
- Diy Installation: This do-it-yourself project easily installs in all types of interior and exterior walls; cutting template and step-by-step instructions are included
- Energy Efficient: The double-flap provides weatherproofing and energy efficiency, and a slide-in closing panel adds extra insulation when your pet is not using it; PVC frame withstands UV exposure
Stucco vs EIFS: Do Not Treat Them the Same
Traditional stucco and EIFS are not the same wall system. Traditional cement stucco is a hard plaster system, usually installed over lath and a water-resistive barrier. EIFS, often called synthetic stucco, typically includes foam insulation board, base coat, mesh, finish coat, and manufacturer-specific water management details. From the sidewalk they can look similar, but they behave differently when cut.
EIFS can be riskier for DIY pet door work because the waterproofing details are system-specific. Cutting through foam and coatings without correct edge sealing can create a direct water path into the wall. Some EIFS warranties also depend on approved installation methods and compatible sealants. If you are not sure whether your home has traditional stucco or EIFS, have it identified before choosing the installation method.
Free tools Windows power users keep installed
One-click scans. No signup required.
A simple field clue is that EIFS may sound more hollow or softer when tapped, while traditional stucco feels harder and more cement-like. That is not a substitute for inspection. Older repairs, multiple wall systems, and decorative foam trim can make visual identification unreliable.
Energy Performance, Drafts, and Comfort
A dog door is an intentional hole through the exterior envelope, so energy performance matters. Lightweight vinyl flaps are inexpensive, but they can curl, gap, flap in the wind, and leak conditioned air. In a laundry room that may be tolerable. In a main living area, it is usually a poor long-term choice.
Double-flap doors, magnetic seals, insulated flaps, and rigid panels improve comfort. They reduce drafts, slow heat transfer, and help keep dust and insects out. In high-AC-load climates, a better-sealed dog door can make the room feel less humid and reduce the amount of conditioned air spilling outside. In cold or windy climates, it can prevent the cold-air plume that homeowners often notice near cheap pet doors.
Air sealing around the frame is just as important as the flap. The tunnel perimeter, interior trim, exterior flange, and fastener penetrations all need attention. A good installer will seal the rough opening in a way that controls air leakage without trapping bulk water. Expanding foam should be used carefully, if at all, because too much pressure can distort frames and too much reliance on foam can hide poor water detailing.
Permits and Code Considerations
Permit rules vary by city and county. Some jurisdictions treat small pet doors as minor work. Others may require a permit when the work changes an exterior wall, cuts stucco, affects structural framing, or occurs in regulated wall assemblies. San Jose, for example, publishes guidance for stucco and siding projects, and Florida counties commonly define permit triggers for exterior wall and structural work. The practical answer is local: check with your building department before cutting.
Code concerns become more likely when the opening is large, the wall is structural, the home is in a high-wind or seismic area, the wall is part of a fire separation, or the exterior cladding is part of a tested assembly. The IRC requirement that exterior walls resist water intrusion is the baseline. The installed pet door should not create a path for water into the wall cavity or structural framing.
If a contractor tells you no permit is ever needed for a stucco dog door, ask them to be more specific. The better answer is: it depends on the jurisdiction, wall type, opening size, and whether framing or rated assemblies are affected.
When to DIY vs When to Hire a Pro
DIY can make sense for a removable patio-panel pet door, a simple door-mount installation, or a basic wall kit in a low-risk interior-to-exterior wall when the homeowner has carpentry experience and understands exterior sealing. It makes less sense for stucco. The cut is permanent, the finish is visible, and the hidden water-control layers are easy to damage.
Consider DIY only if all of these are true: the wall is wood-framed traditional stucco, the opening fits cleanly between studs, there are no utilities in the cavity, the location is protected from heavy rain exposure, you can identify and repair the WRB, you have the tools to cut stucco cleanly, and you are comfortable patching lath, plaster, texture, and paint. Even then, plan a full day or weekend, not a one-hour project.
Hire a pro when the door is large, the wall is thick, the wall may be structural, the exterior is EIFS, the home has masonry or block behind the stucco, the opening is near electrical or plumbing, the location is exposed to wind-driven rain, or the room has expensive flooring and finishes. Also hire a pro if you care about the stucco patch blending well. Matching texture and color is a separate skill from installing the pet door.
Also popular on Amazon

- Perfect for Large Pets: The VOSOIR Large Pet Door is designed specifically for Large dogs weighing up to 110 lbs. It features a 18.7 x 9.92-inch flap opening for easy access, while the wall cutout measures 10.6 x 18.9 inches to ensure a snug fit during installation. The expandable channel accommodates walls ranging from 3.95 to 7.5 inches thick, making it versatile for most homes. Please check the size chart in images 6 and 7 to confirm compatibility before purchasing.
- 100% Aluminum Alloy – Superior Durability: The VOSOIR dog door is made entirely of premium aluminum alloy, unlike iron (rusts), plastic (cracks), or hybrid materials (warps). Advanced welding ensures strength, rust-resistance, and a flawless finish that won’t flake. Built to last, it’s the ultimate choice for pet owners who value quality and style.
- Upgraded Double Flaps – Soft & Seamless: Crafted with heat and cold-resistant materials, our double flaps provide year-round insulation and warmth, ensuring comfort in any weather. The premium magnetic strips on the flaps and dust-proof furring strips on the door frame work together to block wind, dust, and insects. Designed to be soft and flexible, they ensure smooth, quiet pet access, while the light-transmitting design keeps pets confident and safe.
- Secure Closing Panel & Dual-Sided Aluminum Locks: The VOSOIR pet door features a closing panel to lock the door when not in use. Equipped with aluminum locks on both sides, the panel ensures added security – it cannot be opened from the outside when locked from the inside, maintaining your home’s burglary resistance.
- Easy Installation & Quick-Change Flaps: Designed with a spacious retractable channel, this pet door fits a variety of indoor and outdoor walls. It includes screws, a guide template, detailed instructions, and all necessary accessories. Simply use the template to cut the wall hole, then follow the steps to install the inner and outer door. Plus, the quick-release flap design makes replacing or cleaning the flaps a breeze – straightforward and hassle-free!
When interviewing installers, ask direct questions:
- How will you tie the opening into the existing water-resistive barrier?
- Will the sill or tunnel be sloped to the exterior?
- What flashing tape, fluid flashing, or sealant system will you use?
- How will you repair cut lath around the opening?
- Are corrosion-resistant fasteners included?
- Does the price include stucco texture matching and paint?
- Will you check for electrical, plumbing, and framing conflicts before cutting through the exterior?
- Can you provide progress photos before the flange and patch cover the work?
If the installer can only talk about the pet door brand and not the wall assembly, keep looking.
Recommended Free Tools
Maintenance After Installation
A dog door in stucco should be inspected at least once a year and after major storms. Look for cracked sealant, gaps at the exterior flange, loose fasteners, staining below the opening, soft stucco, swollen interior trim, damp drywall, musty odor, ants or termites, and flap wear. Open and close the lockout panel to make sure it still seats correctly.
Clean the flap, magnets, side tracks, hinges, and threshold. Dirt buildup can prevent the flap from sealing. Replace worn flaps before they curl permanently. For electronic models, test collars, batteries, sensors, and locking functions on a schedule. A door that fails open during a storm or fails locked when the dog expects access is more than an inconvenience.
Sealant should not be ignored. Even a good exterior sealant joint is a maintenance item. Depending on sun exposure, movement, and product quality, inspection every 12 months is reasonable. Recaulk only with compatible materials and after removing failed sealant properly. Smearing new sealant over dirty, cracked sealant is a short-term patch, not maintenance.
Final Recommendation
For most homeowners, the best dog door for a stucco wall is a high-quality insulated wall-mount unit installed by someone who understands exterior walls. Endura Flap-style insulated wall doors are strong all-around choices for energy performance and wind resistance. Hale-style wall models are useful when sizing and configuration flexibility matter. PlexiDor-style rigid-panel wall doors are worth considering for durability and security. Electronic models make sense when access control is the priority, but they add cost and maintenance.
Do these 3 things before closing this tab:
1Scan for outdated or missing drivers - takes under a minute2Clear out junk files and repair common Windows errors3Fix the driver behind crashes, sound loss and screen glitchesIf you have a sliding glass door nearby, compare a removable patio-panel pet door before cutting stucco. It may reduce clear opening width and may not perform as well for security or energy use, but it avoids a permanent exterior wall penetration and is easier to reverse. For renters, future remodels, or uncertain door placement, that reversibility can be valuable.
If you do cut the stucco, treat the project like a small exterior opening. Confirm the size with a mockup. Choose a wall-mount door with a proper tunnel. Avoid structural, wet, and security-sensitive locations. Flash the opening, slope the sill, repair the WRB, patch the lath and stucco, and maintain the sealant. The goal is not just a dog that can get outside. The goal is a dog door that still looks good, locks properly, controls drafts, and keeps water out of the wall five years from now.
Frequently Asked Questions
Can you install a dog door through a stucco wall?
Yes, but it should be treated as an exterior wall penetration. The installer needs to cut through stucco, lath, water-resistive barrier, sheathing, framing space, insulation, and drywall while restoring flashing, drainage, air sealing, and the stucco finish.
How much does it cost to install a dog door in a stucco wall in 2026?
A realistic US budget is about $500 to $2,000 or more installed. Basic wall kits may land near the lower end, insulated wall doors often run $900 to $2,000+, and premium rigid or electronic models can exceed $3,000 installed.
Is a wall-mount dog door better than a door-mount dog door for stucco?
Yes. A wall-mount dog door is designed to bridge the full wall thickness with a tunnel and finished frames. A door-mount model is made for a much thinner door slab and usually is not the right product for stucco walls.
Do I need a permit for a dog door in a stucco wall?
Permit requirements depend on your city or county, wall type, opening size, and whether framing, fire separation, or structural bracing is affected. Check with the local building department before cutting an exterior wall.
What is the biggest risk with a stucco dog door?
The biggest risk is hidden water intrusion. A poor installation can interrupt the water-resistive barrier and let moisture into sheathing, framing, insulation, or drywall long before visible damage appears.
Can I install a stucco wall dog door myself?
DIY is possible for experienced homeowners, but stucco is not the best first pet-door project. Hire a pro if the wall is EIFS, masonry, block, structural, exposed to heavy rain, near utilities, or if you need the stucco texture and paint to blend cleanly.
Quick Recap
Product prices and availability are accurate as of the date/time indicated and are subject to change. Any price and availability information displayed on Amazon at the time of purchase will apply.

