The Tool Desk
Outbyte PC Repair FREEClear out junk files and repair common Windows errorsFree Scan →Outbyte Driver Updater FREEScan for outdated or missing drivers - takes under a minuteDriver Scan →Some links on this page are affiliate links: if you buy through them we may earn a commission, at no extra cost to you.
The best belt-sanding result comes from matching the machine and abrasive to the job, using light controlled pressure, and removing dust at the source. For shaping on the belt of a stationary belt/disc sander, WOOD Magazine gives 80- or 120-grit as practical examples; its examples for detail work on the disc are 150- or 220-grit. Those are task-specific starting points, not a universal grit schedule for every wood, sander, or finish.
Before touching the workpiece, identify whether you are using a handheld belt sander or a stationary belt/disc machine. The exposed abrasive, how the stock is supported, dust-port arrangement, and safe operating procedure differ. OSHA identifies entanglement at in-running rolls, contact with abrasive surfaces, flying chips, dust, and damaged belts as the principal hazards.
As an Amazon Associate I earn from qualifying purchases.
Do these 3 things before closing this tab:
1Clear out junk files and repair common Windows errors2Scan for outdated or missing drivers - takes under a minute3Repair Windows errors before they cause bigger problemsStart by identifying your belt-sanding setup
A belt sander uses pulleys to carry a coated abrasive belt across the work. That basic mechanism appears in two very different shop tools:
Handheld belt sander
You guide the tool over a supported workpiece. The machine manual determines how to hold it, where its guards are, which direction the belt travels, how to change belts, and how its dust port works. Do not transfer the stationary-machine procedure of pressing a board against a moving belt to a handheld tool. Keep both hands on the handles specified by the manufacturer, keep the cord or battery clear of the abrasive, and set the tool down only after the belt has stopped.
Popular on Amazon

- 7-amp motor rotates the belt at over 13 feet per second
- Compact design weighs in at a mere six pounds to limit the fatigue of the user
- Includes a detachable dust bag to minimize clean-up
- Lock-in safety feature allows for continuous sanding without requiring a constant grip on the trigger
- Backed by a two-year warranty and a nationwide network of skilled technicians
Stationary belt/disc sander
The machine remains fixed while you bring the workpiece to the belt or disc. A table, miter gauge, platen, or other support may control the stock, but the exact arrangement varies by machine. The belt and disc expose different working surfaces and are useful for different operations. Treat each as a separate abrasive station and use the guards supplied with the machine.
This distinction matters because pressure, feed direction, hand position, and workholding that are reasonable on a stationary machine can be unsafe on a handheld tool. If a manual conflicts with general advice, follow the manual and the machine’s guarding instructions.
Free tools Windows power users keep installed
One-click scans. No signup required.
What grit should you use for belt sanding?
Choose grit according to the amount of material you need to remove and the surface you need to leave. Coarser abrasive removes stock faster but can leave deeper scratches; finer abrasive removes less material and is better suited to refining a surface. The correct choice also depends on the wood, the amount of material, the belt or disc design, and whether another finishing operation will follow.
| Operation | Machine area | WOOD Magazine examples | How to interpret the example |
|---|---|---|---|
| Shaping or substantial stock removal | Belt on a stationary belt/disc sander | 80-grit or 120-grit | Use as a starting range for shaping; it is not a mandatory sequence or a finish specification. |
| Detailing | Disc on a stationary belt/disc sander | 150-grit or 220-grit | Suitable examples for finer detail work on the disc; the final choice still depends on the job and the next finish step. |
Do not assume that a belt labeled with one grit is interchangeable with every other belt. Match the belt’s length, width, backing, and abrasive type to the exact sander. A belt that fits the dimensions but is unsuitable for the machine’s speed or intended material can create poor results or a safety problem.
A practical grit decision
- Use the coarser end of the cited shaping range when you must remove visible high spots or change a profile quickly.
- Use the finer end when the shape is already close and you want to reduce the depth of the sanding marks before moving on.
- Use the disc examples for controlled detail work rather than assuming the disc and belt should always carry the same grit.
- Stop and inspect often. If the abrasive is removing more material than you can control, move to a finer belt or reduce pressure and feed.
These steps are a decision framework, not a promise that one grit will produce a finished surface. A particular finish system may require additional sanding with another tool or abrasive.
Also popular on Amazon
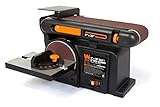
- Two-in-one sanding machine includes both a 4-by-36 inch belt and a 6-by-6 inch disc
- Belt tilts anywhere from 0 to 90 degrees
- Sturdy cast iron base prevents any heavy vibrations
- 4.3 Amp motor provides up to 3600 RPM
- Tension release lever provides for simple changes between sandpaper grits
Prepare the machine and workpiece
- Read the tool’s instructions. Confirm the approved belt dimensions, belt direction, guard positions, table adjustments, and dust-collection requirements. For a handheld tool, identify the designated handles and the manufacturer’s start-and-stop procedure.
- Inspect the belt before installation. Do not use a belt that is torn, frayed, excessively worn, or otherwise damaged. OSHA warns that worn belts can contribute to heat buildup and belt failure. Replace the belt rather than trying to trim or repair a damaged section.
- Disconnect power before changing anything. Unplug a corded machine or remove its battery according to the manual before changing a belt, clearing a jam, adjusting a guard, or reaching near pulleys.
- Set up dust extraction. Connect the sander’s dust port to a compatible vacuum or dust collector. Check the port diameter, hose size, and any adapter required; a connection that leaks or restricts airflow will collect less dust.
- Secure the workpiece when appropriate. A handheld sander needs a stable board or bench. On a stationary machine, use the table, fence, or other support provided for the operation. Keep loose offcuts, cords, and clothing away from the belt path.
- Plan the first contact. Decide which face or edge will meet the abrasive and where your hands will remain throughout the cut. Start the machine with the work clear, then bring the stock to the abrasive in a controlled manner.
Stationary belt-sanding technique
The following sequence reflects the stationary operation described in an OSHA belt-sander training script. It is not a substitute for the instructions for a particular machine.
Use light pressure
Lightly press the workpiece into the rotating belt. The abrasive should cut; forcing the stock increases friction and heat and makes it harder to control the shape. If the belt stops cutting effectively, inspect the grit, belt condition, alignment, and dust extraction instead of simply pushing harder.
Move the work horizontally
Move the workpiece horizontally from left to right across the belt in the training procedure. This movement spreads wear and helps minimize heat. Keep the stock moving rather than dwelling in one spot, especially on a narrow edge or a small area that can heat quickly.
Check progress periodically
Withdraw the work and inspect the surface at regular intervals. Compare the shape with a layout line, template, square, or other reference appropriate to the job. Frequent checks prevent you from sanding past a line and reduce the temptation to correct an error with excessive pressure.
Assume the sanded surface may be hot
Do not touch the newly sanded area immediately. OSHA’s training script warns that the surface can be hot. Set the piece down safely or allow it to cool before checking it by hand.
Quick wins for a faster PC:
Fix the driver behind crashes, sound loss and screen glitchesFind Drivers →Clear out junk files and repair common Windows errorsFree Scan →Scan for outdated or missing drivers - takes under a minuteDriver Scan →Also popular on Amazon

- Up to 22% more power** - complete traditionally corded sanding applications with a brushless motor that delivers efficiency and long runtime.
- Efficient dust collection - minimize dust exposure in your workspace and get up to 95% dust collection efficiency with the tool-free, DEWALT airlock (sold separately) compatible dust collection system.
- Tackle large jobs - finish large sanding jobs fast with 16.7% more sanding surface area vs. Milwaukee (2832-20) m18 fuel 18-volt lithium-ion cordless 3 in. x 18 in. belt sander.
- Help maximize user control - optimize the speed of your sander to the application with the variable speed trigger featuring a 25-speed selection dial that allows for precise results in a variety of materials.
- Quick sanding belt changes - change the sanding belt fast with the quick-release tool-free system.
Handheld belt-sander technique
A handheld belt sander removes material aggressively, so control comes from support, balance, and movement rather than downward force.
- Place the work on a stable surface and keep the sanding path clear.
- Hold the tool only at its designated handles and keep your fingers away from the moving belt and rollers.
- Start the tool with the belt clear of the work, then lower it smoothly. Avoid dropping a running sander onto an edge.
- Keep the tool moving at a steady pace. Staying in one place can create a hollow or a heat mark.
- Use the tool’s manual for belt direction and for any recommendation about sanding with or against the grain. Do not assume the stationary left-to-right instruction applies to a handheld model.
- Lift the tool clear before switching it off, and wait for the belt to stop before setting it down.
For narrow parts or small pieces, consider whether a stationary setup with proper support is safer than trying to hold the work and the tool at once. Never balance a small workpiece in a way that places your fingers near the abrasive.
Dust collection and ventilation
OSHA states that sanders produce a considerable quantity of fine wood dust and should be ventilated carefully. Connect extraction before sanding, not after the air is already dusty. A shop vacuum or dust collector can work when its hose and adapter match the sander’s port and provide adequate airflow.
Check the port and adapter
WOOD Magazine notes that sander ports may require adapters and that a small port can reduce dust-collector effectiveness. Measure the machine port and the hose connection, then choose an adapter that fits without a loose gap or severe restriction. If the collector’s hose overwhelms a small port, the connection may be convenient but still capture poorly.
Use room ventilation as a second layer
Extraction at the tool does not eliminate airborne dust. Provide careful general ventilation appropriate to the workspace, keep other people away from the sanding area, and follow the respiratory-protection requirements that apply to your operation. Clean settled dust with a method that does not simply blow it back into the air.
Also popular on Amazon

- Power & Variable-Speed Design: 7 Amp, 120V motor rotates the belt at over 13 feet per second. Variable-speed knob with 6 dials enables you to match the best speed to the application from 120-400rpm
- Bench & Belt Sander: Jellas belt sander with 2 metal C clamps, it can be turned over and fixed to table, acting as a bench sander, lock-on button will help you release your hand, reduce your work intensity
- 10 Pcs Sanding Belts: The deck sander comes with 2pcs 40 grits, 2pcs 60 grits, 2pcs 80 grits, 2pcs 120 grits and 2pcs 180 grits aluminum oxide sanding belts, meeting the requirements for your different projects
- High Effective Dust Collection Bag: The dust collecting bag is detachable, can be easily installed and removed, easy to clean dust. 2 in 1 (35mm and 32mm) vacuum dust adapter makes it possible to connect your vacuum cleaner, reaching effective dust collection
- Installing Belt: When installing the sanding belt, please keep the arrow on the belt in the same direction of the arrow on the machine, which enables the belt a longer service life, avoiding leaving scratches on the board
Watch for a change in collection
A sudden increase in visible dust can indicate a disconnected hose, blocked port, full collector, damaged seal, or an adapter that does not fit. Stop the machine, disconnect power, and correct the extraction problem before continuing.
Independent reader supportYour contribution helps us test, update, and keep practical guides available for everyone.Safety hazards that deserve a pre-start check
OSHA describes the primary belt-sander danger this way: “The primary safety hazard of belt sanders is that workers may catch their hands, clothing, or jewelry in the in-running rolls.” Treat that warning as a checklist rather than a general caution.
| Hazard | Preventive action |
|---|---|
| Entanglement at in-running rolls | Keep hands, loose clothing, jewelry, hair, and cords away from rollers and the belt entry points. |
| Contact with abrasive surfaces | Keep hands away from the moving belt or disc; use the supplied guards and supports. |
| Unused belt run and transmission pulleys | Keep the unused run and pulleys guarded. Do not operate with a guard removed unless the manufacturer’s procedure specifically requires a controlled adjustment with power disconnected. |
| Flying chips | Wear the eye and face protection required for the operation and stand out of the likely chip path. |
| Damaged or worn belt | Replace torn, frayed, or excessively worn belts. Continued use can increase heat and contribute to belt failure. |
| Dust exposure | Use dust extraction and careful ventilation; inspect the system if visible dust escapes. |
OSHA also advises sanding on the downward-moving side of the belt. Identify that side on your particular machine before bringing stock to the abrasive. Keep the work supported so it cannot be caught and lifted unexpectedly.
Common problems and corrections
Uneven or hollow surface
Excessive dwell time, uneven pressure, or an unsupported workpiece is usually the first place to look. Keep the tool or stock moving, use lighter pressure, and check the surface often. On a stationary machine, improve support rather than trying to correct the hollow by pressing harder.
Burning, heat, or a hot surface
Heat can result from dwelling, excessive pressure, a worn belt, or poor dust and chip clearance. Stop and inspect the belt. Use the horizontal movement described for the stationary procedure, reduce pressure, and allow the work to cool before touching it.
Also popular on Amazon

- Pressure control technology warns user when excessive pressure is applied
- 6.0 A of power sands any type of wood surface
- Micro-filtration captures and contains fine dust particles
- Auto track belt alignment keeps belt centered
- Vacuum compatible - fits standard 1-1/4 IN. vacuum hoses
Dust escaping around the port
Check that the collector is running, the hose is clear, and the adapter seals correctly. Confirm that the hose and machine port are compatible. A very small port or restrictive adapter can limit collection even when the hose is connected.
The belt tracks poorly or appears damaged
Stop, disconnect power, and consult the machine manual for tracking and tension adjustments. Replace a belt that is torn, frayed, or excessively worn instead of continuing to run it.
Too much material comes off too quickly
Move to the finer end of the appropriate grit examples, reduce pressure, and shorten each contact interval. Marking a reference line and checking it frequently helps preserve the intended profile.
A repeatable belt-sanding workflow
- Define the operation: handheld sanding, stationary belt shaping, or stationary disc detailing.
- Choose an abrasive that matches the operation; use 80 or 120 grit as WOOD Magazine’s belt-shaping examples and 150 or 220 grit as its disc-detailing examples, while treating both ranges as non-universal guidance.
- Verify belt dimensions, condition, direction, guards, and support surfaces.
- Connect a compatible extractor and provide careful room ventilation.
- Put on the required protective equipment and remove anything that could catch in the in-running rolls.
- Start with the work clear, then make controlled contact with light pressure.
- Keep the work moving, inspect progress periodically, and watch for heat.
- Stop the machine before changing belts, clearing dust or jams, or reaching near rollers and pulleys.
- Replace damaged belts and correct extraction or guarding problems before the next pass.
When the machine type, grit, movement, and dust setup all match the job, belt sanding becomes a controlled shaping operation instead of a race to remove material. The safest result is the one that preserves the intended profile while keeping hands, clothing, heat, and fine dust under control.
Quick Recap
Product prices and availability are accurate as of the date/time indicated and are subject to change. Any price and availability information displayed on Amazon at the time of purchase will apply.

