Do these 3 things before closing this tab:
1Repair Windows errors before they cause bigger problems2Scan for outdated or missing drivers - takes under a minute3Clear out junk files and repair common Windows errorsA perfect plywood cut is not just a pretty edge. On a job site, a good cut is straight, square, measured from the right reference edge, supported during the cut, and still useful after it is fastened into a wall, roof, floor, stair, cabinet, or built-in. The fastest way to ruin plywood is to treat every sheet the same. A 23/32-inch roof sheathing panel, a $90 hardwood veneer panel, and a pressure-treated exterior panel need different expectations, blades, handling, and installation details.
Here is the short answer: choose the correct panel, inspect it before layout, mark the keep piece, account for blade kerf, use a sharp plywood blade, set the saw just deeper than the sheet, support the full 4-by-8 panel, guide the saw, protect the veneer, control dust, and install structural panels with the required gaps and fastening schedule. The thirteen pointers below are the same sequence we use on our job sites because it follows the real workflow: plan, mark, cut, handle, and install.
Plywood is too expensive in 2026 to learn by wasting sheets. Common 4-by-8 structural sheathing is often in the roughly $35 to $60 per sheet range at major U.S. retailers, depending on thickness, grade, region, and exposure rating. A listed 23/32-inch RTD Southern Yellow Pine sheathing panel at one national retailer was $41.99, with bulk pricing around $37.79 for 48 or more sheets. Sanded, hardwood, marine, pressure-treated, and specialty panels can easily move into the $50 to $150-plus range, and many marine panels run $100 to $200-plus. One bad rip can cost more than the blade that would have prevented it.
1. Start With the Right Sheet, Not Just the Right Saw
Clean cutting starts with using the correct sheet product for the job. Many people search for plywood cutting tips while working with OSB, MDF, underlayment, hardwood veneer plywood, pressure-treated plywood, or structural sheathing. Those materials do not behave the same.
Recommended Free Tools
#1 Best Overall

- 【Perfectly Compatible with festool track saw】Our track saw guide rail is specifically designed for Festool TS-55/TS-75/TS-60 track saws, ensuring a perfect fit and seamless operation. Seamless docking with festool track saw guide rail ,Perfectly compatible with festool track saw guide rail accessories, such as FT handle clamp, TSO parallel guide etc. Packing list: ① 55in track saw guide rail x 2 ②3m splinter guard x 2 ③ Guide Rail Connector
- 【2-Year AFTER】Feikeer always provide a 2 year on guide rail for festool track saw. For any reason you are not satisfied, you can unconditionally request a replacement. customer satisfaction is our unremitting pursuit. If you have any questions, you can contact us at any time. We will give you a satisfactory reply within 12 hours!
- 【Enhanced Design for Precision Woodworking】Our guide rail features 2 anti-friction strips on the front, providing optimal protection for your electric circular saw. With meticulous attention to detail, we have crafted this guide rail to enhance your focus on precision woodworking projects
- 【Reliable and Durable Guide Rail System】Crafted from professional-grade extruded aluminum, our track saw guide rail offers exceptional durability and resistance to deformation and rust. You can rely on its dependability and longevity for all your cutting tasks.
- 【Streamlined Track Saw Cutting Operations】Effortlessly create flawless results in your woodworking projects and furniture installations with our exclusive saw guide rail. Whether you need to craft sheets of plywood or make accurate and repeatable rip cuts, this guide rail ensures precision and efficiency in your cutting operations
For framing and sheathing, we care about panel rating, thickness, exposure classification, layout, fastening, and expansion gaps. For finish carpentry, we care more about face veneer quality, grain direction, visible edges, and tearout. For shop work, MDF may cut cleanly but creates very fine dust and does not have the same strength or moisture performance as structural plywood. OSB is common for wall and roof sheathing, but it does not leave the same edge quality as sanded plywood.
Before buying, match the panel to the use. A cabinet side may justify a $70 to $150 hardwood veneer panel and an 80-tooth table saw blade. A roof deck usually needs APA-rated sheathing with the proper span rating and thickness, not furniture-grade material. A bathroom subfloor, exterior repair, or deck-related detail may require pressure-treated or exposure-rated panels. Specialty sheathing systems, WRB-faced panels, fire-retardant-treated plywood, and pressure-treated plywood should be cut and sealed according to the manufacturer’s instructions.
2. Inspect, Store, and Acclimate Panels Before Layout
A warped, swollen, delaminated, or rain-soaked panel will not cut like a flat sheet. It also may not install properly. On our jobs, we reject damaged sheets before layout because the cheapest time to catch a bad panel is before the first mark.
Check the face for raised grain, delamination, crushed corners, edge swelling, forklift damage, and deep face voids. Sight down the long edge. If the sheet rocks on a flat surface, bows badly, or has a wet edge, do not use it for a precision cut. For finish work, look at veneer direction and defects before deciding which side becomes the visible face.
Store plywood flat, supported, and off the ground. A 4-by-8 sheet weighs roughly 40 to 75 pounds depending on thickness and species, so a leaning stack can bend over time. Keep panels covered but ventilated. If sheets come from a cold garage, humid yard, or hot delivery truck, give them time to adjust before precision work. For interior built-ins and trim-grade panels, 24 to 72 hours in the work area can reduce surprises. For structural sheathing, protect panels from standing water and install them with the required expansion gaps.
3. Read the Panel Stamp Before You Cut It Off
Structural plywood is not just a sheet of wood. APA-rated panels carry information such as span rating, thickness, grade, exposure durability classification, and mill data. Inspectors and builders use that stamp to confirm the material is appropriate for the assembly.
This matters when a cut panel becomes part of a roof deck, wall bracing line, subfloor, stair, shear wall, fire-rated assembly, or exterior envelope. If you rip the stamp off every piece and scatter the offcuts, you can create confusion during inspection. On structural work, we try to keep at least one stamp visible in each installed area where practical, and we keep documentation for specialty panels.
Clean cuts are only one part of a compliant structural panel installation. The International Residential Code and engineered panel manufacturer instructions may govern panel thickness, nailing schedule, edge support, blocking, fastener type, fastening pattern, and orientation. If plans call for 15/32-inch wall sheathing, 19/32-inch roof sheathing, 23/32-inch subfloor, or a specific shear-wall schedule, do not substitute based only on what cuts easily.
4. Separate Construction Cuts From Finish Cuts
A construction cut and a finish cut have different standards. A roof-sheathing cut must land correctly on framing, leave the required gap, and accept the specified fasteners. A cabinet panel cut must be straight, square, clean on the visible face, and often accurate within 1/32 inch. Treating both cuts the same causes waste.
For construction sheathing, the key questions are: Does the panel fit the layout? Are edges supported where required? Is the panel oriented correctly? Is there a 1/8-inch gap at panel edge and end joints unless the manufacturer says otherwise? Can the fastener schedule still be followed without splitting the edge?
For finish plywood, the key questions are: Which face shows? Which edge shows? Does the grain direction match adjacent pieces? Will the blade exit through the visible veneer? Do we need tape, scoring, a zero-clearance insert, a sacrificial backer, or a track saw?
That distinction saves time. We do not need cabinet-grade cut prep for every attic baffle or temporary brace. We do need it for a stain-grade bookcase side, a finished soffit panel, or a visible stair skirt template.
5. Measure From a Known Edge and Mark the Waste Side
Most plywood cutting errors are layout errors. The saw only makes them permanent. Start from a factory edge when it is straight enough for the work. For precise projects, verify the factory edge with a long straightedge because sheet goods can be damaged during handling.
Rank #2

- Premium Home Improvement Tools: Universal compatibility fits most circular saws in the market with blades up to 7-1/4”
- Multiple Length Settings: Cuts 50” out of the box, or extends to any length required with optional GuideRail extensions to rip entire sheets
- Sturdy Woodworking Tools: All-metal construction Increases rigidity and reduces the flex for a more accurate cut
- Versatile Carpentry Tools: The low profile lets you cut over 1-3/4" deep - enough to cut through common interior door thickness
- Straight-Edge Guide: The red cutting-strip acts as a guide and helps reduce splintering and chipping
Mark the keep piece clearly. We use a simple X on the waste side, especially when multiple similar parts are coming from one sheet. The blade has thickness, called kerf. A common circular saw blade removes about 1/8 inch of material, though thin-kerf blades may remove less. If you cut directly on the wrong side of the line, your finished part can be short by the kerf width.
For repeat cuts, use a stop block, story stick, or cut list instead of remeasuring from scratch. If you need five strips at 11 7/8 inches, set up the guide once and verify the first piece. Repeated tape-measure marks introduce small errors that add up. Label parts immediately after cutting: pantry left side, pantry right side, top rail, filler strip, finished face up. This is especially useful when panels have similar dimensions but different grain direction or face orientation.
6. Choose the Correct Blade for Plywood
A framing blade is made for speed, not a clean plywood edge. It may be fine for rough sheathing, but it is the wrong choice for veneered panels, finish-grade plywood, built-ins, or cabinet parts.
The Tool Desk
Outbyte PC Repair FREEClear out junk files and repair common Windows errorsFree Scan →Outbyte Driver Updater FREEFix the driver behind crashes, sound loss and screen glitchesFind Drivers →For a 7 1/4-inch circular saw, a 40-tooth to 60-tooth carbide fine-finish or plywood blade is a good general range. Expect to spend about $15 to $60 for a decent blade, with premium options above that. For a 10-inch table saw, an 80-tooth or higher blade is common for finish plywood cuts. Blade quality matters, but sharpness matters just as much. A dull premium blade still burns, wanders, and tears veneer.
Blade geometry also matters. More teeth usually give a cleaner edge but cut slower. Thin-kerf blades require less power and waste less material, but they can flex if pushed too hard. A high alternate-top-bevel tooth pattern is usually better for clean crosscuts in plywood veneer. For rough sheathing, a general-purpose carbide blade may be acceptable, but if the panel face will show, upgrade the blade before cutting.
7. Set Blade Depth Just Below the Panel
Do not run a circular saw with the blade hanging an inch below the plywood. Set the depth so the teeth project about 1/8 to 1/4 inch below the sheet. That setting gives the blade enough clearance to cut cleanly while reducing tearout, kickback exposure, and the chance of cutting into a support, cord, table, or sawhorse.
For 23/32-inch sheathing, the saw depth should be only slightly deeper than the panel, not fully extended. For 1/2-inch plywood, reset the saw. This takes less than 30 seconds and improves both safety and cut quality.
Quick wins for a faster PC:
Clear out junk files and repair common Windows errorsFree Scan →Scan for outdated or missing drivers - takes under a minuteDriver Scan →Let the saw reach full speed before entering the sheet. Keep steady forward pressure, but do not force the tool. Forcing the saw increases heat, blade deflection, splintering, and motor strain. If the saw bogs down, the blade may be dull, the sheet may be pinching, the guide may be misaligned, or the material may be poorly supported.
8. Support the Full 4-by-8 Sheet
A 4-by-8 sheet is too large to control well when half of it is hanging in the air. Poor support causes splintering, binding, broken offcuts, crooked cuts, and unsafe body positions. This is one of the biggest differences between casual DIY cutting and professional results.
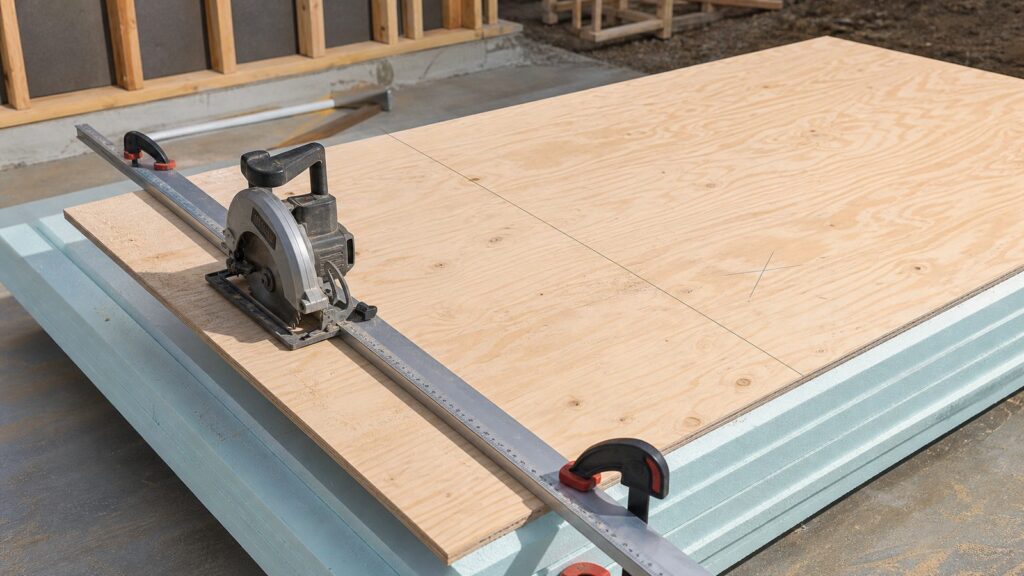
For circular saw work, rigid foam insulation on a flat surface is one of the best jobsite setups. Lay a 1-inch or 2-inch foam board on the floor or a stable platform, place the plywood on top, and set the saw depth so it barely enters the foam. The entire cut line stays supported, the offcut does not fall, and the blade has a sacrificial backing. A foam sheet costs money, but it can save multiple panels and a lot of frustration.
Sawhorses can work, but they need enough cross support to keep both sides of the cut stable. Never let the waste side drop before the cut is complete. For table saw work, use infeed and outfeed support. A full sheet on a small portable table saw is a common source of wandering cuts and unsafe leverage. In many cases, it is better to break the sheet down with a circular saw and guide first, then make final cuts on the table saw.
What’s actually slowing this PC down?
Pick the symptom - the matching free tool is one click away.
9. Use a Guide, Track, Fence, or Straightedge
Freehand cutting plywood is fine for rough openings and temporary work. It is not the method for accurate panels. A straightedge guide, track saw, or shop-made saw guide matters as much as blade quality because plywood sheets are too large to steer accurately by eye.
A straightedge clamp or saw guide often costs about $25 to $100. A track saw system commonly runs about $300 to $800-plus for the saw and track. That is not necessary for every homeowner, but it makes sense for repeated finish cuts, built-ins, cabinet parts, occupied-home remodeling, and work where dust collection matters.
Rank #3
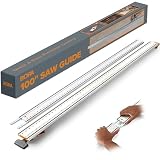
- 100 Inch Circular Saw Guide Rail: Professional track saw guide rail system combines 50 inch clamp edge and 50 inch extension; delivers precise straight edge cuts on plywood and large sheet materials with any circular saw
- Built-In T-Track System: Integrated dual T tracks transform this saw guide into a versatile workbench accessory; clamp edge saw guide adds instant functionality for routers, jigsaws and other circular saw accessories
- Quick Lock Clamp Technology: Ergonomic clamp handle provides one-sided adjustability for fast setup; straight edge clamp secures tightly to materials without movement, saving time on every cut with reliable grip
- Heavy-Duty Aluminum Construction: Rigid straight edge tool crafted from thick aluminum ensures your saw track stays perfectly straight; this cutting guide for circular saw delivers stable, consistent results on any project
- Universal Compatibility Kit: Complete saw guide rail for circular saw works with all brands; bora track saw guide includes connectors and large locking handles; perfect straight cut guide for woodworking and remodeling
Before cutting, measure the offset from your saw blade to the edge of the saw base. If the blade is 1 1/2 inches from the base edge, the guide must be clamped 1 1/2 inches away from the finished cut line, unless you are using a zero-clearance track that aligns directly with the cut. Check both ends of the guide. Clamp it firmly. Make a test cut on scrap if the visible face matters.
10. Control Tearout With Face Direction, Tape, Scoring, and Backing
Plywood chips where the blade exits the face. With most circular saws, the blade teeth cut upward, so the top face is more likely to chip. That is why many jobsite cuts are made with the finish face down when using a circular saw. On a table saw, the blade exits through the top face, so finish face up is usually the better orientation. Track saws and scoring methods can change the result, so test when the panel is expensive.
Free tools Windows power users keep installed
One-click scans. No signup required.
Painter’s tape over the cut line can help support fragile veneer fibers. Press it down firmly, mark the line on top, and remove it carefully after cutting. For high-value veneer plywood, score the line with a sharp knife before the full-depth cut, or make a shallow scoring pass first. A sacrificial backer or zero-clearance insert supports the fibers at the cut edge and reduces splintering.
Do not expect tape to fix a dull blade, unsupported sheet, or rushed feed rate. Tearout control works best as a system: sharp blade, correct face orientation, shallow blade depth, full support, guide, and steady feed.
11. Match the Tool to the Cut
No single saw is best for every plywood cut. The right tool depends on the size of the sheet, accuracy required, jobsite conditions, and whether the edge will be visible.
| Tool | Best use | Face orientation | Blade choice | Tearout control |
|---|---|---|---|---|
| Circular saw | Breaking down 4-by-8 sheets, sheathing, jobsite cuts | Finish face down for most standard saws | 40T-60T carbide plywood or fine-finish blade | Foam support, straightedge guide, tape, shallow depth |
| Track saw | Long accurate rips, built-ins, finish panels, occupied remodels | Usually finish face up, depending on saw and splinter strip | Fine-finish track saw blade | Splinter strip, scoring pass, dust extraction |
| Table saw | Repeatable narrow rips and final sizing after sheet breakdown | Finish face up | 80T or higher for clean finish cuts | Zero-clearance insert, outfeed support, steady feed |
| Jigsaw | Curves, sink openings, notches, irregular cutouts | Depends on blade tooth direction | Fine-tooth plywood blade or reverse-tooth blade | Drilled starter holes, tape, slow feed, backing where possible |
A jigsaw is useful for curves and notches, but it is not the tool for long straight finished edges. A table saw is excellent for repeatable rips, but pushing a full 4-by-8 sheet through a small saw without support is asking for trouble. A circular saw with a good guide is often the most practical tool for homeowners. A track saw is the cleanest portable option when the budget and workload justify it.
Windows Errors? Fix Them Before They Spread
Repair common Windows errors and clear accumulated junk for a smoother, more stable PC - no reinstall needed.Free scan · no reinstallCrashes, No Sound, or Screen Glitches?
Random freezes, missing sound and display glitches usually trace back to one bad driver. Find and replace yours safely.Free scan · under a minute12. Cut Safely and Control Wood Dust
Wood dust is not just a nuisance. OSHA identifies wood dust from cutting and sanding as a health concern, and engineering controls such as local exhaust or dust collection are preferred. Respirators are useful as short-term or supplemental protection, but they should not be the only plan when better dust control is practical.
Use eye protection, hearing protection, and a properly fitted respirator when dust exposure warrants it. Connect dust collection when the tool supports it, especially indoors. Cut outside or in a well-ventilated area when possible. Keep bystanders away from the cut zone. Clamp guides and panels so both hands can control the tool. Keep the cord and hose out of the cut path.
Do not disable guards. Do not reach under the panel while cutting. Do not stand directly behind a saw in a way that puts your body in the line of kickback. Let the blade stop before setting the saw down. For pressure-treated plywood, fire-retardant-treated plywood, MDF, and specialty panels, follow the safety data and manufacturer guidance for dust, edge treatment, and disposal of scraps.
13. Install, Gap, Seal, and Store Cut Panels Correctly
The cut is not finished until the panel is installed or stored without damage. For structural plywood and OSB sheathing, APA guidance commonly calls for a 1/8-inch gap at panel edge and end joints unless the manufacturer says otherwise. Tightly butted panels can swell and buckle when moisture changes. That small gap is not sloppy work; it is part of a durable installation.
Cut edges may need attention. Exterior panels, pressure-treated plywood, and specialty sheathing systems may require compatible sealers, flashing, tape, or manufacturer-approved edge treatment. Subfloor panels may need adhesive and specific fastener spacing. Wall and roof panels may need blocking, clips, or edge support depending on span rating and local code requirements.
If you cut panels ahead of installation, keep them flat, labeled, and dry. Do not leave finish plywood leaning against a wall overnight in a humid room and expect it to stay flat. Do not stack structural panels in mud or on uneven blocks. Keep offcuts large enough to be useful, but do not mix structural scraps into finish parts without checking grade, thickness, and face quality.
Independent reader supportYour contribution helps us test, update, and keep practical guides available for everyone.Common Plywood Cutting Problems and Fixes
When a plywood cut goes wrong, the edge usually tells you why. Use the symptoms below to diagnose the setup before ruining another sheet.
Rank #4

- Ultimate Compatibility & System Integration: This 110-inch track saw guide rail is engineered as a direct replacement for Makita. 194368-5. It is fully compatible with Makita. XPS01, XPS02, DSP600, DSP601, and SP6000 track saws. Our design ensures seamless docking with major Makita. accessories, including the parallel guide and standard handle clamps, allowing you to instantly expand your existing track saw system with confidence support
- Flawless Finish: Achieve professional-grade edges on every pass. The integrated SM Splinter Guard works to prevent material tear-out on delicate sheet goods, including melamine and veneer, saving valuable time on finishing work. The splinter guard is securely pre-installed at the factory, requiring no additional setup on your part. This feature ensures precise, clean cuts in any application, giving your woodworking projects a polished, expert look
- 110-Inch Long-Cut Solution: The 110" Guide Rail set contains two robust 55-inch saw tracks and a connector kit that includes two 13.4-inch connectors, enabling you to quickly and securely join the tracks for extra-long cuts over 9 feet. The extruded aluminum construction ensures the entire guide rail system maintains rigidity and remains resistant to bending or deformation under heavy use
- Optimized for Smooth & Stable Operation: Experience superior control and protection with the integrated design features. Dual anti-friction strips along the rail's front edge facilitate effortless, snag-free saw movement, while also safeguarding your power tools and workpiece surface. This enhanced stability is critical for ensuring repeatable, high-accuracy results on large projects
- Purchase with Confidence – 2-Year Warranty: We stand by the longevity and craftsmanship of this track saw guide rail. We provide an extended two-year warranty and dedicated customer support. If you have any questions, please contact us and we will respond within 24 hours
| Problem | Likely cause | Fix |
|---|---|---|
| Chipped top face | Blade exits upward through veneer; dull or rough blade | Cut finish face down with circular saw, use tape, score line, upgrade blade |
| Chipped bottom face | Poor underside support or wrong table saw setup | Use sacrificial backing, zero-clearance insert, or full foam support |
| Wandering cut | Freehand cut, dull blade, unsupported sheet, forced feed | Use a guide or track, support the panel, slow down |
| Burnt edge | Dull blade, slow feed, blade misalignment, resin buildup | Clean or replace blade, check saw alignment, maintain steady feed |
| Splintered exit corner | Unsupported end of cut or rushing through exit | Support the offcut, slow at the end, use backing |
| Bowed narrow strip | Panel stress release, moisture imbalance, thin rip | Let material acclimate, cut oversized then final trim, store flat |
What Clean Plywood Cuts Cost in 2026
The least expensive approach is not always the cheapest. If you are cutting two rough sheathing panels, a straightedge and a sharp circular saw blade may be enough. If you are cutting $120 veneer panels for built-ins, a better blade, guide, and tearout control are cheap insurance.
| Item | Typical 2026 U.S. cost | When it is worth it |
|---|---|---|
| Common 4-by-8 structural sheathing | About $35-$60 per sheet | Roofs, walls, floors, bracing, general construction |
| Sanded or hardwood plywood | About $50-$150+ per sheet | Cabinets, built-ins, furniture, visible panels |
| Marine-grade plywood | About $100-$200+ per sheet | High-moisture and specialty applications where specified |
| 7 1/4-inch plywood blade | About $15-$60 | Nearly any clean circular saw work |
| Straightedge clamp or saw guide | About $25-$100 | Accurate rips and crosscuts without a track saw |
| Track saw system | About $300-$800+ | Repeated finish cuts, built-ins, cleaner indoor work |
Plywood prices remain volatile. The FRED Producer Price Index for plywood reached 290.979 in June 2026, up from 272.226 in February 2026, roughly a 6.9 percent increase over four months at the producer level. Retail prices vary by city, grade, species, treatment, and availability. For homeowners, the practical lesson is simple: plan the cut list before buying, buy the right panel the first time, and spend a small amount on the blade and support setup before wasting expensive material.
When to DIY and When to Hire a Pro
Many plywood cuts are reasonable DIY work. Breaking down shelving panels, cutting garage storage parts, trimming underlayment, or making simple sheathing patches can be done safely with a circular saw, a good blade, clamps, straightedge, foam support, and basic PPE. Expect to spend 30 to 60 minutes setting up carefully if you are not doing this every week.
Hire a professional when the plywood is part of a structural, weatherproofing, fire-rated, or inspected assembly and you are unsure about the code requirements. That includes roof decking, wall bracing, subfloor replacement, stair framing, shear walls, exterior sheathing, and repairs tied to windows, doors, flashing, or water damage. A clean edge will not compensate for the wrong panel thickness, missing edge support, incorrect nailing pattern, tight joints, or a compromised moisture barrier.
Also consider hiring out high-value finish work. Built-ins, stain-grade panels, large cabinet parts, and matched veneer layouts require more than a sharp blade. They require square reference edges, controlled sequencing, accurate repeat cuts, and careful handling. If the material costs $100-plus per sheet and the project needs ten panels to align, professional setup can cost less than repeated mistakes.
Final Jobsite Checklist for Better Plywood Cuts
Before cutting, confirm the panel type, thickness, rating, face direction, and moisture condition. Read the stamp if it is structural. Mark the keep side and waste side. Account for the saw kerf. Choose a sharp blade suited to plywood. Set blade depth just below the sheet. Support the full panel, preferably on rigid foam for circular saw cuts. Clamp a guide or use a track. Protect veneer with tape, scoring, backing, or a zero-clearance setup when the edge will show. Control dust. Label parts. Store or install the cut pieces correctly.
That sequence is not slow once it becomes habit. On a construction site, clean plywood cuts save money, reduce rework, make installation faster, and help the finished assembly perform the way it was designed to perform.
Frequently Asked Questions
What is the best circular saw blade for cutting plywood cleanly?
For a 7 1/4-inch circular saw, use a sharp 40-tooth to 60-tooth carbide fine-finish or plywood blade. For visible veneer cuts, pair the blade with a straightedge guide, tape or scoring, shallow blade depth, and full sheet support.
Should plywood be cut face up or face down?
With most circular saws, cut finish face down because the blade exits upward and can chip the top face. On a table saw, finish face up is usually better. For track saws, follow the saw and blade setup, and test on scrap when the face matters.
The Tool Desk
Outbyte Driver Updater FREEScan for outdated or missing drivers - takes under a minuteDriver Scan →Outbyte PC Repair FREEClear out junk files and repair common Windows errorsFree Scan →How much gap should be left between plywood sheathing panels?
APA guidance commonly recommends a 1/8-inch gap at panel edge and end joints unless the manufacturer says otherwise. This gap helps accommodate moisture movement and reduces the risk of buckling.
Can painter’s tape prevent plywood tearout?
Painter’s tape can reduce light veneer splintering, but it is not a complete fix. The best results come from combining tape with a sharp plywood blade, correct face orientation, full support, a guide, and steady feed speed.
Is a track saw worth it for plywood?
A track saw is worth it for repeated finish cuts, built-ins, cabinet parts, and occupied-home remodeling where accuracy and dust collection matter. For occasional rough cuts, a circular saw with a sharp blade and straightedge guide is usually enough.
When should plywood cutting be left to a contractor?
Hire a pro when cut plywood becomes part of a structural, weatherproofing, fire-rated, or inspected assembly such as roof decking, wall bracing, subfloor replacement, stair framing, or exterior sheathing.
What’s actually slowing this PC down?
Pick the symptom - the matching free tool is one click away.
Quick Recap
Product prices and availability are accurate as of the date/time indicated and are subject to change. Any price and availability information displayed on Amazon at the time of purchase will apply.