Windows Errors? Fix Them Before They Spread
Repair common Windows errors and clear accumulated junk for a smoother, more stable PC - no reinstall needed.Free scan · no reinstallOutdated Drivers Are Slowing You Down
One free scan finds every outdated or missing driver and matches the right update for your exact hardware.Free scan · exact hardware matchGood woodworking depends on more than choosing a tool and making a cut. Safe habits, clear layout, an understanding of wood movement, and a planned assembly sequence all affect the result. The 42 points below are a practical guide for new and developing woodworkers—not a canonical checklist or a substitute for machine training and applicable safety rules.
Safety and shop habits
1. Learn a machine before switching it on
Know its controls, intended use, operating instructions, and safety devices before making a cut. If you are unsure how to operate it, pause and get qualified instruction.
2. Never run equipment with a failed safety device
OSHA’s woodworking guidance warns of injuries including lacerations, amputations, severed fingers, and blindness. Do not operate a machine if a guard or other safety device is missing, damaged, or not functioning as intended.
3. Treat guarding as part of the machine
A guard is not an optional accessory to remove for convenience. Keep guards in place and use the equipment as its manufacturer directs.
What’s actually slowing this PC down?
Pick the symptom - the matching free tool is one click away.
#1 Best Overall
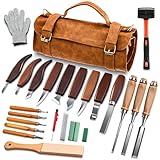
- 18+ Only - Age Verification Required 25-PREMIUM WOOD CARVING TOOLS FOR EVERY PROJECT:This comprehensive wood carving kit includes 3 chisels, 8 whittling knives, 5 detail knives, 1 scriber, 1 hammer, 1 marking knife, 1 large sharpening stone, polishing paste, a leather strop, and safety gloves. Perfect for wood carving, spoon carving, stone carving, and detailed craftwork, it meets all your artistic needs whether you're a beginner or a professional.
- DURABLE LEATHER STORAGE ROLL WITH PORTABILITY:Comes with a high-quality leather tool roll bag featuring double-layer storage, a handheld strap, and a shoulder strap. It keeps all Wood Whittling Kit organized, protected, and easy to carry—ideal for woodworking on the go or storing safely at home.
- SHARP & DURABLE BLADES FOR SMOOTH CARVING:Each wood carving knife and chisel is made of corrosion-resistant stainless steel reinforced with Mo.V alloy. Pre-sharpened and assembled with air-pressure technology, they resist deformation, stay sharp longer, and ensure clean cuts in wood carving blocks and other soft materials.
- COMFORTABLE & SAFE TO USE: The Wood Carving Knife equiped with ergonomic walnut handles are varnished for a non-slip grip that reduces hand fatigue. The upgraded leather strop includes a handle and table mount hole for secure sharpening. Safety gloves are also included—making this Whittling Kit safe and user-friendly for beginners.
- PERFECT GIFT FOR CRAFT ENTHUSIASTS :An excellent Wood Whittling Kit for men, women, and craft lovers. Great for holidays like Christmas, birthdays, or Thanksgiving. It encourages creativity and makes for a meaningful hobby—whether for whittling, carving stencils, or DIY woodworking projects.
4. Keep hands away from the point of operation
The point of operation is where the machine acts on the material. Plan how you will control and feed the work without putting fingers near a blade or other hazardous moving part.
5. Use a push stick when the cut calls for one
OSHA’s point-of-operation guidance describes push sticks for feeding short or narrow stock while keeping fingers away from blades. Use a suitable feeding aid when the operation requires it; a push stick does not make an otherwise unsafe setup safe.
6. Support the work before cutting
Consider how the stock will be held and supported through the cut. A workpiece that shifts or is difficult to control can make an operation hazardous and compromise accuracy.
7. Plan for dust, not just blade contact
OSHA identifies wood dust as a health hazard that may cause respiratory and skin disease. Include dust control and appropriate protective measures in your workshop plan rather than treating safety as only an issue at the saw.
8. Handle finishing products as hazardous materials
OSHA also identifies chemicals used in finishing products as potential health hazards. Read and follow the product’s directions and safety information, and plan handling and ventilation accordingly.
9. Keep the work area orderly
Make room to control the stock and complete the operation without clutter obstructing your movement. Good housekeeping supports safer work; it does not replace guarding, training, or safe operating practices.
10. Separate legal requirements from general advice
OSHA’s woodworking eTool is workplace-focused safety guidance. Which legal requirements apply depends on the workplace and jurisdiction; hobbyists should not assume every workplace rule applies to them in the same way, but should still follow safe operating practices and the machine maker’s instructions.
Wood, grain, and material choices
11. Wood responds to changing moisture conditions
Solid wood changes dimension as its moisture content changes. How much it moves depends on factors including species, climate, and grain orientation, as WOOD Magazine explains in Dealing with Wood Movement, updated August 28, 2025.
Free tools Windows power users keep installed
One-click scans. No signup required.
Rank #2
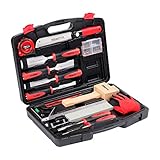
- 【Upgraded Version Of Wood Chisel Set】6x chisels 1/4", 1/2", 3/4", 1", 1-1/4", 1-1/2" (6mm, 13mm, 19mm, 25mm, 32mm, 38mm), 1x honing guide, 1x sharpening stone (120/200 grit), 1x 7-1/4-Inch Dovetail Saw, 1x Wooden Mallet, 1x 16-Feet(5-Meters) Tape Measure, 1x Combination Square Ruler, Screw Kits, 2x Carpenter Pencil, 1x Work Gloves, Sharpening Papers. Housed in a large deluxe tool box for easy tool storage and portability. Its sturdy interior and organizer keeps tools in place.
- 【6 Pieces Heat Treaded Cr-V Woodworking Chisels】*Large strike cap withstands repetitive hammer strikes, a wood mallet is in the wood chisel set. *Ergonomic handles with ProTouch Grips are durable enough to withstand jobsite abuse. *High quality hardened steel blade for superior performance and edge retention.
- 【Exquisite and Practical Dovetail Saw】Designed for fine woodworking,KINGTOOL Dovetail Saw is great for interior trim work and detailed work around windows. The flexible blade is also great for making flush cuts on dowels. This pull saw features a polymer handle that gives a comfortable, stable grip, even during long sessions.
- 【Honing Guide & Sharpening Stone】Chisels will need sharpening to ensure maximum performance.These marples chisel sharpener tool set are suitable for wood chisel, planer, blade, graver, carving knife, plane iron, flat chisel edge sharpening.
- 【Domestic and Professional Use】KINGTOOL wood chisel sets are suitable for amateur and professional carpenter or wood work artist woodworking jobs. The combination Square Ruler, lightweight-durable 16 Feet Tpae Measure and other accessories will add points to your work.Also this garage organization is perfect for Father's Day, and is a great option as gift for Dad, Boyfriend, Man & Brothers.
12. Account for movement in the design
Do not design a wide solid-wood panel as if it were dimensionally fixed. Its attachment to surrounding parts needs to accommodate seasonal expansion and contraction rather than restrain the panel rigidly.
13. A finish does not stop wood movement
Finishes can slow the exchange of moisture between wood and its surroundings, but they do not prevent seasonal movement. Do not rely on a finish as a substitute for movement-aware construction.
14. Grain orientation affects movement
Grain direction matters when predicting how a board changes dimension. Identify the orientation of the piece and account for it when laying out panels and their attachments.
15. Avoid universal movement estimates
There is no single movement figure that applies to every board. Species, board width, grain orientation, and moisture conditions all matter, so do not apply a generic number to a project without checking those specifics.
The Tool Desk
Outbyte Driver Updater FREEFix the driver behind crashes, sound loss and screen glitchesFind Drivers →Outbyte PC Repair FREERepair Windows errors before they cause bigger problemsFix Now →16. Consider sheet goods when stability matters
WOOD Magazine notes that sheet goods do not expand or contract significantly in the way solid wood does. They can be a sensible option when dimensional stability is a priority, though appearance and construction requirements may lead you to choose otherwise.
17. Choose material for the job, not by habit
Solid wood and sheet goods have different behavior and construction implications. Let the design, desired appearance, and need for dimensional stability guide the choice instead of assuming one material is always better.
18. Learn the vocabulary of a board
Knowing how board dimensions and grain are described makes it easier to plan cuts and keep parts oriented. WOOD Magazine’s Board Basics covers board dimensions and grain vocabulary.
19. Think about movement before choosing a joint
A joint connects parts, but the material still responds to moisture. Consider how the parts are oriented and whether the joint or attachment can accommodate the movement the design requires.
Recommended Free Tools
Rank #3

- 【90 Degree Wood Working Tools and Equipment Precision Angle Clamp】Made of high quality aluminum alloy to ensure 90 degree precision, Square wood clamps for Woodworking right angle positioning tools with plastic toolbox. the surface is red anodized, anti-rust and corrosion-resistant, CNC processing makes it more durable.
- 【Corner Clamp are Widely Used】The wood clamps for woodworking L has slightly chamfered edges that won't scratch your hands and woodwork to help level them during gluing, splicing, welding. Check and correct for 90 degree angles on wood, countertops, saw blades, etc. right angle clamp are a great tool to make woodworking projects easier.
- 【The Sales Status and Actual Use of Woodworking Angle Clamps Show That】(140mm/5.5 inch) Woodworking tools and accessories are a very scientific size choice. Ideal for assembling frames: picture frames, drawers, cabinets, furniture cabinets, birdhouses, mailboxes, or maintaining any object you want to keep perfectly square at 90 degrees.
- 【90 Degree Clamp for Easy Operation】The wood is adjusted to the correct position using the aluminium corner clamps and then the work is completed by tightening the wood and clamp using the L-shaped metal screw, plastic nut. For boards with a maximum clamping thickness of 3.5" / 90 mm with both metric and imperial units of measurement.
- 【A Unique Gift for DIY Hobbyists or Woodworkers】This woodworking square clamping is a unique gift for fathers, husbands, Diy enthusiasts, boy/girlfriends, woodworkers. We offer a one year warranty and have a 24 hour customer service hotline. If you have any quality problems, please contact the after-sales service at first.
Measuring, marking, and keeping parts straight
20. Match the measuring tool to the task
Choose a measuring tool appropriate to the length and layout. For short measurements, a rigid metal rule can lie flat on the workpiece, a practice described in WOOD Magazine’s Measuring and Marking article, published September 20, 2016.
21. Make layout marks easy to interpret
A mark should tell you where the intended cut or reference lies. A fine, clear layout line helps distinguish the cut line from the waste side instead of leaving a broad mark that obscures the boundary.
22. Identify the waste side
Before cutting, make clear which side of the mark is waste and which side is the finished part. This small decision helps prevent a cut that removes material from the wrong side of the layout.
23. Label parts as soon as they become parts
Mark components with names or identifiers while they are still easy to distinguish. WOOD Magazine’s Marking Your Wood Projects, updated July 7, 2023, recommends labeling and orientation marks to keep pieces identifiable.
Quick wins for a faster PC:
Scan for outdated or missing drivers - takes under a minuteDriver Scan →Repair Windows errors before they cause bigger problemsFix Now →Fix the driver behind crashes, sound loss and screen glitchesFind Drivers →24. Establish a reference face and edge
Choose a consistent face and edge to use as references during layout and machining. Mark them so measurements and orientations can be related to the same surfaces from one operation to the next.
25. Mark orientation as well as identity
A part label alone may not show which end or face belongs where. Add orientation marks where they will prevent a component from being turned around or installed in the wrong position.
26. Keep identifying marks through machining
Parts can look alike after they are cut. Carry the labels and reference marks forward through machining so you can still tell which piece is which at assembly time.
27. Lay out matching parts from a shared reference
When parts need to align, use a consistent reference and transfer the layout carefully. Clear, related marks make it easier to form matching features and spot a mismatch before assembly.
Rank #4

- [Wood Carving Kit Deluxe Edition] Everything you need to start carving: 4 knives, 4 chisels, 7 basswood blocks, spoon blank, polishing compound, leather strop, sharpening stone, gloves, sandpaper, templates, and guide. All stored in a portable PU leather case—perfect for beginners and pros.
- [Premium Walnut Handles & Sharp Blades] Blades are precision-sharpened for effortless cuts. Metal cap prevents blade breakage. Ergonomically rounded walnut handles reduce hand fatigue, ensuring comfortable grip during long carving sessions.
- [Complete Maintenance & Storage Set] The wood whittling kit comes with a portable storage bag, easy to store and carry. Leather strop, polishing compound and sharpening stone prevent the blades from rusting and make them brighter and sharper.
- [Safe Carving for All Skill Levels] This wood carving knife set comes with cut-resistant gloves and cut-resistant bandage, and all knives come with protective sleeves. You can enjoy a safe and enjoyable carving experience with our high quality wood carving knife.
- [Perfect Gift for Creative Minds] Ideal for fathers, mothers, partners, or friends who love DIY crafts. Suitable for beginners and experts. Give the joy of wood carving—a relaxing and rewarding hobby that creates handmade treasures.
28. Check the mark before making the cut
Pause long enough to confirm the part, reference edge, cut line, and waste side. The check is most useful before a cut that would be difficult to reverse.
29. Use the layout to guide assembly, too
Orientation marks and part labels are not just for the saw or workbench. Keep them available during glue-up so components return to their intended positions.
Independent reader supportYour contribution helps us test, update, and keep practical guides available for everyone.Tools and a reliable workflow
30. Choose tools around operations, not a universal shopping list
The tools a project needs depend on the work it involves. WOOD Magazine’s Woodworking How-To covers areas such as preparation, measuring, joinery, assembly, safety, and finishing; no single tool or method suits every shop or project.
31. Weigh control and setup as well as speed
When considering a hand tool or power tool for a task, think about the control it gives you, the setup it requires, and the safety considerations of the operation. The right choice depends on the job and the woodworker’s ability to use it safely.
32. Complete preparation before machining
Identify the parts, references, and intended cuts before moving into machining. Preparation helps keep the operation and later assembly connected to the same plan.
33. Avoid forcing a tool to solve a planning problem
If the stock is hard to control or the layout is unclear, stop and improve the setup or plan. A different tool alone cannot correct an ambiguous mark or an unsafe approach.
34. Treat accuracy as a chain of steps
Measurement, marking, machining, and assembly all affect whether parts meet as intended. Clear references and consistent identification help each operation build on the previous one.
35. Pause when the setup changes
A change in stock size, operation, or machine setup can alter how the work should be controlled. Reassess the setup rather than assuming the previous approach still applies.
Do these 3 things before closing this tab:
1Repair Windows errors before they cause bigger problems2Scan for outdated or missing drivers - takes under a minute3Clear out junk files and repair common Windows errorsBest Value

- [Japanese Woodworking Tools] The Japanese woodworking tools kit designed for beginners just starting to use Japanese woodworking tools.
- [All in One Standard Set] Japanese Pull Saw x 1 / Japanese Chisels x 2 / Japanese Plane x 1 / Japanese Woodworking Hammer x 1 / Marking Gauge x1 / Carry Bag x 1
- [Easy to Carry] Comes with a tool bag for safe storage and transport.
- [Japanese Quality Tools] All are made in Japan. Enjoy and explore a new woodworking experience with authentic Japanese woodworking tools.
- [Product Specifications] Made in Japan / Size: Ryoba Japanese Saw (9.5"), Japanese Mortise Chisel (3/8"), Japanese Wood Chisel (1"), Japnese Hand Plane (42mm), Japanese Hammer (13.2 oz), Japanese Marking Gauge (90mm), Canvas Bag *Refer the bottom of the page for detailed specs
36. Make safety devices and work habits part of the workflow
Plan for guarding, safe feeding, dust, and finishing-chemical handling alongside the project’s cuts and assembly. These are workshop concerns throughout the work, not a final checklist after the build.
Joinery, assembly, and finishing
37. Select a joint for the design and material
Joinery is a design choice, not a contest with one universal winner. Consider project geometry, material movement, fit, and the assembly sequence when choosing a joint; the available guidance does not establish a strength ranking for joint types.
38. Understand biscuit joinery as a sequence
A biscuit joint involves laying out aligned positions, cutting matching slots, adding glue and biscuits, and clamping the parts. WOOD Magazine’s Biscuit Joinery Basics presents biscuit joinery as one concrete option, not an answer for every connection.
39. Treat alignment as a joinery requirement
Matching slots or other mating features need to align for the parts to come together as intended. Establish related layout marks before machining the features.
40. Make fit and clamping part of the assembly plan
Think through how parts will be brought together and held while the connection is assembled. Fit, alignment, glue, and clamping are connected steps, not separate details to improvise at the last moment.
41. Preserve part identity during glue-up
Use the labels and orientation marks carried through machining to put components in their planned positions. This is especially helpful when similar pieces must be assembled in a particular order or orientation.
42. Plan finishing with exposure and wood movement in mind
Finishing products present chemical-exposure hazards, so include safe handling in the plan. Also remember that a finish slows moisture exchange rather than stopping the movement of solid wood; it cannot replace a design that allows for seasonal change.
Quick Recap
Product prices and availability are accurate as of the date/time indicated and are subject to change. Any price and availability information displayed on Amazon at the time of purchase will apply.




