Crashes, No Sound, or Screen Glitches?
Random freezes, missing sound and display glitches usually trace back to one bad driver. Find and replace yours safely.Free scan · under a minuteWindows Errors? Fix Them Before They Spread
Repair common Windows errors and clear accumulated junk for a smoother, more stable PC - no reinstall needed.Free scan · no reinstallIf you build only one tablesaw jig, make it a full-size crosscut sled. It is the most broadly useful fixture here, improving support and repeatability for 90-degree cuts while helping keep hands farther from the blade. The remaining eleven jigs solve narrower problems, from small parts and miters to tapers, joinery, rough lumber, and large coves.
If you build only one tablesaw jig, build a full-size crosscut sled. It is the most broadly useful fixture in this list: it supports wide or awkward stock, provides zero-clearance support at the blade, makes 90-degree cuts easier to repeat, and can keep your hands farther from the blade than a conventional miter gauge.
As an Amazon Associate I earn from qualifying purchases.
After that, choose jigs according to the work you actually do. Small-parts and miter sleds improve control over specialized crosscuts; tapering and straight-line-rip jigs solve stock-shaping problems; tenoning, box-joint, spline, and cross-lap jigs make repeatable joinery practical; and cove-cutting fixtures handle specialized molding work. None of these fixtures makes an inherently hazardous tablesaw operation automatically safe. They improve control only when they are correctly built, securely set up, and used with the saw manufacturer’s required guards and procedures.
The Tool Desk
Outbyte Driver Updater FREEScan for outdated or missing drivers - takes under a minuteDriver Scan →Outbyte PC Repair FREERepair Windows errors before they cause bigger problemsFix Now →What a tablesaw jig should accomplish
A good jig does more than make a measurement repeatable. Depending on its design, it can:
#1 Best Overall

- Crosscut Sled Kit: Package includes 2 pcs 12-inch aluminum T-tracks, 2 pcs 17-inch UHMW miter bars for table saw sled, 1 star knob and bolt, 1 round washer, and 15 screws. Compatible with most standard table saw slots (Note: wooden sled are not included in the package)
- Sturdy Material: T-tracks are made of solid aluminum, and the table saw miter sled are made of UHMW linear polyethylene, which is sturdy and reliable, smooth surface without burrs, and can be reused for a long time
- UHMW Miter Bars: Suitable for use as a crosscut sled guide and table saw sled runners, with low friction and stability during use, and will not expand or shrink due to environmental changes
- Precise and Efficient: Crosscut sled for table saw help to cut accurately, meet various cutting needs, reduce measurement and cutting errors, and help woodworkers improve safety and efficiency
- Wide Application: Table saw sled kit is suitable for crosscutting, repeated length cutting and small cutting, stabilizing the workpiece, and the included knob and bolt can be used as a stop block to achieve consistent cutting without frequent adjustment of measurements
- Immobilize or guide the workpiece during the cut.
- Provide zero-clearance support around the blade to reduce tearout and prevent small pieces from dropping into the throat opening.
- Keep hands farther from the blade.
- Support narrow, short, wide, heavy, rough, or awkward stock.
- Make repeated cuts consistent without relying on a pencil mark for every part.
These benefits do not remove kickback or blade-contact hazards. OSHA identifies binding stock, an incorrectly adjusted blade, dull or damaged blades, poor-quality lumber, and missing safeguards as contributors to kickback. Use sharp, appropriate blades; keep guards and safety devices in working order; support the stock and offcut; and keep hands out of the cut line. Wear eye and face protection, stand to the side of the blade path when practical, and use a push stick or suitable pushblock for small stock.
1. Full-size crosscut sled: build this first
A full-size crosscut sled rides in one or both miter slots. Its platform supports the workpiece while a fixed fence guides the sled through the blade. Compared with a standard miter gauge, a well-made sled gives long, wide, heavy, or awkward workpieces a larger and more stable support surface.
Best for: accurate 90-degree crosscuts, wide boards, repeated lengths, cabinet parts, and general shop work.
Build it with accurately fitted runners, a rigid platform, a square fence, and a replaceable sacrificial kerf or backer. Add a stop system if you regularly cut multiple parts to the same length. A hold-down can improve control, but it must not obstruct the blade or trap the workpiece in a way that encourages binding. Verify the fence with test cuts rather than assuming that the edge of the sled is square.
If you would rather buy than tune runners and square a fence, a table saw crosscut sled is the most sensible commercial starting point. A documented commercial design includes adjustable-angle capability, zero-clearance support, a hold-down, and a flip stop for repeated cuts. Do not assume that a commercial sled fits every saw: check the miter-slot dimensions, table size, blade clearance, and instructions before purchase.
Important: A sled is not a substitute for blade guarding, proper outfeed or side support, or waiting for the blade to stop before retrieving a cutoff. Keep the sled’s sacrificial kerf narrow enough to support the work without allowing small pieces to disappear into a large opening.
2. Small-parts sled
A small-parts sled is a compact crosscut sled designed for workpieces that are too short, narrow, round, or awkward to control confidently with a conventional miter gauge. The sled surrounds or supports the piece while it travels through the cut.
Best for: dowels, short blocks, tenon stock, narrow moldings, small boxes, and repeated short parts.
Its main advantage is containment, not capacity. Zero-clearance support helps prevent a small piece from dropping between the blade and throat plate. A travel stop can help keep the blade covered within the sled when the sled is pulled back, although the stop must never interfere with the blade or the workpiece.
Use a sacrificial face or replaceable insert where the blade exits. Keep the workpiece fully supported and use a clamp or hold-down when the design calls for one. Do not hold a tiny part with your fingers near the blade simply because the sled feels controlled.
3. Miter sled
A miter sled is a crosscut sled optimized for accurate angled cuts, especially repeated 45-degree miters. The base and fences provide more support than a bare miter gauge, while a stop makes opposing frame or box parts easier to match.
Free tools Windows power users keep installed
One-click scans. No signup required.
Best for: picture frames, boxes, casework, trim, and four-sided assemblies.
Rank #2
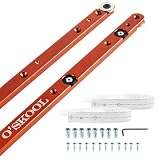
- Expansion collars help reduce sled play: Fine-tune each expansion collar from above with the included hex key to reduce side-to-side movement without removing the bars, helping crosscut and table saw sleds track more smoothly through the miter slot
- Rounded Entry for Smoother Setup: The rounded leading end helps each runner enter the miter slot with less catching during setup, making repeated test fits easier when building crosscut sleds, taper sleds, and woodworking jigs
- Two Mounting Methods with Top Access: Attach the bars from above with 1/4"-20 machine screws or from underneath with wood screws; top access holes let you reach the collar adjustments after the sled is assembled
- Check Your Miter Slot Before Ordering: Made for standard 3/4" x 3/8" T-shaped and U-style slots and not for 5/8" slots; remove the retaining discs for a non-T-shaped straight slot as shown in the instructions
- Two 430mm Bars for Sled and Jig Builds: Use the pair for crosscut sleds, table saw sled runners, taper or jointer sleds, and compatible router-table jigs; includes mounting hardware, hex key, templates, and instructions
Dual runners or a rigid, well-fitted base reduce wiggle. Build the fence around a known reference angle, then verify it with test cuts. A printed scale is not enough: four small errors can produce a visibly open frame even when each individual cut looks close.
For frames, test the jig by cutting four identical scraps and assembling them without glue. If the corners do not close, correct the fence before cutting expensive stock. A replaceable zero-clearance backer reduces tearout at the miter and helps support narrow pieces.
4. Tapering jig
A tapering jig guides stock at an angle to produce tapered legs, chair parts, cleats, handles, and other low-angle shapes. Fixed-sled versions generally ride in a miter slot. Hinged versions commonly register against the rip fence and can be adjusted for different taper widths.
Best for: table and chair legs, tapered feet, repeated tapers, and straightening a rough edge.
Many tested tapering-jig designs cover low-angle tapers up to roughly 15 degrees. Hold-downs are especially valuable on narrow workpieces. A commercial straight-line/taper jig can use a miter slot, adjustable fence, and hold-down clamps, and some designs can be configured for straight-line ripping as well.
Before cutting, confirm that the stock is held flat against the jig and that the jig remains stable for the entire travel. Avoid designs that leave a narrow piece inadequately clamped. Keep the jig’s reference edge against the intended guide surface consistently; changing which edge registers against the fence changes the result.
5. Thin-rip jig
A thin-rip jig cuts narrow, repeatable strips without trapping the offcut between the blade and the rip fence. The jig establishes the strip width while the workpiece remains registered against the fence and the offcut falls away on the opposite side of the blade.
Recommended Free Tools
Best for: edge banding, splines, Kumiko strips, glass retainers, decorative inlays, and repeated narrow rips.
This is a high-control operation. Use a purpose-designed jig or pushblock, keep both hands away from the blade, and follow the instructions for the particular design. Verify the first strip with calipers or a test assembly before making a batch.
For a commercial push-control option, the thin-rip pushblock accessory made for the MicroJig GRR-RIPPER 3D pushblock is specifically intended for thin strips. Its documented compatibility includes all GRR-RIPPER 3D pushblock models. Compatibility is not the same as universal suitability: confirm the accessory, blade, stock dimensions, and operating method against the manufacturer’s instructions.
6. Straight-line rip jig
A straight-line rip jig gives rough, waney, slab-like, or distorted lumber a straight reference edge. This is useful when a jointer or large bandsaw is unavailable, or when the board is too large for the equipment you have.
Rank #3

- 【EASY TO USE】GOINGMAKE thin rip jig is easy to use. Just slide the guide into T-track miter slot of your table saw and lock it in front of the saw blade. Fits for 3/8" x 3/4" T slot and U shape slot and 1/4" x 3/8" T slot. The thin rip jig can extend to 8 inch from the center of miter slot to blade. Thin rip table saw accessories makes thin strips cut consistent and easily.
- 【SAFE AND FAST】GOINGMAKE table saw jig thin ripping guide provides safe and fast thin strips cutting. The one way roller bearing ensures the workpiece moves forwards and does not kickback, making safe and fast repetitive narrow strip cutting with ease. You can keep the same thickness thin strips cutting consistent with this table saw thin rip jig.
- 【PRECISE THIN RIPPING】GOINGMAKE table saw thin rip jig guide is precise and adjustale. Including mm and inch laser engraving scales. The zero clearance design is easy for set the right distance. Repeat with each strip the same size as the first for precison cutting. Set up the scale to the saw is easy. First take the bearing close to the saw blade and adjust the scale indicator to the nearest mark, then set the dimension of your strips.
- 【HIGH QUALITY】GOINGMAKE thin rip guide is made of high quality metal for durable, long lasting use. You can cut the thin strips as thin as 1/32" accurately. GOINGMAKE thin rip jig table saw jig guide is a must have table saw accessories for cutting repeat thin strips.
- 【WIDE APPLICATION】GOINGMAKE thin ripping guide is compatible with standard band saw, table saw and router table. Extended range of GOINGMAKE table saw guide is from 2-5/8 inch to 8 inch. GOINGMAKE thin rip table saw jig is easy to setup and use. GOINGMAKE thin rip gauge is a must have table saw accessories for safer and accurate cutting thin strips.
Best for: rough lumber, slabs, live-edge boards, and stock with no trustworthy straight edge.
The jig is usually a sled or panel with a genuinely straight reference edge and hold-down clamps. Secure the board so it cannot shift during the first pass. The initial cut establishes one straight edge; after that, place the new edge against the rip fence for conventional ripping.
Inspect the stock for loose bark, embedded metal, twist, and movement before cutting. A hold-down is not a cure for severely unstable lumber. If the board rocks or the jig cannot maintain positive support, change the preparation method rather than forcing the cut.
7. Tenoning jig
A tenoning jig holds the workpiece vertically so the tablesaw can cut tenon cheeks, shoulders, angled tenons, half-laps, bridle joints, and related joinery. Vertical support can produce smoother, more controlled cheek cuts than attempting the same work horizontally with a stacked dado set.
Quick wins for a faster PC:
Repair Windows errors before they cause bigger problemsFix Now →Fix the driver behind crashes, sound loss and screen glitchesFind Drivers →Best for: mortise-and-tenon work, angled tenons, half-laps, bridle joints, bevels, and shoulder cuts.
Shop-made designs can combine a crosscut sled with a micro-adjustable carriage. The carriage controls the cheek cuts, while the sled and an adjustable stop control shoulder placement. A well-designed fixture can include a blade-covering guard and a forward-travel stop.
Setup accuracy is critical. Confirm that the workpiece is square to the sled, clamp it securely, and make test cuts in scrap. Measure the resulting tenon against the actual mortise rather than relying only on the jig’s scale. Follow the saw and jig manufacturer’s specific guard procedure; do not remove or defeat a guard merely because the jig makes access inconvenient.
8. Box-joint jig
A box-joint, or finger-joint, jig indexes repeated dado cuts so that mating fingers fit together. It replaces repeated layout with a mechanical relationship between the cutter and an indexing key.
What’s actually slowing this PC down?
Pick the symptom - the matching free tool is one click away.
Best for: boxes, drawers, trays, cases, decorative joinery, and repeatable finger joints.
A simple shop-made jig can use a fixed indexing key. A commercial adjustable jig offers more finger widths and finer fit adjustment. The INCRA I-Box is documented for use on a tablesaw or router table with standard 3/4-by-3/8-inch miter slots. Its lead-screw mechanism adjusts pin widths from 1/8 to 3/4 inch and supports stock from 1/4 to 7/8 inch thick. Depending on the setup, it can use a stacking dado set, a dedicated box-joint blade set, or straight router bits.
An adjustable box-joint jig is worth considering when you make several box sizes or need to tune the fit across different materials. The cutter setup matters: the I-Box documentation warns against wobble dado sets and thin-kerf 3/32-inch blades. Check the current manual for the exact cutter and slot requirements before using any named product.
Rank #4

- 🇺🇸 If you own a table saw, you probably have come across a situation or two where you need to make smaller cuts or make cross cuts. You may also have had the need to make repetitive cuts of the same length. Making small cuts, cross cuts and repetitive length cuts is where table saw crosscut sleds excel. Crosscut sleds help stabilize the work piece and are very accurate since they are essentially calibrated to your saw during the sled building process.
- 🇺🇸 Some time ago we noticed a lot of companies had UHMW bars available for purchase. While we as a woodworking company know exactly what they are used for, many novice or non-woodworkers do not. That’s when we decided to create this package with pre-cut UHMW bars, pre-cut aluminum track, a knob and bolt and an easy to understand how to guide booklet so you can create your very own, custom crosscut sled to fit your table saw!
- 🇺🇸 UHMW bars are most commonly used as runners for crosscut sleds since they don’t produce as much friction as wood does. Another advantage is that UHMW won’t expand or contract like wood does during drastic weather changes. Each bar is approximately 3/4” x 3/8” which fits most standard table saw slots. UHMW bars are also slick and won’t leave any residue, dust or shavings behind like wooden bars tend to do.
- 🇺🇸 The tracks that are included in this kit are made from solid extruded aluminum and are Made in the USA. Each track is cut to length for the perfect sub-fence on the crosscut sled. The included knob and bolt is for making a simple stop block which when finished, can slide the length of either track along the sub-fence. The stop block will allow you to make repetitive cuts without having to constantly move and measure the fence distance each time you make a cut.
- 🇺🇸 We have also included a full color and detailed how to guide book to help you with the crosscut sled building process. Each kit comes with 2 each 19” long by 3/4” by 3/8” UHMW bars, 2 each 12” long mini tracks, 1 each knob, 1 each 1/4” by 20 tpi bolt, 1 ea. blade guard, 1 ea. stop block and a how to build your own crosscut sled guide book. Make your crosscut sled to the size you want or need for your table saw and your specific cutting needs. Please Note, the bars do NOT FIT RYOBI table saw track slots. MADE IN USA
Make the first joint in scrap from the same material and with the same cutter. A fit that is too tight can split a finger during assembly; a loose fit cannot be repaired by extra glue.
9. Spline jig
A spline jig holds a box or picture frame at an angle—commonly 45 degrees—to cut slots across miter joints. Thin wooden splines inserted into those slots reinforce the joint and can provide a contrasting decorative detail.
Best for: picture-frame miters, box corners, decorative splines, and geometric patterns.
Many spline jigs are modified sleds. Adjustable designs may be usable on both a tablesaw and router table, depending on the particular construction. The fixture must hold the assembly squarely and repeatedly at the intended angle. Add a sacrificial face to support the cut and reduce tearout.
Cut all matching corners with the same reference orientation. Mark the inside and outside faces of the frame or box before placing it in the jig; reversing one piece can put the spline on the wrong face or at the wrong distance from the corner.
Do these 3 things before closing this tab:
1Repair Windows errors before they cause bigger problems2Scan for outdated or missing drivers - takes under a minute3Clear out junk files and repair common Windows errors10. Cross-lap jig
A cross-lap jig indexes repeated dado cuts for half-lap or cross-lap joints. After the dado width is set, an adjustable fence and indexing key register each succeeding cut against the previous kerf.
Best for: lattice, wine racks, mullions, grids, and assemblies made from evenly spaced interlocking parts.
The primary benefit is cumulative accuracy. Marking every slot independently allows small layout errors to accumulate; indexing transfers the same spacing relationship from one cut to the next. Test the cutter width and depth on scrap before cutting the actual grid, and keep the reference face of every workpiece oriented the same way.
Use a suitable hold-down or push method for narrow strips. A wide dado blade creates a different workholding problem from a single kerf, so ensure the jig’s backer and fence support the stock close to the cutter without binding it.
Free tools Windows power users keep installed
One-click scans. No signup required.
11. Sacrificial dado/rabbet fence
A sacrificial fence facing is an auxiliary fence attached to the rip fence so a dado blade can be partially buried in it. This lets the fence support stock close to a wide cutter when cutting rabbets, dados, or stub tenons.
Best for: rabbets, dados, stub tenons, and controlled cuts where the fence must support stock close to a wide cutter.
Best Value

- Cross Cut Sled for a Table Saw: The kit Greatly improves cutting accuracy, makes saw operations safer, and steadies the workpiece while shielding your finger from harm
- Fun of DIY: Not only can you create your own special table saw sled for your need, but also lies in the sense of accomplishment and creativity it brings, being more motivated and confident in the following saw working when you use it
- Vary Size: You may build your own unique sled to fit your table saw; Make your desired crosscut sled size and meet your unique cutting requirements
- Table Saw Accessories: 3/4'' x 3/8'' UHMW (17’’ long) bar is the often used material in crosscut sled runners which fits most table saws and will not expand under sudden temperature changes as well is slick enough to slide smoothly; The aluminum t track (12’’ long) is solid extruded and can be trimmed to match your sled; (ATTENTION: The bars DO NOT fit RYOBI table saw track slots)
- Package Included: Crosscut table saw sled accessories (2 UHMW bars (3/4'' by 3/8'' ), 2 T tracks, 1 star knob and bolt, wood screws of varying lengths) and 1 specific guide booklet (glue and other building materials are not included). Backs its products within 90 days guarantee. Please do not hesitate to reach out if you encountered any problem, we will reply in 24 hours and provide you a satisfactory solution
Use a flat, straight fence facing secured with appropriate clamps or equivalent hardware. Set the blade height and fence position with the saw switched off, then make a controlled opening in the sacrificial facing. Replace the facing when it becomes too damaged to support the work accurately.
OSHA specifically identifies rabbeting and dadoing as operations where normal guarding may not be usable and calls for suitable jigs, featherboards, or combs to hold stock. That does not mean guard removal is automatically acceptable. Follow the tablesaw manual, use the required guarding and workholding, and do not place hands over or alongside the exposed cutter.
12. Cove-cutting jig
A cove-cutting jig carries stock diagonally across the tablesaw blade. By making a series of shallow passes and gradually changing the position, the blade removes material to form a concave profile. The method can produce large coves and crown-molding components that may be too large for some router-table setups.
Best for: architectural moldings, large coves, custom trim, and specialized profiles.
This is the least beginner-friendly jig in the list. The setup requires careful alignment, secure clamping, controlled feed, appropriate blade selection, and a way to lock every adjustment. Make shallow test passes in scrap and inspect the workpiece and jig after each adjustment.
Do not treat a cove jig as a general-purpose shaping fixture. If the stock can shift, the jig can twist, or the feed path is not predictable, stop and correct the setup. Use only a design and operating procedure you fully understand.
Which tablesaw jigs should you build first?
| Priority | Jig | Why it comes here |
|---|---|---|
| 1 | Full-size crosscut sled | Broadest usefulness and a strong improvement over unsupported crosscutting. |
| 2 | Small-parts sled | Controls short and narrow pieces that are difficult to manage with a miter gauge. |
| 3 | Miter sled | Makes repeated 45-degree and other angled cuts easier to match. |
| 4 | Tapering jig | Useful for furniture parts and repeated low-angle tapers. |
| 5 | Thin-rip jig | Solves narrow-strip work that demands controlled offcut management. |
| 6 | Straight-line rip jig | Extends the saw’s usefulness to rough and live-edge stock. |
| 7 | Tenoning jig | Opens up accurate furniture joinery but requires careful setup. |
| 8 | Box-joint jig | Efficient for repeatable finger joints and decorative boxes. |
| 9 | Spline jig | Strengthens and decorates mitered frames and boxes. |
| 10 | Cross-lap jig | Useful when making grids, lattices, and evenly spaced interlocking parts. |
| 11 | Sacrificial dado/rabbet fence | Helpful for specific joinery operations requiring close fence support. |
| 12 | Cove-cutting jig | Highly specialized and demanding; build it when the project justifies it. |
This is a practical progression, not a manufacturer ranking. Move a jig up the list if your work depends on it—for example, a box maker may need a box-joint jig before a tapering jig.
Build or buy?
Build a shop-made jig when it is primarily plywood, runners, a fence, and a stop. Full-size crosscut sleds, small-parts sleds, miter sleds, straight-line-rip jigs, sacrificial fences, and basic tapering jigs are usually reasonable projects for a careful woodworker with accurate measuring and cutting tools.
Buying makes more sense when precision adjustment, indexing, hold-downs, or specialized geometry would take substantial time to reproduce. Adjustable box-joint jigs, refined tapering jigs, thin-rip jigs, and specialty spline or cove fixtures can justify their cost when they will be used repeatedly.
Before buying any jig, check:
- Miter-slot dimensions and whether the jig uses one or two slots.
- Maximum stock thickness, width, and length.
- Compatible blades, dado sets, or router bits.
- Whether hold-downs, runners, stops, and replacement backers are included.
- How the jig handles dust, offcuts, and blade clearance.
- Whether the current manual describes the exact operation you intend to perform.
For a specialized box-joint or thin-rip setup, a commercial accessory can be useful; for a crosscut sled, a well-built shop-made version is often perfectly practical. Do not buy a product on the assumption that it performs all twelve operations.
Tablesaw jig safety checklist
- Read the tablesaw and jig instructions before the first cut.
- Keep the blade sharp, correctly installed, and set only as high as the operation requires.
- Use the riving knife, spreader, anti-kickback device, and blade guard whenever the operation and equipment allow.
- When a guard cannot be used for a particular rabbeting, dadoing, or similar cut, use the saw manufacturer’s approved procedure and suitable workholding such as a featherboard, comb, or jig.
- Keep hands out of the blade path and use a push stick or pushblock for small or narrow work.
- Support long stock, heavy stock, and the offcut so neither can lever, twist, or fall during the cut.
- Stand out of the likely kickback line when practical.
- Clamp workpieces securely in tenoning, tapering, spline, and other fixtures that require positive registration.
- Make test cuts in scrap after every important setup change.
- Switch off the saw and wait for the blade to stop completely before retrieving cutoffs or adjusting a jig.
- Stop if stock binds, shifts, burns, chatters, or requires unusual force. Find and correct the cause instead of pushing harder.
A jig is a control aid, not a safety guarantee. The operator, saw condition, blade choice, stock quality, guarding, and workholding still determine whether the operation is appropriate.
Frequently Asked Questions
A full-size crosscut sled is the best first tablesaw jig for most shops. It supports wide and awkward stock, provides zero-clearance support, improves 90-degree crosscut control, and can include stops for repeatable lengths.
What is the best tablesaw jig to build first?
No. Jigs can improve control, support the work, reduce tearout, and keep hands farther from the blade, but they do not eliminate blade-contact or kickback hazards. Use the saw’s required guards and safety devices, support the stock and offcut, and follow the jig’s instructions.
Do tablesaw jigs make cutting safe?
Use a purpose-designed thin-rip jig or pushblock. It helps the operator cut repeatable narrow strips without trapping the offcut between the blade and rip fence. Keep hands away from the blade and verify the setup with scrap.
Which tablesaw jig is best for thin strips?
Build simple sleds and fences when they mainly require plywood, accurate runners, a fence, and a stop. Consider buying adjustable box-joint, refined tapering, thin-rip, and specialty spline or cove fixtures when reproducing their indexing or adjustment system would take substantial time.
Should I build or buy a tablesaw jig?
The Bottom Line
Start with a full-size crosscut sled, then add a small-parts sled, miter sled, tapering jig, and thin-rip or straight-line-rip jig according to your projects. Add tenoning, box-joint, spline, cross-lap, dado/rabbet, and cove fixtures when their specialized work justifies them. Every jig should improve control without replacing guards, push devices, stock support, sharp blades, and a deliberate setup.
Quick Recap
Product prices and availability are accurate as of the date/time indicated and are subject to change. Any price and availability information displayed on Amazon at the time of purchase will apply.




