Outdated Drivers Are Slowing You Down
One free scan finds every outdated or missing driver and matches the right update for your exact hardware.Free scan · exact hardware matchPC Slower Than It Used to Be?
A free scan shows the junk files, broken settings and background clutter dragging Windows down - then fixes them in one click.Free scan · Windows 10 & 11A kitchen island is a good idea only when it earns its footprint. The right island adds useful prep space, storage, seating and social connection. The wrong one narrows the work aisle, blocks appliance doors, creates a traffic bottleneck and adds expensive plumbing, electrical, ventilation or countertop work.
Before choosing a waterfall edge, pendant light or paint color, decide whether your room needs a fixed island, peninsula, cart, table-height worktable or no island at all. The practical target is to finish this guide with two or three concepts that you can mark on the floor, walk through and review with a kitchen designer, contractor, electrician, plumber and countertop fabricator.
As an Amazon Associate I earn from qualifying purchases.
The short answer
- Choose a fixed island when you have generous clearances and need substantial storage, a sink, dishwasher, cooktop or appliance drawers.
- Choose a peninsula when you want prep space or seating but cannot preserve comfortable circulation around a freestanding island.
- Choose a cart when flexibility, rental-friendliness or occasional extra prep space matters most.
- Choose a table-height worktable when baking, dining and comfortable seated work are more important than built-in cabinetry.
- Choose no island when the proposed footprint would narrow the main work aisle or interfere with doors and traffic.
Start with the fit, not the photograph
Inspiration galleries from ELLE Decor, Martha Stewart and IKEA can help you identify a style, but a photograph rarely proves that the island fits your room. It may omit the room dimensions, appliance door swings, stool clearance, plumbing route, hood duct, countertop supports or the amount of uninterrupted counter left for actual preparation.
Quick wins for a faster PC:
Repair Windows errors before they cause bigger problemsFix Now →Fix the driver behind crashes, sound loss and screen glitchesFind Drivers →Use the ideas below as design prompts, not as ready-to-order plans. A fixed island has no universal minimum size or legal clearance that works in every room. One professional rule of thumb describes approximately 4 feet of length and slightly more than 2 feet of depth as a practical starting point for a fixed island, but that is guidance rather than building code. A cart or worktable can be useful at a smaller footprint; an island containing a sink, cooktop or dishwasher normally needs deeper cabinet-based construction. This Old House and Fine Homebuilding both emphasize that the island must be sized around its intended work rather than around an arbitrary minimum.
#1 Best Overall
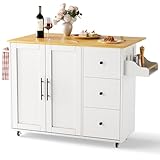
- [Ample & Versatile Storage Space]This storage-equipped kitchen island optimizes kitchen organization with diverse storage options: multiple drawers for utensils and large prep tools, closed cabinets for small appliances, and built-in spice racks for seasonings. Integrated towel bars keep daily essentials within easy reach. Compact yet functional, it serves as both a practical kitchen island and extra storage, boosting kitchen efficiency without occupying excess space.
- [Multifunctional Design for Various Scenarios]This versatile kitchen island is more than just a meal prep station, serving as a kitchen cart, mobile craft station, snack cart, food prep cart or grinding station. Its sturdy worktop doubles as a cutting board, and the absorbent surface is ideal for food preparation. This flexible kitchen island table also fits casual dining needs, meeting diverse demands for meal prep, gatherings, craft activities and more.
- [Sturdy Construction & Secure Locking Wheels for Stability]Made of high-quality materials, this wheeled kitchen island features a robust, durable structure for steady use. It comes with heavy-duty 360° swivel locking wheels for smooth mobility even in tight spaces, and foot-pedal locks keep it firmly in place during prep or use. The rubber wheels protect hardwood/tile floors from scratches, perfectly combining easy movement with reliable stability for this cart-style island.
- [Expandable Workspace & Perfect Height]This kitchen island features a 30+ inch solid uninterrupted worktop, offering ample counter space for various cooking tasks. Its drop-leaf extensions expand the surface area, ideal for gatherings or large-scale meal prep and perfect for small kitchens to maximize space use. The optimal height ensures comfortable use as a cutting board or work station, eliminating back strain during operation.
- [Easy Assembly & Stylish Appearance]No professional installation required—this kitchen island is hassle-free to assemble, easily completed by two people. Its elegant design and ideal color scheme add a sophisticated touch to any kitchen decor. The wooden top is both stylish and easy to clean. This rolling wheeled kitchen island fuses functionality with aesthetics perfectly, making it a great addition to any home, even compact kitchens.
The five-minute island fit test
Do this before ordering cabinets, relocating utilities or choosing a countertop slab. It is inexpensive, reversible and more revealing than viewing a rendering.
- Measure the room. Record finished wall-to-wall dimensions, not just the rough framing dimensions. Note ceiling height and the location of doors, windows, radiators, vents, columns and low soffits.
- Map the traffic. Mark the route from the main entrance to the dining room, living room, pantry, patio and refrigerator. An island should not force every person in the house through the cooking zone.
- Mark appliance doors open. Use the actual specifications for the refrigerator, dishwasher, wall oven, microwave, range and freezer drawers. A clear aisle that works with doors closed may fail when two doors open at once.
- Tape the cabinet box. Use painter’s tape for the proposed island footprint. A typical base cabinet box is about 24 inches deep, but include end panels, fillers, legs, trim and any overhang in the outline.
- Add the work aisle. Measure from the opposing counter front, appliance front or tall cabinet to the island edge. Plan on 42 inches for one cook or 48 inches for multiple cooks as NKBA guidance.
- Add the seating zone separately. The space for stools is not the same as the cabinet depth. Include the countertop overhang, the stool itself, room to pull it out and space for people to pass behind it.
- Use cardboard or newspaper. Cut the island to size from cardboard, newspaper or flattened moving boxes. HGTV’s kitchen island checklist recommends a temporary floor template for testing the footprint.
- Walk the room carrying something large. Carry a tray, roasting pan or stockpot from the refrigerator to the sink and from the oven to the serving area. Check whether corners, stools or open doors create collisions.
- Test two people. Have one person load the dishwasher while another opens the refrigerator or prepares food. If the room only works when one person stands still, the island is too ambitious for the space.
- Check reach and cleaning. Make sure the center of a wide island can be reached comfortably, that every surface can be wiped and that shutoffs, outlets, plumbing access and appliance service panels will not be permanently trapped.
Do not keep an island simply because the room can technically contain one. A clear general walkway may still be too narrow for a busy work aisle, seating with traffic behind it or wheelchair maneuvering.
Clearances and dimensions that actually matter
The following are useful U.S. planning benchmarks from the National Kitchen and Bath Association Kitchen Planning Guidelines. They are recommendations, not a substitute for local building, plumbing, electrical or accessibility requirements.
| Planning issue | Useful benchmark | What it means |
|---|---|---|
| Work aisle, one cook | 42 inches | Measure between opposing counter fronts, appliances or tall cabinets. |
| Work aisle, multiple cooks | 48 inches | More comfortable when people work on both sides or pass behind one another. |
| General walkway | 36 inches | A planning baseline for ordinary passage, not a universal answer for work or accessible routes. |
| Seating with no traffic behind | 32 inches | For a seated diner against a wall or other non-traffic edge. |
| Seating with passage behind | 36 to 44 inches | Use the larger figure where people regularly walk behind seated diners. |
| Wheelchair passage behind seating | Up to 60 inches | The necessary clearance depends on knee space, turning and maneuvering requirements. |
| Seating width | 24 inches per diner | Less may physically fit, but it is cramped for regular meals. |
| Knee depth at table height | 18 inches | Useful for a roughly 30-inch-high table surface. |
| Knee depth at counter height | 15 inches | Useful for a roughly 36-inch-high work surface. |
| Knee depth at bar height | 12 inches | Useful for a roughly 42-inch-high bar surface, though less comfortable for long meals. |
| Primary prep area | 36 inches wide by 24 inches deep | Continuous counter beside a sink, without a sink or cooktop interrupting it. |
| Sink landing | 24 inches on one side and 18 inches on the other | Landing space for dishes, ingredients and utensils; exact placement depends on the sink and layout. |
| Cooktop landing | 12 inches on one side and 15 inches on the other | Space for hot pans and ingredients. Appliance instructions may require more. |
| Counter behind a cooktop | 9 inches minimum | Applies when a same-height counter is used behind the cooking surface. |
| Refrigerator landing | 15 inches | Place on the handle side or immediately across from the refrigerator where practical. |
| Microwave landing | 15 inches | Useful beside or below the microwave for hot containers. |
| Oven landing | 15 inches | Place beside the oven or across from it if the door and aisle remain safe. |
| Dishwasher distance | Within 36 inches of the sink | Reduces carrying distance during loading and unloading. |
| Standing space at dishwasher | 21 inches | Provide usable space in front of the open door. |
PERIMETER COUNTER OR TALL CABINETS
          <—— 42 in. one-cook work aisle ——>
          <—— 48 in. multiple-cook aisle —>
          ┌──────────────────────────────┐
          │       ISLAND CABINET BOX     │  about 24 in. deep
          └──────────────────────────────┘
          <—— 12–18 in. seating overhang, if used ——>
          <—— 32 in. no traffic / 36–44 in. passage ——>
          GENERAL WALKWAY: about 36 in. or more
A useful illustrative calculation is a 25.5-inch perimeter counter plus a 42-inch work aisle, a 24-inch island cabinet and a 36-inch general walkway: 25.5 + 42 + 24 + 36 = 127.5 inches, or approximately 10 feet 7.5 inches of room width. With a 48-inch work aisle, the same arrangement needs approximately 133.5 inches, or 11 feet 1.5 inches. These calculations do not include seating overhangs, stools, trim, irregular walls or appliance doors. A seating island needs additional depth and clearance beyond the 24-inch cabinet box.
NKBA also gives 158 inches of countertop frontage, 24 inches deep, as a general recommendation for accommodating landing, preparation, work and storage uses across a kitchen. That is total kitchen countertop frontage, not a required island size. It is a useful reminder that adding an island is not automatically adding usable worktop if the island is filled with fixtures.
Fixed island, peninsula, cart, table or no island?
| Option | Choose it when | Main risks |
|---|---|---|
| Fixed island | You need storage, a sink, dishwasher, cooktop, microwave drawer or integrated work zones. | Permanent loss of floor space, utility costs, difficult future changes and possible floor repairs. |
| Peninsula | One side can connect to existing cabinets and the room is too narrow for circulation around all four sides. | The projecting end can still create a bottleneck and may limit seating or appliance access. |
| Rolling cart | You rent, have a small kitchen or need occasional prep and serving space. | Casters can move while cutting; storage, weight capacity and accessibility are limited. |
| Furniture-style worktable | Baking, dining, seated work and a lighter visual footprint matter most. | It may not support a sink, dishwasher, deep drawers or heavy stone without reinforcement. |
| No island | The island would narrow a work aisle, block a main route or provide less useful surface than it consumes. | You must solve storage, prep or seating elsewhere, often with a peninsula, wall storage or table. |
A movable island is not automatically permit-free. A simple cart may avoid construction work, but built-in electrical, plumbing, anchoring, structural changes or appliance installation can still require permits or inspections. A fixed island may be the better investment in a high-use kitchen, while a cart may be the better design in a rental or narrow apartment. This Old House’s island overview covers the trade-offs between permanent islands, carts and peninsulas.
Choose the layout before the finish
The classic work triangle remains a useful test between the cooking surface, cleanup or prep sink and refrigerator. NKBA guidance generally keeps the three legs between 4 and 9 feet, with a combined travel distance of no more than 26 feet, and says no leg should intersect an island or other obstacle by more than 12 inches. Modern kitchens often need more than three centers, however: a prep zone, cleanup zone, cooking zone, beverage zone, baking zone and social zone may work better than a rigid triangle. Use the triangle to find needless travel, then use work zones to plan how several people will share the room.
One-wall kitchen with a centered island
A centered island can turn a single run of cabinets into a complete prep, dining and social kitchen. Keep the island aligned with the main sink or cooking zone rather than centering it mathematically if that improves workflow. Watch out: a one-wall kitchen often has limited storage and utilities, so a large island can become overloaded with every appliance and leave no clear prep surface.
L-shaped kitchen with a rectangular prep island
This is a flexible arrangement for separating cooking and cleanup while allowing the island to face a dining or living area. Place the island where it shortens trips between the refrigerator, sink and cooktop. Watch out: protect the inside corner of the L from a door swing or an island corner that makes the corner cabinet difficult to use.
U-shaped kitchen with a compact island
A small island can add a central prep surface to a U-shaped kitchen and give a cook a place to face the room. Watch out: U-shaped rooms already contain three cabinet runs; use the 42- or 48-inch work-aisle test carefully so the island does not turn the kitchen into a narrow tunnel.
Galley kitchen with a slim rolling island
A narrow cart can provide a temporary landing surface and move against the wall when two people need to pass. Watch out: do not sacrifice the galley’s essential circulation for a cart that is only useful when nobody else is in the kitchen.
Peninsula instead of a freestanding island
Connecting the work surface to a wall or cabinet run delivers prep space and seating without requiring a walkway on the attached side. Watch out: account for the projecting end, stool backs and the route around the peninsula.
Double islands for separate prep and social functions
In a very large kitchen, one island can hold a sink and prep storage while the other provides a clean serving and seating surface. Watch out: two islands need enough space between them and around the perimeter; they are not a solution for merely average rooms.
Two smaller islands instead of one oversized block
Separate islands can improve reach, circulation and division of labor, with one dedicated to preparation and the other to entertaining. Watch out: two islands increase countertop, lighting, flooring and circulation costs, and can create two obstacles instead of one.
Ell-shaped island to shorten walking distances
An L or ell shape can bring a prep leg closer to the sink and a seating leg closer to the dining area. Watch out: inside corners lose cabinet efficiency and can make countertop seams, cleaning and stool placement complicated.
L-shaped island for corner seating
An L-shaped island provides two seating directions and can face both a living room and a dining area. Watch out: corner seating requires generous knee space and can make the two diners compete for legroom.
Curved island for smoother circulation
A curved edge softens a busy path and reduces the chance of striking a sharp corner. Watch out: curved cabinetry, countertops and support structures are more custom and can cost more while producing less rectangular storage.
Rounded island end for safer traffic flow
Rounding the end nearest a doorway or walkway is a practical safety improvement in a tight room. Watch out: verify that the fabricator can create the desired radius and that the rounded cabinet still provides useful storage.
Oval-ended island for furniture character
An oval end makes a built-in island resemble a table and works well in traditional, organic or transitional kitchens. Watch out: the decorative shape may reduce the amount of straight counter available for appliances and landing space.
Free tools Windows power users keep installed
One-click scans. No signup required.
Offset island aligned with the main prep zone
Shifting the island away from the room center can place the largest clear surface beside the refrigerator and sink. Watch out: check that the offset does not narrow a doorway, create an uneven passage or make the room look unintentionally misaligned.
Island aligned with a window or architectural axis
Alignment with a window, doorway, beam or sightline can make an open-plan kitchen feel deliberate. Watch out: visual alignment should not override the work aisle, appliance access or comfortable seating clearance.
Island deliberately shifted away from the room center
A modest shift can preserve a heavily used path to a pantry, patio or living room while retaining useful prep space. Watch out: mark the traffic route first; do not assume symmetry is more important than movement.
Small-space, rental and flexible island ideas
Small kitchens usually benefit from less built-in equipment and more adaptable surfaces. If the room cannot preserve the recommended aisle, a narrow cart or peninsula is often more useful than a miniature fixed island packed with appliances.
16. Narrow 18- to 24-inch console island
Best for: serving, light prep and a small apartment where a full cabinet island will not fit. Watch out: an 18-inch console is usually furniture-like; it may not have enough depth for a sink, cooktop or dishwasher.
17. Rolling butcher-block cart
Best for: an inexpensive, warm prep surface that can be moved beside the refrigerator or parked against a wall. Watch out: lock the casters and protect the wood from standing water, hot pans and knife damage.
18. Drop-leaf island
Best for: adding counter space only when cooking or serving. Watch out: the hinges, legs and leaf supports must be strong enough for kneading or a loaded serving tray, and the open leaf needs its own clearance.
19. Fold-out dining island
Best for: replacing a rarely used kitchen table with a surface that can become a breakfast bar. Watch out: confirm that the folded and open positions both preserve the work aisle and that chairs can be stored without blocking circulation.
What’s actually slowing this PC down?
Pick the symptom - the matching free tool is one click away.
20. Two nesting carts that combine when needed
Best for: households that need separate prep and serving surfaces during parties but not every day. Watch out: uneven heights, unlocked casters or a heavy combined top can make the arrangement unstable.
Rank #2

- [Premium Durable Workstation] Crafted with solid wood and a reinforced frame, this kitchen island is built to last. The extra-large tabletop (41.7"L x 29.5"W) offers ample space for cooking, baking, or meal prep, while its scratch-resistant smooth surface ensures effortless cleaning. Tools included for hassle-free assembly.
- [Expandable Dining Bar On Demand] Boost functionality with the foldable drop-leaf extension – instantly transform it into a spacious dining bar for guests or collapse it to save space. Perfect for small kitchens or impromptu gatherings.
- [Smart Storage, Clutter-Free Kitchen] Organize with 2 large cabinets + 1 deep drawer – hide appliances behind dual cabinet doors and sort utensils in easy-access drawers. Keep countertops clean and essentials within reach.
- [Roll, Lock, Stay Stable] Glide seamlessly on 5 silent-roll casters (2 with brake locks) for smooth mobility. Park securely on any floor type – no wobbles, just steady convenience wherever you need it.
- [Transform Any Space Instantly] Beyond a kitchen island: Use as a breakfast bar, baking station, mobile serving cart, or compact office. Fits kitchens, dining rooms, hallways – adapts to your lifestyle effortlessly.
21. Furniture-style worktable
Best for: baking, dining, craft work and a lighter visual effect in a traditional or farmhouse kitchen. Watch out: a table may lack the drawer storage and utility access expected from a cabinet island.
22. Antique table converted into an island
Best for: character, reuse and a furniture-like focal point. Watch out: inspect the table for stability, food-safe finishing, hidden damage and the ability to carry the countertop or any added equipment.
23. Freestanding island with no floor anchoring
Best for: renters and owners who want to remove or reposition the piece. Watch out: a freestanding unit can shift during cutting and may be unsafe for children or anyone leaning on it unless its base is stable.
Do these 3 things before closing this tab:
1Clear out junk files and repair common Windows errors2Fix the driver behind crashes, sound loss and screen glitches3Repair Windows errors before they cause bigger problems24. Island with lockable casters
Best for: a mobile unit that must stay put during prep but move for cleaning or entertaining. Watch out: caster locks are not the same as structural anchoring; test stability with real cutting and kneading force.
25. Open-base island that preserves sightlines
Best for: making a small open-plan kitchen feel less crowded and displaying baskets or stools. Watch out: open shelves collect dust and visual clutter, and the lost cabinet volume may be more valuable than the lighter appearance.
26. Narrow beverage island
Best for: coffee, tea, bottles, glassware and entertaining without interrupting the primary prep area. Watch out: an undercounter refrigerator, ice maker or sink still needs ventilation, utilities, service access and dedicated planning.
27. Island with tuck-under stools
Best for: preserving a clear walkway when the stools are not in use. Watch out: allow enough knee depth and check that stool legs do not hit the cabinet, drawer fronts or foot rail.
Recommended Free Tools
28. Island with a removable countertop
Best for: DIY or rental projects where the base may need to move through a narrow doorway. Watch out: the top must be secured against sliding while in use, and heavy stone is not practical to remove casually.
29. Island made from modular base cabinets
Best for: controlling cost, combining drawer widths and planning a future upgrade. Watch out: modular cabinets still require proper leveling, fastening, finished ends, countertop support and utility coordination.
30. Storage bench that doubles as an island
Best for: a tiny kitchen where a shallow bench can hold linens, pantry goods or pet supplies. Watch out: a bench may be too low for comfortable standing prep and too deep for the available passage.
31. Island with a dining-table extension
Best for: combining everyday prep with a table-height eating surface. Watch out: table chairs need more pull-out space than stools, and the extension needs legs or another support system.
The Tool Desk
Outbyte PC Repair FREEClear out junk files and repair common Windows errorsFree Scan →Outbyte Driver Updater FREEScan for outdated or missing drivers - takes under a minuteDriver Scan →32. Slim island used only for prep and serving
Best for: keeping the top clear and useful in a small or medium kitchen. Watch out: without a defined storage plan, the surface may become a permanent drop zone rather than a work zone.
33. Mobile island parked against the wall
Best for: opening the room for parties, cleaning or large cooking projects. Watch out: identify a real parking location; a cart that lives in the doorway is not flexible in practice.
34. Peninsula with an angled end
Best for: easing the turn into a narrow kitchen and creating a more welcoming seating edge. Watch out: angled cabinets and countertops consume space quickly and can complicate doors, drawers and seams.
35. Island that replaces a rarely used kitchen table
Best for: gaining storage and prep space while retaining informal meals. Watch out: do not remove the only comfortable dining surface if the household regularly eats together or needs wheelchair-accessible seating.
Storage-focused island ideas
Put storage where the item is used. Pots belong near the cooktop, dishes near the dishwasher, serving pieces near the dining side and waste bins beside the main prep zone. A public-facing side can hold shallow storage or display shelving, while the working side usually benefits from drawers.
36. Wide drawer stacks for pots and pans
Best for: heavy cookware that is easier to lift from a drawer than a low cabinet. Watch out: confirm drawer-box capacity, clearances for handles and the depth needed for unusually large pans.
37. Deep drawers beneath an induction cooktop
Best for: keeping pans and lids immediately below a flush cooking surface. Watch out: the cooktop manufacturer may require a clearance or protective panel that reduces the top drawer’s usable height.
38. Vertical tray storage
Best for: baking sheets, cooling racks and cutting boards beside the oven or prep area. Watch out: narrow dividers must be strong enough to prevent heavy trays from leaning or scratching one another.
39. Sheet-pan storage near the oven
Best for: reducing the distance between hot pans and their storage. Watch out: leave a safe landing area beside the oven; storage cannot substitute for counter space.
40. Cutting-board slot at the island end
Best for: quick access without opening a drawer during prep. Watch out: keep boards away from floor-level splashes and provide ventilation so damp boards can dry.
41. Pull-out spice storage
Best for: narrow gaps beside a cooktop or oven. Watch out: heat, grease and narrow shelves can make labels difficult to read; do not place spices where hot cookware can strike the pull-out.
42. Pull-out trash and recycling
Best for: keeping waste beside the primary prep surface and sink. Watch out: allow ventilation, removable bins and enough clearance to pull the unit out without blocking the work aisle.
Outdated Drivers Are Slowing You Down
One free scan finds every outdated or missing driver and matches the right update for your exact hardware.Free scan · exact hardware matchWindows Errors? Fix Them Before They Spread
Repair common Windows errors and clear accumulated junk for a smoother, more stable PC - no reinstall needed.Free scan · no reinstall43. Pull-out compost bin beside a prep sink
Best for: vegetable prep and quick disposal of scraps. Watch out: moisture and odor require a washable interior and a bin that can be removed easily.
44. Dish storage beside the cleanup sink
Best for: unloading the dishwasher and putting away everyday plates with minimal carrying. Watch out: do not place the storage where an open dishwasher door blocks access.
45. Glassware storage on the social side
Best for: allowing guests to help themselves without entering the cooking zone. Watch out: exposed glassware needs protection from stool traffic, children and impact at the island end.
46. Cookbook shelving at the island end
Best for: using an otherwise shallow end panel and keeping favorite recipes visible. Watch out: books near a sink, cooktop or dishwasher may collect grease and moisture.
Recommended Free Tools
47. Shallow cabinets on the public-facing side
Best for: placemats, serving platters, games and infrequently used items without making the island deeper. Watch out: shallow cabinets reduce interior capacity and may add cost for custom doors and boxes.
Rank #3

- Quality & Durability: Our kitchen island’s top plate uses high-quality solid rubber wood, and it has a frame made of durable MDF, which makes it long-lasting for years to come. The top features are anti-dirt and waterproof.
- Convenient Storage: The kitchen island with storage provides ample storage space with its drawers, cabinets, and racks, making it easy to keep your kitchen organized. Drawer for storing utensils and dinnerware; Spice rack and towel holder for added convenience; Cabinet for accessing your microwave, toaster, and other small appliances; Doors keep your space tidy and clean.
- Lockable Wheels for Mobility: Its four swivel casters can be easily moved around the kitchen, making it convenient to use wherever you need it. If you want to keep island stationery, these lockable casters give you the option. You can use the towel rack as a handle to help you move easily.
- Well-Designed Details: Are you ready to adapt! The shelves can be adjusted at 32mm intervals along the entire unit. You can raise or lower them to accommodate various kitchen items! The thickness of the board has been upgraded to 5mm for more stable load-bearing. Smooth drawer glides can prevent the drawers from falling out. The golden handle provides a better user experience.
- Versatile Functionality: This white kitchen island is an innovative and efficient solution for smaller kitchens or dining spaces, maximizing the use of your room. It can also be used as a kitchen island, bar cart, or mobile coffee station. In addition, it is easy to install with suitable accessories and installation videos.
48. Open shelving for serving pieces
Best for: a furniture-style island where baskets and platters are part of the design. Watch out: open storage shows clutter and needs regular dusting, especially in a cooking area.
49. Hidden appliance garage
Best for: keeping a toaster, blender or coffee machine plugged in but out of sight. Watch out: appliances generate heat; use manufacturer-approved clearances and do not operate them in a closed compartment.
50. Mixer lift or small-appliance drawer
Best for: bakers who want a heavy mixer at a comfortable working height. Watch out: verify the lift’s weight rating and the clearance needed for the mixer bowl and attachments.
What’s actually slowing this PC down?
Pick the symptom - the matching free tool is one click away.
51. Knife drawer with a protected insert
Best for: keeping knives organized below the work surface. Watch out: use a secure insert and locate it away from children’s access and the island’s seating side.
52. Towel and cleaning-supply drawer
Best for: placing towels, brushes and dishwasher supplies near the sink. Watch out: separate chemicals from food and provide a child-safe solution where needed.
53. Pet-feeding drawer or station
Best for: storing bowls, scoops and food in a dedicated location. Watch out: pet food and bowls need hygiene, ventilation and protection from the main food-preparation surface.
54. Beverage-storage drawers
Best for: coffee pods, tea, bottles, napkins and bar tools. Watch out: place them on the entertaining side so beverage traffic does not cross the cook’s main path.
The Tool Desk
Outbyte PC Repair FREERepair Windows errors before they cause bigger problemsFix Now →Outbyte Driver Updater FREEFix the driver behind crashes, sound loss and screen glitchesFind Drivers →55. Wine or bottle storage
Best for: using a narrow end cabinet and keeping bottles near serving space. Watch out: protect bottles from heat, sunlight, children and impact from stools.
56. Refrigerator drawers
Best for: frequently used produce, drinks or children’s snacks within easy reach. Watch out: appliance ventilation, dedicated power and door clearance consume cabinet space and may increase service complexity.
57. Freezer drawers
Best for: storing frozen ingredients close to a prep or baking zone. Watch out: low drawers can be difficult to use for anyone with limited bending or reach.
58. Warming-drawer cabinet
Best for: entertaining, batch cooking and keeping plates or food warm near a serving side. Watch out: follow the appliance’s ventilation, electrical and mounting requirements and leave a safe landing area.
Quick wins for a faster PC:
Clear out junk files and repair common Windows errorsFree Scan →Fix the driver behind crashes, sound loss and screen glitchesFind Drivers →Repair Windows errors before they cause bigger problemsFix Now →59. Microwave drawer
Best for: keeping the microwave below eye level and accessible from the social side. Watch out: the open drawer projects into the aisle; verify clear floor space, child safety and the manufacturer’s installation details.
60. Charging drawer with cord management
Best for: phones, tablets, homework and recipe devices. Watch out: use listed electrical components, manage heat and spills, and make the charger replaceable rather than burying it permanently.
61. Drawer for placemats and napkins
Best for: seating islands and everyday family meals. Watch out: locate it on the dining side so users do not reach across a cooktop or active prep area.
62. Baking-ingredient pull-outs
Best for: flour, sugar and oils beside a baking worktop. Watch out: heavy containers need sturdy hardware, and pull-outs should be protected from heat and moisture.
63. End cabinet with a lazy Susan
Best for: making a deep corner or angled end more usable. Watch out: rotating shelves have limited capacity and require accurate clearances to avoid door collisions.
64. Bookcase-style island end
Best for: a decorative furniture effect in a traditional, transitional or organic kitchen. Watch out: books and objects at a traffic-facing end can be bumped, and the display must not reduce required circulation.
65. Toe-kick drawers for rarely used items
Best for: flat serving trays, seasonal linens and step stools. Watch out: toe-kick drawers are low and can create a trip hazard if they are opened into a walkway.
Prep, cooking and cleanup ideas
An appliance-heavy island may look multifunctional while leaving too little uninterrupted counter for actual work. Choose one primary job for the island and no more than two secondary jobs. A sink or cooktop is not automatically an improvement if it consumes the exact surface the kitchen lacks.
66. Large uninterrupted prep island with no appliances
Best for: cooks who need space for chopping, rolling dough, assembling meals and serving. Watch out: plan waste, knife and mixing-bowl storage nearby or the clean top will quickly become cluttered.
67. Island with a dedicated prep sink
Best for: separating vegetable washing and food preparation from dish cleanup, especially when two cooks share the room. Watch out: preserve a continuous prep area and confirm drain, vent, water-line and shutoff access before cabinets are installed.
68. Island with the main cleanup sink
Best for: facing guests while washing dishes and placing the dishwasher beside the sink. Watch out: dirty dishes are visible from the living area, and the sink can consume the island’s most valuable uninterrupted counter.
69. Island with a small auxiliary sink
Best for: beverage service, handwashing or light prep in a large kitchen. Watch out: a small basin still needs adequate landing space, plumbing venting and cleaning; do not install one solely to fill an empty top.
Free tools Windows power users keep installed
One-click scans. No signup required.
70. Island with a cooktop
Best for: cooks who want to face the room and converse while working. Watch out: you must solve hood or downdraft ventilation, landing space, heat safety, utility routing, controls and children’s access before committing.
71. Island with an induction cooktop
Best for: a lower-profile cooking surface with no open flame and a contemporary appearance. Watch out: confirm cookware compatibility, electrical capacity, cooling clearances and a safe place for hot pans.
72. Island with a downdraft cooktop
Best for: reducing the visual impact of an overhead hood in an open-plan kitchen. Watch out: performance depends on the appliance, duct route and cooking style; the mechanism can consume cabinet storage and does not eliminate ventilation planning.
73. Island with a concealed appliance garage
Best for: keeping a coffee machine or blender ready without making the island look appliance-heavy. Watch out: do not operate heat-producing appliances in a closed garage and plan a listed receptacle and service access.
74. Island with a butcher-block prep insert
Best for: adding a warm, replaceable cutting or rolling surface beside a stone countertop. Watch out: wood needs appropriate sealing and drying, and the insert must not become a water trap beside the sink.
Rank #4

- Kitchen Cabinet with Charging Station: This kitchen island with a 15"D x 26"W island top offers you the additional space for your delicious meals. Your kitchen essentials can find the right place to stay and the power strip including 3 sockets and a 59" long cord facilitates your free charging of various kitchen appliances
- Simple yet Elegant: The noble white body of this kitchen island gives you the special aesthetic experience while the graceful shape foils the warm style of your kitchen. Partition design and sufficient storage space solidify your pursuit of exquisiteness by protecting your and your family's daily meals and then changing your ordinary life
- More Space for Storage: The upper drawer of this kitchen island is 9.7"D x 22.7"W x 4.8"H in size for simple organization of knives, forks and other cutlery. The adjustable shelf in the lower double-door storage cabinet can be installed in 3 heights to store kitchenware like bowls and dishes, cookware or toasters. The 3-tier side spice rack with rails is ideal for your spice bottles
- Rolling Kitchen Island: Four 360 degree rotating wheels enable this kitchen island to move smoothly or stand stationary with 2 lockable casters, which allows you to decide the placement without space limit. Upon the diagonal assembly of 2 wheels with brakes, a gentle lock can fix this kitchen island firmly
- Solid and Easy-to-Clean Materials: This kitchen island on wheels is made of quality particleboard, MDF and strong metal, featuring firm structure and strong bearing ability up to 55 lb. The smooth finish eases your daily cleaning. Only a rag is needed for wiping off the dust and light stains
75. Island with a lower baking surface
Best for: rolling pastry and seated or lower-height baking work. Watch out: a lower surface changes the visual line and must provide knee clearance, comfortable posture and a sanitary transition from the floor.
76. Island with a dedicated landing zone beside the refrigerator
Best for: unloading groceries and setting out ingredients. Watch out: locate it on the refrigerator’s handle side and make sure an open refrigerator door does not block it.
77. Island with a landing zone beside the oven
Best for: transferring roasting pans and baking sheets safely. Watch out: a 15-inch recommendation is a starting point; large pans, oven doors and the cook’s stance may require more room.
Do these 3 things before closing this tab:
1Clear out junk files and repair common Windows errors2Scan for outdated or missing drivers - takes under a minute3Repair Windows errors before they cause bigger problems78. Island with a landing zone beside the microwave
Best for: children or guests removing hot containers without crossing the main cooking area. Watch out: keep the surface heat-resistant and the appliance at a reachable height.
79. Island with a dishwasher beside the sink
Best for: efficient loading and unloading. Watch out: NKBA recommends the nearest edge within 36 inches of the sink and at least 21 inches of standing space in front; check that the open door does not block a required route.
80. Island with an undercounter refrigerator
Best for: drinks, produce or children’s food on the room-facing side. Watch out: the appliance can attract traffic into the work aisle, and it still needs ventilation, power and door clearance.
81. Island with an ice maker
Best for: entertaining and a dedicated beverage zone. Watch out: water, drain, filtration, electrical and service requirements need to be planned before the floor and cabinets close.
The Tool Desk
Outbyte PC Repair FREERepair Windows errors before they cause bigger problemsFix Now →Outbyte Driver Updater FREEScan for outdated or missing drivers - takes under a minuteDriver Scan →82. Island with a beverage refrigerator
Best for: separating drinks from the main refrigerator and keeping guests out of the cooking zone. Watch out: avoid placing it where an open door conflicts with stools or a main walkway.
83. Island with a warming drawer
Best for: serving large meals and coordinating several dishes. Watch out: provide a safe landing surface and follow the manufacturer’s installation and heat-clearance requirements.
84. Island with a built-in steamer
Best for: cooks who regularly steam food and have a large, highly specified kitchen. Watch out: this is a niche appliance that adds water, drainage, power, ventilation and maintenance requirements; it may not justify lost drawer space.
85. Island with a pull-out mixer shelf
Best for: keeping a heavy mixer at a stable working height without leaving it on display. Watch out: check the shelf rating and make sure the mixer can be lifted, plugged in and operated without blocking the aisle.
86. Island with integrated compost and recycling
Best for: making sorting convenient during prep and cleanup. Watch out: provide washable bins, odor control and enough volume for the household rather than a tiny decorative compartment.
87. Island with a separate serving counter
Best for: buffet meals and entertaining, with a clean surface distinct from the prep zone. Watch out: a two-tier or separated surface can reduce usable depth and create a barrier if it is too tall.
88. Island with a second prep zone for multiple cooks
Best for: two people working on opposite sides or at separate ends. Watch out: provide the 48-inch multiple-cook aisle where appropriate and avoid placing both cooks in conflict with one appliance door.
89. Island with an end-mounted sink to preserve central prep space
Best for: keeping a long central run of counter open while retaining a water source. Watch out: the end position may reduce sink landing space and can place plumbing in a tight cabinet where drawers or seating were planned.
90. Island with a heat-resistant cooking side and softer seating side
Best for: visually and functionally separating hot-pan work from dining. Watch out: different surfaces may require a seam, different maintenance routines and careful support at the transition.
Seating and family-use island ideas
Plan 24 inches of counter width per diner as a comfortable starting point. A 30-inch table-height surface generally needs about 18 inches of knee depth, a 36-inch counter-height surface about 15 inches and a 42-inch bar-height surface about 12 inches. The overhang is also a structural element: countertop support depends on material, thickness, cabinet construction, cutouts and the length of the overhang. Cambria’s installation guidance requires additional support beyond specified limits and identifies support spacing of no more than 36 inches on center in stated applications; MSI’s quartz guidance similarly varies requirements by slab thickness and overhang. Always use the fabricator’s instructions for the selected material.
91. One-stool end seat
Best for: a small kitchen where one person can sit without adding a long seating run. Watch out: protect the end from passing traffic and provide enough knee room beyond the cabinet or waterfall panel.
92. Two-stool breakfast bar
Best for: quick meals, coffee and conversation in a medium kitchen. Watch out: two stools require about 48 inches of seating width before allowing for arms, backs and comfortable spacing.
93. Three-stool family island
Best for: everyday homework, snacks and informal meals. Watch out: the island may need to be longer than expected once 72 inches of seating width, end panels and supports are included.
94. Four-stool entertaining island
Best for: large open-plan kitchens where the island is a social anchor. Watch out: regular traffic behind four diners may require 44 inches or more, so calculate the entire seating zone rather than only the counter length.
95. Wraparound corner seating
Best for: creating a conversational corner and using an L-shaped island. Watch out: corner diners need coordinated knee space, and the wraparound can make the island deeper than the room can comfortably support.
96. Table-height island with dining chairs
Best for: long meals, older adults, children and anyone who finds counter stools uncomfortable. Watch out: chairs need more pull-out and passage space, while the lower surface may provide less cabinet storage beneath it.
97. Standard counter-height island with counter stools
Best for: combining ordinary prep height with casual seating. Watch out: leave sufficient knee depth and do not confuse a comfortable counter stool with a bar-height stool.
98. Bar-height extension for a narrow footprint
Best for: screening prep mess and providing a slim seating ledge. Watch out: bar height is less comfortable for children, older adults and long meals, and its 12-inch knee-depth benchmark can feel cramped.
99. Two-tier prep-and-dining island
Best for: separating a lower worktop from a higher serving or seating surface. Watch out: the raised tier reduces prep depth, interrupts sightlines and may complicate accessible use and outlet placement.
100. Island with a homework and charging station
Best for: family kitchens where the island supports schoolwork, recipes and devices. Watch out: keep cords away from sinks, hot surfaces and walking paths; include task lighting and a replaceable, properly listed charging solution.
Recommended Free Tools
101. Wheelchair-friendly seated work and dining section
Best for: inclusive kitchens, aging in place and households with varied mobility. Watch out: a lower countertop alone is not enough; include clear floor space, knee and toe clearance, reachable storage and a route that stools do not block.
Best Value

- Generous Storage Solution: This kitchen island boasts an expansive storage capacity, effectively addressing the challenge of limited countertop and kitchen space. By relocating small appliances to the cabinet, you'll enjoy an abundance of workspace while cooking. Maximize the utility of your space to maintain a tidy and well-organized kitchen.
- Practical Kitchen Organizer: The storage-integrated kitchen island is robust enough to accommodate everyday kitchen tools and appliances. The drawers are ideal for storing napkins and cutlery, and the adjustable shelves offer sufficient room for small kitchen gadgets. The towel racks are designed to hold kitchen paper and towels securely.
- Effortless Mobility: Equipped with 4 quiet omnidirectional wheels (2 with brakes) at the base, this mobile kitchen cart can be easily positioned and locked in place. Thanks to its towel rack design, it can be maneuvered with ease. Its smooth-rolling wheels allow for convenient movement, making floor cleaning a breeze.
- Versatile Functionality: This kitchen island transforms your kitchen into more than just a cooking area. It features a range of powerful functions, including a countertop, storage cabinet, dining space, and an additional side table for drinks and supplies during gatherings.
- Premium Quality Build: Crafted from high-grade solid wood boards and featuring a durable structure, our kitchen island ensures long-lasting use. The tabletop, measuring 26"L x 18"W, provides a spacious surface for cooking and food preparation. Its sleek surface simplifies cleaning, and the installation process is straightforward, with all necessary tools included.
Ideas by kitchen size
Small kitchens
Start with a cart, peninsula, drop-leaf unit, table-height worktable, narrow console or slim prep island. Open bases and one-sided storage can preserve sightlines. Avoid installing a sink or cooktop unless the room still has the required work aisle, landing areas, door clearances and ventilation route. In a small kitchen, an uninterrupted 36-by-24-inch prep area may be more valuable than a miniature appliance island.
Medium kitchens
A medium kitchen can often support a dedicated prep island, two or three stools, drawer storage and one carefully selected appliance such as a microwave drawer or compact prep sink. Use contrasting paint, wood or countertop material to define the island without making it visually heavier than the room.
Large kitchens
Large rooms can support multiple work zones, double islands, separate prep and entertaining surfaces, a beverage area or an appliance-heavy island, but size alone does not eliminate planning problems. Long islands increase walking distance, wide islands become difficult to reach and clean, and two islands need generous space between them. If one island grows beyond comfortable reach, consider two smaller islands or an ell shape instead.
Choose the island’s primary job
| Primary job | Features that support it | Features to limit |
|---|---|---|
| Prep | Continuous counter, prep sink, knives, cutting boards, waste and mixing-bowl storage. | Cooktops, raised tiers and too many outlets interrupting the surface. |
| Cleanup | Main sink, dishwasher, dish storage, waste, recycling and towel storage. | Seating directly behind an open dishwasher or a sink with no landing area. |
| Cooking | Cooktop, pan drawers, landing areas, heat-resistant surface and properly ducted ventilation. | Children’s stools, through-traffic and insufficient hood clearance. |
| Dining | Comfortable height, knee space, foot support and enough width per diner. | Sink, cooktop, sharp corners and appliance doors in front of diners. |
| Entertaining | Clean serving surface, beverage storage, glassware, charging and social-facing seating. | Dirty-dish storage and noisy appliances facing guests. |
| Storage | Wide drawers, tray slots, shallow public-side cabinets and task-specific pull-outs. | Overhangs or open shelving that consume more capacity than they provide. |
| Accessibility | Seated worktop, clear floor space, knee and toe clearance, reachable storage and contrast. | Raised tiers, deep low drawers, sharp edges and stools blocking the route. |
| Room division | Consistent public-facing finish, controlled sightlines and a clean serving side. | A massive block that closes the entrance or makes the living area feel smaller. |
Choose one primary job and no more than two secondary jobs. A sink, cooktop, dishwasher, microwave drawer, wine refrigerator, charging drawer and four stools may all fit in a rendering, but they can leave very little room for preparing an actual meal.
Countertop materials: choose by use, not by claims of perfection
| Material | Good fit | Trade-off to plan for |
|---|---|---|
| Quartz | Low-maintenance surfaces with a consistent appearance. | Pattern can look uniform, edges can chip and hot-pan limits depend on the manufacturer. |
| Granite | Natural variation and strong everyday performance. | Slabs vary and sealing or care requirements depend on the stone. |
| Quartzite | Natural-stone character and a high-impact statement island. | Cost, fabrication, sealing and care vary significantly by stone. |
| Marble | Baking, classic kitchens and a surface that can develop patina. | More vulnerable to staining, etching and scratching. |
| Butcher block | Warm farmhouse or organic style and a dedicated prep surface. | Needs ongoing care and protection from moisture, heat and standing water. |
| Laminate | Budget-conscious, lightweight and rental-friendly projects. | Less resistant to heat and impact than many stone surfaces. |
| Solid surface | Seamless appearances and integrated sinks. | Excessive heat and abuse can damage it, though some damage may be repairable. |
| Stainless steel | Professional, hygienic and industrial kitchens. | Scratches, fingerprints and dents are part of its appearance. |
| Concrete | Custom shapes and modern or handcrafted character. | It can stain, crack or require sealing and careful fabrication. |
| Porcelain or sintered surface | Thin dramatic slabs and heat-oriented applications. | Fabrication, edges, seams and installation are specialized. |
| Tile | Color, pattern and a potentially DIY-friendly surface. | Grout maintenance and an uneven work surface can be inconvenient. |
| Reclaimed wood or antique top | Furniture character, reuse and a distinctive traditional look. | Condition, hygiene, sealing and structural stability must be checked. |
There is no universally best countertop. Consumer Reports’ countertop buying guide compares materials for stains, abrasion, cutting, heat and impact, illustrating why each surface balances different strengths. Ask the supplier about heat, stain, scratch, sealing, edge and repair expectations for the exact product rather than relying on a material label alone.
Style directions that still support function
- Modern: use slab-front cabinets, a quiet edge profile, integrated appliances and a single uninterrupted surface. Keep outlets and storage visually controlled.
- Farmhouse: combine a painted base with a butcher-block or natural-stone top, furniture legs or an apron-like end. Protect wood from sink splashes and heavy cutting.
- Transitional: pair a traditional cabinet door with contemporary drawers, simple hardware and a contrasting island color.
- Traditional: use furniture feet, turned legs, framed ends or bookcase details, but keep projections outside the required traffic zone.
- Organic: choose wood grain, softly rounded ends, natural variation and matte finishes. Confirm that reclaimed or porous surfaces can meet the household’s maintenance expectations.
- Colorful: make the island the statement element with paint, tile or a distinctive stone while keeping the perimeter quieter.
- Minimalist: use flush panels, hidden charging, concealed appliances and a clean top. Minimalism fails when every appliance is left on the surface.
- Luxury: consider quartzite, porcelain, waterfall panels, custom metalwork or a second work zone, but verify slab availability, seams, weight and support before finalizing the design.
NKBA’s 2026 kitchen trends report, based on a survey of 634 industry professionals, found that 57% expected statement color to land on islands, 85% identified beverage areas as a popular lifestyle feature, 85% identified powerful vent hoods as a growing feature and 63% identified pendant lights as popular. The same report points toward multifunctional, storage-heavy kitchens and greater attention to accessibility. These are professional expectations, not instructions that every homeowner should follow. Read the NKBA report as trend context, then choose features that match your household.
Lighting, outlets and charging
Lighting
Use layered lighting: general ambient light, shadow-free task lighting over the worktop and decorative pendants where they will not interfere with sightlines or tall users. Put task lighting on a separate switch or dimmer from decorative fixtures. A pendant over a seating area can be attractive, but a fixture directly over a prep zone should not cast a shadow from the cook’s body. Avoid glare on polished stone and provide even lighting at an accessible work surface.
Free tools Windows power users keep installed
One-click scans. No signup required.
Electrical planning is edition- and location-specific
Do not copy an old island-outlet diagram without identifying its code edition. Under the 2023 NEC, receptacles serving island and peninsula work surfaces became conditional rather than automatically required based on countertop square footage. Where receptacles are installed to serve the surface, the permitted placement rules include locations on or above the work surface within the stated height limit or listed countertop or work-surface assemblies. The 2023 rule also addresses provisions for future addition where no receptacle is installed. See the explanations from Leviton and Eaton.
The 2026 edition of NFPA 70, the NEC, now exists, but jurisdictions adopt different editions, amendments and interpretations. Before cabinets or countertops are ordered, ask the authority having jurisdiction and a licensed electrician which edition applies and how it will be interpreted locally. Confirm the location and listing of any countertop pop-up receptacle, raised backsplash receptacle or integrated work-surface assembly. Also plan dedicated circuits for appliances, GFCI protection where applicable, lighting circuits, dimmers and future conduit. A floor outlet may be useful but needs suitable protection from spills and traffic.
Keep cords from crossing walkways or hanging where children can pull them. Place charging drawers away from sinks and heat, provide ventilation where equipment needs it and make the charging hardware replaceable. An outlet hidden behind a sink, appliance garage or drawer may technically exist but be useless in everyday life.
Ventilation: the decision that makes island cooktops expensive
A cooktop against a wall can use a relatively straightforward hood route. An island cooktop usually needs a ceiling-mounted hood or a downdraft system, with consequences for ducting, ceiling structure, make-up air, noise and the open-plan sightline. Decide whether the social benefit of cooking in the island is worth giving up storage and adding this complexity.
Crashes, No Sound, or Screen Glitches?
Random freezes, missing sound and display glitches usually trace back to one bad driver. Find and replace yours safely.Free scan · under a minuteWindows Errors? Fix Them Before They Spread
Repair common Windows errors and clear accumulated junk for a smoother, more stable PC - no reinstall needed.Free scan · no reinstall- Ceiling-mounted island hood: usually the strongest visual and capture solution when it can be ducted outdoors, but it can dominate the room and needs careful mounting height and duct planning.
- Downdraft: preserves a cleaner sightline, but its performance depends on the appliance and duct route, and its mechanism may consume cabinet storage.
- Recirculating hood: simpler to install but does not provide true outdoor ventilation. It filters and returns air to the room rather than exhausting moisture, odors and combustion products outdoors.
The EPA’s remodeling and indoor-air-quality guidance recommends exhausting cooking-related moisture, odors and combustion products outdoors and cites approximately 100 cfm for a typical range based on ASHRAE and HVI recommendations. That figure is not a universal rating for every cooktop, hood or home. Larger fans may require make-up air and can depressurize a home enough to create combustion backdrafting risks.
The Home Ventilating Institute says a hood should generally be at least as wide as the cooking surface and notes that island cooking may require greater capacity because of cross-currents and higher mounting positions. Follow the cooking-appliance and hood manufacturer’s instructions, local mechanical code and the advice of the HVAC professional. Include filter access, cleaning, noise and the duct route in the design—not after the cabinets arrive.
Before committing to an island cooktop
- Confirm whether the hood can be ducted outdoors and where the duct will run.
- Check hood width, mounting height, capture area and noise.
- Ask whether make-up air is required.
- Check for fireplaces, furnaces or other combustion appliances that could be affected by depressurization.
- Preserve the 12- and 15-inch landing recommendations, plus the counter behind the cooktop where applicable.
- Keep controls reachable without reaching across burners.
- Decide where hot pans will go and whether seating is too close.
Plumbing and appliance coordination
An island sink is not simply a sink placed in a cabinet. The drain, venting method, water lines, shutoffs, disposal, dishwasher connection, floor assembly and future service access must be resolved before the island is fixed in place. This Old House notes that island sinks may require underfloor vent routing or an air-admittance valve, subject to local code; neither method is universally permitted.
Ask the plumber to show the route and access points before flooring and cabinets are installed. Avoid hiding a shutoff, cleanout or leak-prone connection where a heavy cabinet, stone top or waterfall panel makes service impossible. Confirm that plumbing does not consume the drawer depth promised in the design.
Quick wins for a faster PC:
Clear out junk files and repair common Windows errorsFree Scan →Scan for outdated or missing drivers - takes under a minuteDriver Scan →For a cleanup island, keep the dishwasher close to the sink, provide at least 21 inches of standing space in front and check that the open door does not block the main aisle. For a prep island, preserve the continuous 36-by-24-inch prep zone beside the sink where possible. For an appliance island, obtain the final specifications for every appliance—including ventilation, clearances, electrical load, door swing, panel requirements and service access—before the cabinet order.
Accessible and aging-in-place island planning
Do not describe every lower counter as an ADA island. The federal ADA standards apply to specified covered facilities and certain residential units with required mobility features; local, state, fair-housing and project-specific requirements may also apply. The U.S. Access Board’s kitchen provisions are the appropriate reference for covered accessible residential kitchens.
For broader inclusive residential design, consider providing at least one genuinely usable seated work area. In covered accessible kitchens, the Access Board specifies a work surface at least 30 inches wide, a maximum height of 34 inches, clear floor space and knee and toe clearance. Adjustable surfaces may be designed from approximately 29 to 36 inches where appropriate. Controls should not require reaching across burners, and appliance doors must not obstruct required clearances.
- Provide a 30-inch-wide or wider lower work surface with real knee and toe clearance, not merely a shorter cabinet.
- Keep a clear approach and turning area around the island; do not fill it with stools, bins or open doors.
- Use drawers and pull-outs instead of deep, low base cabinets for everyday items.
- Place the microwave, controls and frequently used storage within comfortable reach.
- Consider a seated prep sink or cooktop, with insulated undersides and protected plumbing where needed.
- Use contrasting counter edges, rounded corners, easy-grip hardware and even task lighting without glare.
- Coordinate a wheelchair position with the seating overhang, footrest and the route behind other diners.
Countertop overhang, seams and structural support
Seating overhang is not just a decorative extension. The required support depends on the material, slab thickness, substrate, cabinet depth, cutouts, seam location and overhang length. Ask the countertop fabricator for a drawing that identifies brackets, legs, corbels, steel supports, seam placement and support spacing before the cabinets are finalized.
Do these 3 things before closing this tab:
1Repair Windows errors before they cause bigger problems2Scan for outdated or missing drivers - takes under a minute3Clear out junk files and repair common Windows errorsDo not assume that a 12- or 18-inch overhang is acceptable for every quartz, quartzite, granite, porcelain or solid-surface top. Cambria’s technical guideline requires additional support beyond stated limits and identifies no-more-than-36-inch support spacing in specified applications. MSI’s guidance also varies by thickness and overhang length. The selected supplier’s current instructions control.
Keep seams away from unsupported overhangs and, where possible, away from sink or cooktop cutouts. Confirm that a waterfall panel will not obstruct accessible knee space, end seating, a doorway or a cabinet drawer. Round or clip corners, particularly near a tight walkway; NKBA recommends avoiding sharp counter corners where circulation is constrained.
Common kitchen island mistakes
- Making the island too large. A huge surface can increase walking, become difficult to reach and make cleaning awkward. Consider two islands or a different shape instead of endlessly lengthening one block.
- Making the island too narrow to be useful. A shallow console may work for serving, but it cannot automatically support a sink, cooktop, landing area and storage.
- Using 36 inches for every clearance. That may be a general walkway baseline, not enough for multiple cooks, seating traffic, appliance doors or wheelchair maneuvering.
- Ignoring open appliance doors. Refrigerator, dishwasher and oven doors can turn a comfortable plan into a collision zone.
- Filling the island with appliances. The surface that solved the kitchen’s prep problem disappears under a sink, cooktop, outlets and small appliances.
- Adding a cooktop without solving ventilation. Hood size, ducting, make-up air, noise and sightlines must be designed together.
- Installing a sink with no landing area. A basin is not a substitute for a continuous prep surface.
- Putting the dishwasher where it blocks the sink. Keep it near the sink but preserve standing space and door clearance.
- Planning outlets from an old article. Identify the NEC edition adopted locally and ask the electrician or authority having jurisdiction before finalizing the design.
- Under-supporting the overhang. Countertop material, thickness and support spacing must be approved by the fabricator.
- Putting storage on the wrong side. Dishes, glasses, waste bins and serving pieces should be reachable from the activity that uses them.
- Choosing a surface by appearance alone. Check heat, stains, scratching, sealing, impact and repair expectations for the exact product.
- Using sharp corners in a traffic path. Rounded or clipped ends can be safer and easier to navigate.
- Forgetting future access. Do not permanently bury plumbing shutoffs, cleanouts, appliance service panels or electrical pathways.
- Calling a low counter accessible. Accessibility also requires approach space, knee and toe clearance, reachable controls, suitable storage and a usable route.
- Designing for photographs instead of movement. Test the plan carrying a pan, opening doors, loading the dishwasher and passing another person.
Pre-order checklist
Before cabinets, plumbing, electrical, flooring or countertops are ordered, assemble one preliminary plan and verify each item below.
- Room dimensions, finished wall locations, doors, windows, vents, radiators and traffic routes.
- Island length, cabinet depth, finished height, end panels, fillers, legs and overhang.
- 42-inch work aisle for one cook or 48 inches for multiple cooks where applicable.
- At least a 36-inch general walkway, increased for seating passage, accessibility or busy routes.
- Seating width of approximately 24 inches per diner, plus knee depth, stool pull-out and traffic clearance.
- Primary island job and no more than two secondary jobs.
- Continuous prep and landing surfaces beside the sink, cooktop, refrigerator, microwave and oven.
- Appliance specifications, door swings, panel requirements, ventilation and service clearances.
- Plumbing route, drain and venting method, water shutoffs, disposal, dishwasher connection and service access.
- Hood or downdraft type, outdoor duct route, make-up air, noise, filter access and combustion-appliance review.
- Electrical plan using the NEC edition adopted in the jurisdiction, including dedicated circuits, GFCI where applicable, lighting, charging and future conduit.
- Countertop material, slab availability, seam locations, cutouts, edge profile, overhang supports and waterfall-panel weight.
- Floor condition and whether the island will be anchored or remain movable.
- Accessible work surface, clear floor space, knee and toe clearance, reachable storage and rounded or contrasting edges where needed.
- Permit, inspection and professional sign-off requirements.
Finally, tape the final footprint again. Invite the people who will actually use the kitchen to walk it at the same time. If the plan works with real bodies, real stools, real doors and a real roasting pan, the style decisions become much safer to make.
What’s actually slowing this PC down?
Pick the symptom - the matching free tool is one click away.
Frequently Asked Questions
What is the minimum size for a kitchen island?
There is no universal minimum. A practical fixed-island starting point is often around 4 feet long and slightly more than 2 feet deep, but a cart or worktable can be useful at a smaller footprint. The decisive test is whether the room preserves a suitable work aisle, general walkway, appliance-door clearance and any seating space. A sink, cooktop or dishwasher usually requires a deeper cabinet-based design.
Is 36 inches enough space around a kitchen island?
It can be a reasonable general-walkway baseline, but it is not enough for every situation. NKBA guidance recommends 42 inches for a one-cook work aisle and 48 inches for multiple cooks. Seating needs about 32 inches without traffic behind it, 36 inches for passage and 44 inches where regular traffic passes behind diners. Accessibility and appliance-door maneuvering may require more.
Should the sink or cooktop go in the island?
A sink often provides more everyday prep utility with less visual and ventilation complexity. A cooktop can create a social cooking center, but it requires careful landing space, heat safety, electrical or gas planning and a properly designed ventilation system. If the island is small, an uninterrupted prep surface may be more useful than either fixture.
Do kitchen islands need electrical outlets?
The answer depends on the electrical code edition adopted by the local jurisdiction and its interpretation. The 2023 NEC changed island and peninsula countertop receptacle provisions, and the 2026 NEC now exists. Have a licensed electrician confirm the applicable edition, placement, GFCI requirements, appliance circuits and any future-provision requirement before the countertop is ordered.
Free tools Windows power users keep installed
One-click scans. No signup required.
Is a peninsula better than an island for a small kitchen?
Often, yes. A peninsula can provide prep space, storage or seating while using an existing cabinet or wall as one side, so it does not need a full circulation route around all four edges. It still needs careful planning at the projecting end, around stools and near appliance doors.
The Bottom Line
Bottom line
The best kitchen island is not the largest or most decorated one. It is the one that gives your household a clear primary benefit without damaging circulation. Measure the room, test two or three taped footprints, open every appliance door, allow for the correct work and seating clearances, then coordinate plumbing, electrical, ventilation, countertop support and accessibility before ordering. If a fixed island fails that test, a peninsula, worktable or movable cart is not a compromise—it may be the better design.
Quick Recap
Product prices and availability are accurate as of the date/time indicated and are subject to change. Any price and availability information displayed on Amazon at the time of purchase will apply.

