What’s actually slowing this PC down?
Pick the symptom - the matching free tool is one click away.
Most conventional tank-style water heaters should be flushed about once a year. Flushing drains mineral sediment from the bottom of the tank, where buildup can reduce heating efficiency and contribute to popping or rumbling noises. Hard water, heavy usage, and the manufacturer’s instructions may justify a different schedule.
This procedure applies to a standard storage-tank heater—not automatically to a tankless or heat-pump unit. Before opening a valve, identify the heater, read its installation or use-and-care manual, and make sure you can safely handle hot water and the unit’s electrical, gas, and pressure components.
As an Amazon Associate I earn from qualifying purchases.
What flushing a water heater actually does
A conventional water heater stores water in a tank. Over time, minerals and other particles settle at the bottom as sediment. A controlled drain-and-refill process uses fresh water to carry some of that sediment out through the tank’s drain valve.
Crashes, No Sound, or Screen Glitches?
Random freezes, missing sound and display glitches usually trace back to one bad driver. Find and replace yours safely.Free scan · under a minuteWindows Errors? Fix Them Before They Spread
Repair common Windows errors and clear accumulated junk for a smoother, more stable PC - no reinstall needed.Free scan · no reinstallSediment creates an insulating layer between the burner or heating elements and the water. That can make heating less efficient and may produce popping, rumbling, or crackling sounds as water becomes trapped beneath the deposits. Annual draining and flushing is routine maintenance intended to reduce sediment deposition, support operating efficiency, and help maintain the heater—not a guarantee of a specific energy-bill reduction or service-life extension.
#1 Best Overall

- Skoutag dual hex socket wrench removal tool is made of quality Carbon Steel Galvanized, sturdy and anti-corrosion, specially designed to install or remove screw-in water heater elements and anode rods.
- One end size 1-1/2" hex, fits most residential screw-in water heater elements.
- One end size 1-1/16" hex, fits all 3/4" thread anode rods.
- The 8mm side holes allow a screwdriver, or similar object, to be inserted and used for leverage, meaning you won't damage the bolts or your hands in the process, given much room and space for maintenance your water heater.
- Servicing the anode and element on your water heater is a must if you want to protect your tank and keep it at its best for years to come, this tube spanner allows you to do regular maintenance water heater easily and not requires any additional tools.
Important distinction: A tankless water heater does not have a storage tank to drain. It usually requires periodic descaling of its heat exchanger through service-isolator valves. A heat-pump water heater has additional controls, filters, and condensate components, so its manual should control the maintenance procedure.
How often should you flush a water heater?
| Heater or condition | Practical starting point |
|---|---|
| Conventional electric or gas storage tank | About once per year, unless the manual specifies otherwise. |
| Hard water or visible sediment | Possibly more often—sometimes every six months—but treat that as a condition- or manufacturer-specific recommendation, not a universal rule. |
| Tankless heater | Periodic heat-exchanger descaling, commonly annually, subject to water conditions, usage, and the manufacturer’s schedule. |
| Rumbling, popping, cloudy hot water, reduced hot-water supply, or slower recovery | Inspect and service promptly. Sediment may be involved, but these symptoms can have other causes. |
The U.S. Environmental Protection Agency’s WaterSense guidance generally points to annual flushing for storage-tank heaters and advises following the appliance manual or using a professional. Rheem and Bradford White likewise describe annual maintenance while noting that water quality, usage, and model design affect the interval.
Before you begin: safety and equipment
Water discharged from a heater can be hot enough to cause serious burns. Wear gloves and eye protection, keep children and pets away, and route the discharge to a drain or outdoor location that will not be damaged by high-temperature water. Never assume a hose, floor drain, bucket, or receiving surface can safely handle hot water without checking first.
For a conventional tank flush, gather:
- A garden hose with a fitting compatible with the heater’s drain valve
- A safe floor drain or other discharge location
- Protective gloves and eye protection
- A bucket only if it can be handled safely and will not overflow
- A flashlight for checking the valve, fittings, and floor for leaks
You generally do not need a powered pump or chemical descaler for a conventional tank flush. Pumps, hoses, and approved descaling solutions are primarily used for tankless heat-exchanger maintenance.
Rank #2
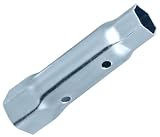
- Dual Functionality Design: This Dual Hex Wrench Removal Tool allows the removal and replacement of both residential screw-in elements and anodes, including RV and Camper Travel Trailer
- Convenient Length Design: Features a 6-inch length that provides optimal leverage and reach for accessing water heater elements and anode rods in tight spaces commonly found in RVs and residential installations
- Precise Sizing Specifications: One end size 1-1/2-inch hex removing all residential screw-in water heater elements; another end size 1-1/16-inch hex removing all anode rod 3/4" NPT
- Wide Compatibility Range: Removing all residential/RV screw-in water heater elements before 1991 and all water heaters manufactured after 1994. Also, all Anode Rod Size 3/4" NPT Thread
- Essential Maintenance Tool: Servicing the anode and element on your water heater is a must if you want to protect your tank and keep it at its best for years to come, this tube spanner allows you to do regular maintenance water heater easily and not requires any additional tools
Identify the heat source before shutting it down:
- Electric tank: Switch off the dedicated circuit breaker. Do not restore power until the tank has completely refilled and air has been purged from a hot-water faucet.
- Gas tank: Use the exact shutdown or pilot procedure in the manufacturer’s manual. Depending on the model, the control may need to be set to “pilot” or “off.” Do not improvise gas-control or relighting instructions.
- Heat-pump water heater: Follow the model manual, including its electrical, condensate, filter, and operating-mode instructions.
- Tankless heater: Do not use the conventional tank-draining procedure. Follow the descaling instructions for that model.
How to flush a conventional tank-style water heater
The sequence below is a general framework for a conventional tank. Your owner’s manual takes priority, particularly for the gas control, relief valve, drain valve, and restart procedure.
- Turn off the heat source. Turn off the electric heater at its dedicated breaker. For gas, place the control in the manufacturer-specified safe mode. If you cannot identify the correct setting, stop and call a qualified professional.
- Let the water cool if possible. Cooling reduces the burn risk, although the tank may remain hot for hours. Do not touch or stand over the discharge stream.
- Close the cold-water inlet. This is normally the cold-water pipe entering the top of the tank. Closing it prevents the heater from continuously refilling while it drains.
- Attach the hose to the bottom drain valve. Tighten the connection and route the hose to a suitable drain or discharge location. Make sure the end cannot whip around or come loose.
- Open a nearby hot-water faucet. This admits air and helps the tank drain. Some manufacturer procedures also discuss carefully opening the temperature-and-pressure relief valve, but doing so is not automatically required and can release dangerously hot water. Only operate it if the manual calls for it and the discharge can be controlled safely.
- Open the drain valve. Allow the tank to drain completely, or follow the manual’s instruction for draining until the water is substantially clear. Bradford White’s published procedure emphasizes complete draining to remove as much sediment as possible.
- Flush remaining sediment if appropriate. If the water is cloudy or contains particles, briefly reopen the cold-water supply while the drain remains open, if the manual permits. Fresh water can stir and carry out deposits. Stop if the drain clogs, leaks, or will not close.
- Close the drain valve and remove the hose. Confirm that the valve is fully closed before beginning the refill. A worn plastic or metal drain valve may not seal reliably after being disturbed.
- Refill the tank completely. Open the cold-water inlet. Leave a hot-water faucet open until water flows in a steady stream without sputtering air. This indicates that the tank is full and the plumbing has been purged.
- Restore the heat source only after the tank is full. Turning on an electric heater before its elements are submerged can damage them. Restart a gas heater exactly as the manual specifies.
- Check for leaks. Inspect the drain valve, hose connection, water fittings, relief-valve area, and floor around the heater. Recheck after the unit has returned to normal operation.
Never energize an electric water heater with an empty or partially filled tank. Dry-firing can burn out the heating elements. If you are uncertain whether the tank is full, leave a hot-water faucet open until water flows steadily and do not restore power before that point.
What if the drain valve is stuck or starts leaking?
Do not force a stuck valve aggressively, drill it out, or remove it while the tank is full. A damaged valve can release hot water rapidly, and an older tank may have corrosion around the opening. If the valve leaks when closed, will not open, clogs with sediment, or breaks during the procedure, shut down the heat source and arrange professional service.
An older heater that has never been maintained may contain compacted deposits or have a deteriorated drain valve. Flushing may not remove hardened sediment, and disturbing a corroded connection can reveal a leak that was previously sealed by deposits. A professional can determine whether the valve, tank, anode rod, temperature-and-pressure relief valve, expansion tank, burner, venting, or other components need attention.
Rank #3

- COMPLETE SET FOR UNIVERSAL USE: Includes 1 x 27mm (1-1/16 6-Point Deep Socket + 1 x 38mm (1-1/2 6-Point Deep Socket + 1 x 1/2 Drive Extension Bar. Perfect for removing and replacing screw-in elements in all residential and RV water heaters
- PRECISE 6-POINT GRIP & DEEP WELL DESIGN: Engineered with a hex-deep well construction to securely latch onto elements, preventing stripping or rounding. The 1/2 drive ensures maximum torque transfer for effortless installation/removal, even on corroded fittings
- HEAVY-DUTY STEEL & CORROSION RESISTANCE: Forged from industrial-grade steel with anti-rust coating, this wrench withstands high-pressure tasks and humid environments, ensuring 10X longer lifespan than standard tools
- ULTRA-THIN WALL FOR TIGHT SPACES: Slim-profile sockets (wall thickness <3mm) easily access cramped areas behind water heaters, RVs, or under sinks—no need to dismount entire units
- PROFESSIONAL-GRADE EFFICIENCY: Ideal for DIYers and pros. The 38mm (1-1/2 socket tackles large elements, while the 27mm (1-1/16 handles compact fittings—all with one extension bar
Tankless water heaters: descaling is a different procedure
Tankless units heat water as it passes through a heat exchanger. Mineral scale can accumulate inside that exchanger, especially in hard-water areas. Maintenance typically involves isolating the heater, connecting hoses and a circulation pump through service valves, circulating an approved descaling solution, rinsing with fresh water, and returning the valves and heater to service according to the manual.
A typical high-level sequence is:
- Turn off the heater’s power or gas as directed by the manufacturer.
- Close the hot- and cold-water isolation valves.
- Clean the cold-water inlet filter if the manual calls for it.
- Connect the pump and two hoses through the service-isolator valves.
- Use only a descaling solution approved or permitted by that model’s instructions.
- Circulate the solution for the specified time; do not assume one brand’s concentration or timing applies to another.
- Drain and rinse the system with fresh water as directed.
- Restore the valves, power, gas, and operating mode according to the manual, then check for leaks and proper operation.
For readers who own a compatible tankless unit and intend to do this maintenance themselves, a tankless water heater flush kit can provide the pump, hoses, and container needed for the process. It is optional if you hire a professional, and it is not needed for a standard storage-tank flush. Verify that the kit, service-valve arrangement, and descaling solution are compatible with your exact heater before buying or connecting anything. Rheem’s RTG20124 is one model-specific example documented for compatible Rheem tankless systems; it should not be treated as a universal fit.
Do not treat a routine flush as water-system disinfection
A sediment flush is maintenance for the heater. It does not sterilize the household plumbing, remove every contaminant, or treat a diagnosed water-quality problem. If the home has been vacant, the plumbing has stagnated, or there is a concern about Legionella or another contamination issue, follow appropriate public-health and manufacturer guidance or contact a qualified professional. Do not use a routine heater flush as a substitute for a disinfection procedure.
Quick wins for a faster PC:
Repair Windows errors before they cause bigger problemsFix Now →Scan for outdated or missing drivers - takes under a minuteDriver Scan →Clear out junk files and repair common Windows errorsFree Scan →Check the temperature-and-pressure relief valve carefully
The temperature-and-pressure, or T&P, relief valve is a safety device—not a normal drain substitute. EPA guidance recommends checking it at least annually, but the appliance manual should determine whether and how a homeowner performs that check.
Manually operating the valve can release dangerously hot water. If the manual calls for testing it, make sure the discharge pipe directs water safely and keep away from the outlet. The relief-valve outlet must never be capped, plugged, blocked, or otherwise obstructed. If the valve leaks after testing or does not reseat properly, stop using the heater until it has been evaluated.
Rank #4

- UNIVERSAL COMPATIBILITY: Designed to work with all standard residential screw-in water heater elements for efficient removal and replacement
- PRECISE FIT: Features a 6-point, 1-1/2 inch socket design that provides secure grip and prevents slipping during use
- PROFESSIONAL GRADE: Built with durable materials and 1/2-inch drive connection for use with standard ratchets and breaker bars
- SPECIALIZED DESIGN: Deep socket construction allows full engagement with heating elements for maximum torque application
- DIMENSIONS: Socket measures 1-1/2 inches across the opening with a 1/2-inch square drive connection for versatile tool compatibility
When to call a professional
Call a licensed plumber or water-heater professional instead of attempting the work yourself when:
- The drain valve is stuck, leaking, damaged, or clogged.
- The tank, fittings, or connections show substantial rust or corrosion.
- The heater is old and has never been flushed.
- You are not comfortable shutting down or restarting gas equipment.
- The unit involves electrical panels, heat-pump controls, venting, or pressure components you cannot safely identify.
- You cannot route hot discharge to a safe location.
- The heater continues to rumble, leak, produce discolored water, or provide inadequate hot water after maintenance.
- You suspect a failed relief valve, expansion-tank problem, burner or venting issue, electrical fault, or tank leak.
A professional can flush the unit while inspecting related components, including the anode rod, T&P valve, expansion tank, burner or venting, electrical connections, water fittings, and signs of tank failure. For a difficult or safety-sensitive job, licensed plumber for water heater flushing is the appropriate type of service—not a generic handyman who may not be qualified to work on gas or pressure equipment.
Scald prevention after maintenance
The U.S. Consumer Product Safety Commission commonly recommends a residential water-heater setting around 120°F to reduce scald risk, while recognizing that controls and household needs differ. Do not change the thermostat automatically as part of a flush. Follow the manufacturer’s instructions and verify the temperature at a fixture safely after service, especially if children, older adults, or people with limited mobility live in the home.
Temperature at the tap can differ from the setting on the heater. Mixing valves, plumbing length, control accuracy, and fixture conditions all affect the final outlet temperature.
Best Value

- Robust Removal: This premium 10-inch heavy-duty heating element wrench features a dual hex design that provides extra length for enhanced leverage and torque. Perfect for tackling the most stubborn anode rods and heating elements.
- Elemental Ease: Simplify the removal of elements with our durable, precisely fitting water heater element removal tool, designed for quick and safe removal of elements..
- Universal Socket: Our water heater socket is the all-in-one solution for diverse models and residential water heaters, streamlining your maintenance tasks. Dual Hex 1 1/16 socket x 1 1/2 socket x 10 in length
- Wrench Mastery: Gain the upper hand on stubborn bolts with our dual hot water heater element wrench and anode rod socket, crafted for maximum torque without strain.
- Compatibility: Perfectly tailored for suburban and residential use, our wrench ensures your system’s longevity with every twist. Perfect for suburban sw10de parts or RV hot water heater element
Frequently Asked Questions
Is flushing a water heater really necessary?
For most conventional storage-tank heaters, annual flushing is recommended maintenance because sediment can collect at the bottom and reduce efficiency or contribute to rumbling and popping. It is not a guarantee that every symptom will disappear, and the owner’s manual should control the exact procedure.
Does flushing a water heater save money?
It can help the heater operate more efficiently by reducing sediment buildup, but there is no universal savings amount. Actual results depend on the heater’s condition, water quality, usage, temperature setting, and other components.
How often should a tankless water heater be flushed?
A tankless unit normally needs heat-exchanger descaling rather than conventional tank draining. Annual service is a common starting point, but hard water, usage, and the manufacturer’s schedule may call for a different interval.
What should I do if the water-heater drain valve is stuck?
Do not force or remove it casually, especially while the tank contains hot water. Shut down the heat source and call a qualified professional. Forcing the valve can cause a leak or damage a corroded tank connection.
Does cloudy or discolored hot water always mean the heater has failed?
No. Sediment, corrosion, the anode rod, plumbing, or another water-quality issue can cause discoloration. Persistent discoloration, leaks, unusual odor, or inadequate hot water warrants professional diagnosis rather than repeated flushing alone.
The Bottom Line
For a conventional tank-style water heater, plan on flushing about once a year. Shut down the heat source, control the hot-water discharge, drain through the bottom valve, refill the tank completely, and restore heat only after it is full. Tankless heaters require a separate, model-specific descaling process. If a valve is stuck, the tank is corroded, or gas, electrical, venting, or pressure components are involved, use a qualified professional.
Do these 3 things before closing this tab:
1Repair Windows errors before they cause bigger problems2Fix the driver behind crashes, sound loss and screen glitches3Clear out junk files and repair common Windows errorsQuick Recap
Product prices and availability are accurate as of the date/time indicated and are subject to change. Any price and availability information displayed on Amazon at the time of purchase will apply.

