Free tools Windows power users keep installed
One-click scans. No signup required.
Use caulk on cracks between parts that stay fixed, and weatherstripping where a door or operable window moves. Caulk creates an airtight bridge across a stationary joint; weatherstripping compresses or interlocks when a sash or door closes, then releases so it can open again.
One opening can contain several different joints. A door may need weatherstripping at its jambs and head, a sweep at the bottom, caulk at a fixed trim joint, and low-expansion window-and-door foam or backer rod in the concealed gap between the jamb and rough framing. Identify the leaking joint before buying a seal.
As an Amazon Associate I earn from qualifying purchases.
Start by identifying the leaking joint
A draft is moving air, not a diagnosis. The same doorway can leak at the latch edge, beneath the slab, through a stationary frame-to-trim crack, or through the hidden space between the jamb and the rough opening. Each location has a different sealing requirement.
Quick wins for a faster PC:
Fix the driver behind crashes, sound loss and screen glitchesFind Drivers →Repair Windows errors before they cause bigger problemsFix Now →- Operable edge: The perimeter where a door slab or window sash meets its frame. The parts move, so use weatherstripping that seals when closed without blocking normal operation.
- Door bottom: The threshold-facing edge of an exterior door. A correctly sized sweep or door-bottom seal is usually the appropriate repair.
- Stationary frame or trim joint: A crack between fixed components, such as a door frame and interior casing. A compatible caulk is generally appropriate.
- Concealed rough-opening gap: The space between a window or door unit and the surrounding framing. This is not the same joint as the operable edge; suitable choices include caulk, foam backer rod, or low-expansion foam made for windows and doors.
Look for visible daylight, a loose-fitting exterior door, drafts around the window frame, dust trails, or a noticeable temperature difference near the opening. On a windy day, move a smoke pencil or a thin strand of tissue around the perimeter. Keep the test away from flames and do not use an open candle near curtains, solvents, or a combustion appliance.
#1 Best Overall

- Press-In Kerf Fit: This weather stripping door seal fits 1/8" kerf slots and 1/4"–1/2" closed door gaps. For pre-cut kerf frames only; not self-adhesive. Measure before ordering
- Block Drafts & Energy Loss: The flexible door frame seal strip helps reduce cold drafts, light leaks, outside noise and heating or cooling loss for year-round comfort
- Replace Worn Exterior Door Seals: Ideal for replacing old, cracked, compressed or pet-damaged door weather stripping on front, back and garage entry doors
- Easy Press-In Installation: Remove the old seal, clean the kerf groove, measure and cut, then press the flange firmly into place. The 40FT roll can be cut to fit multiple doors
- Durable PE-Covered Foam: Resilient PU foam with a tough PE cover compresses and rebounds to help maintain a snug, long-lasting seal
A blower-door test can reveal leakage that is too small or concealed to find by hand. Smoke used during or after the test helps identify the exact path. For a window or door rough opening, the U.S. Department of Energy (DOE) specifically describes a blower-door test and smoke pencil as ways to check whether sealing was successful.
The decision rule: movement determines the material
| What is leaking? | Does the joint move? | Typical material | What success looks like |
|---|---|---|---|
| Fixed frame-to-trim or masonry crack | No | Caulk selected for the substrates and exposure | A continuous, bonded bead with no gaps or pull-away |
| Door jamb, head, or window sash contact | Yes | Weatherstripping | Seal compresses or engages when closed, while the door or sash still opens, closes, and latches normally |
| Exterior door bottom | Yes at the threshold | Door sweep or door-bottom seal | Contact with the threshold blocks air without dragging or preventing closure |
| Window or door unit to rough framing | Usually concealed; not an operating joint | Suitable caulk, foam backer rod, or low-expansion window-and-door foam | The gap is air-sealed without bowing the frame or damaging the unit |
This rule is more reliable than choosing a product by name alone. “Window sealant,” for example, may refer to a product for a fixed exterior joint, while an operable sash needs a flexible weatherstrip that tolerates repeated movement and friction.
When caulk is the right choice
Fixed joints around frames and trim
Caulk is intended for cracks and openings between components that remain stationary relative to each other. Common examples include a fixed door or window frame meeting trim, a frame meeting a sill, or a small crack where two building materials meet. Choose a formulation whose label lists both substrates and the joint conditions: interior or exterior exposure, expected movement, moisture, temperature, and paintability.
What’s actually slowing this PC down?
Pick the symptom - the matching free tool is one click away.
DOE guidance emphasizes that not every joint should be caulked and that no single product is suitable for every use. Follow the current product label rather than assuming that a familiar caulk will adhere to metal, masonry, vinyl, painted wood, or damp surfaces. A joint that is designed to drain, move, or be serviced may need to remain open.
Preparing a stationary joint
- Confirm that the parts are fixed. Open and close the door or window. If the crack changes width as the unit operates, it is not a simple fixed-joint caulking job.
- Remove failed material. Cut out loose caulk and scrape away dirt, dust, and flaking paint. Do not damage flashing, gaskets, or the frame finish.
- Dry and clean the surfaces. The label may require a specific cleaner or a dry substrate. Follow that requirement; trapped moisture can cause adhesion failure.
- Check the joint depth. A deep or wide void may require backer material before the surface bead. Do not fill a large concealed cavity with an arbitrary mass of caulk.
- Apply one continuous bead. Hold the nozzle at a consistent angle and fill the joint without leaving skips or bubbles.
- Tool and cure as directed. Tool the bead before the stated skin time, then protect it from water, movement, or paint until the label’s cure condition is met.
- Inspect the perimeter. Look for pinholes, gaps at corners, and places where the bead has pulled away from one substrate.
Caulk is not a substitute for correcting a loose door, a displaced window, or damaged flashing. If the opening is moving because hinges, a strike plate, fasteners, or the frame itself is out of alignment, repair that condition before sealing the visible crack.
When weatherstripping is the right choice
Exterior doors
Weatherstripping is designed to seal a door or operable window while allowing repeated opening and closing. The seal must be snug enough to stop infiltration but not so thick or stiff that it prevents the latch from engaging, causes excessive force at the knob, or leaves the door standing open.
DOE and the National Renewable Energy Laboratory’s job aid Install Weatherstripping on an Exterior Door (DOE/GO-102023-5934, June 2024) starts with a practical check: look for visible daylight or a loose fit. A door that is sagging or poorly aligned may need its hinges, knob, or strike plate adjusted before new weatherstripping is installed.
Recommended Free Tools
Rank #2

- No light penetration: Our door seals are made of high-density foam core material, which effectively blocks light from penetrating around the door.
- Lower Energy Costs: This weather stripping protects your home from air leakage in both winter and summer, while increasing comfort and saving energy.
- Fits Most Doors: Door seal strip are flexible to fit slots from 0.35" to 0.59" and will fit most doors. Please check the slot you need to seal before ordering.
- Easy to Install: The door seal requires no adhesive and will not leave marks. Simply insert the door strips into the grooves or recesses to complete a tight seal that will not fall off easily.
- Enhance Your Living Space: The weather strip offers good resilience and sound insulation, effectively sealing gaps to block dust, water, and reduce noise, creating a comfortable and serene living environment.
Weatherstripping types and trade-offs
| Type or behavior | Strengths | Risks if poorly selected or installed | Best fit |
|---|---|---|---|
| Interlocking systems | Can be durable and create a positive seal while permitting operation | Alignment and installation are more demanding; mistakes can prevent the door from closing | Doors where a precise, robust jamb and head seal is justified and the installer can maintain alignment |
| Resilient compression seals | Accommodate some irregularity and compress as the door closes | Oversizing can make the door hard to close or stress hardware; undersizing leaves leaks | Jambs and heads with a reasonably consistent contact surface |
| Sliding or friction seals | Can follow a closing motion and tolerate certain geometries | Excessive friction can impede operation or wear the contact surface | Locations where the product’s sliding action matches the frame and label instructions |
| Door sweeps and bottom seals | Address a common leakage path at the threshold | A sweep that is too long or low can drag, fold, or stop the door from latching | The bottom edge of an exterior door, measured against the actual threshold |
These categories describe behavior, not a universal product ranking. Compare the seal’s dimensions with the gap, the door’s closing force, the threshold shape, exposure to rain, and the manufacturer’s installation instructions.
Step-by-step: weatherstrip an exterior door
- Find the leak. In daylight, inspect the latch side, hinge side, head, and bottom. A smoke pencil can confirm air movement when conditions are safe.
- Correct alignment first. Tighten or adjust loose hinges, the knob, or the strike plate if the slab does not sit squarely in the frame. A seal cannot compensate for a door that is visibly sagging.
- Measure each location. Measure the left side, right side, and head separately, then measure the bottom for a sweep. Frames are often not perfectly uniform, so do not assume one measurement applies everywhere.
- Check the product’s compression or engagement requirement. Compare the measured gap with the seal’s stated range. A thick seal that requires excessive compression can make the door difficult to close.
- Cut the pieces accurately. Make clean, square cuts and keep the seal continuous at corners where the instructions require it. Do not stretch a flexible strip while fastening it; it can shrink back and leave a gap.
- Position the seal on the contact surface. Follow the product’s orientation and setback dimensions. Interlocking systems require especially careful alignment of the two mating parts.
- Fasten with the supplied screws or fasteners. Start at the locations specified by the instructions, keep the strip straight, and avoid crushing the seal.
- Fit the sweep or bottom seal. Measure the door width, trim the sweep as directed, and set it so it seals against the threshold when closed without scraping excessively.
- Test the complete door cycle. Close it gently, verify that the latch and deadbolt engage, then open it from inside and outside. Check for smooth operation at several points rather than forcing the door once.
- Verify the result. Recheck with smoke or a blower door when available. The target is lower air infiltration with proper operation maintained or improved.
Operable windows
Casement, awning, sliding, and double-hung windows use different contact paths. Replace or add weatherstripping only where the sash is meant to seal against the frame. Do not caulk the operating gap shut: doing so can immobilize the sash, block drainage, and make future maintenance difficult. If a window is difficult to lock or leaves an uneven gap, investigate hardware and sash alignment before selecting a thicker seal.
Concealed gaps at the rough opening need a separate solution
The joint between a window or door unit and the rough framing is hidden behind trim or within the wall assembly. DOE Building Science Education guidance lists caulk, canned spray foam, or foam backer rod for appropriate gaps at this location. If you use foam, choose a low-expansion product designated for windows and doors. High-expansion foam can bow jambs and interfere with sash or door operation.
Why fibrous insulation alone is not enough
Fibrous insulation can reduce heat transfer in a cavity, but by itself it does not block airflow through an open path. A rough-opening repair needs an air-sealing layer that remains continuous around the unit. Keep the seal compatible with the flashing and drainage design; do not bridge a path that is intended to shed water to the exterior.
Outdated Drivers Are Slowing You Down
One free scan finds every outdated or missing driver and matches the right update for your exact hardware.Free scan · exact hardware matchPC Slower Than It Used to Be?
A free scan shows the junk files, broken settings and background clutter dragging Windows down - then fixes them in one click.Free scan · Windows 10 & 11Safer sequence for a rough-opening repair
- Expose only what you can restore. Remove trim carefully and note shims, flashing, backer materials, and drainage paths before disturbing them.
- Measure the void. Narrow, shallow joints may accept a labeled sealant; wider or deeper joints may need backer rod before the surface seal.
- Choose the assembly-appropriate product. Use a low-expansion window-and-door foam where the label permits it, or use caulk or backer rod when that better matches the joint geometry and materials.
- Protect the operating unit. Keep foam and sealant out of tracks, hinges, locks, weep holes, and moving sash edges. Mask surfaces if the product instructions require it.
- Fill without overpacking. Foam expands after application. Follow the can’s bead-size and cure instructions rather than filling the cavity completely in one oversized pass.
- Restore the trim and water management. Reinstall shims, trim, and exterior seals without covering drainage openings or creating a new path for water.
- Test the perimeter. Use smoke or a blower-door test after the repair. A visually full joint is not proof of an airtight connection.
The rough-opening gap may be the only closure between indoors and outdoors at that point in the assembly. If you cannot identify the flashing or drainage arrangement, or if the frame is out of square, have a qualified window or building-envelope professional assess it before injecting foam.
Caulk and weatherstripping are often used together
Choosing one material does not mean using it everywhere around an opening. Consider an exterior door with three separate conditions:
- The moving latch and hinge edges need weatherstripping.
- The threshold-facing edge may need a sweep.
- A stationary gap between the frame and casing may need caulk.
A replacement window can have the same pattern: weatherstripping at the operable sash, caulk at a fixed trim joint, and a suitable air seal at the concealed jamb-to-framing gap. Treat each joint according to its movement and function. Do not run caulk across an operable edge simply because it is the most visible crack.
Rank #3

- Complete Package: no need for any additional purchases, our weather stripping door seal comes with 4 42-inch strips and 1 36-inch strip within one package; The weather stripping material is quality and comes with all necessary accessories for quick installation
- Accommodating Design: our weather door seal strip comes in a versatile size package; Thanks to the accommodating design, it easily adapts to curved and uneven doors, providing a snug fit; You will no longer have to worry about wind and noise leaking into your home
- Efficient Sealing Solution: the exterior door weather stripping offers a quality solution to keeping your indoors free of dust, rain, and cold; Made of reliable aluminum and foam, the door seal is inherently corrosion resistant and offers efficient sealing capabilities, ensuring your home stays warm
- Install Without Fuss: the exterior door weatherstripping features predrilled, slotted screw holes for easy installation; All you need to do is align it with your door, and you can install it directly; package includes mounting screws, 84" sides, 36" top
- Special Features: not only is this front door weather stripping rainproof, it is also successful in blocking out wind, light, draft, and snow; With this door seal, enjoy peaceful, isolated indoors, away from external elements and noise
Common mistakes and how to correct them
Caulking a moving joint
Symptom: The door or sash binds, the bead tears, or the seal breaks as the unit cycles.
The Tool Desk
Outbyte Driver Updater FREEScan for outdated or missing drivers - takes under a minuteDriver Scan →Outbyte PC Repair FREEClear out junk files and repair common Windows errorsFree Scan →Correction: Remove the caulk from the operating edge, restore the intended clearance, and install correctly sized weatherstripping. Use caulk only on adjacent fixed joints that the product label allows.
Installing weatherstripping over a misaligned door
Symptom: The latch will not engage, the knob requires unusual force, or one corner still shows daylight.
Correction: Adjust loose hinges, the strike plate, or other hardware first. Re-measure each side and the head, then select a seal that matches the corrected gap.
Using a seal that is too thick
Symptom: The door springs open, the sash will not lock, or the seal is permanently crushed.
Correction: Compare the actual gap with the manufacturer’s compression range. Replace an over-thick strip instead of forcing the hardware to overcome it.
Using a seal that is too thin or discontinuous
Symptom: Smoke still moves at corners, or daylight remains after installation.
Rank #4
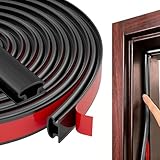
- 【THICKENED SILICONE MATERIAL - COMPLETELY BARRIERING AIR AND NOISE】:The weather stripping is made of thickened TPE material with good sealing and anti-deformation properties, with this weather stripping you can completely seal the gaps, keep the room warm in winter and cool in summer, Helps To Reduce Energy Consumption ,and blocking the entry of noise, light, rain, dust, wind, leaves, snow, and odor, and no reptile will sneak in.
- 【CUSTOMIZABLE IN A VARIETY OF SIZES】This weatherstripping is easy to customize, can be cut to size with scissors, and can be easily bent into any shape. Overall length 50 feet, width: 0.35 inch; thickness: 0.23 inch; fits gaps and spacing from 0.1 to 0.22 inch.NOTE: Please measure the width of the gap before purchase
- 【STRONG ADHESION - WON'T FALL OFF】This door weather stripping is covered with a strong adhesive substance. Simply remove the red film from the surface and install. After 24 hours of bonding, everything is securely bonded and there is no need to worry about peeling or adhesive residue, ensuring that this door seal strip in place long after use (and is no longer affected by extreme temperatures).
- 【EASY INSTALLATION】Measure the length of the groove to be sealed, cut the Universal Weatherstrip to the desired length, clean and dry the surface, and insert the Soundproof Weatherproof Weather strip into the groove.(Note:Low Temperature Will Result In Poor Adhesive Performance,Please Use A Hair Dryer To Heat The Adhesive Backing To Increase The Bonding Effect Before Installation)
- 【WIDELY USED】The Door Insulation Strip is a tough, long-lasting self-adhesive tape with minimal compression that helps prevent rattles, vibrations and squeaks. It is widely used as weather stripping, gaskets or cushioning and stabilizes major appliances such as doors, windows, furniture, electrical cabinets, speakers, toys, crafts, sports equipment, vents, air conditioning, plumbing, HVAC. Also, in cars, trucks and boats.
Correction: Check measurements, corner transitions, cuts, and fasteners. A small unsealed corner can bypass an otherwise sound perimeter.
Filling a rough opening with ordinary high-expansion foam
Symptom: A jamb bows, a sash rubs, or a door becomes difficult to close after the foam cures.
Do these 3 things before closing this tab:
1Fix the driver behind crashes, sound loss and screen glitches2Repair Windows errors before they cause bigger problems3Scan for outdated or missing drivers - takes under a minuteCorrection: Remove only the excess that can be safely removed, restore alignment if possible, and use a low-expansion window-and-door product for any remaining gap. Severe distortion may require a professional repair.
Relying on insulation without air sealing
Symptom: The cavity looks full, but smoke or a blower-door test still shows a strong leak.
Correction: Add a compatible, continuous air-sealing layer at the correct plane. Fibrous insulation alone is not an air barrier.
Blocking drainage or weep paths
Symptom: Water accumulates at a sill, trim stains, or the unit leaks during rain even though drafts are reduced.
Correction: Stop and inspect the flashing and drainage design. Remove sealant from blocked openings and repair the water-management layer before resealing.
Best Value

- Premium Thickened Flexible Silicone Material - Heat And Cold Resistant: OXRQ Door Draft Stopper is made from high-quality silicone, which is flexible and durable & easy to bend and rebound in one second, superior in performance and durability to other rigid plastic products on the market. Smoothly surface, high resilience. Strong Adhesive stick firmly and won't damage your door and floor, you can easily open the door along the door bottom seal or against daily wear.
- Saving Money & Energy - Warm In Winter and Cool in Summer: OXRQ Draft Stopper for Bottom of Door can effectively prevent the leakage of air conditioning and heating from escaping during summer and winter. Especially for reducing heat and cooling costs and energy consumption, maintaining good usability for environmental protection. Self-adhesive door draft blocker is very suitable for covering gaps in exterior/interior doors,door bottom, threshold, windows, basement and furniture.
- Easy Installation In Under 1 Minute & Long-Lasting Hold: Door Sweep for Bottom of Door just need a few steps to install on interior and exterior doors within 1 minute. Just: 1) Clean and dry the surface; 2) Measure and cut the strip; 3) Peel and stick. 4)It bonds firmly after 24 hours. (Note: In cold weather, We recommend to using a hair dryer to heat the door draft stopper for 2 minutes before installation.)
- Waterproof & Soundproof Backing Adhesive-Strong Adhesion - Draft Multiple Blocking: OXRQ Door Sweep is specially designed structure not only blocks cold drafts but also effectively Noise-Reducing & making it ideal for bedrooms, offices, or anywhere a quiet environment is needed. It can also well prevent cold drafts, dust, odors, rain, light, and insects from entering.Multi-Purpose & Pet-Friendly.
- Wide Applications to Different Material Doors: 1.96"W x 39" L, seal the gap up to 1.5 inches, multiple sizes to choose from: 1 PACK (39inch), 2 PACK (78inch), 5 PACK, including black, white, brown, gray and transparent colors. Thanks for strong adhesive of OXRQ Door Draft Stopper, It’s ideal for various materials like wood, glass, metal, and plastic for blocking noise, dust, and pests. (Note: the Under Door Draft Stopper may not work well on rough or textured doors.)
How to verify that the repair worked
Operate every repaired door or window several times. Confirm that it closes fully, latches or locks, and does not require abnormal force. Then inspect the seal in daylight and repeat a smoke-pencil check under similar wind conditions. If available, compare blower-door results before and after the work; the test is especially useful for concealed rough-opening leaks.
For a fixed caulk joint, look for a continuous bond at both sides of the crack. For weatherstripping, look for even contact or engagement around the closed perimeter, with no compressed section that prevents closure and no loose section that leaves a bypass. Recheck after the seal has experienced its first temperature cycle and after the product’s full cure or set time.
Air sealing must be balanced with ventilation
Reducing uncontrolled drafts improves comfort, but a tighter home still needs intentional fresh-air ventilation. The DOE’s Consumer Guide to Air Sealing the Home says to consider fresh-air requirements and ventilation for combustion appliances. Sealing work can change pressure relationships, especially in homes with fireplaces, furnaces, boilers, water heaters, or other fuel-burning equipment.
- Do not block a required combustion-air opening or appliance vent.
- If a combustion appliance is located near the work, ask a qualified professional how air-sealing changes could affect draft and backdrafting risk.
- Consider a professional assessment when drafts persist, the home has indoor-air-quality concerns, or the source is hidden in walls or ceilings.
What the measured evidence shows about a concealed gap
DOE Building Science Education cites a study by Oak Ridge National Laboratory’s Buildings Technology Center involving a 3/4-inch rough-opening gap. The reported equivalent leakage area was 28.2 cm²/m² before sealing and 0.5 cm²/m² after sealing from the interior. The DOE page does not state the study year, and the figures describe that tested assembly rather than a guaranteed result for every house. They demonstrate why a concealed jamb-to-framing gap deserves its own air-sealing treatment instead of being dismissed as a cosmetic crack.
When to call a professional
DIY weatherstripping and a small fixed-joint caulk repair are reasonable when the frame is sound, the gap is visible, and the product instructions are clear. Get help when:
- The door or window is out of square, the rough opening is damaged, or the frame moves when the unit operates.
- You cannot determine where the flashing, sill pan, or drainage path carries water.
- Foam has already bowed a jamb or blocked a moving part.
- A blower-door test shows substantial leakage that is not accessible from the room side.
- The work is near a combustion appliance or changes required ventilation openings.
- Moisture, mold, rot, or insect damage is present around the opening.
A professional can combine pressure testing, smoke tracing, and an inspection of the building-envelope layers instead of treating only the most visible crack.
Practical maintenance checklist
- Inspect exterior doors and operable windows at the start of the heating and cooling seasons.
- Look for daylight, torn or brittle weatherstripping, loose fasteners, and compressed sections.
- Clean contact surfaces before installing replacement seals.
- Check that doors latch and windows lock after every adjustment.
- Keep weep holes, tracks, and drainage paths clear.
- Inspect caulk for cracking, shrinkage, or separation at corners.
- Replace a seal when it has lost resilience rather than adding a second strip that prevents closure.
- Recheck rooms with fuel-burning appliances after major air-sealing work.
For technical background, see the U.S. Department of Energy’s guidance on air-sealing essentials, the June 2024 DOE/NREL exterior-door weatherstripping job aid, DOE’s homeowner guide to repairing windows and doors (January 2006, used as a technical reference with current product instructions taking precedence), and DOE Building Science Education’s rough-opening air-sealing guidance.
Quick Recap
Product prices and availability are accurate as of the date/time indicated and are subject to change. Any price and availability information displayed on Amazon at the time of purchase will apply.

