Do these 3 things before closing this tab:
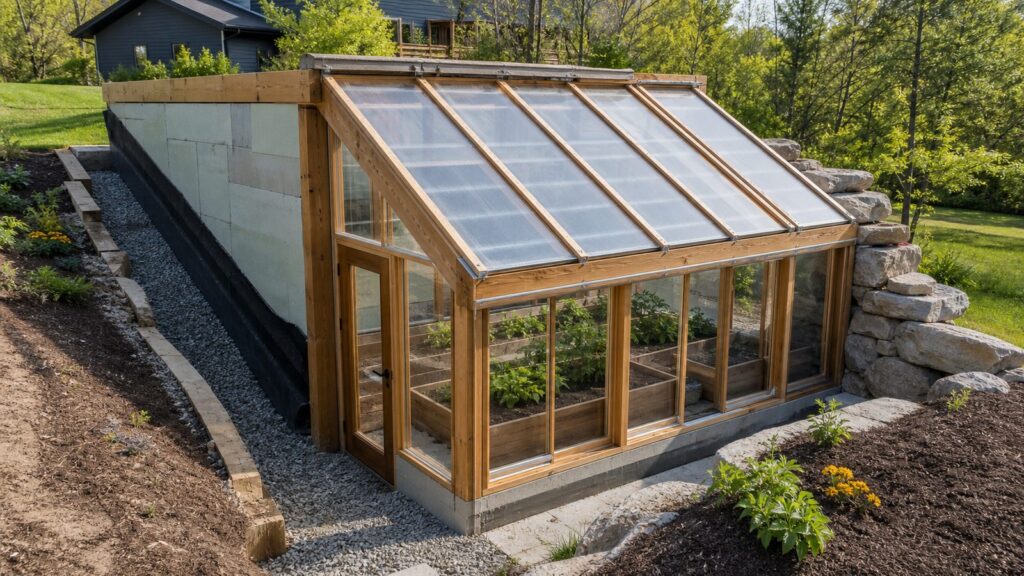
1Fix the driver behind crashes, sound loss and screen glitches2Clear out junk files and repair common Windows errors3Scan for outdated or missing drivers - takes under a minuteA walipini greenhouse is a partially underground, passive-solar growing structure. Done well, it uses the steady temperature of the earth, a south-facing glazed roof, insulated walls, drainage, ventilation, and thermal mass to grow food through more of the year than a simple above-grade bed or hoop house.
Done poorly, it becomes an expensive wet hole.
The internet often describes walipinis as cheap underground greenhouses that can be built for a few hundred dollars. On real residential job sites in the United States, that number usually does not survive the first conversation about excavation, soil, water, retaining walls, safe stairs, roof loads, ventilation, and permits. A small owner-built version can still be economical, but a durable 2026 walipini usually deserves the same planning discipline as a retaining wall, a basement entry, or an accessory structure.
For a practical planning range, expect a small DIY-friendly walipini to land around $25 to $75 per square foot when soil is stable, drainage is simple, access is easy, and most labor is owner-provided. A contractor-built residential walipini commonly falls around $80 to $200+ per square foot, especially with engineered walls, polycarbonate glazing, electrical work, fans, plumbing, sump systems, or difficult excavation access. Those numbers are higher than the myth, but they are realistic enough to prevent rework.
What a Walipini Actually Is
A true walipini is typically set about 4 to 8 feet below grade with a glazed roof facing the winter sun. In the Northern Hemisphere, that usually means the long glazed face points south. The underground portion moderates temperature swings because soil below the frost-affected surface changes temperature more slowly than outdoor air.
Free tools Windows power users keep installed
One-click scans. No signup required.
#1 Best Overall

- Strong Material - 10 pieces of 8 x 4 ft polycarbonate panels, approximately 0.24 inches thick, feature a twin-wall design for outstanding impact resistance, making it withstand hail and falling objects without cracking or breaking, is the perfect material for greenhouses
- Weather Resistant - Greenhouse panels can withstand extreme weather conditions, ranging from -40°C to 120°C, including hurricanes, heavy rainfall, and snow loads. With excellent heat preservation and insulation, they ensure a stable and comfortable environment for plants year-round, extending the growing season
- High Transparency - The polycarbonate roof panels feature highly transparent material with a UV-resistant coating, effectively blocking 99.9% of UV while allowing an 89% light transmission. The double-layer structure diffuses light softly, promoting healthy and robust plant growth
- Easy to Work with - The lightweight greenhouse replacement panels not only save on handling and installation costs but also offer easy cutting without cracking or splintering. Additionally, they can be cold-bent to create curved roofs, making them perfect for DIY garden builders
- Widely Used - Lightweight and clear polycarbonate sheets are ideal for greenhouses, pool roofs, aisle roofs, garden fences, cold frames, aquarium lids, chicken coop roofs, hurricane windows, and more. Combining aesthetics with practicality, they offer versatile solutions for various applications
That does not mean the greenhouse runs itself. Earth sheltering helps, but it does not replace ventilation, drainage, insulation, summer shading, pest control, safe access, or occasional supplemental heat in severe climates. The glazing is still the largest heat-loss surface. Air leaks still matter. Humidity still builds. Snow and wind still load the roof.
Think of the walipini as a small earth-retaining building with a greenhouse roof, not as a garden trench with plastic over it. That mindset changes the design in the right ways.
Start With Site Feasibility Before Choosing a Size
On our job sites, the first question is not, “How big should it be?” It is, “Should this site have one at all?” A walipini is best suited to a sunny, well-drained part of the property with enough grade to move water away. It is a poor fit for flood-prone lots, high-water-table sites, heavy clay without engineered drainage, shaded urban yards, and properties with restrictive HOA rules.
Before sketching the roof angle, check these items:
- Solar exposure: The south-facing glazing needs winter sun from roughly mid-morning to mid-afternoon. Buildings, fences, evergreen trees, and hills can make a site fail even if it looks bright in summer.
- Water table: Verify seasonal groundwater, not just dry-week conditions. A pit that is dry in August can flood in March.
- Soil type: Sand, clay, loam, rock, and fill behave differently. Vertical cuts in poor soil can collapse or push hard against retaining walls.
- Drainage outlet: A gravity daylight drain is best. If water has nowhere legal and practical to go, the project becomes more complicated.
- Equipment access: A compact excavator may need 36 to 60 inches of access, while larger machines need more. Limited access increases labor and spoil-handling cost.
- Utilities: Locate electric, gas, water, sewer, irrigation, communications, and private lines before digging.
- Setbacks and easements: Check property lines, septic areas, drainage easements, utility easements, and HOA restrictions.
If drainage is uncertain, a shallow earth-sheltered or bermed greenhouse is often smarter than a deep 8-foot pit. You can still gain thermal stability from earth contact while reducing the risk of groundwater intrusion and wall pressure.
How Deep Should a Walipini Be?
Most residential walipini concepts fall between 4 and 8 feet deep. The deeper end gives more earth contact and headroom along the north side, but it also increases excavation cost, lateral soil pressure, stair complexity, drainage risk, and permit scrutiny.
A practical homeowner layout might be 10 by 20 feet, 12 by 24 feet, or 14 by 30 feet. For comfortable use, plan at least one central path around 30 to 36 inches wide. If you want to use a wheelbarrow or garden cart, wider is better. Beds along the sides are commonly 24 to 36 inches deep if accessed from one side, or 42 to 48 inches if accessible from both sides.
Depth should be driven by site conditions, not copied from a diagram. In a cold northern climate, frost depth, insulation, and glazing quality may matter more than another foot of excavation. In a wet climate, staying shallower with better perimeter drainage may outperform a deeper structure that constantly fights water.
A Buildable Depth Strategy
For many residential projects, we would rather see a controlled 4- to 6-foot excavation with engineered or well-detailed walls, a reliable drain system, insulated north and end walls, and good glazing than an 8-foot-deep pit with underbuilt walls and no cleanouts. The first version is easier to maintain. The second can become a structural and moisture problem.
Orientation, Roof Angle, and Winter Light
In most of the United States, the long glazed roof should face true south, not magnetic south. A small shift is usually manageable, but the more you rotate away from south, the more winter performance drops. Southeast orientation can warm earlier in the day; southwest can hold afternoon heat. Due south is the usual starting point.
Rank #2

- Polycarbonate Panels: The greenhouse roof panels allow 80% light transmission into the greenhouse, which greatly benefits plant growth. Polycarbonate roof panels are different from traditional iron sheds as they are less prone to water seepage and provide ample sunlight for the plants
- High-Quality Material: The greenhouse replacement panels are made of twinwall polycarbonate material,ensuring the greenhouse remains warm in winter and cool in summer, creating an ideal environment for plants to thrive. The roof panels are resistant to high temperatures, with a working temperature range from -44°C to 120°C
- Strong and Shatterproof: The polycarbonate panels have excellent impact strength and are highly shatterproof, making them sturdy and durable to withstand severe weather conditions and accidental falls that could cause fragmentation
- Easy to Use: The installation of polycarbonate panels is simple. Use a cutter knife or scissors to cut the desired size, remove the adhesive backing before applying, and then stick them in the desired location
Roof angle depends on latitude, snow, framing span, glazing type, and the crops you plan to grow. Many passive-solar greenhouse designs use a steeper winter-oriented glazing angle than a standard shed roof. A common planning approach is to start near the site latitude, then adjust steeper for winter gain and snow shedding. For example, a property around 40 degrees north latitude may land somewhere around a 40- to 55-degree glazing angle after balancing sun, snow, headroom, and materials.
Do not treat that as a universal rule. A roof that is ideal for winter sun may be harder to frame, harder to glaze, and more exposed to wind. A roof that is too shallow may collect snow, leak at laps, and admit less low winter sun.
Keep the winter light path clear. Place taller crops, shelving, water barrels, and masonry mass where they will not shade short winter greens. Thermal mass only helps when sunlight can reach it during the day and when nighttime heat loss is controlled.
Drainage Is the Make-or-Break System
Water is the largest technical risk in walipini greenhouse design. If a normal greenhouse leaks, you patch a roof or redirect a downspout. If an underground greenhouse collects water behind the walls or under the floor, the repair can involve excavation, demolition, pumping, and rebuilding.
A proper drainage plan should include several layers:
- Surface water diversion: Use uphill swales, berms, grading, or drains to keep runoff from flowing toward the greenhouse.
- Roof runoff control: Collect or discharge water from the glazed roof so it does not dump directly behind walls.
- Perimeter drain: Install a French drain or footing drain with free-draining stone and filter fabric where conditions require it.
- Wall waterproofing: Use waterproofing or damp-proofing appropriate to the wall system and soil exposure.
- Drain cleanouts: Include cleanouts so clogged lines can be serviced without digging up the structure.
- Gravity outlet or sump: Daylight drainage is preferred. A sump pump is a fallback when gravity discharge is not possible, but it adds power dependence and maintenance.
For a typical small residential walipini, we would commonly look at 4-inch perforated drain pipe around the perimeter, washed stone, filter fabric, positive slope to daylight where possible, and a separate plan for roof water. Local drainage rules matter. You may not be allowed to discharge concentrated water onto a neighbor’s property, into a septic area, or into certain public systems.
What’s actually slowing this PC down?
Pick the symptom - the matching free tool is one click away.
Retaining Walls Are Not Optional Details
Any vertical or near-vertical soil cut creates lateral pressure. That pressure increases with depth, wet soil, clay expansion, freeze-thaw cycles, nearby driveways, patios, trees, slopes, and structures. Popular walipini articles often understate this part.
Wall options include reinforced concrete, concrete masonry units, pressure-treated timber, insulated concrete forms, earthbags, stone, or hybrid systems. The right answer depends on depth, soil, budget, local code, and how permanent the greenhouse needs to be.
For a contractor-built residential walipini, concrete or reinforced block is often easier to detail, waterproof, inspect, and insure than experimental wall systems. Timber may reduce upfront cost but has moisture and lifespan concerns. Earthbag or natural wall systems may work in some owner-built rural contexts, but permitting and engineering can be harder.
As a rough planning signal, once walls approach typical basement-like depths, or when the cut is near a driveway, patio, slope, tree, or existing foundation, bring in a qualified builder or engineer. The cost of professional design is usually small compared with the cost of rebuilding a failed retaining wall.
Quick wins for a faster PC:
Clear out junk files and repair common Windows errorsFree Scan →Fix the driver behind crashes, sound loss and screen glitchesFind Drivers →Rank #3

- [High Transmittance & UV Protection] Made of optical-grade material, this polycarbonate sheet has over 90% light transmittance. Sunlight slips through easily, giving plants a full "sunbath" for photosynthesis. Its UV-resistant coating blocks 99% of UV rays—no wilting plants, and unlike low-quality greenhouse plastic, it won’t yellow or age.
- [Tough & Long-Lasting] As a top choice for greenhouse panels, it’s made of high-strength polycarbonate. Its impact resistance is 200x that of glass—hail or branches won’t crack this polycarbonate sheet. No frequent replacements like ordinary panels—saves trouble and money, a real "worry-saver" for polycarbonate greenhouse panels.
- [Extreme Weather Resistance] This polycarbonate sheet stands up to harsh weather: -40℃ (no cracking, more frost-resistant than fragile regular greenhouse panels), 120℃ (no softening, unlike heat-prone greenhouse plastic). Rain and sand won’t make it rust or fade. It stays in top shape, guarding inner spaces safely.
- [Versatile Uses] Home – plant shelters, frost-proof veg gardens, coops, aquarium lids, fences; commercial – polycarbonate greenhouse panels, nurseries, workshop skylights, prefab houses; also pool roofs, canopies, aisle roofs, garages, indoor pools. Blends aesthetics, heat preservation, sun protection, insulation; suits all environments.
- [DIY-Friendly] This polycarbonate sheet is lightweight and flexible—unlike heavy glass or bulky traditional greenhouse panels. No pros or heavy tools needed: a utility knife cuts it to size. Build a small shelter or flower stand in 30 mins. Save installation fees, enjoy DIY fun—beginners can even make small polycarbonate greenhouse panels easily!
Glazing: Plastic Film vs Polycarbonate vs Glass
The roof covering determines light, heat loss, durability, maintenance, and storm performance. The cheapest material is rarely the cheapest over the life of the structure.
| Glazing option | Best use | Typical strengths | Common drawbacks |
|---|---|---|---|
| Greenhouse plastic film | Low-budget DIY or seasonal structures | Lowest upfront cost, easy to source, flexible over simple frames | Shorter lifespan, UV degradation, punctures, wind fastening issues, weaker insulation |
| Twin-wall or multiwall polycarbonate | Most durable residential walipinis | Better insulation, impact resistance, lighter than glass, good service life | Higher upfront cost, needs correct fastening, expansion gaps, and sealed channels |
| Glass | Architectural or highly finished builds | Long-lasting, clear appearance, strong light transmission | Heavy, breakable, expensive framing, more safety and code concerns |
For many homeowners, twin-wall or multiwall polycarbonate is the practical middle ground. It costs more than plastic film but improves durability and insulation. Use manufacturer-approved fasteners, closure strips, compatible sealants, and proper overlap details. Plan for panel replacement from the beginning; a roof that requires dismantling half the greenhouse to replace one damaged panel is not serviceable.
Glazing loses heat quickly at night. Insulated curtains, night covers, or better glazing can make a large difference in winter performance. Seal air leaks around doors, vents, panel edges, and transitions between the roof and wall system.
Ventilation, Humidity, and Summer Overheating
Underground does not mean cool enough. A sunny walipini can overheat quickly on a clear day, even in winter. It can also hold too much humidity during cold periods. Greenhouse humidity above roughly 85% increases disease pressure, so passive vents alone may not be enough.
Use a high-low ventilation strategy. Low intake vents bring in cooler air. High exhaust vents release hot, humid air. Add circulation fans to prevent stagnant pockets, especially behind dense plantings and near corners. In warm climates or shoulder seasons, shade cloth may be necessary.
A small walipini may use a combination of manual vents, automatic wax-cylinder vent openers, thermostatically controlled exhaust fans, and small circulation fans. If you add electrical, use proper exterior or damp-location rated components where required, GFCI protection where applicable, and code-compliant wiring methods. Greenhouses are wet, humid environments. Extension-cord solutions do not belong in a permanent installation.
Insulation and Thermal Mass That Actually Work
The ground moderates temperature, but it also conducts heat. Insulate the north wall, end walls, door, rim areas, and exposed foundation edges. In cold climates, exterior rigid insulation may be part of the wall assembly, but it has to be protected from moisture, insects, and damage.
Thermal mass can include masonry, concrete, stone, soil beds, or water barrels. Water is effective because it stores a lot of heat, but it must be placed where sun can reach it and where it does not block the winter light path. Dark-colored barrels along the north wall are common because they collect solar heat without shading the primary beds as much.
The Tool Desk
Outbyte PC Repair FREEClear out junk files and repair common Windows errorsFree Scan →Outbyte Driver Updater FREEFix the driver behind crashes, sound loss and screen glitchesFind Drivers →Thermal mass is not a magic heater. It stores daytime surplus and releases it later. If several cloudy days pass, or if the glazing leaks heat all night, the mass cannot create energy that never entered the structure. In colder regions, plan for backup heat if you want tender crops to survive hard freezes.
Realistic 2026 Cost Planning
A national residential greenhouse benchmark in 2026 is about $11,000 average, with a typical broad range of $2,000 to $25,000. Simple DIY hoop or greenhouse projects can start around $1,000 to $2,000. Walipinis often cost more than basic above-grade kits because they add excavation, drainage, waterproofing, retaining walls, stairs, and more complex roof detailing.
Rank #4

- 80% Light Transmission: With 80% transparency, these roof panels allow ample light while blocking 98% of UV-rays, preventing overheating and supporting stable, plant-friendly temperatures year-round.
- Durable Construction: Heavy-duty double-layer honeycomb design with a weight of ≥1.2 kg/m² and 0.16-inch thickness resists damage from hail and heavy falling objects, ensuring long-lasting protection.
- High & Low Temperature Resistant: Designed for -40°C to 120°C environments, these greenhouse panels endure extreme weather, providing warmth in winter and heat resistance in summer, withstanding rain, snow, and typhoon conditions without cracking or erosion.
- Easy to Cut and Bend: Lightweight and flexible, the clear roofing panels are easy to cut or bend for installation in high or curved spaces, adapting to various settings.
- Wide Coverage: Each set includes 24 panels, covering up to 189.1 sq. ft., making it ideal for greenhouses, garages, and walkways with adjustable quantities for any space, ensuring you have the flexibility to customize coverage to perfectly fit your project’s needs.
Use these numbers for early planning, then price your local site:
| Project type | 2026 planning range | What it usually includes |
|---|---|---|
| Simple DIY above-grade hoop or greenhouse | $1,000-$2,000+ | Light frame, plastic covering, minimal site work, owner labor |
| Small DIY-friendly walipini | $25-$75 per sq ft | Basic excavation, simple drainage, owner labor, modest framing and glazing |
| Contractor-built residential walipini | $80-$200+ per sq ft | Excavation, spoil handling, drainage, waterproofing, retaining walls, polycarbonate, access, vents, possible utilities |
| Simple commercial greenhouse reference range | $6-$10 per sq ft | Basic commercial structure, usually above grade and not comparable to a buried residential build |
| More sophisticated commercial greenhouse systems | $15-$50+ per sq ft | Larger structures, improved systems, controls, stronger coverings, more infrastructure |
For example, a 12 by 24-foot walipini has 288 square feet. At $25 to $75 per square foot, a DIY-heavy version might plan around $7,200 to $21,600. At $80 to $200+ per square foot, a contractor-built version might run around $23,040 to $57,600+. Those are planning ranges, not bids, but they are far more useful than pretending the structure is only a roll of plastic and a weekend of digging.
Crashes, No Sound, or Screen Glitches?
Random freezes, missing sound and display glitches usually trace back to one bad driver. Find and replace yours safely.Free scan · under a minutePC Slower Than It Used to Be?
A free scan shows the junk files, broken settings and background clutter dragging Windows down - then fixes them in one click.Free scan · Windows 10 & 11Major cost drivers include excavation depth, equipment access, soil type, groundwater, wall height, frost depth, snow and wind loads, glazing choice, insulation level, grading, drainage outlet, utilities, automation, local labor rates, engineering, and permits. Carry a 15% to 25% contingency. Subsurface surprises are common, and water management changes can move the budget quickly.
Permits, Codes, and Safety
Permit rules vary by city and county. The adopted residential or building code also varies by jurisdiction, but common triggers include accessory structure rules, retaining walls, excavation safety, setbacks, glazing, electrical work, plumbing, stairs, guards, drainage, and structural roof loads.
Do not assume “greenhouse” means “no permit.” Some locations exempt small temporary structures under a certain size, while others regulate permanent foundations, retaining walls over a certain height, electrical installations, stormwater discharge, or structures close to property lines. If the walipini has retaining walls, a fixed roof, electrical service, plumbing, or a deep excavation, call the building department before digging.
Safety details matter. Provide stable stairs or a ramp, a door that operates reliably in winter, non-slip walking surfaces, adequate headroom, safe glazing overhead, and a way out that does not depend on climbing over beds. If older family members will use the greenhouse, consider wider paths, lower thresholds, handrails, and a shallower bermed design instead of a deep stairwell.
Also think about radon and soil gas in regions where that is a concern. An earth-sheltered structure can trap soil gases if it is tightly enclosed and poorly ventilated. Good air exchange is part of both plant health and occupant safety.
Independent reader supportYour contribution helps us test, update, and keep practical guides available for everyone.When to DIY vs When to Hire a Pro
A walipini can be a satisfying owner-built project when the site is simple and the design is modest. It can also cross into professional territory quickly. The dividing line is usually water, walls, and utilities.
DIY Is More Reasonable When
- The site is sunny, well-drained, and not in a low spot.
- The excavation is shallow, typically around 4 feet or less.
- There is a clear gravity drainage route.
- No tall retaining walls are required.
- You are using a simple, serviceable frame and glazing system.
- No permanent electrical or plumbing work is involved.
- Local rules clearly allow the structure or the permit path is simple.
Hire a Pro When
- The walipini is 5 to 8 feet deep.
- The site has clay soil, groundwater, fill, slope, or poor drainage.
- Walls retain significant soil or sit near loads such as driveways, patios, buildings, or large trees.
- The roof must be designed for meaningful snow or wind loads.
- You need electrical, fans, sump pumps, lighting, irrigation, or heating.
- The building department requires stamped drawings or inspections.
- You want a permanent structure that should last decades, not seasons.
A preconstruction consult with a builder, excavation contractor, or engineer can save a project. The cheapest walipini is the one that does not need to be pumped out, regraded, reframed, or rebuilt after the first storm season.
A Practical Build Sequence
A well-run walipini project follows a sequence. Skipping steps is where budgets get hurt.
Recommended Free Tools
Best Value

- 8 LARGE-FORMAT PANELS – Includes eight translucent panels, each measuring approximately 8 x 4 ft and covering 32 sq. ft. Provides up to 256 sq. ft. of total coverage before trimming, overlap or installation waste.
- MORE COVERAGE, FEWER SEAMS – Each 8 x 4 ft sheet covers four times the area of a 4 x 2 ft panel, helping reduce joints, connectors and repeated cuts across large greenhouse roofs and sidewalls.
- 6MM TWIN-WALL INSULATION – The 0.24 in (6mm) fluted structure provides added rigidity and helps slow heat transfer. These are non-structural covering panels and require proper framing, support spacing and secure installation.
- ONE-SIDE UV PROTECTION – The UV-coated side maintains natural light transmission while helping block harmful UV rays. Install the marked UV side facing the sun. Translucent panels diffuse light but are not glass-clear.
- EASY TO FABRICATE – Cut and drill with common everyday tools for use by DIYers and contractors. Impact-resistant polycarbonate resin offers ASTM E84 Class A material performance for greenhouses, porch enclosures and garden shelters.
- Confirm feasibility. Check sun, soil, water, access, utilities, setbacks, and drainage.
- Set performance goals. Decide whether you want season extension, winter greens, citrus protection, seed starting, or year-round production. Each goal changes heat and ventilation needs.
- Choose dimensions. Start with bed layout and access, then size the structure around the way it will be used.
- Design drainage. Plan surface diversion, roof runoff, perimeter drains, cleanouts, waterproofing, and discharge.
- Design walls and roof. Match retaining walls and framing to soil, depth, span, snow, wind, and glazing.
- Check permits. Confirm requirements before excavation.
- Excavate and manage spoil. Stockpile usable soil safely and keep equipment away from unsupported edges.
- Build drainage and walls. Install drain components while access is open. Waterproof before backfill.
- Frame and glaze the roof. Use proper flashing, fasteners, overlaps, and panel support.
- Add ventilation, access, and systems. Install vents, fans, doors, stairs, irrigation, electrical, and monitoring.
- Test before planting heavily. Watch temperature, humidity, leaks, and drainage through several weather events.
Plan on several weekends for a small DIY version after design and permitting are handled. A contractor-built project may take 2 to 6 weeks on site depending on excavation, concrete or masonry scheduling, utility work, inspections, and glazing lead times. Weather can stretch both timelines.
Common Walipini Mistakes to Avoid
The biggest mistake is building in the wrong place. A low spot or high-water-table area can turn the greenhouse into a cistern after heavy rain. The second mistake is cutting vertical soil walls and assuming they will stand because they looked solid on day one. Soil changes when wet, frozen, dried, loaded, or disturbed.
Other common problems include copying a generic roof angle, using cheap plastic without planning replacement cycles, undersizing vents, ignoring summer overheating, omitting drain cleanouts, and placing thermal mass where it shades the crops that need winter light. We also see people forget ordinary use: there is no room for carts, compost, repairs, seed trays, fans, or safe movement.
Pest exclusion deserves attention too. Gaps at vents, doors, roof edges, and drain outlets can invite rodents and insects. Use hardware cloth, tight door sweeps, screened vents, and maintainable seals. A walipini is harder to clean out than an above-grade hoop house once pests settle in.
Is a Walipini Worth It?
A walipini is worth considering if your property has strong winter sun, good drainage, manageable excavation access, and you want a long-term growing structure rather than a temporary seasonal cover. It is especially appealing for homeowners who value passive design, protected winter production, and a greenhouse that visually sits lower in the landscape.
It is not the right answer for every yard. If the site is wet, shaded, tight, heavily regulated, or difficult to excavate, an above-grade greenhouse, high tunnel, attached sunspace, or bermed greenhouse may be the better investment. Those options can be easier to permit, easier to ventilate, easier to repair, and less risky around groundwater.
The best walipini designs are not extreme. They are dry, accessible, well-drained, insulated where it counts, ventilated from low to high, glazed with serviceable materials, and sized for the way the owner actually gardens. Underground growing gets much easier when the structure is designed first as a building and second as a garden feature.
Frequently Asked Questions
What is a walipini greenhouse and how does it work?
A walipini is a partially underground passive-solar greenhouse. The earth moderates temperature swings, while south-facing glazing captures winter sun. Insulated walls, drainage, ventilation, and thermal mass help keep the growing space usable through more of the year.
Recommended Free Tools
How deep should a walipini greenhouse be?
Most true walipinis are about 4 to 8 feet below grade, but deeper is not always better. For many residential sites, a 4- to 6-foot-deep or shallow bermed design is more buildable and less risky than a deep pit, especially where drainage is uncertain.
How much does a walipini greenhouse cost in 2026?
A small DIY-friendly walipini commonly budgets around $25 to $75 per square foot. A contractor-built residential walipini is more often $80 to $200+ per square foot once excavation, drainage, retaining walls, glazing, access, ventilation, utilities, and permits are included.
Do you need a permit to build an underground greenhouse?
Often, yes. Requirements vary locally, but retaining walls, excavations, fixed roofs, setbacks, electrical work, plumbing, drainage discharge, stairs, and structural loads can all trigger permits or inspections. Check with the local building department before digging.
What direction should a walipini face in the United States?
In most U.S. locations, the long glazed face should point toward true south to capture low winter sun. The final orientation should also account for shade from trees, fences, neighboring buildings, hills, and the property’s drainage pattern.
Free tools Windows power users keep installed
One-click scans. No signup required.
How do you keep a walipini greenhouse from flooding?
Choose a well-drained site, avoid low spots, verify the seasonal water table, divert uphill runoff, control roof runoff, install perimeter drainage with cleanouts, waterproof the walls, and use a gravity outlet where possible. A sump pump may be needed when gravity drainage is impossible.
Quick Recap
Product prices and availability are accurate as of the date/time indicated and are subject to change. Any price and availability information displayed on Amazon at the time of purchase will apply.