Do these 3 things before closing this tab:
1Scan for outdated or missing drivers - takes under a minute2Repair Windows errors before they cause bigger problems3Fix the driver behind crashes, sound loss and screen glitchesYes, an old PC case fan can generate electricity when its rotor is spun by moving air. The result is a useful proof-of-concept: enough to produce a measurable voltage or possibly illuminate an LED. It is not a practical phone charger, computer power source, or household wind turbine.
The “10 minutes” estimate is a best-case scenario for a compatible fan and someone who already has a soldering iron, wire cutters, and a multimeter. Opening the hub, identifying the winding connections, and reassembling the bearing can take longer—and the modification is not universal to every PC fan.
As an Amazon Associate I earn from qualifying purchases.
What you are actually building
You will convert a compatible brushless DC case fan into a small generator by removing or bypassing its electronic motor controller. The modified fan produces a variable electrical output from its motor windings when the rotor is driven by hand or by moving air.
A simple test circuit looks like this:
Modified fan → LED and series resistor
             or
Modified fan → multimeter
For a more advanced version, the output can feed a rectifier, smoothing capacitor, and regulated converter. That does not create more energy; it only makes a small, irregular output easier to use.
#1 Best Overall

- Designed Beginner Kit:6 Pcs mini Generator motor,6 Pcs Motor Mounting Bracket Holder,6 Pcs 2mm Shaft Propeller(3 Pcs 4 Vanes and 3 Pcs 3 Vanes,Color random),9 Pcs LED(Red,Yellow,Green),6 Pcs Quick Connector,Color English Manual
- Different voltage corresponds to different speed, Voltage:DC 3V;Rated Speed:1500 RPM;Voltage:DC 4.5V;Rated Speed:2500 RPM;Voltage:DC 12V;Rated Speed:6500 RPM;Motor Body Diameter:24mm/0.94";Motor Height:22.21mm/0.87";Shaft Size:8.25x2.0mm/0.32"x0.08";Line length:14cm/5.51in
- This is a multi-functional beginner's Kit. It can be driven by wind, gears and pulleys to generate current to light up LEDs. It can also be driven by solar panels or batteries to make various solar and electric toys.
- Using the parts in our kit, you can assemble a simple wind power generation model, which can be used to test whether the motor in the kit is damaged, and it can also explain how wind energy is converted into electrical energy, which is then converted into light energy through LEDs.
- Warning: If you have purchased a rocker switch, please pay attention to the product picture to avoid short circuit caused by wrong wiring. High temperature will cause the battery box to melt. Children should use it under the supervision of an adult. When you are not using it, please disconnect the power supply.
Choose the right fan first
The best donor is a typical 5 V or 12 V desktop or server case fan with a relatively large, accessible hub—an 80 mm, 92 mm, 120 mm, or 140 mm model is usually easier to work on than a miniature fan.
- Choose a fan with a rotor that spins freely and does not scrape.
- Prefer a conventional brushless case fan over a sealed laptop blower.
- Look for a hub large enough to open without damaging the coil assembly.
- A printed 5 V or 12 V rating is the fan’s normal motor-drive rating, not a guaranteed generator output.
- Two-, three-, and four-wire fans can have different internal layouts. Wire colours and connector conventions are not reliable substitutes for tracing the circuit.
Computer-style fans use permanent-magnet brushless motors, but their controllers and winding arrangements vary. TI’s 5 V, 12 V, and laptop-fan reference designs illustrate that these are not electrically identical designs: 5 V BLDC fan reference design, 12 V BLDC fan reference design, and laptop-fan reference design.
Why a fan can become a generator
The fan’s rotor contains permanent magnets and the stationary part contains coils. During normal operation, the onboard electronics switch current through those coils in sequence, creating a rotating magnetic field that drives the rotor.
When you mechanically spin the rotor instead, its changing magnetic field induces a voltage in the coils. This is the same motor-generator principle used in larger machines. Generated back EMF increases with rotational speed, as described in Texas Instruments’ motor back-EMF explanation.
There is an important catch: a multimeter may show a noticeable open-circuit voltage even though the fan can supply very little current. Connecting a load creates opposing electromagnetic torque, which slows the rotor and usually reduces the voltage. The U.S. Department of Energy’s wind-turbine teaching material explains this load effect: DOE wind-turbine classroom material.
Tools and materials
- Old PC case fan
- Fine-tip, temperature-controlled soldering iron
- Solder and flux
- Small screwdriver or pick
- Side cutters or desoldering tool
- Two short hookup wires
- Digital multimeter
- LED and suitable series resistor
- Safety glasses
- Optional: alligator clips, heat-shrink tubing, electrical tape, hot glue, bridge rectifier, and capacitor
Step-by-step conversion
1. Inspect and document the fan
Read the label, note the original wire connections, and photograph the PCB before opening the fan. Check that the rotor turns smoothly and that the bearings do not have excessive play.
Rank #2

- Wind-Powered LED Light Display: This small wind-mill generator powers a 10-meter colorful tape lights used to decorate the backyard. Mount it in an open place and the colorful tape lights will light up with the wind without batteries or external power supply. The brightness of the tape lights varies with the strength of the wind. The stronger the wind, the brighter the lights. Add a touch of dynamic color to your backyard on windy evenings. It needs to be installed in an open area for better performance
- Interactive Backyard Experience: Assemble this small wind-mill generator and fix it in an open space, making wind power practical in your yard. You will watch the strip lit up on every windy night, which is fun
- Durable Construction and Easy Installation: Most of its parts are DIY assembled. It can withstand super strong winds. It can be fixed to your railings, higher places, or other open areas with the complimentary flange and 4 screws. The use of brushless motor makes the windmill rather durable. The blades are made of anti-aging materials of ASA/PC
- All-Weather Durability: It is rain-proof and age-resistant, and can be used outdoors for a long time. Further, it is noise-free. A wind blowing from any direction can be used efficiently as the tail vane enables the blades adapt themselves to different directions
- Simple Assembly and Smart Design: It needs to be installed in an open area for better performance. It is cleverly designed and constructed, and is easy to assemble with straightforward instructions for quick setup
Do not assume that red is positive, black is ground, or that the extra wires are generator outputs. Three- and four-wire fans commonly include tachometer or PWM-control connections, but the exact pinout varies.
Recommended Free Tools
2. Remove the rear label
Carefully peel back the label on the rear of the hub. Under it, you should find the shaft retainer, often a small plastic washer or clip.
3. Remove the shaft retainer
Use a small pick or screwdriver to remove the retainer without bending or breaking it. Keep the retainer, washer, and any bearing parts together. The rotor must be secured again later; a damaged retainer can allow it to rub, detach, or fly out during testing.
4. Open the hub and identify the controller
Gently pull the rotor from the stator assembly and locate the small controller PCB. The controller electronically commutates the motor windings during normal fan operation. Driver information from TI, including the DRV10866 and DRV10975, shows why a normal brushless fan is not simply a two-wire DC motor.
Before removing anything, identify the winding terminals and determine whether they are accessible. Stop if the board is potted, the traces cannot be followed, or the design does not resemble the documented conversion.
The Tool Desk
Outbyte PC Repair FREERepair Windows errors before they cause bigger problemsFix Now →Outbyte Driver Updater FREEFix the driver behind crashes, sound loss and screen glitchesFind Drivers →5. Remove or bypass the controller only when the wiring is clear
In the particular fan documented by the original project, the controller IC was desoldered and the external output wires were connected to accessible winding terminals arranged in series. See the original conversion example and its related Hackster project description.
Rank #3
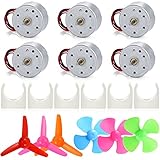
- Designed Beginner Kit: 6 PCS mini dc motor, 6 PCS Motor Mounting Bracket Holder and 3 PCS different colors 4 Vanes shaft propellers and 3 PCS 3 Vanes shaft propellers
- Parameter: Different voltages correspond to different speeds. Voltage: DC 3V, rated speed: 1500 RPM, voltage: DC 4.5V, rated speed: 2500 RPM, voltage: DC 12V, rated speed: 6500 RPM. Color: silver. Motor Body Diameter: 24mm/0.94"
- Two-way Conversion: When the bearing rotates, it generates electricity, when receiving power, the bearing will rotate. This mini wind generator set enables the conversion of kinetic and electrical energy
- Good Present: This learning toy is good for curious kids, let the children know the driving principle of the motor, how the propeller rotates to produce wind. Cultivate children's practical ability, so that knowledge is no longer theoretical
- Warning: Suitable for 8+ years, please see the picture carefully, use the correct circuit diagram to avoid short circuit, short circuit will produce high temperature and cause the battery holder case to melt and burned, the kids must use under the supervision of adults
Treat that as one wiring example, not a universal instruction to remove one chip from every fan. On another model, removing the wrong component can break a coil connection or damage a winding trace. Desolder only the components that interfere with the clearly identified winding connections, then attach two insulated output wires and cover exposed joints with heat-shrink or tape.
6. Reassemble the rotor
- Reinsert the rotor carefully.
- Replace the washer or shaft retainer.
- Turn the rotor by hand and confirm that it spins freely without rubbing.
- Replace the label or cover the opening with tape.
- Secure the fan frame before applying airflow.
Test the generator
Measure open-circuit voltage
- Set the multimeter to voltage. Start with DC voltage; if the reading is unstable or very low, try AC voltage as well.
- Connect the probes across the two output wires.
- Spin the rotor by hand, or place the fan in front of a separate electric fan.
- Reverse the probes if the meter displays a negative sign.
- Record the reading at several airflow levels.
The voltage will vary with speed and may be alternating, pulsating, or otherwise unlike clean regulated DC. A brief no-load voltage spike is not evidence of useful power.
Try an LED load
Connect an LED through a series resistor rather than directly across the generator. The LED may flicker as the rotor speed changes. If it remains dark, reverse its polarity or use a suitable rectifier arrangement. LED brightness demonstrates that some electrical output is present, but it does not measure the available power.
Free tools Windows power users keep installed
One-click scans. No signup required.
Measure useful output more honestly
For a repeatable test, connect a known resistor and measure the voltage across it:
I ≈ V / R
P ≈ V2 / R
Alternatively, measure voltage and current and calculate:
P = V × ILabel every result with the specific fan, airflow source, rotor speed or test method, and load resistance. There is no universal output voltage, wattage, efficiency, or startup wind speed for converted PC fans. The documented projects demonstrate voltage and LED illumination but do not establish standardized power performance.
Rank #4
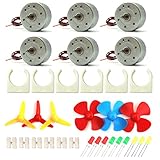
- Color:Silver;Voltage:DC 3V;Rated Speed:1500 RPM;Voltage:DC 4.5V;Rated Speed:2500 RPM;Voltage:DC 12V;Rated Speed:6500 RPM;
- Motor Body Diameter:24mm/0.94";Motor Height:22.21mm/0.87"Shaft Size:8.25x2.0mm/0.32"x0.08";Line length:14cm/5.51in±1cm
- Great fun Motor,perfect for mini fan,electric toys and science experiments etc.
- You can use it to build a micro motor wind turbine generator or Wind Turbine Generator.hand-cranked generator model, solar power model.
- Package includes: 6 pcs Generator DC Motor ; 6 pcs Motor Mounting Bracket Holder;3 pcs 4 vanes propeller;3 pcs 3 vanes propeller;9 pcs mini LED;6 pcs connectors(Does not contain other things)
Optional output conditioning
If you want to power a small defined circuit rather than an LED, a typical signal path is:
What’s actually slowing this PC down?
Pick the symptom - the matching free tool is one click away.
Fan windings → rectifier → smoothing capacitor → regulator or converter → load- A rectifier converts suitable alternating or multiphase output into a usable polarity, but diode losses may consume a significant fraction of a tiny output.
- A capacitor smooths the pulses and can briefly raise the no-load voltage. It can also create a transient, so check voltage ratings.
- A boost converter can trade lower current for higher voltage. It cannot create energy and may fail to start if the generator cannot meet its minimum input voltage or startup current.
- A rechargeable battery needs a chemistry-specific charge controller, voltage and current limits, reverse-current protection, and appropriate safety protections.
For example, Adafruit’s PowerBoost 500 is a low-voltage boost-converter board described as accepting about 1.8 V or more and producing approximately 5.2 V, with a 500 mA-class capability. It is not a wind-turbine controller or a lithium-ion battery charger.
Troubleshooting
| Symptom | Likely cause | What to do |
|---|---|---|
| No voltage | Controller remains in circuit, wrong terminals, broken winding, or insufficient speed | Check continuity, inspect solder joints, try AC measurement, and verify the winding connections |
| Rotor rubs | Retainer, washer, or bearing parts were misassembled | Reopen the hub and reseat the parts before spinning it faster |
| LED stays dark | Wrong polarity, wrong terminals, or inadequate speed | Reverse the LED, check the resistor and continuity, and test with a meter |
| Voltage collapses under load | The generator can produce voltage but very little current | Use a lighter load and treat the project as a demonstration |
| Meter reading is unstable | Variable speed or pulsating/alternating output | Compare AC and DC ranges and test with a resistor load |
| Fan behaves differently from the example | Different brushless topology or controller layout | Do not copy the wiring blindly; trace the board or use another fan |
Can it charge a phone?
Not directly, and generally not usefully. A phone expects a regulated USB supply with enough current. This project provides an irregular, load-dependent output from a small rotor whose available power has not been established.
A usable charging system would require measured power, rectification where appropriate, voltage regulation, energy storage, and a proper charging controller. It would also need enough airflow to overcome the fan’s mechanical and electrical losses. A boost converter alone does not solve those requirements.
If an electric household fan provides the airflow, the demonstration consumes more electricity than it recovers. It is useful for a controlled experiment, not free or net-positive energy.
Crashes, No Sound, or Screen Glitches?
Random freezes, missing sound and display glitches usually trace back to one bad driver. Find and replace yours safely.Free scan · under a minuteWindows Errors? Fix Them Before They Spread
Repair common Windows errors and clear accumulated junk for a smoother, more stable PC - no reinstall needed.Free scan · no reinstallQuick Recap
Easier alternatives
- Brushed DC motor: Usually simpler to use as a generator because it does not require bypassing an electronic commutator.
- Purpose-built hobby generator: Better when you need known voltage, mounting options, or repeatable results.
- Educational renewable-energy kit: A supported option for classrooms or structured experiments. For example, DFRobot’s Renewable Energy Power Station Kit includes wind and solar components, storage, and voltage detection.
- Unmodified PC fan: It can remain useful for airflow, anemometer, or motor-control experiments without risking the fan electronics.
Product prices and availability are accurate as of the date/time indicated and are subject to change. Any price and availability information displayed on Amazon at the time of purchase will apply.

