Free tools Windows power users keep installed
One-click scans. No signup required.
Push water through one syringe and the pressure moves a second syringe. Connect the second plunger to a lever, claw, lift, or arm and you have a simple hydraulic actuator—the same basic principle used at a much larger scale in construction equipment.
This guide shows how to build a leak-free two-syringe hydraulic system, turn it into a simple moving model, improve its lifting ability, and troubleshoot weak or jerky movement. It is a tabletop demonstration, not a miniature excavator capable of industrial work.
As an Amazon Associate I earn from qualifying purchases.
How syringe hydraulics work
A basic syringe hydraulic system has five parts:
- A driver syringe that you push or pull.
- A working syringe whose plunger moves the mechanism.
- Flexible tubing connecting the syringe outlets.
- Water or another compatible liquid.
- Sealed connections with as little trapped air as possible.
When you push the driver plunger, it applies pressure to the confined water. That pressure travels through the tubing and pushes the working plunger outward. Pulling the driver back can retract the working plunger if the linkage, spring, gravity, or a second actuator provides a return force.
This is an example of Pascal’s principle: pressure applied to a confined liquid is transmitted through the liquid.
#1 Best Overall

- BUILD WORKING ROBOTS: Teach your kids mechanical engineering in a way they can't resist! Designed for kids 12+, this kit will guide your learner through the process of building real, working robots - taught in a way that they'll understand!
- POWERED BY WATER: Use the power of hydraulics to harness and control the Hydrobot! The arm includes 6 different axes and can rotate up to 270 degrees - no batteries required
- MOVES, ROTATES & GRABS: Use the levers to control the gripper which can open and close or be replaced with suction components to pick up objects
- NOT JUST ROBOTICS: With our Teach Tech Kits, the learning doesn't just stop at robotics. Teach Tech instructions are specifically designed to develop problem solving skills, analytical thinking and curiosity in young minds
- Hands-on Building: This is an in-depth STEM building project, not a pre-assembled toy. Follow the detailed step-by-step assembly instructions, take time to ensure proper assembly, and enjoy a true STEM experience. Expect multiple hours of build time.
The ideal relationships are:
P = F / A
F₂ / F₁ = A₂ / A₁
A₁d₁ ≈ A₂d₂
P is pressure, F is force, A is piston area, and d is piston travel. A larger output syringe can produce more force, but it moves a shorter distance for the same amount of water. A smaller output syringe moves farther but produces less force. Matching syringes provide roughly one-to-one force and travel, before friction, leakage, trapped air, and mechanical losses are considered.
Hydraulics do not create free force or energy. They trade input distance and speed for output force, just as a lever does.
What you need
Two-syringe demonstrator
- Two matching blunt plastic syringes.
- Flexible tubing that fits tightly over or into both syringe outlets.
- Clean water.
- A cup or tray for spills.
- Optional food coloring.
- Optional clamps, tape, or cable ties.
Use syringes as craft components only. Do not attach needles, and never use project syringes for medical purposes.
Do these 3 things before closing this tab:
1Repair Windows errors before they cause bigger problems2Fix the driver behind crashes, sound loss and screen glitches3Clear out junk files and repair common Windows errorsFor a moving model
- Cardboard, foam board, craft sticks, or thin plywood.
- Skewers, bolts, or drinking straws for pivots.
- Tape, hot glue, or craft glue.
- Additional syringe-and-tube pairs for additional movements.
- A cardboard claw, scoop, platform, or lifting arm.
- Rubber bands or small springs where a return stroke is needed.
The original 2017 Hackaday project used clear vinyl tubing and paired syringes as actuators in a toy excavator or robotic arm. Its more advanced version added 12-volt motors, bolts, and nuts to drive the syringe plungers. That project is a showcase rather than a complete dimensioned beginner build, so the hand-operated version below is the better starting point.
Build a two-syringe hydraulic actuator
1. Check the fit
- Push and pull both plungers. They should move smoothly without sticking badly.
- Fit the tubing to both outlets.
- Check that each connection is snug.
- Make sure the tube is not kinked, crushed, or so narrow that it blocks flow.
Tubing compatibility matters more than having a particular nominal diameter. The connection must seal without cracking the syringe tip or stretching the tube so far that it slips off.
2. Fill the line with water
- Fill one syringe with water.
- Hold its outlet upward and tap the barrel to release visible bubbles.
- Push water through the tubing until the line is full.
- Connect the second syringe while water is present at the outlet.
- Cycle both plungers slowly to move remaining bubbles toward one end.
- Disconnect and refill if a large air pocket remains in the middle of the tube.
A small bubble may be tolerable in a toy model, but a large bubble makes the system feel springy. Air compresses before the working plunger moves, causing delay and poor positional control. Water is the simplest default because it is inexpensive and easy to clean, not because every possible fluid is suitable for every syringe and tube.
Rank #2
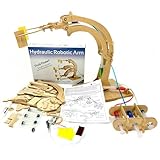
- WHAT IS IT? Construct a hydraulic robotic arm with this diy wooden building kit for kids. Complete with all necessary components, this STEM kit provides hands-on mechancial enginerring experience in building a mechancial robotic arm capable of lifting, manipulating, and rotating objects up to 90 degrees. Perfect for educational fun, it’s also an engaging office desk toy.
- HOW LONG DOES IT TAKE? Assembling the Robotic arm takes around 45-60 minutes, depending on the young builder’s experience. This STEM toy transforms science into a fun, interactive learning experience for kids.
- Discover the fundamentals of hydraulics, engineering, and assembly. This kit demonstrates how water can power a machine, offering insights into fluid dynamics and mechanical functions. It's a fantastic way to explore STEM concepts while building a functional robot arm
- WHO IS IT IDEAL FOR? Designed for kids aged 8-14 who love hands-on projects and problem-solving. It’s a great gift for birthdays and ideal for budding engineers, both boys and girls. Also enjoyable for adults as a unique desk toy or hobby project
- QUALITY AND MATERIAL? We only make high quality educational toys that are made from fsc natural untreated wood, non toxic and comply with and pass the ASTM toy safety standards for childrens toys
3. Test the actuator
Hold one syringe body stationary and push its plunger. The second plunger should extend. Pull the driver back and check whether the working plunger retracts. If it does not, the second syringe may need a spring, rubber band, gravity-assisted linkage, or a design that actively pushes and pulls it.
What’s actually slowing this PC down?
Pick the symptom - the matching free tool is one click away.
4. Secure the working syringe
Tape or clamp the working syringe body to a rigid part of the model. The syringe body is the fixed cylinder; its plunger rod is the moving link. Do not allow the body to slide when pressure is applied.
Turn the actuator into a moving model
Start with one motion rather than attempting a complete excavator immediately. A hinged flap, lifting platform, cardboard claw, scoop, or one-joint boom can all demonstrate the principle.
Make a pivot by passing a skewer or bolt through two aligned holes. Attach the working plunger to the moving section with tape, wire, a small screw, or a simple cardboard clevis. Keep the plunger aligned with its push-pull direction. Side loading can make it stick, damage the seal, or bend the syringe tip.
Actuator position changes the result:
- Attach it close to the pivot for greater lifting force and less movement.
- Attach it farther from the pivot for greater movement and less lifting force.
- Keep the load close to the pivot when testing.
- Support the syringe body firmly and reinforce flexible cardboard.
A long arm or scoop can defeat a working hydraulic pair because the load acts through a large lever. Frame flex, rough pivots, and tubing pulling against the joint can waste more force than the hydraulic system itself.
Quick wins for a faster PC:
Scan for outdated or missing drivers - takes under a minuteDriver Scan →Clear out junk files and repair common Windows errorsFree Scan →Fix the driver behind crashes, sound loss and screen glitchesFind Drivers →Design choices that change performance
| Design choice | Likely result |
|---|---|
| Larger output syringe | More output force, less output travel |
| Smaller output syringe | More output travel, less output force |
| Matching syringes | Simple, predictable movement with approximately one-to-one travel |
| Longer lever arm | More movement, less lifting force |
| Shorter lever arm | Less movement, more lifting force |
| More air in the tubing | Softer, delayed, less precise response |
| Better-sealed tubing | Firmer and more responsive movement |
| Smoother pivots | Less wasted force and less jerky motion |
Using a small driver syringe with a larger working syringe demonstrates force multiplication. The cost is output travel: the driver must move farther, or be pumped through more strokes, to supply the larger syringe’s volume.
Rank #3

- 3-in-1 STEM Adventure: Build 4-Jaw Grab Bucket, Suction Cup and Tongs Grab with one hydraulic robot arm kit—no batteries, motors or glue required! Perfect for ages 8+ to explore engineering, physics and creativity
- Brain-Boosting Fun for Curious Kids: Boost problem-solving skills, focus and STEM knowledge through hands-on assembly (3-5 hours). Ideal for classrooms, playrooms or family bonding—wherever kids love to tinker
- Ambidextrous & Ultra-Safe Design: Kid-friendly, non-toxic materials and intuitive building pieces make this robotic arm a worry-free gift for birthdays, holidays or budding engineers aged 7-12
- Outsmart Screen Time: Inspired by classic erector sets but cooler—hydraulic power teaches mechanics effortlessly. Watch kids beam with pride as they lift, grip and learn like real scientists
- Gift for Future Innovators: Crush the competition with our 3-in-1 versatility and focus on STEM confidence. Guaranteed to spark "Whoa, I built that!" moments
Add more construction-style movements
Use one syringe pair for each independent movement:
- One pair for a grabber or bucket.
- One pair for raising and lowering a boom.
- One pair for extending an arm.
- One pair for a rotating base or platform.
Commercial educational arms use the same paired-control idea. For example, the 4M KidzLabs Mega Hydraulic Arm listing describes eight syringes and four tubing sections, while the Home Science Tools Hydraulic Robotic Arm uses six syringes and three tubing sections for claw, lift, and rotation functions.
There are three useful project levels:
- Two-syringe demonstrator: shows pressure transmission with almost no structure.
- Manual cardboard arm: adds pivots, levers, and one or more hand-operated controls.
- Motorized model: adds electrical power, motor-driven screw mechanisms, alignment, wiring, and a stronger frame. This is substantially more complex than the “super simple” principle.
Water, air, and other fluids
Water is normally the best first choice for a classroom or household build. It is inexpensive, visible when colored, and easy to wipe up. Keep it away from batteries, motors, switches, and other electrical parts.
The Tool Desk
Outbyte PC Repair FREEClear out junk files and repair common Windows errorsFree Scan →Outbyte Driver Updater FREEFix the driver behind crashes, sound loss and screen glitchesFind Drivers →An air-filled system is pneumatic rather than hydraulic. Because air compresses, it produces delayed and springy motion. Oil can sometimes give smoother operation, but it may stain, leak, or damage plastics, tubing, seals, adhesives, or kit components. Vegetable oil appears as a supplied comparison fluid in the Home Science Tools Hydraulic Arm Engineering Kit, but that does not prove compatibility with every off-the-shelf syringe or tube.
Independent reader supportYour contribution helps us test, update, and keep practical guides available for everyone.Troubleshooting
Nothing moves
- Remove the mechanical load and test the syringe pair by hand.
- Check for a disconnected, blocked, or kinked tube.
- Confirm that neither syringe outlet is capped.
- Check that both plungers move freely.
- Inspect the frame and linkage for a jam.
The output moves only after a delay
Trapped air is the most likely cause. Refill the line, hold the tubing so bubbles can rise toward one end, and cycle the plungers slowly. Avoid rapidly pumping, which can introduce more bubbles.
The arm moves but cannot lift
Reduce the load first. Then check whether the output syringe is too small, the actuator is attached too far from the pivot, the arm is too long, the frame bends, or the plunger is being pushed sideways. A larger output syringe, shorter lever arm, stronger frame, or better alignment may help.
Rank #4

- Bulk Hydraulic and Pneumatic Supply: Includes 20 high quality 10ml plastic syringes, 15 feet of flexible vinyl tubing, and 10 syringe adapters, providing all necessary components for up to 10 science and engineering projects. Enough syringe tube components for classroom-scale hydraulic and pneumatic machine projects.
- Made for STEM Learning: Provides all necessary components for tons of science and engineering projects. Components connect easily without additional tools.
- Hands-On Fluid Mechanics: Students build and test hydraulic and pneumatic systems, directly observing how pressure and fluid transfer create mechanical force. Supports structured engineering design challenges.
- Versatile Project Compatibility: Syringes and tubing work for a wide range of hydraulic and pneumatic machine builds, including robotic arms, lifts, bridges, and other pressure-driven mechanisms.
- Cost-Effective Bulk Purchase: Buying in bulk keeps per-student costs low. Provides a budget-friendly way to stock up on essential components for hydraulic and pneumatic STEM activities.
The motion is jerky
Bleed the air, inspect for a kink, and test for sticky syringe seals. Rough pivots and flexible cardboard can also cause stick-slip movement. Replace damaged syringes or tubing rather than forcing them.
The mechanism moves out but will not return
A single hydraulic pair may push reliably but lack a return force. Add a suitable rubber band or spring, use gravity where appropriate, or install a second arrangement that actively drives the return stroke. Also check for slack or binding in the linkage.
The tubing leaks
- Remove the load and inspect every joint.
- Replace punctured or cracked tubing.
- Use tubing that fits the syringe outlet securely.
- Refill the line and push air toward an open end rather than trapping it in the middle.
- Retest before reconnecting the mechanism.
Avoid permanent glue on plungers or tubing unless the assembly is intentionally disposable. Adhesive can restrict movement and make repairs difficult.
Build a kit or use loose parts?
Loose syringes, compatible tubing, cardboard, craft sticks, and simple pivots give technically curious builders the greatest freedom. You can change piston sizes, linkage positions, and arm geometry while learning why performance changes.
A kit is more convenient when you need matched parts and instructions. The 4M KidzLabs Mega Hydraulic Arm is a ready-made multi-function option. The Hydraulic Arm Engineering Kit is aimed at grades 3–7 and includes investigations involving syringes, tubing, fluid comparison, a scissor lift, a claw, and a complete arm. The Educational Innovations Hydraulic Arm Kit is a simpler manual gripper design, while its HydroBot Arm offers six hydraulic functions.
Prices, stock status, and shipping dates change. Check the linked seller pages before purchasing; some listings have recently shown backorder or out-of-stock status.
Safety and limitations
- Use blunt, unused project syringes only. Never attach needles.
- Do not use craft syringes for medical procedures.
- Supervise young children; kits contain small parts that may be choking hazards.
- Use care with scissors, craft knives, drills, bolts, and hot glue.
- Wear eye protection when pressurizing or motorizing a system.
- Keep water away from electrical components.
- Do not pressurize sealed syringes beyond their intended use.
- Do not describe a toy model as equivalent to an industrial excavator.
A syringe arm demonstrates pressure transmission, but its load capacity is limited by syringe seals, tubing, piston area, pivot friction, frame strength, lever geometry, and trapped air. Do not promise a lifting capacity without testing the exact build.
The construction lesson
A syringe hydraulic model turns an abstract construction-machine principle into something visible: an enclosed liquid transmits pressure, while piston size and linkage geometry determine the practical balance between force and movement. Begin with two matching syringes and water, remove the air, then add one rigid pivoted mechanism. Once that works reliably, expand to a claw, boom, lift, or rotating base.
Quick Recap
Product prices and availability are accurate as of the date/time indicated and are subject to change. Any price and availability information displayed on Amazon at the time of purchase will apply.

