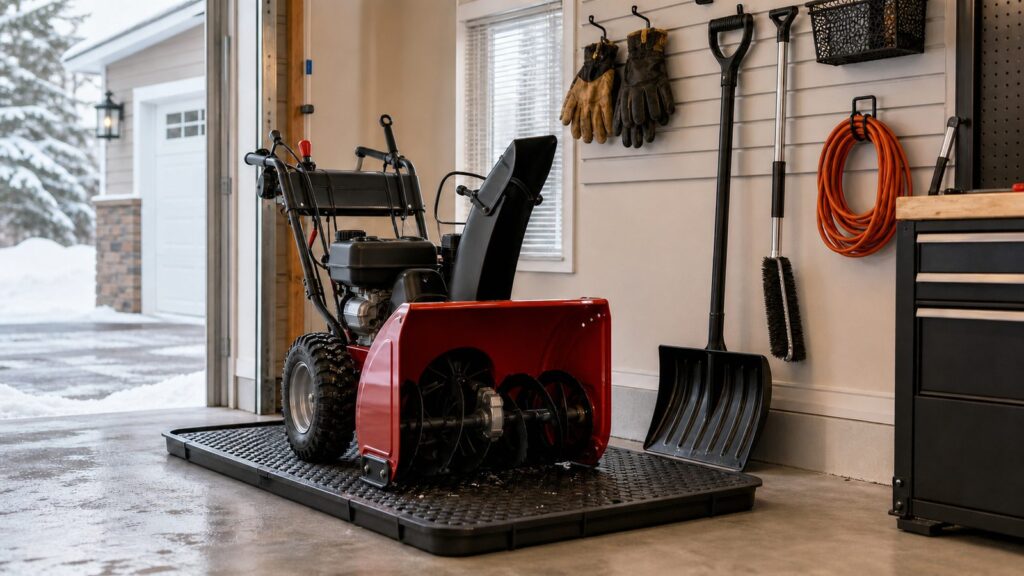
A snow blower is awkward to store because it has two different jobs. From November through March, it needs to be reachable in bad weather without moving half the garage. From spring through fall, it needs to be protected from moisture, stale fuel, dead batteries, salt corrosion, rodents, and accidental bumps from cars or bikes.
The best storage setup is not always the biggest shed or the most expensive garage system. It is the one that gives the machine a clear parking lane, a dry floor, safe fuel or battery storage, and enough clearance to pull it out when the driveway is already covered.
As an Amazon Associate I earn from qualifying purchases.
For planning, assume a single-stage snow blower needs about 2 feet by 3 feet of floor space. A two-stage unit commonly needs about 2.5 feet by 4.5 feet or more. Add 12 to 18 inches on the access side so you can grab the handles, rotate the chute, and move around the machine without scraping walls or vehicles. Door width matters just as much as square footage. A 30-inch-wide machine through a 32-inch shed door is a daily frustration. A 36-inch or wider door is a better target when you are building or buying storage.
Free tools Windows power users keep installed
One-click scans. No signup required.
Start With the Storage Rules That Prevent Damage
Before choosing a layout, handle the basics. On our job sites, we treat winter equipment like any other machine with steel, belts, bearings, fuel, and electrical parts: clean it, dry it, keep it off standing water, and store the maintenance parts where the operator can find them with gloves on.
#1 Best Overall

- | Universal Fit Standard Snow Blower Cover | - Measures 70" L (diagonal) x 54" W (side) x 33" W (front) x 45" H, Zettum 600D snow blower cover is designed to fit most brands' 2-stage / 1-stage snow blowers, including Honda, Ego, Ryobi, Snow Joe, PowerSmart, Ariens, Cub Cadet, Troy Bilt, Craftsman, Greenworks, Husqvarna, Toro and More. ( Please check the size carefully. )
- | 600D Heavy-Duty & Super Waterproof | - Made of Premium 600-Density oxford cloth with PU coating, Zettum snowblower covers are extremely heavy-duty and super waterproof. Compared with PVC type covers, our walk behind snow blower covers are more breathable and softer, hard to be torn. More importantly, PU-type coating is more environmentally friendly!!
- | Easy to Put On with Great Protection | - Designed by our snow blower experts team, Zettum outdoor snow thrower covers are very easy to put on and put off. With the cover on your self propelled snow blower machine, no more worry about the sunlight, rain, snow, wind, dust, resin, leaves, debris and bird droppings, etc. Zettum will be the tough protector of your outside snow blowers!
- | Windproof Smart Buckles Design | - Upgrade adjustable velcros design making the cover secure to the snow blower with single stage or two stages super tightly, no wind can blow away Zettum snow blower covers! Coming with a portable storage bag for storage and a soft cloth for daily cleaning. ( Please check the size of your snow blower carefully! )
- | Fading-Resistant Cover for Years | - UV Test can reproduce the damage caused by sunlight, rain, and dew through the equipment. The test shows that Zettum all weatherproof snowblower cover can withstand at least 3 years of UV aging, which is much better than others. Thanks to its fading-resistant feature, our snow blower covers will keep your snow blower new for years!
Brush snow, slush, and road salt off the auger housing, chute, tires, and frame before parking the machine. In a heated garage, snow melt carries salt and grime onto the slab and under the housing. A rubber mat, drip tray, or raised platform is cheap insurance. Let the engine and muffler cool before covering a gas machine, and do not trap moisture under a non-breathable tarp.
Gas units need off-season prep before they are pushed to the back corner. Clean the machine, inspect belts and the scraper bar, lubricate grease points where the manual calls for it, change oil if due, and touch up chipped paint before bare steel starts rusting. Fuel guidance varies by manufacturer. Some manuals call for draining or running fuel out for storage; others support fresh fuel treated with stabilizer and circulated through the engine. The practical rule is simple: follow the owner’s manual for that engine, avoid stale ethanol fuel, use stabilizer correctly when called for, and do not leave a half tank sitting for months.
Cordless snow blowers need a different setup. Store the blower body where it fits, but remove the batteries and charger. Keep them dry and indoors in a moderate temperature range. EGO battery documentation lists 50 to 80 degrees Fahrenheit as the optimum storage range and 41 to 104 degrees Fahrenheit for charging. That means an unconditioned shed may be fine for the plastic and steel blower body, but it is usually the wrong place for expensive lithium-ion batteries.
Cost Comparison for Snow Blower Storage Options
Here is the quick planning table we would use with a homeowner before building anything. Costs are typical 2026 US ranges and vary by region, material, site access, and how much labor is hired out.
| Storage option | Best for | Typical 2026 cost | Key dimensions or specs |
|---|---|---|---|
| Garage parking bay | Fast winter access | $0-$300 | Machine footprint plus 12-18 inches access clearance |
| Hooks and small organizers | Tools, shear pins, cords, gloves | $10-$300 | Mount to studs or rated track, not drywall alone |
| Wall shelves | Maintenance kit and seasonal accessories | $40-$180 | Keep heavy fuel cans low, not overhead |
| Rolling dolly or mat setup | Tight garages and wet slabs | $40-$200 | Use casters rated for the loaded machine weight |
| Snow blower cover | Dust, splash, light outdoor exposure | $12-$40 basic; $35-$115+ heavy-duty | Look for breathable fabric or vents for indoor storage |
| Localized slatwall zone | Organized garage wall | $300-$1,500 | Usually enough without full custom cabinets |
| Prefab shed | No garage space | $1,875-$8,250 common installed range | 36-inch door preferred, ramp, ventilation, anchored base |
| Custom shed or bump-out | Long-term, fitted storage | $3,500-$15,000+ depending scope | Treated skid or foundation, snow-load roof, lockable hardware |
14 Handy Snow Blower Storage Ideas
1. Create a dedicated garage parking bay
The most reliable winter setup is a dedicated bay near the garage door with the snow blower facing out. Rotate the chute to reduce width, keep the handles accessible, and mark the floor with tape or a painted rectangle so the space does not slowly fill with bins and sports gear.
For a single-stage unit, plan roughly 2 feet by 3 feet plus working clearance. For a two-stage unit, start around 2.5 feet by 4.5 feet and add 12 to 18 inches on one side. From November through March, do not store anything in front of it. The blower should be reachable without moving cars, ladders, holiday decorations, or fuel cans during a storm.
2. Use an under-workbench alcove
If your garage has a deep workbench, the space below it can work for a compact single-stage or cordless blower. This is best when the bench has at least 34 to 38 inches of clear height and enough depth for the handle position. Measure the machine in its actual parked shape, not just the manufacturer’s width.
What’s actually slowing this PC down?
Pick the symptom - the matching free tool is one click away.
Keep the alcove open at the front. Doors look tidy but become annoying when you are wearing boots and trying to get out before work. If the bench is wood, seal the bottom edge or install a rubber mat so meltwater does not wick into the framing.
3. Put the machine on a rolling equipment dolly
A dolly helps in tight garages where the blower needs to slide sideways between seasons. Expect to spend $40 to $200 for a dolly, mat, or drip tray setup, more if you build a heavy platform with high-capacity casters. Match the caster rating to the machine. A 250-pound two-stage blower on bargain casters will be harder to move than it should be.
Use locking casters on at least two corners. If the garage floor has cracks or a steep slope, larger 3-inch or 4-inch casters roll better than small furniture wheels. A dolly can also double as a light service stand, but do not make it so tall that loading becomes awkward.
Rank #2

- Heavy Duty Winter Protection: This snow blower covers for inside is constructed from 210D marine-grade, tear-resistant fabric with reinforced seams and a secure tightening mechanism. The waterproof snow blower cover offers twice the weight of standard covers, it embodies the durability of Tough Cover's design, providing superior protection against winter's harshest elements
- Comprehensive indoor Shield: Our universal snow blower cover protecting against UV rays, dust, and debris. Ideal for outdoor snow blower storage, it perfectly fits snowblower accessories and other equipment such as a snow plow or pitching machine cover
- Universal Fit For Most Models: As a versatile snow thrower cover, it accommodates most two-stage snow throwers, including models from Snow Joe, Honda, and Craftsman. This snow blower covers offers dimensions of 47" L x 32" W x 40" H, it suits various snowblower storage needs, including simplicity, and 26 Craftsman snowblower covers
- Convenient Storage And Handling: The Cover snow thrower cover ensures complete machine coverage and comes with a practical storage bag. Easy to manage and store, it is a valuable addition to any snowblower storage setup, lawn mower storage box stand-up, or snow blower storage sheds
- Unmatched Quality Assurance: Cover is committed to exceptional quality and durability. Our snowblower cover is engineered to last, offering dependable protection for your investment in heavy outdoor equipment. Choose Tough Cover for unparalleled outdoor performance during the winter season
4. Build a wall-mounted accessory zone
Do not hang a full-size snow blower on wall hooks unless the manufacturer provides a rated lift or storage system for that exact purpose. Many machines weigh 100 to 300 pounds or more, and drywall anchors are not a storage plan.
Use the wall for everything around the machine: chute brush, extension cord, shovel, gloves, spare shear pins, scraper bar, fuel funnel, wrench, and maintenance kit. Hooks and small wall organizers typically run $10 to $300. Wall shelves are often $40 to $180, and basic freestanding shelves usually fall around $60 to $300. Mount load-bearing hardware into studs or a rated track system.
5. Use a breathable snow blower cover
A cover keeps dust, sawdust, leaves, and splash off the machine. Basic universal covers commonly cost $12 to $40. Heavier 600D to 1000D or custom-fit covers often run $35 to $115 or more. Fabric weight, UV resistance, vents, drawstrings, buckles, and sizing drive the price.
For indoor storage, breathable material or vents matter more than waterproofing. A cheap plastic tarp can trap condensation and accelerate rust. For unavoidable outdoor exposure, use a waterproof and UV-resistant cover, but still keep the blower raised off wet ground and out of direct roof runoff.
6. Use a compact deck box for cordless accessories
A small deck box can work for cordless snow blower accessories, but usually not for a full two-stage machine. It is a better fit for batteries removed from the machine only if the box is indoors and temperature controlled. Outdoors, use it for the chute tool, gloves, scraper, and other non-electronic accessories.
Recommended Free Tools
For cordless systems, keep batteries and chargers on an indoor shelf. A labeled battery shelf near an outlet works well, but avoid placing chargers beside gasoline, solvents, water heaters, furnaces, or other ignition sources.
7. Add a small lean-to shed
A lean-to shed against a garage or side wall is useful when the garage is full but the machine needs to stay close to the driveway. Keep the roof sloped, not flat, and design the opening wide enough to roll the blower straight in. A 36-inch or wider door is a practical target for many residential machines.
The floor should be raised and weatherproof. Treated skids, a compacted gravel base, and exterior-rated floor sheathing are common choices. Add a low-threshold ramp with traction strips so the auger housing does not catch on the entry.
8. Buy a prefab resin or metal shed
Prefab sheds are the middle ground between a garage corner and a custom structure. National shed costs commonly cluster around $1,875 to $8,250 installed, with many averages reported around $3,350 to $4,500. Very small kits can cost a few hundred dollars, while larger sheds with utilities, better foundations, or custom features can reach $30,000 or more.
Windows Errors? Fix Them Before They Spread
Repair common Windows errors and clear accumulated junk for a smoother, more stable PC - no reinstall needed.Free scan · no reinstallCrashes, No Sound, or Screen Glitches?
Random freezes, missing sound and display glitches usually trace back to one bad driver. Find and replace yours safely.Free scan · under a minuteIn snowbelt markets, check the roof load rating. Avoid flimsy flat-roof boxes where roof drift or plow piles can press against the structure. Look for ventilation, a lockable door, a floor system that stays dry, and anchoring where wind exposure requires it.
Rank #3

- 【Universal Size Compatibility】The cover fits most two-stage snow throwers, including models for brand Snow Joe, Honda, Craftsman, Ariens, Cub Cadet, Husqvarna, Ego, Ryobi, Snow Joe, Toro, and more
- 【Premium Quality Material】Constructed with high-quality 600D Oxford fabric and PU coating, Himal Outdoors' snow blower cover offers enhanced breathability, tear resistance, colorfastness, and superior waterproofing. It effectively shields your snow blower from rain, snow, sunlight, and damages, ensuring long-lasting durability
- 【Secure Elastic Design】The bottom elastic rope snugly fits the machine, preventing the cover from slipping or blowing away even during strong winds or heavy snowfall.ensuring your machine stays in top condition year-round
- 【Weather-Resistant and Anti-Aging】Himal Outdoors' snow blower cover undergoes anti-aging tests, demonstrating exceptional resistance against sun damage, rain, snow, tearing, and cold cracks. Its remarkable colorfastness, tear resistance, and anti-cold crack properties effectively safeguard the cover against harsh weather elements
- 【Convenient Storage Solution】: When not in use, the cover can be easily folded and stored in the included drawstring storage bag, making it compact and convenient to keep in your garage or shed without taking up much space
9. Build a custom wood shed with a real ramp
A contractor-built shed is worth considering when the snow blower is part of a larger equipment storage problem. A good shed detail includes a treated skid or foundation, anchored framing, weatherproof flooring, roof overhangs, ventilation, lockable hardware, and a ramp that is wide, stiff, and low enough for routine use.
For the ramp, 36 inches clear width is a comfortable minimum for many machines. Use exterior-rated framing, non-slip strips, and a slope that can be managed when icy. If you are storing a two-stage blower, design around the machine’s weight and turning radius, not just the footprint.
10. Raise the blower above a wet garage floor
Heated garages create meltwater. That water often contains salt, sand, and road grime, and it sits right where the auger housing and scraper bar are parked. A raised platform, thick rubber mat, or drip tray helps keep corrosion under control.
The Tool Desk
Outbyte PC Repair FREERepair Windows errors before they cause bigger problemsFix Now →Outbyte Driver Updater FREEFix the driver behind crashes, sound loss and screen glitchesFind Drivers →A simple platform can be built from treated lumber and exterior plywood, but keep it low. Two-by framing can work if the edges are beveled or paired with a small ramp lip. The goal is drainage and separation from saltwater, not a tall stage that makes the machine harder to move.
11. Add a fold-down ramp or low-threshold entry
Small thresholds cause big headaches with snow equipment. The scraper bar, skid shoes, and auger housing can hang up on a lip that looks harmless in July. If you are using a shed, side entry, or raised platform, add a low-threshold ramp.
For wood ramps, use exterior-rated lumber, corrosion-resistant fasteners, and replaceable traction strips. Keep the ramp wide enough that tires and skid shoes are fully supported. A removable or fold-down ramp saves space, but it needs a positive stop so it cannot slip while the machine is halfway up.
12. Use overhead shelves for accessories only
Overhead storage is useful for light seasonal items, but not for gasoline, batteries, or the blower itself. Store extra extension cords, an empty fuel funnel, spare covers, and lightweight winter gear overhead if the rack is rated and properly anchored.
Quick wins for a faster PC:
Scan for outdated or missing drivers - takes under a minuteDriver Scan →Clear out junk files and repair common Windows errorsFree Scan →Keep frequently used storm items at arm height. Spare shear pins, a wrench, gloves, and the chute-clearing tool should not be in a ceiling bin when the driveway is filling up. On our projects, we also like a clear label or small pouch near the machine with the manual and a photo of the model and serial plate.
13. Use off-site storage for mild climates or extreme space limits
Off-site storage can make sense where snow is occasional or garage space is more valuable than immediate access. It is not ideal in heavy snow country because the machine may be needed with little warning. If you choose this route, store the blower clean, dry, and fully prepped for the off-season before it leaves the house.
For a gas machine, resolve the fuel according to the owner’s manual before storage. For a cordless unit, do not leave batteries in a hot, freezing, or damp storage unit. Bring the battery packs and charger home and store them indoors.
Rank #4

- LIGHTWEIGHT 210D FABRIC BUILT FOR EASY, EVERYDAY USE: This snow blower cover is made from durable, tear-resistant 210D polyester fabric, a lighter-weight construction engineered for practical, easy-to-handle protection between uses.
- WATER-REPELLENT COATING SHIELDS AGAINST THE ELEMENTS: A water-repellent exterior and water-resistant interior help guard your snow blower cover from dust, dirt, rain, and light outdoor exposure in garage, shed, or covered storage.
- STANDARD FIT FOR TWO- AND THREE-STAGE SNOW BLOWERS UP TO 27IN: Sized at 60in L x 33in W x 45in H, this cover fits most two- and three-stage snow blowers up to a 27in clearing width, including Craftsman, Honda, and similar models.
- SECURE DRAWSTRING KEEPS THE COVER IN PLACE: (2) Secure drawstring closures hold this snowblower cover snug during storage, so everyday wind and shifting aren't a worry.
- STORAGE BAG AND 18-MONTH WARRANTY INCLUDED: Every Tough Cover snow blower cover ships with a bonus storage bag for easy off-season organizing, backed by our 18-month warranty for lasting peace of mind.
14. Create a battery-and-fuel separation station
This is less glamorous than a new shed, but it prevents real problems. Keep gasoline physically separated from battery chargers, electrical panels, furnaces, water heaters, and other ignition sources. Store approved fuel containers low, upright, capped, and away from exits.
Local rules can be stricter than national guidance. Some cities publish residential fuel storage limits, and fire codes often distinguish portable containers, attached garages, and accessory structures. If you are storing more than a small homeowner quantity of gasoline, check your local fire department guidance. For most homeowners, the best answer is to keep only the fuel you need, use approved containers, label them clearly, and avoid turning the garage into a fuel room.
Garage Layouts That Work in Real Life
For a one-car garage, place the snow blower near the overhead door on the side opposite the driver’s door swing. Keep the chute turned inward, handles facing out, and accessories on the nearest stud bay. If the garage is only 10 to 12 feet wide, a rolling dolly can let you shift the machine sideways after the storm season.
For a two-car garage, create a winter lane along the wall closest to the driveway. A 30-inch-deep zone is often enough for a single-stage machine and wall accessories. A two-stage unit may need 54 inches or more of depth depending on handle length. Keep bikes, trash carts, and holiday bins out of that lane from the first hard freeze until spring cleanup.
For attached garages, be especially careful with fuel and ignition sources. Do not store gasoline beside a furnace, water heater, battery charger, or anything with a pilot light or spark potential. Keep fuel containers off the main walking path so they are not kicked, punctured, or blocked behind other items.
Shed Planning, Permits, and Safety Notes
A shed for snow equipment is a small building, and small buildings still need planning. Many jurisdictions exempt small detached accessory structures from building permits under certain size limits, but zoning, setbacks, utility easements, height limits, floodplain rules, HOA rules, and electrical permits may still apply. The 2024 International Residential Code includes permit exemptions for certain small one-story detached accessory structures, but local adoption and amendments control what applies to your property.
Some cities allow small sheds without a building permit only below a defined square footage. Others require permits based on height, foundation, location, or whether utilities are added. Minnesota guidance, for example, treats storage shed requirements as a local jurisdiction issue with attention to size and placement. Cities such as Austin and Denton publish their own accessory structure rules. The practical move is to call the local building department before ordering the shed, especially if it will be near a property line.
For snow blower storage, the shed details matter more than decorative trim. Specify a stable base, anchored frame, weatherproof floor, door wide enough for the machine, low-threshold ramp, roof overhang, ventilation, and lockable hardware. In snowy regions, ask for the roof snow-load rating and think about where shoveled or plowed snow will pile. A shed placed at the end of a plow path can be damaged by side pressure even if the roof is strong.
When to DIY and When to Hire a Pro
Most garage storage improvements are good DIY work. Installing hooks, a localized slatwall zone, wall shelves, a rubber mat, a dolly, or a cover is usually a half-day project with basic tools. The key is mounting into studs or rated tracks and respecting load limits. Expect $10 to $300 for hooks and small organizers, $40 to $180 for wall shelving, and $60 to $300 for basic freestanding shelving.
Do these 3 things before closing this tab:
1Repair Windows errors before they cause bigger problems2Scan for outdated or missing drivers - takes under a minute3Clear out junk files and repair common Windows errorsDIY also makes sense for a simple treated-wood platform or a small ramp if you are comfortable cutting lumber square, fastening into solid framing, and making the surface slip-resistant. Keep the platform low and strong. Do not build a narrow ramp that only supports the tires while the skid shoes hang off the edge.
Best Value
- HEAVY-DUTY 600D FABRIC FOR LONG-LASTING PROTECTION: Constructed from rugged 600D solution-dyed Oxford polyester, this snow blower cover resists tearing and outdoor wear while holding its color and appearance season after season.
- WATERPROOF-TAPED INTERIOR SEAMS FOR MAXIMUM DEFENSE: Extreme adds fully taped interior seams on top of our waterproof PU coating and water-repellent exterior, delivering the added rain and moisture protection prolonged wet conditions call for.
- STANDARD FIT FOR TWO- AND THREE-STAGE SNOW BLOWERS UP TO 27IN: Sized at 60in L x 33in W x 45in H, this cover fits most two- and three-stage snow blowers up to a 27in clearing width, including Snow Joe, Honda, and Craftsman models.
- UV & FADE RESISTANT CONSTRUCTION FOR OUTDOOR USE: Evaluated through a 500-hour Xenon fade test (Class 4.5), this heavy duty snow blower cover withstands prolonged sun, rain, and snow without breaking down.
- SECURE DRAWSTRING CLOSURES, STORAGE BAG, AND 18-MONTH WARRANTY: (2) Secure drawstring closures hold the cover snug in high winds. Includes a storage bag and Tough Cover's 18-month warranty.
Hire a pro when the storage solution becomes a building project. That includes custom sheds, attached lean-tos, concrete pads, electrical work, drainage changes, structural wall modifications, and anything close to a property line or utility easement. A contractor-built storage bump-out or shed is worth it when you need secure, weatherproof, code-aware storage for a snow blower plus mowers, ladders, garden tools, and seasonal equipment. It is also worth hiring out when poor drainage or frost movement would make a cheap shed fail within a few winters.
Final Checklist Before You Park It for the Off-Season
At the end of winter, do not just push the machine into a corner. Clean off salt and grime, dry the housing and chute, inspect belts and wear parts, lubricate as directed, touch up chipped paint, and handle the fuel exactly as the owner’s manual requires. If oil is due, change it before storage so the engine sits with clean oil.
For cordless machines, remove the batteries, wipe the contacts clean and dry, and store battery packs and chargers indoors in a moderate temperature range. Keep the blower body covered but ventilated. Store the manual, shear pins, wrench, scraper bar, gloves, and chute tool in the same zone so the first storm does not turn into a scavenger hunt.
The best snow blower storage idea is the one you will still use during a 6 a.m. storm. Give the machine a clear path, protect it from moisture, separate fuel and batteries safely, and build enough clearance into the layout that winter use feels ordinary instead of improvised.
Frequently Asked Questions
Can I store a snow blower outside all year?
You can, but it is not ideal. Use a raised, dry surface and a fitted waterproof cover with ventilation. For long-term outdoor storage, a lockable shed with a weatherproof floor is much better than leaving the machine under a tarp.
How much space do I need to store a snow blower?
Plan about 2 feet by 3 feet for many single-stage units and about 2.5 feet by 4.5 feet or more for two-stage units. Add 12 to 18 inches of access clearance so you can move the handles, rotate the chute, and pull the machine out safely.
Should I drain gas before storing my snow blower?
Follow the owner’s manual for your exact engine. Some manufacturers recommend draining or running fuel out, while others allow fresh fuel with stabilizer circulated through the system. Do not leave stale ethanol fuel sitting for months.
Recommended Free Tools
Where should I store snow blower batteries?
Remove lithium-ion batteries from the blower and store them indoors in a dry, moderate-temperature area. For example, EGO lists 50 to 80 degrees Fahrenheit as an optimum storage range and 41 to 104 degrees Fahrenheit for charging.
Is it safe to hang a snow blower on garage wall hooks?
Do not hang a full-size snow blower on ordinary wall hooks. Many machines weigh 100 to 300 pounds or more. Hooks are useful for accessories, cords, shovels, and tools, but the blower itself should stay on the floor unless the manufacturer provides a rated storage system.
Do I need a permit for a snow blower storage shed?
Maybe. Many areas exempt small detached sheds under certain size limits, but local zoning, setbacks, height rules, easements, HOA rules, and electrical work can still trigger requirements. Check with your local building department before buying or building.
Quick Recap
Product prices and availability are accurate as of the date/time indicated and are subject to change. Any price and availability information displayed on Amazon at the time of purchase will apply.

