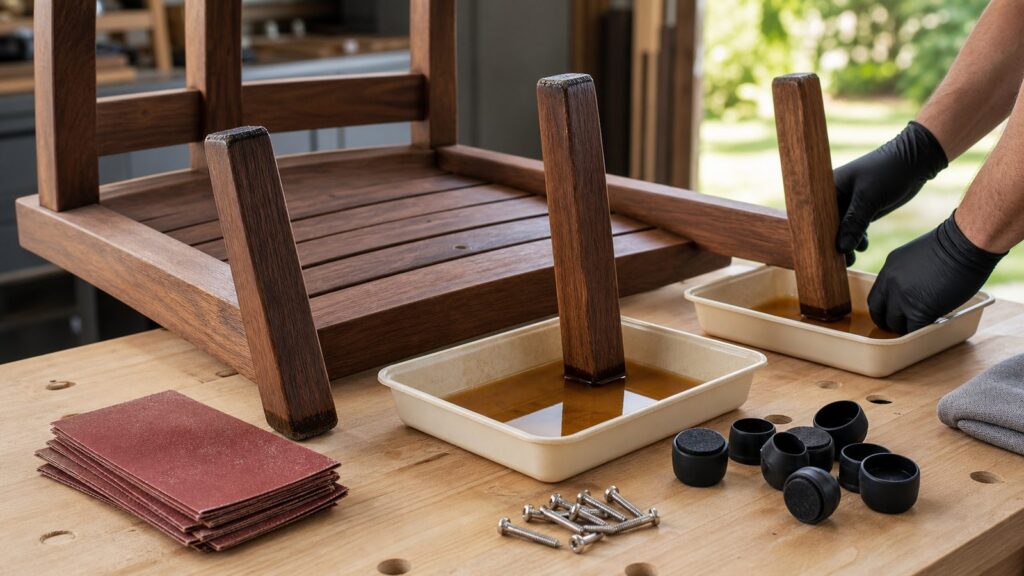
The easiest way to seal outdoor furniture leg end grain is to turn the chair, bench, or table upside down and place each bare leg end in a shallow dish of exterior penetrating finish. Let the end grain drink until it stops darkening quickly, wipe off the excess, allow the finish to cure, then install plastic, nylon, rubber, or HDPE glides so the wood is not sitting directly on wet concrete, pavers, grass, or deck boards.
That simple detail solves the real problem. Outdoor furniture legs usually fail first at the bottom because end grain behaves like a bundle of tiny straws. It pulls water upward much faster than the long grain on the sides of the leg. Once water gets in, the bottom of the leg sees abrasion, trapped moisture, freeze-thaw cycling, UV damage, mildew, and eventually softening or rot.
As an Amazon Associate I earn from qualifying purchases.
For a typical U.S. homeowner in 2026, sealing one patio furniture set is usually a $15 to $75 DIY job. A basic exterior stain/sealer and sandpaper may keep the material cost under $15 per set if you already own supplies. penetrating epoxy, marine-grade products, and new glides can push the project toward the higher end. A handyman or carpenter may charge a $100 to $250 minimum service call, so this is usually worth doing yourself unless the furniture also needs structural repair.
Why Leg End Grain Fails First Outdoors
On our exterior carpentry and repair jobs, the bottom inch of wood tells the story before the rest of the piece does. A chair may look fine from standing height, but when you flip it over the leg ends are gray, checked, cupped, or soft enough to dent with a fingernail. That is not random wear. It is a predictable moisture detail.
Wood moves water differently through end grain than it does through face grain. The cut bottom of a table leg exposes the open cellular structure of the wood. When that end sits on a wet patio, the moisture path is direct. Concrete and pavers hold water after rain. Deck boards can trap damp debris underneath furniture feet. Grass and leaf piles keep the leg wet for hours or days. Sprinklers make the cycle worse because they re-wet the same area repeatedly.
#1 Best Overall

- Protect Your Floors - Don’t let your furniture leave scratches on your floor. Installing these chair caps on your chairs helps keep your hardwood and laminate floors in pristine condition.
- Move Your Furniture Easily - Using these furniture glides will allow you to smoothly glide your furniture across the floor–no need to lift them. They also keep you from making loud noises.
- Built Tough - Made with UV-safe plastic, these plastic chair leg caps won’t get damaged easily. This strength makes them perfect for outdoor, garden, deck, lawn, or patio wrought iron furniture.
- A Breeze To Install - These round caps are meant to fit snugly onto chair legs with an inner diameter of 1.5”. Simply pop them into your furniture’s feet and hit using a rubber hammer or a mallet.
- More Value For Your Money - These high-quality chair feet covers are available in two sets. Get our set of 24 white gliders for furniture legs for 6 chairs or choose our pack of 32 black caps for 8 chairs.
Once moisture gets into the leg, several things happen. The bottom swells, then shrinks as it dries. Repeated movement opens checks and cracks. Sun breaks down exposed finish. Abrasion from sliding the furniture removes the protective coating exactly where the leg needs it most. In cold climates, trapped water can freeze and expand. In humid or shaded patios, the leg may never fully dry between wet cycles.
Better wood species help, but they do not eliminate the detail. Teak, ipe, cedar, cypress, white oak, and pressure-treated lumber tolerate outdoor exposure better than poplar, pine, red oak, or indoor furniture woods. Still, even durable wood benefits from sealed end grain and a replaceable foot. The goal is not just to coat the wood. The goal is to keep the wood from acting like a sponge.
Free tools Windows power users keep installed
One-click scans. No signup required.
The Best Easy Method: Soak, Wipe, Cure, Add Glides
Brushing one light coat across the bottom of a chair leg is better than leaving it raw, but it is not the best method. End grain needs to be saturated. The simplest homeowner-friendly approach is a shallow soak.
Tools and Materials
For one dining set, bench, or pair of Adirondack chairs, gather the following:
- Exterior penetrating oil, exterior stain/sealer, marine-grade penetrating sealer, penetrating epoxy, or dedicated end-grain sealer
- 80-, 120-, and 150-grit sandpaper or sanding sponge
- Disposable shallow bowls, plastic lids, or small trays, about 1/4 inch to 1/2 inch deep
- Nitrile gloves and eye protection
- Clean rags or blue shop towels
- Painter’s tape if the finish needs to stay off visible surfaces
- Plastic, rubber, nylon, HDPE, or stainless-adjustable furniture glides
- Stainless steel or coated exterior screws if the glides require fasteners
Most patio chairs and tables only need a few ounces of finish for the leg bottoms. The container size matters less than the product type. Use a tray just wide enough to hold the leg end and shallow enough that you are not wasting finish.
Step-by-Step Process
- Clean the furniture. Remove dirt, leaf stains, mildew residue, and old loose finish from the leg bottoms. If the wood is wet, let it dry. For best results, give the furniture 24 to 48 hours in a dry, shaded, ventilated place before sealing.
- Flip the piece upside down. Work on a padded surface so you do not scratch the arms, seat, or tabletop. Check that the furniture is stable before pouring finish.
- Sand the bottom end grain. Start with 80 or 120 grit if the end is rough, gray, or checked. Finish around 150 grit. Do not polish it glass-smooth; you want the sealer to penetrate.
- Ease the bottom edges slightly. A sharp 90-degree edge sheds finish and chips easily. A small 1/16-inch to 1/8-inch eased edge holds coating better and is less likely to splinter.
- Pour a shallow pool of finish. Use about 1/4 inch of material for oil, stain/sealer, or marine sealer. For epoxy, follow the manufacturer’s mix ratio exactly and use only what you can apply during its working time.
- Set each leg end into the finish. Let the end grain soak. Sound, dry wood often darkens quickly in the first few minutes. Keep the bottom wet until it slows down and stops absorbing rapidly.
- Wipe the excess. Remove puddles, runs, and thick buildup. The furniture must sit flat after curing. A blob of cured epoxy or gummy oil on one leg will make a chair rock.
- Let it cure fully. Many oil and water-based exterior sealers need 24 to 48 hours before normal handling, with longer cure times in cool or humid weather. Epoxy systems vary, so use the product’s cure schedule.
- Install glides or feet. Once the finish is cured, add replaceable feet. The glide is the wear part. The sealer is the moisture barrier.
For new furniture parts or repaired legs, seal the end grain before final assembly when possible. It is easier to flood-coat a loose leg end on a bench than to work around stretchers, aprons, and cross braces later.
Which Sealer Should You Use?
There is no single best product for every furniture set. The right choice depends on the wood, exposure, appearance, and whether the leg is sound or already starting to soften. For routine prevention on sound wood, an exterior oil-based stain/sealer or marine-grade penetrating sealer is usually the easiest choice. For high-risk furniture, early softening, or expensive pieces, penetrating epoxy gives the strongest moisture resistance but costs more and takes more care.
| Option | Best Use | 2026 Typical Cost | Pros | Watchouts |
|---|---|---|---|---|
| Exterior oil or stain/sealer | Routine prevention on sound patio furniture | $25-$55 per gallon | Easy to apply, good penetration, low per-set cost | Needs inspection and recoat every 1-3 years depending on exposure |
| Marine-grade penetrating sealer | Humid, coastal, sprinkler-exposed, or frequently wet furniture | $45-$60 per gallon | Good water resistance, homeowner-friendly application | Availability and VOC rules vary by region and formulation |
| Spar urethane | UV and water topcoat over sealed wood | $20-$35 per quart | Useful protective film on exposed surfaces | Not ideal as the only treatment on thirsty end grain unless flooded in multiple coats |
| Penetrating epoxy | Maximum moisture resistance, older furniture, early softening | $41-$78 for small kits | Hardens and seals end grain very well | Messier, more expensive, often needs UV-resistant topcoat if exposed to sun |
| Dedicated end-grain sealer | Hidden bottoms, fresh cuts, checking control | About $24 per quart or $45-$50 per gallon | Designed for cut ends and checking reduction | May not look good on visible surfaces or accept topcoats evenly |
| Feet, glides, or pads | Keeping sealed legs off wet surfaces | $5-$25 per set | Replaceable, reduces abrasion, improves drying clearance | Use stainless or exterior-rated fasteners where needed |
Exterior Oil or Stain/Sealer
This is the practical default for many homeowners. Use a product rated for exterior wood, not interior stain or indoor polyurethane. A gallon in the $25 to $55 range can handle many furniture sets, so the actual cost for one table and several chairs may be modest.
Oil-based products tend to wet end grain well and are forgiving to refresh later. Tinted or pigmented exterior finishes usually provide better UV resistance than clear-only coatings. If the leg bottoms are hidden, appearance may not matter much, but compatibility does. Write down the product type and date so the next reseal does not accidentally put an incompatible coating over it.
Marine-Grade Penetrating Sealer
Marine-grade penetrating wood sealers are a good step up for furniture that lives in rough exposure: coastal air, humid shade, wet decks, or patios hit by sprinklers. Current 2026 pricing for common marine-grade water-based or penetrating sealers is about $45 to $60 per gallon at major retailers and online sellers.
Do these 3 things before closing this tab:
1Fix the driver behind crashes, sound loss and screen glitches2Clear out junk files and repair common Windows errors3Scan for outdated or missing drivers - takes under a minuteThese products are still straightforward to use. The key is surface preparation. They cannot perform well over dirt, wax, failing clear coat, or wet gray fibers. Sand to sound wood, soak the end grain, wipe it clean, and respect the cure time.
Penetrating Epoxy
Penetrating epoxy is the most serious option for leg bottoms. It is useful when the wood is valuable, the exposure is harsh, or the leg has early softening but is not structurally gone. It works by soaking into the end grain and hardening the fibers, giving the bottom of the leg much better resistance to moisture entry.
Expect small kits to run about $41 to $78 in 2026, with larger kits costing more. Epoxy is more exacting than oil. Mix ratios matter. Pot life matters. Gloves matter. Keep the coating thin and flat at the bottom so the furniture still sits correctly. If epoxy is exposed to sunlight, use a UV-resistant exterior topcoat after cure and light sanding. Clear epoxy alone is not a complete long-term sun finish.
Spar Urethane
Spar urethane is a useful exterior clear topcoat, commonly around $20 to $35 per quart for consumer products. It can protect visible wood from water and sunlight, but we do not treat it as the only answer for raw end grain unless we are flooding multiple coats into the bottom. A surface film sitting on top of thirsty end grain is vulnerable to pinholes, abrasion, and cracks.
If you want a clear finished look, use a penetrating sealer first on the end grain, then apply spar urethane where a film finish makes sense. Maintain it before it flakes. Once a film finish fails, repair takes more sanding than an oil refresh.
Dedicated End-Grain Sealer
Wax and polymer end-grain sealers are common in lumber handling because they reduce checking in cut ends. They can be useful on hidden furniture leg bottoms, especially fresh cuts. Typical pricing in 2026 is about $24 per quart for specialty products and around $45 to $50 per gallon for Anchorseal-type products, depending on seller and shipping.
Rank #2

- Weatherproof & long-lasting outdoor furniture pads – These outdoor chair leg sliders floor protectors feature a UV stabilized clear sleeve with long lasting premium marine grade berber to withstand the outdoor elements. These furniture socks work great both outdoors and indoors.
- Secure fit to furniture legs – These deck and patio furniture feet pads fit rectangular legs between 1/2” x 1-1/2” to 5/8” x 1-3/4” (please measure your furniture leg to make sure you choose the correct size).
- Patented protection for wood & composite decks – Ideal outdoor furniture floor protectors for wood / composite decks, stamped/smooth concrete patios / porches, and tiled floors (for concrete pavers & rough concrete surfaces we recommend Slipstick Gorilla Outdoor Nylon Glide Products).
- Heavy duty furniture pads guaranteed to stay on – Heavy duty and transparent clear sleeve socks keeps marine grade berber floor protector caps attached to furniture feet for lasting outdoor furniture floor protection.
- Smooth & quiet sliding outdoors & indoors – Premium marine grade berber outdoor furniture feet pads provide smooth and quite sliding decks, patios, porches, tiled floors, smooth concrete, hardwood floors, and all smooth hard surface floors.
The tradeoff is appearance and topcoat compatibility. Some end-grain sealers are not intended to be a visible furniture finish. On a hidden bottom, that may not matter. On a visible foot detail, test first.
Do Not Skip the Feet or Glides
Sealer slows water movement. Feet and glides reduce the water contact in the first place. The best long-term repair uses both.
PC Slower Than It Used to Be?
A free scan shows the junk files, broken settings and background clutter dragging Windows down - then fixes them in one click.Free scan · Windows 10 & 11Crashes, No Sound, or Screen Glitches?
Random freezes, missing sound and display glitches usually trace back to one bad driver. Find and replace yours safely.Free scan · under a minuteFor outdoor wood furniture, we like replaceable glides because they take the abuse instead of the wood. Nylon glides work well on many chairs. rubber feet can grip slick patios but may hold dirt and moisture if shaped poorly. HDPE pads are durable and do not absorb water. Stainless-adjustable levelers can help tables sit flat on uneven pavers. For fasteners, use stainless steel or exterior-rated screws. Plain steel screws rust, stain the wood, and eventually fail.
Size the foot to the leg. A 1-inch-square chair leg needs a smaller glide than a 3-inch table leg. Leave enough bearing area that the foot does not punch into soft wood. If the leg bottom is already chewed up, square it, seal it, and use a wider pad. On heavier tables, a 1/4-inch to 1/2-inch thick pad can make a meaningful difference because it gives water and air a path under the leg.
Do not bury the glide in sealant or silicone caulk. Silicone can trap moisture, collect grit, and make later refinishing frustrating. If a screw-on glide is used, predrill the hole, seal the hole walls if practical, and snug the fastener without crushing the wood.
How Long Should the Legs Soak?
For exterior oil, stain/sealer, or marine penetrating sealer, plan on 15 minutes to a few hours, depending on how dry and open the wood is. Very thirsty end grain may absorb quickly at first. Keep the bottom wet until it stops darkening rapidly. That visual cue is more useful than a fixed timer.
The Tool Desk
Outbyte PC Repair FREEClear out junk files and repair common Windows errorsFree Scan →Outbyte Driver Updater FREEFix the driver behind crashes, sound loss and screen glitchesFind Drivers →For dense hardwoods such as teak or ipe, absorption may be slower and shallower. For soft or porous woods, the finish may disappear into the end grain quickly. With epoxy, follow the product directions because pot life and cure chemistry control the schedule. Do not leave a mixed epoxy puddle unattended for hours unless the system allows it.
After soaking, wipe the leg bottom and edges thoroughly. The finish should be in the wood, not forming a lumpy foot. Then let it cure in a dry, ventilated place. A reasonable planning window is one afternoon for prep and application, then 24 to 48 hours before placing the furniture back outside. Cool, damp, or shaded conditions can extend that timeline.
What If the Leg Bottom Is Already Soft?
Sealer is preventive maintenance, not a magic repair for active rot. Before coating, test the leg. Press the bottom with a screwdriver tip or awl. If the tool sinks easily, the wood is punky. If the leg crushes, splits, or no longer supports weight, it needs repair or replacement.
For minor early softening, let the wood dry thoroughly, sand back to firmer material, and consider penetrating epoxy. Epoxy consolidates fibers that are beginning to degrade, but it needs sound enough wood to bond to. If decay is deep, cut back the damaged portion or replace the leg. On a chair, replacing a leg may cost less time than trying to sculpt a repair that still has to handle racking loads every time someone sits down.
Recommended Free Tools
Check the joint above the leg bottom too. Moisture often travels upward into stretchers, aprons, and screw holes. If a lower stretcher is loose or blackened, address that joint before refinishing the foot. A sealed bottom will not save a chair with a failing frame connection.
Maintenance Schedule for Outdoor Furniture Legs
Inspect outdoor wood furniture at least once per year. In coastal, humid, freeze-thaw, shaded, or sprinkler-exposed locations, inspect twice per year: once before the wet season and once after it. Look for gray end grain, checking, peeling finish, black staining, wicking marks, loose glides, and legs that stay damp after the rest of the furniture dries.
Most sealed leg bottoms need resealing every 1 to 3 years. Furniture stored under cover, kept on a dry porch, or brought inside for winter may sit near the three-year side. Furniture on pavers, uncovered decks, wet grass, or shaded patios may need annual attention.
Good storage matters more than another coat of finish. Keep furniture out of sprinkler spray. Do not store legs in wet grass or leaf piles. If you cover the furniture, use a breathable cover that does not trap condensation against the wood. Tilt tables slightly or store chairs where water can drain instead of pooling around the feet.
Quick wins for a faster PC:
Clear out junk files and repair common Windows errorsFree Scan →Fix the driver behind crashes, sound loss and screen glitchesFind Drivers →Common Mistakes We See
The most common mistake is finishing the visible sides beautifully and leaving the bottom end grain raw. The second is putting the furniture right back on wet concrete after sealing. That combination gives a homeowner a nice-looking chair that still fails from the bottom up.
Avoid interior polyurethane, interior stain, craft paint, ordinary indoor furniture wax, and silicone caulk as general outdoor wood protection. They are not designed for this exposure. Also avoid coating over dirt, wet wood, gray fibers, or failing finish. The coating will stick to the weak layer instead of the furniture.
Do not rush cure time. A tacky finish picks up grit and can lose water resistance. Do not create a thick epoxy mound under the leg. Do not use plain steel screws for feet. Do not assume clear coatings provide enough UV protection forever. Where sunlight reaches the repair, use a UV-resistant exterior topcoat or a pigmented exterior finish when appearance allows.
Rank #3

- Protect Your Floors - Don’t let your furniture leave scratches on your floor. Installing these chair caps on your chairs helps keep your hardwood and laminate floors in pristine condition.
- Move Your Furniture Easily - Using these furniture glides will allow you to smoothly glide your furniture across the floor–no need to lift them. They also keep you from making loud noises.
- Built Tough - Made with UV-safe plastic, these plastic chair leg caps won’t get damaged easily. This strength makes them perfect for outdoor, garden, deck, lawn, or patio wrought iron furniture.
- A Breeze To Install - These round feet caps are meant to fit snugly onto chair legs with an inner diameter of 1.5”. Simply pop them into your furniture’s feet and hit using a rubber hammer or a mallet.
- More Value For Your Money - These high-quality chair feet covers are available in two sets. Get our set of 24 white gliders for furniture legs for 6 chairs or choose our pack of 32 black caps for 8 chairs.
DIY Cost in 2026
For most homeowners, this is a small, high-value maintenance job. A realistic 2026 DIY budget for one patio furniture set is $15 to $75. The low end assumes you buy sandpaper, disposable trays, gloves, and a basic exterior stain/sealer. The high end includes a small penetrating epoxy kit, specialty sealer, or better glides.
What’s actually slowing this PC down?
Pick the symptom - the matching free tool is one click away.
Material costs vary by how many legs you are sealing. Four chairs and a table may have 20 legs. A bench may have only four to six contact points. Bare wood uses more finish than previously sealed wood. Soft pine absorbs more than dense teak. Old checked end grain drinks more than a fresh, clean cut.
If you already have exterior sealer on hand, your only new purchase may be a $5 to $25 set of glides. If the furniture needs rot repair, sanding pads, epoxy, and stainless hardware, the project can move closer to $75. Professional help is rarely economical for sealing alone because many tradespeople have minimum charges. Bundle it with deck repair, exterior refinishing, patio work, or broader maintenance if you want a pro involved.
When to DIY vs When to Hire a Pro
DIY Is Usually Right When
- The leg bottoms are sound, dry, and only gray or lightly checked
- The furniture is stable and not loose at the joints
- You can flip the piece safely without damaging it
- You are using exterior oil, stain/sealer, marine sealer, or simple screw-on glides
- The project is routine maintenance for a patio set, bench, or garden chair
Hire a Pro When
- The leg is soft, cracked, shortened, or no longer carries weight properly
- The furniture is expensive, antique, or custom-built
- Joinery has opened up around stretchers, aprons, or seat frames
- You need a leg replaced, leveled, or rebuilt
- You are bundling the work with deck repairs, refinishing, or other exterior carpentry
A carpenter can square damaged feet, replace rotted leg sections, add discreet pads, and refinish the surrounding wood so the repair does not look like an afterthought. That said, paying a $100 to $250 service minimum just to seal four chair legs is usually not necessary for a capable homeowner.
Safety, VOC, and Permit Notes
Use gloves, eye protection, and ventilation. Oil-soaked rags can create a fire hazard if they are wadded up and left in a pile. Lay them flat to dry outdoors away from buildings, or dispose of them according to the product label and local rules. With epoxy, follow the mix ratio, skin-contact warnings, and cure instructions exactly.
Exterior coatings are regulated for volatile organic compounds, and product availability can vary by state or air-quality district. Buy products labeled for exterior use and legal sale in your area. Low-VOC and water-based marine-grade products may cost more, but they can be the right choice where odor, cleanup, or regional compliance matters.
Sealing, refinishing, or adding glides to movable outdoor furniture normally does not require a building permit. Permits become relevant when you are building or modifying structures such as decks, patio covers, stairs, railings, attached benches, or permanent outdoor installations. If the furniture is built into a deck, guard, stair, or structural feature, check your local building department before altering it.
The Bottom Line
If you want outdoor wood furniture to last, treat the leg bottoms like a construction detail, not just a finishing detail. Sand the bottom end grain clean, soak it until it is saturated, wipe it flat, let it cure, and add replaceable feet or glides. That small job usually costs less than replacing one good chair.
For sound furniture, use an exterior penetrating oil, stain/sealer, or marine-grade sealer. For high-value pieces, harsh exposure, or early softening, use penetrating epoxy and protect exposed areas from UV. Then keep the legs out of standing water. The finish matters, but drainage and clearance are what make the repair last.
Recommended Free Tools
Frequently Asked Questions
What is the easiest way to seal outdoor furniture leg end grain?
Flip the furniture upside down, sand the leg bottoms clean, set each bare end in a shallow dish of exterior penetrating sealer, let the wood absorb finish until it stops darkening quickly, wipe off the excess, let it cure, and install glides or feet.
What is the best sealer for the bottom of wood patio furniture legs?
For routine prevention, an exterior oil-based stain/sealer or marine-grade penetrating sealer is usually best. For expensive furniture, harsh exposure, or early softening, penetrating epoxy provides stronger moisture resistance but costs more and may need a UV-resistant topcoat.
How long should furniture legs soak in finish?
Most leg ends need 15 minutes to a few hours with exterior oil, stain/sealer, or marine sealer. Watch the wood: when the end grain stops darkening and absorbing quickly, wipe off the excess. For epoxy, follow the product’s working time and cure instructions.
Do I need to seal end grain if the rest of the furniture is already stained?
Yes. The bottom end grain is the highest-risk area because it absorbs water faster than the sides of the leg and sits against wet surfaces. Many furniture pieces fail at the feet even when the visible faces still look finished.
Can I put rubber or plastic feet on wood patio furniture?
Yes. Rubber, plastic, nylon, HDPE, and stainless-adjustable glides are all useful outdoors when sized correctly. Use stainless or exterior-rated fasteners, and install the feet after the end grain sealer has cured.
Do I need a permit to refinish or seal outdoor furniture?
No permit is normally needed to seal, refinish, or add glides to movable outdoor furniture. Check local requirements only if the work involves built-in benches, decks, railings, stairs, patio covers, or other permanent structures.
Quick Recap
Product prices and availability are accurate as of the date/time indicated and are subject to change. Any price and availability information displayed on Amazon at the time of purchase will apply.

