Rust on pruning shears is not just cosmetic. A rusty, sticky, dull pair of pruners crushes stems instead of slicing them, spreads sap and soil from plant to plant, and eventually turns a $25 tool into scrap. The good news: most lightly rusty pruning shears can be brought back in 15 to 45 minutes of hands-on work, plus optional vinegar soak time.
The right order matters. Clean first, remove rust second, disinfect only when needed, sharpen and adjust the blades, then oil the pivot and store the shears dry. On our job sites, we treat cutting tools the same way we treat layout tools and finish blades: clean, dry, sharp, and protected before they go back in the box.
If the blades are deeply pitted at the cutting edge, the pivot is loose, the jaws are bent, or the spring and handles are failing, replacement may be the smarter move. Budget bypass pruners often cost about $13 to $25, midrange models commonly run $20 to $45, and professional repairable pruners often land around $70 to $80 or more. That math should guide how much time you spend restoring them.
Quick Answer: The 5-Step Rusty Pruner Reset
For most homeowners, this is the practical sequence:
PC Slower Than It Used to Be?
A free scan shows the junk files, broken settings and background clutter dragging Windows down - then fixes them in one click.Free scan · Windows 10 & 11Crashes, No Sound, or Screen Glitches?
Random freezes, missing sound and display glitches usually trace back to one bad driver. Find and replace yours safely.Free scan · under a minute- Clean: Wash sap, soil, and grit with warm water, dish soap, and a stiff nylon brush.
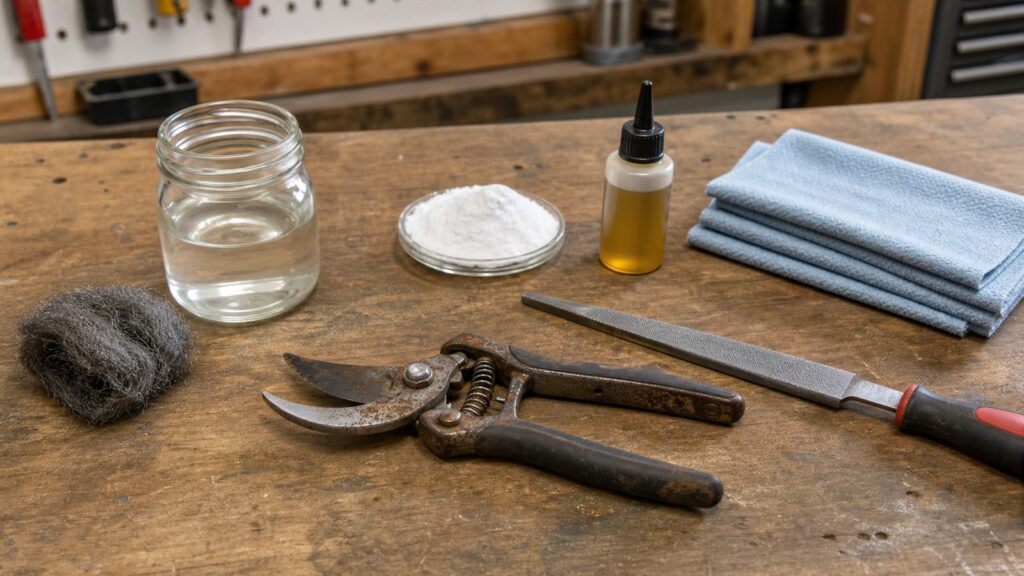
- De-rust: Scrub with steel wool, a brass brush, fine abrasive pad, or rust eraser. Use vinegar only when scrubbing alone is not enough.
- Disinfect: Use 70% isopropyl alcohol or ethanol after cleaning if the shears touched diseased plants. Bleach can disinfect, but it is harder on metal and must be rinsed off.
- Sharpen and adjust: Touch up the bevel with a diamond file or sharpening stone, then check pivot tension.
- Oil and store: Dry completely, oil the blade and pivot, and hang the tool in a dry place away from fertilizer and pool chemicals.
Do not start by sharpening. Sap, rust, and grit hide the blade bevel and can drag abrasive debris across the cutting edge. Cleaning first gives you a clear read on whether the tool is worth saving.
#1 Best Overall

- Diamond coated - These sharpeners are made of diamond-coated hardened steel that meticulously hones pruning shear, knife, and cable cutter blade edges for clean, effortless cuts.
- Perfect for pruners - The sharpening stone is specifically designed to reach all areas for secateur blade sharpening. This means your shears will stay sharp and your cuts will stay precise.
- Improves your tools - The Felco 903 Diamond Coated Sharpener is a multi-function tool for professional-grade, intensive sharpening and blade strengthening.
- Easy to use - No more complicated sharpening. Just rub this simple-to-use whetstone along your blade to improve the sharpness and strengthen the blade.
- Long lasting - The Felco sharpening accessories maintain optimal blade quality for increased longevity and best performance. The stone itself is long-lasting and retains its shape.
What You Need Before You Start
You do not need a full shop setup. A kitchen sink, garage bench, or outdoor work table is enough. Put down cardboard or an old towel so small parts do not bounce away.
Basic supplies
- Dish soap and warm water
- Old toothbrush or stiff nylon brush
- Clean rags or shop towels
- Steel wool, brass brush, wire brush, fine abrasive pad, or rust eraser
- White vinegar for soaking rusty metal parts
- Baking soda for neutralizing vinegar residue and light scrubbing
- 70% isopropyl alcohol or ethanol for disinfection
- Light machine oil, mineral oil, camellia oil, or manufacturer-recommended lubricant
- Diamond file, sharpening stone, or pruner sharpener
- Nitrile gloves and eye protection
DIY supply cost is usually $0 to $25 if you already have soap, vinegar, baking soda, rags, and oil. If you need to buy a diamond file, rust eraser, lubricant, and gloves, expect roughly $15 to $45.
Should you disassemble the shears?
Disassembly helps when rust and sap are packed around the pivot, but it is not always required. If the tool opens and closes smoothly after cleaning, leave it assembled. If the pivot is gritty, stiff, or visibly rusty, take it apart only if the tool is designed for it.
The Tool Desk
Outbyte Driver Updater FREEFix the driver behind crashes, sound loss and screen glitchesFind Drivers →Outbyte PC Repair FREEClear out junk files and repair common Windows errorsFree Scan →Before removing a nut, spring, washer, or bumper, take a photo with your phone and lay the parts out in order. Many pruning shears have small curved springs, spacers, lock tabs, and washers that look obvious until you turn your back for five minutes.
Step 1: Clean Off Sap, Soil, and Grit
Start with the least aggressive method. Open the shears fully and scrub the blades, pivot, handle shoulders, and spring area with warm water, dish soap, and a stiff brush. Soil is abrasive. Sap hardens into a sticky film. Both make a sharp tool feel dull.
Pay close attention to the inside face of bypass pruners. Bypass pruners have two blades that pass close together, like scissors. They are the default choice for living stems because they make a cleaner cut. Anvil pruners close one blade onto a flat surface and are better suited for dead wood; on green stems, they can crush tissue instead of slicing it cleanly.
For heavy sap, let the metal parts sit against a damp, soapy rag for 5 to 10 minutes, then scrub again. Avoid soaking wood handles, plastic grips, springs, coatings, or lock mechanisms longer than necessary. The goal is to loosen residue, not flood every part of the tool.
Do these 3 things before closing this tab:
1Repair Windows errors before they cause bigger problems2Fix the driver behind crashes, sound loss and screen glitches3Clear out junk files and repair common Windows errorsStep 2: Remove Rust Without Ruining the Blade
Use the least aggressive abrasive that works. Surface rust often comes off with steel wool, a fine abrasive pad, or a brass brush. A wire brush can help on heavy rust, but keep it controlled around the cutting edge. You are restoring the steel, not grinding a new tool out of it.
For light surface rust
Spray or wipe the blade with a light lubricant, then scrub with steel wool or a rust eraser. Work along the blade, not across the cutting edge. Wipe the blade clean every few minutes so you can see what is rust and what is clean steel.
Light orange staining is usually not a reason to replace the tool. If the blade is still flat, the edge is intact, and the pivot is tight, restoration is usually worth the 10 to 20 minutes.
For heavier rust: vinegar soak
White vinegar can loosen heavier rust, but it should be used with control. If possible, soak only the rusty metal portions, not the whole tool. A shallow tray works better than a tall bucket because you can keep handles and springs out of the acid.
Rank #2
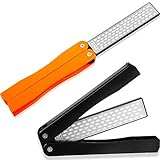
- Easy to use and carry: the pocket knife sharpener works well on restoring and honing all sorts of garden tool, knife, scissors, etc.; Portable folding design fits in the pocket or tool bag, convenient to store and carry around
- Material: the garden tool sharpener is made of titanium plated diamond whetstone for durable use, lightweight ABS handle for comfort; Honeycomb surface can sharpen garden implements faster than conventional stones
- Double-sided diamond design: the diamond sharpening stone features double-sides diamond design, coarse 400 grit for quick edge setting, extra fine 600 grit for honing; No oil is needed, just sharpen dry or with water
- Wide application: pointed tools will make better cuts and require less effort to power through cuts; Due to portable design and lightweight, this camp sharpening stone fits for outdoor activities, camping, garden, kitchen, sports or industries
- Package includes: 1 x black garden knife sharpener and 1 x orange garden knife sharpener, a nice choice of gift for garden lovers, campers, outdoor sports lovers, adventurers, and so on
For moderate rust, start with a 30-minute to 2-hour soak. For more stubborn rust, check the tool every hour instead of leaving it overnight by default. Once the rust softens, scrub with steel wool, a brass brush, or a fine abrasive pad.
After a vinegar soak, rinse the metal thoroughly or wipe it with a baking-soda-and-water solution to neutralize acid residue. Then dry immediately. Do not leave bare, freshly cleaned steel sitting overnight. Flash rust can show up fast, especially in a humid garage or shed.
What not to do
Do not grind away the blade unless you know exactly what you are removing. Deep grinding can overheat thin steel, change the bevel, and shorten the life of the tool. Do not aggressively sand the flat side of bypass pruners. That flat inside face is part of the cutting geometry; rounding it over can make the blades separate and tear stems.
Cleaning, Rust Removal, Disinfection, and Protection Compared
Homeowners often mix up cleaning, rust removal, disinfection, and lubrication. They are separate jobs. Vinegar is not your everyday disinfectant. Alcohol does not remove rust. Oil does not clean disease residue. Bleach can sanitize, but it can also corrode steel if you put the tool away wet.
Free tools Windows power users keep installed
One-click scans. No signup required.
| Product or method | Best use | Typical time | Key caution |
|---|---|---|---|
| Dish soap and warm water | Removes soil, sap, and visible debris | 5 to 10 minutes | Dry pivot areas fully afterward |
| Steel wool, brass brush, abrasive pad | Removes light to moderate surface rust | 5 to 20 minutes | Use controlled pressure near the cutting edge |
| White vinegar | Loosens heavier rust before scrubbing | 30 minutes to several hours | Rinse or neutralize, dry, and oil immediately |
| 70% isopropyl alcohol or ethanol | Disinfects cleaned tools after diseased pruning | Wipe or dip; no long soak needed | Use away from flame and let it evaporate |
| 10% bleach solution | Disinfection when appropriate for disease control | Usually several minutes of wet contact | Corrosive to metal; rinse, dry, and oil after use |
| Light machine oil, mineral oil, camellia oil, protective spray | Lubricates pivot and protects steel from corrosion | 1 to 3 minutes | Use a light coat; wipe off excess before pruning |
Step 3: Disinfect When Disease Spread Is a Concern
Cleaning and disinfecting are not the same. Cleaning removes visible dirt and residue. Disinfecting reduces pathogens on the tool. If you used the shears on healthy plants and only need seasonal maintenance, cleaning, drying, sharpening, and oiling may be enough. If you cut diseased branches, cankers, blighted stems, or suspicious plant material, disinfect the tool after cleaning.
For most pruning jobs, 70% isopropyl alcohol or ethanol is the easiest disinfectant to manage. Keep alcohol wipes or a small bottle in the tool caddy so you can disinfect between plants or between cuts when disease spread is a real concern. Wiping or dipping with alcohol is fast and does not require a prolonged soak.
Bleach can disinfect tools, but it is corrosive to metal. If you use a 10% bleach solution, rinse the metal afterward, dry it completely, and oil the blade and pivot before storage. Never use bleach and then toss the shears into a drawer wet.
Step 4: Sharpen the Blade After It Is Clean
Clean metal lets you see the bevel. That matters. Most bypass pruning shears are sharpened on the outside bevel only. The inside face should remain mostly flat, with only a light pass to remove burrs.
Clamp the tool or hold it firmly on a bench. Follow the existing bevel angle with a diamond file, sharpening stone, or pruner sharpener. Use smooth strokes from the base of the blade toward the tip. Ten to twenty controlled passes are usually enough for normal homeowner maintenance.
Do not chase a razor edge at the expense of blade shape. A clean, consistent bevel is better than an over-thinned edge that chips or rolls. After sharpening, lightly wipe the flat side to remove the burr, then test the cut on a small green stem or a strip of paper. The tool should slice cleanly without crushing or folding the material.
Rank #3

- VERSATILE – The most versatile sharpener in the market to sharpen and hone both single and double beveled blades including knife, mower blade, pruner, loppers, hedge shears, axe, machete, hatchet, scissors, edged tool, etc.
- SUPERIOR SHARPENING PERFORMANCE – As blades vary from different angles, shape, single or double bevel, etc., to fulfill the best sharpening performance for each blade / tool edge, this item is constructed of 5 sharpening parts including 3 different slots of preset optimal sharpening angle, one specially designed tungsten carbide bar, and one ceramic bar.
- DURABLE – All sharpening abrasive materials pass 10,000 times field use test. NEVER WEARS OUT
- SAFE & COMFORTABLE USE – Oversized handle allows for use with gloves. Large hand guard to protect your hands from hurting by blades. Rubber over-molded handle and base provide secure and comfortable grip.
- 3 YEARS of Commitment and Superior After-Sale Service: SHARPAL, headquartered in California, USA, with branches in Germany and Australia, provides easy and effective sharpening solutions. All products undergo rigorous testing to ensure top-tier performance and durability.
Adjust the pivot
A sharp blade still cuts poorly if the pivot is loose. On bypass pruners, the blades should pass close enough to make a clean cut without binding. If there is a pivot nut or bolt, tighten it gradually. Open and close the tool after each small adjustment. The motion should feel smooth, not sloppy and not stiff.
Add one drop of light oil at the pivot, open and close the shears 10 to 20 times, then wipe away excess. If black residue squeezes out, wipe it clean and repeat once.
What’s actually slowing this PC down?
Pick the symptom - the matching free tool is one click away.
Step 5: Oil and Store the Shears Dry
Rust forms fastest when carbon-steel blades are stored wet, left dirty with sap and soil, or kept in humid sheds and garages without oil protection. Storage is where most homeowners lose the battle.
After cleaning and sharpening, dry the shears completely. A clean rag handles most of it, but compressed air or a hair dryer on low can help dry the pivot, spring pocket, and handle seams. Apply a light coat of machine oil, mineral oil, camellia oil, or manufacturer-recommended protective spray to the blade and pivot. Wipe off excess so the tool is protected, not dripping.
Do not use motor oil on garden tools. It can transfer to plants and soil. Also avoid storing pruning shears beside fertilizer, ice melt, pool chemicals, or open bags of soil amendments. Those materials can hold moisture or release corrosive dust.
The best storage is simple: hang the shears on a wall hook, keep them in a tool roll, or place them in a sealed bin with a desiccant pack. A dry hook beats the bottom of a bucket every time. Avoid concrete floors, damp potting benches, and closed drawers where wet tools sit with no airflow.
Quick wins for a faster PC:
Fix the driver behind crashes, sound loss and screen glitchesFind Drivers →Clear out junk files and repair common Windows errorsFree Scan →When Rusty Pruning Shears Are Too Damaged to Save
Some tools are worth restoring because the steel and parts are good. Others are not. The decision should be based on function and replacement cost, not guilt.
Restore budget shears if the rust is superficial, the spring works, the handles are solid, and the blades still meet correctly. Spend 10 to 20 minutes and see if the tool responds. Replace budget shears if the blade is deeply pitted near the cutting edge, the pivot is sloppy, the spring is broken, the lock no longer works, or replacement parts cost nearly as much as a new tool.
For premium repairable pruners, the math changes. Professional models commonly cost about $70 to $80 or more, and many have replaceable blades, springs, nuts, and bumpers. If the frame is straight and the pivot area is sound, replacing a blade or spring can be more sensible than buying new.
| Condition | Best call | Why |
|---|---|---|
| Light orange rust, sticky sap, dull edge | Clean, sharpen, and oil | Usually a 15 to 45 minute fix |
| Rust around pivot, tool opens stiffly | Clean pivot, lubricate, possibly disassemble | Friction can mimic a dull blade |
| Deep pits on cutting edge | Replace blade or tool | Pitting leaves ragged cuts even after sharpening |
| Bent jaws or cracked handles | Replace | Unsafe and hard to tune accurately |
| Premium pruner with replaceable parts | Repair if frame is sound | Parts can extend the life of a $70+ tool |
DIY Cost vs Replacement Cost in 2026
The economics are straightforward. If you already own the supplies, cleaning costs almost nothing. Even buying a basic kit usually stays under the cost of a decent replacement pair.
Rank #4

- 【Quality Material】The garden tool sharpener is made of heavy-duty tungsten steel alloy, which can sharpen the knife finely and quickly, prolonging the knife service life. Sharpening the two sides of the knife with this mini knife sharpener
- 【Small & Convenient】With a compact size of just 12.5cm, easy to carry our knife sharpener is small enough to fit in your pocket or kitchen drawer. This blade sharpening stone is ideal for on-the-go sharpening needs
- 【Wide Application】 The mini blade sharpener stone fit for pocket knives, pruners, hedge shears, axe, hatchets, machetes, various of garden tools. The multipurpose sharpener equips you with all you need to sharpen straight blade tools
- 【Ergonomic Design】The tungsten shear sharpener's ergonomic anti-slip vinyl handle is easy to grip. The blade sharpener is suitable for both right and left handed users, providing a comfortable and efficient grip for everyone
- 【Easy to Use】Designed for maximum efficiency, this compact multi-purpose sharpener for tools works fast and efficiently. Stroke the two sides of the knife with a garden knife sharpener. After the knife is sharpened, wipe its surface with a damp cloth
For 2026 US pricing, a DIY cleaning and rust-removal setup usually runs $0 to $25 with household supplies, or $15 to $45 if you buy a dedicated diamond file, rust eraser, lubricant, and gloves. Replacement pruning shears at big-box stores commonly fall into these ranges: Fiskars bypass and micro-tip shears around $13 to $37, Corona bypass pruners around $20 to $44, and professional Felco models around $76 to $78, with local pricing varying by store and model.
Here is the practical rule: restore good tools and lightly rusty tools; replace cheap tools with structural damage. If a $17 pair needs a new spring, new blade, and an hour of fussing, buy a new pair. If a $78 repairable pruner needs cleaning, sharpening, and a spring, repair it.
When to DIY vs When to Hire a Pro
You do not hire a gardener just to clean one pair of shears. This is a homeowner-level maintenance task. Hire help when the pruning itself is the issue: large shrubs, tall hedges, disease management, heavy cutback, ladder work, or tree limbs that require proper pruning cuts and disposal.
National 2026 online cost guides show broad gardener and yard-help ranges from about $20 to $150 per hour, with common gardener averages around $33 to $50 per hour. Specialized pruning or tree and shrub trimming is often higher, roughly $55 to $80 or more per hour in contractor pricing guides. Minimum service fees can make a small visit expensive, so it usually makes sense to bundle pruning with cleanup, mulching, seasonal trimming, or hauling.
Recommended Free Tools
DIY the tool cleaning if you can safely handle a sharp blade, the tool is mechanically sound, and you have 30 minutes. Hire a pro for the plant work if you are dealing with diseased shrubs, pruning above shoulder height, large branches, thorny overgrowth, or plants where bad cuts can damage shape and long-term health.
Independent reader supportYour contribution helps us test, update, and keep practical guides available for everyone.Safety Notes for Cleaning and Sharpening
Pruning shears are small, but the blade is still a cutting edge. Wear gloves when scrubbing and sharpening. Use eye protection when wire brushing, especially if rust flakes or wire bristles can fly. Work on a stable bench with good lighting.
Keep alcohol away from flame, pilot lights, and sparks. If you use bleach, mix it in a ventilated area and never combine it with ammonia or other cleaners. Rinse bleach from metal tools after disinfection, then dry and oil them.
There are no permits involved in cleaning pruning shears. The safety concern is practical: sharp metal, chemical exposure, and plant disease transfer. If you are pruning diseased material, bag and dispose of plant waste according to local yard-waste rules rather than composting infected debris in a home pile.
Common Mistakes That Bring Rust Back
The most common mistake is putting the tool away wet. The second is cleaning only the blade face while leaving the pivot packed with sap and grit. A pivot that binds makes a sharp tool feel dull and encourages the user to squeeze harder, which damages stems and hands.
Other avoidable mistakes include soaking the whole tool too long in vinegar, leaving acid residue on steel, using bleach without rinsing and oiling afterward, sharpening before cleaning, over-grinding the bevel, and storing shears in a damp bucket or drawer. Fertilizer and pool chemicals are also rough on metal, so do not store pruning tools in the same cramped bin with corrosive products.
Best Value

- [PREMIUM SHARPENING STONE FOR GARDEN TOOLS] This versatile sharpening stone set is perfect for maintaining the sharpness of pruning shears, gardening scissors, sickles, small knives, and horticultural blades. Designed for precision and ease of use, it ensures your tools perform at their best.
- [EASY-TO-USE STICK SHAPE] The compact, stick-shaped stones make sharpening curved blades and hard-to-reach edges effortless—tasks that are often challenging with traditional sharpening stones. For routine maintenance, you can even sharpen your shears without the hassle of disassembling them.
- [STRAIGHT & CURVED SURFACES] The set includes two types of stones: a curved stone for sharpening curved or beveled blades, such as pruning shears, and a flat stone for finishing and removing burrs from blade backs. This combination provides comprehensive care for your tools.
- [ROUGH & MEDIUM GRIT SET] Choose between the medium-grit stone (#800) for regular maintenance and restoring sharpness, and the coarse-grit stone (#320) for repairing chips or heavily dulled blades. Whether you’re fine-tuning or restoring, this set has you covered. Keep your garden tools sharp, efficient, and ready for any task with this specialized sharpening stone set!
- [PRODUCT SPECIFICATIONS] Made in Japan / Each Stone Size: 5.1×0.6×0.4 inches / Included Stones: Coarse Flat (#320), Coarse Curved (#320), Medium Straight (#800), Medium Curved (#800)
For disease-prone pruning, do not wait until the end of the season to disinfect. If you cut diseased branches and then move to a healthy plant, you have already created the problem. Keep alcohol wipes in the yard and deal with it in real time.
A Simple Maintenance Schedule
After each use, wipe the blades clean and dry. If the shears touched diseased plant material, disinfect them before moving to healthy plants. After heavy pruning, wash the tool with soap and water, dry the pivot, and add a drop of oil.
Do these 3 things before closing this tab:
1Repair Windows errors before they cause bigger problems2Scan for outdated or missing drivers - takes under a minute3Clear out junk files and repair common Windows errorsOnce or twice per season, do a deeper reset: clean, inspect, sharpen, adjust, and oil. For homeowners who prune heavily in spring and fall, that usually means one tune-up at the start of spring and one before winter storage. If you live in a humid climate or store tools in an unconditioned shed, inspect monthly during the growing season.
The whole habit takes less time than replacing a damaged shrub. Sharp, clean pruners make smaller wounds, cleaner cuts, and less hand fatigue. That is the point of the maintenance: better work from the same tool.
Frequently Asked Questions
Can I use vinegar to remove rust from pruning shears?
Yes. Use white vinegar for rusty metal parts, ideally only on the blade and other exposed steel. Start with 30 minutes to 2 hours, scrub the loosened rust, then rinse or neutralize with baking soda solution. Dry immediately and oil the blade so flash rust does not return.
Should I use bleach or alcohol to disinfect pruning shears?
For most homeowners, 70% isopropyl alcohol or ethanol is easier and less corrosive. Wipe or dip cleaned blades when disease spread is a concern. Bleach can disinfect, but it can corrode metal, so rinse, dry, and oil the tool afterward.
The Tool Desk
Outbyte PC Repair FREERepair Windows errors before they cause bigger problemsFix Now →Outbyte Driver Updater FREEScan for outdated or missing drivers - takes under a minuteDriver Scan →Do I need to take pruning shears apart to clean them?
Not always. If the shears open smoothly and the pivot is clean, leave them assembled. Disassemble only when sap, rust, or grit is packed around the pivot and the tool is designed to come apart. Photograph the parts first so springs, washers, and nuts go back correctly.
What oil should I use on pruning shears after cleaning?
Use light machine oil, mineral oil, camellia oil, or the manufacturer’s recommended lubricant or protective spray. Apply a thin coat to the blade and one drop at the pivot, work the tool open and closed, then wipe away excess. Do not use motor oil.
When are rusty pruning shears too damaged to save?
Replace them if the cutting edge is deeply pitted, the jaws are bent, the handles are cracked, the pivot stays loose, or replacement parts cost nearly as much as the tool. Premium repairable pruners are often worth fixing if the frame and pivot are sound.
Can dirty pruning shears spread plant disease?
Yes. Sap and plant residue can carry pathogens from diseased plants to healthy ones. Clean visible debris first, then disinfect between plants or cuts when disease transfer is a concern.
Free tools Windows power users keep installed
One-click scans. No signup required.
Quick Recap
Product prices and availability are accurate as of the date/time indicated and are subject to change. Any price and availability information displayed on Amazon at the time of purchase will apply.