Free tools Windows power users keep installed
One-click scans. No signup required.
Some links on this page are affiliate links: if you buy through them we may earn a commission, at no extra cost to you.
A cracked laptop shell can be a cosmetic flaw—or a sign that a hinge, screw mount, or battery is forcing the case apart. Small, unloaded cracks may be reinforced from inside with a compatible two-part epoxy. A broken hinge mount or detached threaded insert usually needs the underlying hinge problem fixed and often calls for a replacement housing or professional repair.
Before choosing an adhesive, identify which part is broken, check what load it carries, and look for the cause of the failure. Gluing a crack while a stiff hinge continues to pull on it is likely to produce another crack.
Choose a repair based on the damage
| Damage | DIY suitability | Approach | When to replace or escalate |
|---|---|---|---|
| Small crack away from hinges, screw posts, and electronics | Often suitable if the inside is accessible | Bond and reinforce the inside with plastic-compatible two-part epoxy | Replace the part if the crack spreads or the repair obstructs reassembly |
| Detached trim or a non-load-bearing clip | Usually suitable | Use a compatible adhesive sparingly, or replace the trim | Escalate if the trim presses on the LCD or must remain removable for service |
| Cracked bottom cover | Sometimes suitable | Reinforce from inside without covering vents or screw holes | Replace if a screw post is missing, the cover no longer supports components, or a battery may be swollen |
| Broken screw boss or missing plastic around a mounting point | Limited; requires careful alignment and clearance | Replace the part where practical; a reinforced rebuild may be a temporary repair | Use professional service if the mount supports a hinge, motherboard, or display assembly |
| Detached hinge insert, cracked hinge area, or top case pulled apart | Not a dependable glue-only repair | Correct the hinge cause and usually replace the affected shell or assembly | Stop if the hinge is stiff, bent, tearing through the case, or affecting the display |
| Case opening without impact | Do not press or glue it shut | Check for battery swelling and seek qualified service if suspected | Stop using and charging the laptop if the battery may be swollen |
These are general decision points, not model-specific repair instructions. Laptop shell materials and assemblies vary, and even a seemingly minor crack can conceal a damaged bracket or mount.
What’s actually slowing this PC down?
Pick the symptom - the matching free tool is one click away.
Identify the broken part
Repair guides often use letters for the major sections of a laptop shell:
#1 Best Overall

- Kaisi 20 pcs opening pry tools kit for smart phone,laptop,computer tablet,electronics, apple watch, iPad, iPod, Macbook, computer, LCD screen, battery and more disassembly and repair
- Professional grade stainless steel construction spudger tool kit ensures repeated use
- Includes 7 plastic nylon pry tools and 2 steel pry tools, two ESD tweezers
- Includes 1 protective film tools and three screwdriver, 1 magic cloth,cleaning cloths are great for cleaning the screen of mobile phone and laptop after replacement.
- Easy to replacement the screen cover, fit for any plastic cover case such as smartphone / tablets etc
- A shell: the outer display lid or screen cover.
- B shell: the bezel surrounding the display.
- C shell: the palm rest, keyboard deck, or top case.
- D shell: the bottom cover.
- Hinge mounts: plastic bosses, brackets, or threaded inserts that secure the metal hinges.
- Clutch or hinge covers: narrow trim over the hinge barrels.
Look beyond the visible crack. A bezel pulling away near a corner, for example, may be reacting to a broken hinge mount behind the display. Replacement parts may also be sold as a larger assembly: a top case may include the keyboard, and a display housing may include other fitted components. Acer community discussion illustrates why these assemblies and shell sections need to be identified for the particular model: Acer Swift casing discussion.
Check whether the damage is structural
A crack away from load-bearing areas is more likely to be a candidate for reinforcement. Treat damage as structural if you find any of the following:
- The lid twists, sits unevenly, creaks, binds, or needs unusual force to open.
- A hinge moves before the other, or is visibly pulling away from the shell.
- A brass insert or screw boss has torn out, or a screw spins without tightening.
- The palm rest lifts as the screen opens, or a bezel repeatedly separates.
- The crack reaches a hinge, display-cable route, battery, or motherboard mounting point.
- The case is separating without an impact, or any area is burned, melted, or heat-damaged.
Repeated repair cases describe hinge mounts and molded inserts as high-stress failure points; they are useful examples, not universal manufacturer repair instructions. See the reported broken hinge frame and top-case cracking near the opening area. If the case has separated without an impact, Microsoft’s Surface repair safety guidance calls for caution with separated or opened cases and heat-damaged parts. Do not force the case back together; a swollen battery is one possible cause.
Choose adhesive, reinforcement, or a replacement part
Small crack in an accessible, rigid shell
A plastic-rated two-part epoxy can be appropriate when the surrounding material is intact, the damaged area is not carrying hinge load, and the inside can be reached. Apply it to the prepared interior surface and, where clearance allows, bridge the crack with a shaped reinforcement patch. This spreads load over sound plastic rather than relying on a bead laid only along the fracture.
Rank #2

- Built for Laptop, Console, and PC Disassembly: Designed for opening bottom covers, releasing tight clips, and separating plastic housings during laptop, MacBook, computer, PS4, PS5, Xbox, Switch, and controller repair.
- Plastic Where Safety Matters, Metal Where Force Is Needed: ESD-safe plastic spudgers help around clips, connectors, and delicate internal parts, while the metal pry tool and double-sided metal spatula add leverage for stubborn covers, shields, and tightly fitted components.
- Great for Game Consoles and Controllers: Ideal for opening PS4, PS5, Xbox, Switch, and controller shells for deep cleaning, fan access, battery replacement, internal maintenance, and general repair work.
- Anti-Static Tools for Internal Work and Cleaning: Anti-static spudgers and the anti-static brush are useful for disconnecting battery and flex connectors, guiding cables, removing dust, and cleaning sensitive electronics during console, laptop, and PC maintenance.
- Compact 12-in-1 Professional Opening Kit: Includes essential pry and disassembly tools for everyday repairs, upgrades, shell opening, clip release, fan cleaning, and internal access across laptops, game consoles, computers, controllers, and small electronics.
J-B Weld’s product documentation lists Plastic Bonder for materials including ABS and other plastics, but that does not establish compatibility with every laptop shell. Check the specific product label and technical documentation, and test on inconspicuous material or a matching scrap where possible: J-B Weld product data sheet and J-B Weld catalogue. Laptop shells are not all the same plastic; do not assume a product suitable for one shell will bond to another.
Broken clip, bezel, or thin trim
Replacing a broken bezel or trim piece is often cleaner and preserves future access. If bonding is appropriate, use very little adhesive and keep it away from the LCD edge, clips that must flex, and any area that needs to come apart during service. Solvent-based products can distort thin plastic. Do not glue down a separating bezel until you have checked whether a hinge or display back cover is pushing it outward; examples of hinge-related bezel separation are discussed in this repair case.
Broken screw boss or detached hinge insert
A screw boss can sometimes be rebuilt with epoxy or epoxy putty and a reinforcement patch, but alignment and screw clearance are critical. A hinge insert is different: it must withstand repeated torque. Replace the affected shell when the correct part is available, and fix or replace a stiff, bent, or damaged hinge before fitting the new housing. A glue-only repair under the same abnormal load may fail again. A community case describes a superglue-type repair failing at broken lid hinge screw mounts; this is an example rather than proof that every adhesive fails in every application.
PC Slower Than It Used to Be?
A free scan shows the junk files, broken settings and background clutter dragging Windows down - then fixes them in one click.Free scan · Windows 10 & 11Crashes, No Sound, or Screen Glitches?
Random freezes, missing sound and display glitches usually trace back to one bad driver. Find and replace yours safely.Free scan · under a minuteCracked bottom cover or damaged metal mounting plate
A bottom-cover crack may be reinforced if the cover still supports the laptop correctly and the repair leaves vents, screws, and internal clearances unobstructed. If a plastic mount has detached from an aluminum frame, bonding may help only if the metal mounting plate is intact. Adhesive cannot restore missing or fractured metal.
Rank #3

- 【Universal】These spudger kit and pry tools professional designed for disassembling a variety of electronics - iPhone, android phone, laptop, tablet, apple watch, iPad, iPod, Macbook, computer, LCD screen, battery and more
- 【Plastic Spudger】Nylon spudger set is made of quality carbon fiber plastic, tough-yet-soft, which makes the tools effective at prying & opening electronics cases and screen without scratching or marring their surface
- 【More Tools】Metal Spudger helps pry and poke when you need a little more power. Ultra thin opening tool easily slips between the tightest gaps and corners. Opening picks are useful for prying open iPad and other glue-laden devices
- 【Package】This electronics pry tool kit includes 1 x plastic spudger, 1 x metal spudger, 1 x ultra-thin opening tool, 1 x hook tool, 1 x pry tool, 2 x opening tools and 4 x opening picks
- 【Warranty】Each electronic pry tool kit is covered by STREBITO's lifetime warranty and 30 days money-back. If you have any issues with your toolkit, simply contact us for troubleshooting help, replacement, or refund
When replacement or professional service makes more sense
Replacement is generally the stronger choice when a hinge mount or threaded boss has failed, plastic is missing from a load-bearing area, several mounting points are cracked, or the hinge itself is damaged. Check the exact model and revision before buying a part: display size, color, keyboard layout, connectors, and antenna arrangement can differ. A nominally simple plastic part may be sold only as a larger assembly. In some models the keyboard is integrated with or riveted to the top case, making replacement of the full upper assembly more practical; this varies by model, as noted in the Acer casing discussion.
Use a repair shop if the job involves a possibly swollen battery, a damaged display, a fragile or glued LCD, extensive component transfers, or a high-value machine you cannot risk damaging. Local service availability, parts, and cost depend on the model and location; there is no universal price for repairing broken laptop plastic.
Prepare safely before opening the laptop
- Back up important data.
- Shut the laptop down fully, unplug the charger, and disconnect peripherals.
- Inspect the case for swelling or unexplained separation. If battery swelling is possible, do not press, puncture, heat, glue, or continue disassembly; stop using and charging the laptop if safe to do so, and seek qualified service.
- Find the exact model and machine-type number, then locate its service manual or model-specific disassembly guide. A marketing name alone may not identify the right procedure.
- Photograph the exterior and each internal stage. Keep screws organized by location and length.
- Work on a clean, well-lit, static-conscious surface. Protect the display, keyboard, and motherboard from dust, fragments, and adhesive.
- Follow the model’s service sequence for disconnecting the battery. Remove or disconnect it as soon as the procedure permits, before working near exposed electronics.
There is no universal screw order or rule about whether the LCD must be removed. Manufacturer documentation is model-specific: Apple, for example, publishes repair manuals with procedures, parts, tools, and safety sections for individual MacBook models. Consult the manual for the exact device, such as Apple’s MacBook Air repair manual or another MacBook Air repair manual. A general cover-removal guide or a guide for a different model cannot replace it; compare the model-specific procedures in the Alienware plastic cover guide and MacBook Pro clutch-cover guide.
Do these 3 things before closing this tab:
1Repair Windows errors before they cause bigger problems2Scan for outdated or missing drivers - takes under a minute3Clear out junk files and repair common Windows errorsTools and materials
For disassembly and protection
- Precision Phillips, Torx, or the drivers specified for the model.
- Plastic opening picks or a spudger, tweezers, and a screw organizer or magnetic mat.
- Isopropyl alcohol and lint-free swabs, if suitable for the material and area being cleaned.
- Nitrile gloves, eye protection, painter’s tape, and a clean mixing surface.
For a plastic repair
- Two-part epoxy explicitly rated for plastic, after verifying material compatibility.
- Optional epoxy putty for rebuilding missing plastic, and a thin plastic, fiberglass, or metal reinforcement strip if it fits without contacting components.
- Fine abrasive paper for lightly keying a glossy bonding surface.
- Small clamps or a soft fixture to hold alignment without crushing the shell.
- Replacement screws, inserts, bezel, cover, or top-case assembly as required.
Ordinary instant glue is not a dependable default for a repeatedly loaded hinge mount. Heat-based plastic welding is also not a beginner’s default: heat can warp thin shells or damage nearby electronics. Do not modify hinge tension unless the model-specific service procedure explicitly instructs it.
Rank #4
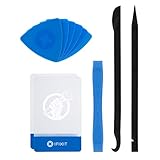
- EFFECTIVE: Open your tech device and safely remove components with ease. Essential for DIY repairs like displays, batteries, motherboards, headphone jacks, joysticks, and more.
- COMPLETE: Includes Spudger, Halberd Spudger, iFixit Opening Tool, Plastic Cards, iFixit Opening Picks (Set of 6).
- UNIVERSAL: Professional opener and pry tools specifically designed for disassembling a variety of electronics.
- MUST-HAVE: Designed for fixing iPhones, Android phones, PC laptops, iPads, computers, smartwatches, tablets, and many other gadgets.
- CURATED: Bundle tools chosen using data from thousands of our repair manuals to maximize usability.
General method for an accessible crack
This is a general method, not a substitute for the exact service manual. If the damage is at a hinge mount, the part cannot be reached safely, or disassembly requires removing a fragile display you are not equipped to handle, stop and use a replacement part or professional service.
- Inspect before opening. With the laptop closed, check whether the lid sits squarely, the bezel is lifting, or the base flexes. Open it only as far as needed to inspect the failure. Do not repeatedly cycle a visibly failing hinge.
- Find the cause. Check for loose hinge screws, a stiff or seized hinge barrel, a bent hinge plate, a separated boss or insert, a pinched display cable, and signs of battery swelling. Correct the hinge fault before rebuilding its mount; otherwise the same load remains.
- Disassemble only as far as necessary. Follow the model-specific procedure to expose the rear of the damaged plastic. Depending on the design, access may involve the bottom cover, battery connection, antennas, display cable, bezel, LCD, hinges, or top case. Do not assume every part must be removed or can safely remain installed.
- Clean and align. Remove loose fragments and old adhesive, dry-fit the pieces, and mark their position. Clean the bonding surfaces with a compatible cleaner and let them dry fully. Lightly roughen glossy plastic. Use barriers to protect cables, screen surfaces, threads, and moving hinge parts; avoid flooding the shell with solvent.
- Check clearances and plan reinforcement. Before mixing adhesive, confirm that the case can close, screws will reach their holes, and the repair will not touch the LCD, hinge path, webcam, antennas, fan, battery, or cables. Plan a thin patch that bridges onto intact plastic.
- Apply and hold the repair. Mix the epoxy exactly as its label directs. Use a small amount in the crack and across the prepared underside, then add the patch if space allows. Build missing material in thin layers. Keep adhesive out of screw threads, vents, connectors, display edges, and moving parts. Clamp or tape the piece in alignment without deforming it.
- Wait for the specified cure. Leave the part undisturbed for the product’s stated handling and full-cure time. A hard surface does not mean the repair is ready to take hinge load.
- Reassemble and test gradually. Seat the hinge correctly, route cables as before, and tighten screws evenly without overtightening into plastic. Restore brackets, shields, and grounding components, and check screw lengths. Reconnect the battery at the point specified by the service procedure. Test the display and other functions while accessible, then move the lid through a few degrees at a time, stopping if resistance is uneven, the case flexes, the bezel lifts, or the image changes.
Inspect the repair and decide whether it is holding
Before returning the laptop to normal use, verify the repair and all functions affected by disassembly:
- The hinge moves smoothly and evenly; the case closes squarely.
- No cable is pinched, stretched, or trapped, and no adhesive touches a moving part.
- Vents are open; the repair does not rub a fan or press on the battery.
- All screws, brackets, and shields are accounted for and correctly seated.
- The display, webcam, speakers, keyboard, touchpad, Wi-Fi, charging, and ports work as applicable.
- Gentle opening and closing produces no creak, binding, new flex, bezel lift, or change in the display image.
After a short period of use, inspect the repaired area for movement, whitening, or a new crack. If the case starts separating again, stop cycling the lid and reassess the hinge and surrounding mounts rather than applying more adhesive over the same fracture.
Troubleshoot common failures
The crack returns
A recurring crack can mean the hinge is still stiff, the hinge screws are misaligned or overtightened, the reinforcement is attached only to weakened material, the plastic and adhesive are incompatible, or the repair was loaded before full cure. Check for flex elsewhere in the housing. For a hinge mount, repeated failure is a reason to replace the housing or seek service rather than repeat a surface-only repair.
Best Value

- 【Wide Application】This precision screwdriver set has 120 bits, complete with every driver bit you’ll need to tackle any repair or DIY project. In addition, this repair kit has 22 practical accessories, such as magnetizer, magnetic mat, ESD tweezers, suction cup, spudger, cleaning brush, etc. Whether you're a professional or a amateur, this toolkit has what you need to repair all cell phone, computer, laptops, SSD, iPad, game consoles, tablets, glasses, HVAC, sewing machine, etc
- 【Humanized Design】This electronic screwdriver set has been professionally designed to maximize your repair capabilities. The screwdriver features a particle grip and rubberized, ergonomic handle with swivel top, provides a comfort grip and smoothly spinning. Magnetic bit holder transmits magnetism through the screwdriver bit, helping you handle tiny screws. And flexible extension shaft is useful for removing screw in tight spots
- 【Magnetic Design】This professional tool set has 2 magnetic tools, help to save your energy and time. The 5.7*3.3" magnetic project mat can keep all tiny screws and parts organized, prevent from losing and messing up, make your repair work more efficient. Magnetizer demagnetizer tool helps strengthen the magnetism of the screwdriver tips to grab screws, or weaken it to avoid damage to your sensitive electronics
- 【Organize & Portable】All screwdriver bits are stored in rubber bit holder which marked with type and size for fast recognizing. And the repair tools are held in a tear-resistant and shock-proof oxford bag, offering a whole protection and organized storage, no more worry about losing anything. The tool bag with nylon strap is light and handy, easy to carry out, or placed in the home, office, car, drawer and other places
- 【Quality First】The precision bits are made of 60HRC Chromium-vanadium steel which is resist abrasion, oxidation and corrosion, sturdy and durable, ensure long time use. This computer tool kit is covered by our lifetime warranty. If you have any issues with the quality or usage, please don't hesitate to contact us
The adhesive will not bond
Oil, residue, a glossy unprepared surface, incorrect mixing, expired product, or a plastic that the adhesive does not bond to can all cause poor adhesion. Polyethylene and polypropylene can be difficult to bond with ordinary adhesives. Identify the plastic marking if available and check the adhesive maker’s technical information; do not assume one product works on every laptop shell.
The bezel keeps lifting
Inspect the hinge mount and display back cover before reattaching the bezel. If the hinge assembly is pushing outward, bonding the trim alone can conceal continuing structural damage.
The bottom cover no longer sits flat
Do not force it into place. Check for a swollen battery, a missing screw post, trapped cable, misplaced component, or an oversized repair. A cracked cover is suitable for reinforcement only if the battery is sound, vents are clear, and the cover still supports the internals correctly.
When to stop DIY work
Stop and seek qualified help if a battery may be swollen, the display is cracked or shows pressure marks, a hinge is tearing through the display housing, or the next step requires removing a glued or fragile LCD. Professional service is also prudent when many delicate parts must be transferred, the shell material is an unknown composite, or a failed repair could put valuable data or the motherboard at risk. Check the manufacturer’s warranty and accidental-damage terms for your region before opening the device; coverage rules and the effect of repair-related damage vary.
A replacement shell, an exact-model donor part, or a professional shell transfer may be more reliable than rebuilding a structural mount. Confirm the part’s revision, dimensions, finish, keyboard layout, and connectors before purchase. If parts and labor approach the value of the laptop—especially when the display or motherboard is also affected—retiring the machine may be the sensible option.
Quick Recap
Product prices and availability are accurate as of the date/time indicated and are subject to change. Any price and availability information displayed on Amazon at the time of purchase will apply.


Leave a Reply