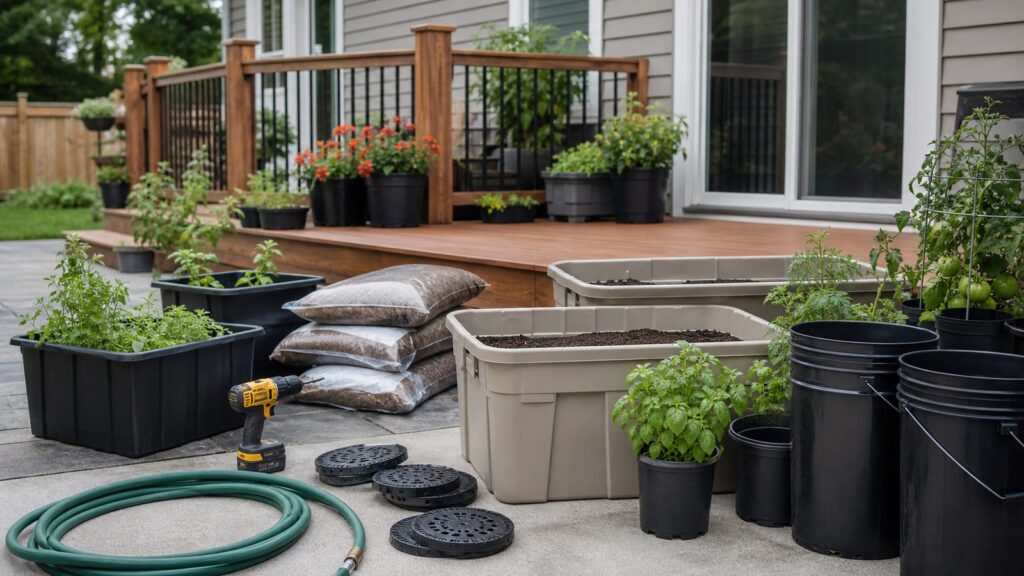
Plastic containers are one of the cheapest ways to expand a garden, but they work best when treated like small building systems: the container needs the right material, drainage, soil volume, support, and location. A 5-gallon bucket can grow a tomato. A storage tote can become a salad bed. A clear jug can protect seedlings from frost. The difference between a clever garden project and a cracked, leaking mess is usually planning.
For edible gardens, start with clean food-safe plastic when possible, especially HDPE #2 buckets and PP #5 tubs. Avoid containers that held chemicals, solvents, unknown liquids, pesticides, pool chemicals, automotive fluids, or construction products. Use potting mix instead of native soil, drill drainage unless you are building a self-watering system, and think about where water and weight will go after a rainstorm.
As an Amazon Associate I earn from qualifying purchases.
On our job sites, we see the same pattern with outdoor projects: the small item is rarely the problem by itself. Problems happen when ten small items become a load, a drainage path, a staining issue, or a maintenance headache. That is especially true on decks, balconies, patios, and tight side yards. Here are nine practical ways to use plastic containers in your garden, with the construction details that keep them working.
Free tools Windows power users keep installed
One-click scans. No signup required.
1. Use 5-Gallon Buckets as Deep Planters
A 5-gallon plastic bucket is the workhorse of low-cost container gardening. It is deep enough for many vegetables, easy to move before filling, and inexpensive. In 2026, standard 5-gallon utility buckets at major U.S. home centers commonly cost about $4 to $8 each. Food-grade bucket-and-lid sets often run about $8 to $20 depending on thickness, certification, and lid style.
Use 5-gallon buckets for tomatoes, peppers, potatoes, dwarf citrus, compact eggplant, annual flowers, and deep-rooted herbs. For tomatoes, one plant per bucket is the practical limit. Peppers can also go one per bucket, although very compact varieties may share a wider tub if spacing is generous.
#1 Best Overall

- OUTDOOR POTTING SOIL: Miracle-Gro Organic Outdoor Potting Mix contains a quick-release natural plant fertilizer and also feeds plants for up to 2 months
- PEAT MOSS: This organic potting soil mix is made with responsibly sourced peat (one hundred percent of peat sourced from certified producers)
- OUTDOOR CONTAINER USE: Use this organic potting mix with all types of outdoor container plants, including flowers, vegetables, herbs, annuals, and perennials
- HOW TO USE: To plant in pots, fill the container partially full with this potting soil for outdoor plants, place the plant in the pot after loosening the root ball, cover with more mix and water thoroughly
- COVERAGE: One 16 qt. bag of Miracle-Gro Organic Outdoor Potting Mix fills one 12-inch pot with garden soil for containers (amounts may vary based on the size of the root ball)
How to Build the Bucket Planter
Drill drainage before adding soil. A simple pattern is six to ten holes, each 1/4 inch to 1/2 inch wide, in the bottom or low sidewall. If the bucket will sit on a deck or patio, raise it on pot feet, pavers, or short treated wood spacers so the holes stay open. A bucket sitting flat on composite decking or concrete can trap water underneath even if the holes are drilled correctly.
A 5-gallon bucket holds roughly 0.65 to 0.75 cubic feet of potting mix. Once wet and planted, expect one bucket to weigh roughly 35 to 55 pounds depending on the mix, water content, plant size, and mulch. That is manageable as a single item, but twenty buckets lined along a deck rail can become a real load and a drainage issue.
The Tool Desk
Outbyte PC Repair FREERepair Windows errors before they cause bigger problemsFix Now →Outbyte Driver Updater FREEFix the driver behind crashes, sound loss and screen glitchesFind Drivers →Use potting mix, not yard soil. Garden soil compacts in containers, drains poorly, and limits oxygen around roots. For vegetables, buy a quality all-purpose potting mix or raised-bed/container mix. A 1 to 2 cubic-foot bag commonly costs about $6 to $18, and a 5-gallon bucket usually uses around half to three-quarters of a cubic foot.
2. Turn Storage Totes Into Salad, Herb, and Strawberry Beds
plastic storage totes are useful when you need width more than depth. A 12- to 30-gallon tote can become a shallow garden bed for lettuce, spinach, arugula, parsley, cilantro, basil, strawberries, pansies, and mixed annual flowers. Basic plastic totes commonly cost about $8 to $35 in 2026, while heavy-duty or UV-resistant bins cost more but hold up better outdoors.
Most leafy greens and many herbs can grow in 6 to 8 inches of potting mix. That makes a wider tote more efficient than several small pots. A 24-inch by 16-inch tote with 8 inches of growing depth gives you enough room for a useful kitchen garden without building a permanent raised bed.
Drainage and Support Matter
Drill several 1/4-inch to 1/2-inch holes in the base or low sidewall. If the tote has a thin bottom, support it continuously with a flat board, paver base, or level shelf. Thin plastic can bow under saturated soil. Once a tote is filled, avoid dragging it; the corners can split, and the weight can scratch deck boards or patio surfaces.
Do not fill a large tote with soil and then set it on a weak shelf, stair landing, balcony corner, or railing-mounted bracket. Saturated potting mix, plants, and water can push a large container over 100 pounds. Wider tubs distribute load better than a narrow bucket, but they still need a stable, level surface.
3. Build a Self-Watering Wicking Tub
Self-watering containers are one of the best uses for plastic tubs because plastic holds water without rotting. The basic idea is simple: a lower reservoir stores water, a wicking column or fabric strip pulls moisture into the potting mix, and an overflow hole prevents the roots from sitting in a swamp.
For a DIY version, use a sturdy tote or bucket, a perforated insert or false bottom, wicking material, and a fill pipe made from 1-inch PVC or similar plastic tubing. Drill the overflow hole in the sidewall about 1 to 2 inches above the bottom of the reservoir. That hole is critical. It lets extra rainwater escape before the root zone becomes waterlogged.
Small and medium self-watering plastic planters usually cost about $15 to $60. Large patio boxes and elevated self-watering beds often run $75 to $200 or more. A DIY version can be cheaper if you already have containers and tools, but fittings, screen mesh, pipe, wicking cord, and drill bits can add $5 to $40 per container.
Best Crops for Self-Watering Containers
Use self-watering tubs for crops that like steady moisture: lettuce, basil, cucumbers, peppers, tomatoes, celery, and many annual flowers. Avoid putting Mediterranean herbs such as rosemary, thyme, oregano, and lavender on the same watering system as lettuce or cucumbers. Group containers by water needs. That one habit prevents a lot of root rot and drought stress.
4. Start Seeds in Small Plastic Trays, Cups, and Clamshells
Seed starting is a practical second life for small plastic containers. Yogurt cups, nursery cell packs, berry clamshells, takeout lids, and shallow food trays can all work if they are clean and properly drained. For vegetables and herbs, use containers that originally held food and avoid any plastic with an unknown chemical history.
Most seedlings only need 1.5 to 3 inches of seed-starting mix at first. Drill or punch small holes in the bottom so water can drain into a tray. Clear clamshells make useful humidity domes, but prop them open or vent them once seeds germinate. Too much trapped moisture encourages damping-off disease.
Use seed-starting mix rather than heavy potting soil for small seeds. Specialty seed-starting mixes usually cost more than basic potting mix, but a small bag goes a long way. Keep the setup bright, warm, and clean. If reused plastic has mineral crust, algae, or old roots, wash it before planting.
Do these 3 things before closing this tab:
1Scan for outdated or missing drivers - takes under a minute2Repair Windows errors before they cause bigger problems3Fix the driver behind crashes, sound loss and screen glitches5. Make Mini-Greenhouses and Frost Covers
Clear plastic jugs, produce containers, and storage bins can act as mini-greenhouses for early-season protection. Cut the bottom off a clear milk jug or water jug, remove the cap for ventilation, and place it over a young transplant when nights are cold. In many U.S. gardens, this can buy seedlings a few degrees of protection during short cold snaps.
The key is ventilation. A closed plastic cover can overheat quickly in direct sun, even when the air feels cool. If the day will be sunny and above roughly 50 to 60 degrees Fahrenheit, vent the cover or remove it during the warmest part of the day. At night, set it back over the plant if frost is expected.
Use plastic covers for frost, wind, rabbits, birds, and short-term pest protection. Do not leave thin, brittle containers in the garden all season. UV exposure weakens plastic, and old plastic can crack into sharp edges. Inspect covers before each season and retire anything chalky, brittle, split, or jagged.
6. Use Plastic Containers as Drip-Irrigation Reservoirs
A clean bucket or tote can become a simple gravity-fed watering reservoir for a small garden zone. This is useful for patio gardens, temporary plantings, and areas where you do not want to run permanent irrigation. A 5-gallon bucket can supply a slow-drip line or several wicking spikes, depending on the emitters and flow rate.
Recommended Free Tools
Set the reservoir higher than the containers being watered, use a lid to reduce debris and mosquitoes, and include a shutoff valve if the setup will run unattended. Keep the water path controlled. On a deck, patio, or balcony, every overflow should have a place to go that does not stain siding, soak framing, drip onto a neighbor, or run back toward the foundation.
For more permanent setups, a hose bib, backflow prevention, pressure regulation, and proper tubing layout matter. That is where a simple garden idea starts to overlap with construction and plumbing judgment. If irrigation will tie into a home water line, run through walls, cross a walkway, or serve built-in planters, hire a qualified pro.
7. Compost or Vermicompost in Lidded Plastic Bins
Plastic bins can make compact compost and vermicompost systems for small yards, garages, and patios. Use a lidded tote with ventilation holes near the upper sidewalls and drainage control at the bottom. For worm composting, many homeowners use an 18- to 20-gallon tote, bedding such as shredded cardboard, and red wiggler worms.
Keep compost bins out of direct hot sun. Dark plastic can heat quickly, and worm bins can fail if they get too hot or too wet. Raise the bin slightly, place a tray below if needed, and make sure leachate does not stain concrete, decking, or pavers.
For food scraps, manage moisture carefully. The contents should feel like a wrung-out sponge, not a wet bucket. If liquid collects in the bottom, add dry carbon material and improve drainage. If odors develop, the bin is usually too wet, too compacted, overloaded with food scraps, or short on air.
8. Store Soil, Mulch, Fertilizer, and Hand Tools
Not every plastic container needs to become a planter. Some of the best garden uses are storage. Lidded buckets and totes keep potting mix, seed-starting supplies, gloves, drip parts, twine, labels, and hand tools organized and dry. On active job sites, our crews label containers because it prevents wasted time and mistakes. The same habit works in a garden shed.
Use separate containers for fertilizer, pest-control products, and edible-garden supplies. Do not store fertilizers or garden chemicals in unlabeled food containers. Keep lids tight, place containers out of sun when possible, and avoid stacking heavy bins where they can fall or deform.
Rank #2

- FEEDS UP TO 6 MONTHS: Miracle-Gro Potting Mix is a gardening soil for outdoor containers that feeds all types of potted plants, including flowers, vegetables, shrubs, annuals, and perennials for up to 6 months
- PROMOTES GROWTH: This potting soil for outdoor plants Grows Plants Twice As Big! (vs. unfed plants)
- WHERE TO USE: Use this home gardening product with all types of outdoor container plants, including annual and perennial flowers, vegetables, herbs and shrubs
- HOW TO USE: To use this plant soil for potting, fill a container about 1/3 full with potting mix, place your plant in the soil, and fill the rest of the pot, pressing lightly
- COVERAGE: This bundle includes two 16 qt. bags of Miracle-Gro Potting Mix, an outdoor potting soil; each bag fills one 12-inch container (amounts may vary depending on the size of the root ball)
For bulk potting mix, choose a tote with a strong rim and lid. A flimsy bin can crack if it is lifted while full. If you need to move soil around the property, use smaller containers. Two 5-gallon buckets are easier and safer to carry than one overloaded tote.
9. Protect Young Plants From Pests, Wind, and Splashback
Plastic containers can be cut into collars, guards, and splash shields. A bottomless nursery pot set around a young transplant can protect the stem from light wind and some surface pests. A plastic ring sunk 1 to 2 inches into the soil can help direct water to the root zone. A shallow tray or cut panel can reduce soil splash on lower leaves during rain.
Be careful with heat. Plastic collars can warm soil in spring, but they can also trap too much heat in summer. Remove or widen guards as stems grow. Any cut plastic edge should be smooth enough that it will not slice stems, hands, irrigation tubing, or fabric row covers.
For frost protection, use covers temporarily. For pest exclusion, use mesh or row cover when airflow matters. Plastic is useful, but it is not always the best long-term barrier because it blocks ventilation and degrades in sun.
Plastic Container Options and 2026 Cost Guide
Costs vary by region, brand, thickness, and whether you are reusing materials. For a basic DIY plastic-container garden, a realistic national range is about $10 to $60 per planted container when using reused buckets or totes, bagged potting mix, drainage hardware, and seeds or starter plants. Decorative and self-watering setups commonly run $25 to $150 or more per container.
Quick wins for a faster PC:
Repair Windows errors before they cause bigger problemsFix Now →Fix the driver behind crashes, sound loss and screen glitchesFind Drivers →| Container Type | Best Garden Use | Typical 2026 Cost | Planning Notes |
|---|---|---|---|
| 5-gallon plastic bucket | Tomatoes, peppers, potatoes, dwarf citrus, deep annuals | $4-$8 standard; $8-$20 food-grade sets | Use one large plant per bucket; drill drainage; raise off surfaces. |
| Plastic nursery pot | Herbs, flowers, starts, small vegetables | Under $1-$5 small multipacks; $10-$50 for many 12- to 20-inch resin pots | Good drainage is common, but check holes and brittleness. |
| Storage tote | Greens, herbs, strawberries, mixed flowers | $8-$35 for many 12- to 30-gallon totes | Support the bottom; saturated loads can exceed 100 pounds. |
| Self-watering planter | Moisture-loving vegetables and patio gardens | $15-$60 small/medium; $75-$200+ large | Needs overflow control and seasonal cleaning. |
| Clear jug or clamshell | Seed starting, humidity dome, frost cover | Often reused | Vent during sunny days; inspect for sharp or brittle edges. |
Choose Safer Plastics for Edible Gardens
For vegetables, herbs, and fruiting plants, container history matters as much as the recycling number. Preferred choices are generally HDPE #2 and PP #5 because they are widely used for food-contact applications and are durable enough for many garden uses. New food-grade containers are the safest choice when the budget allows.
Avoid PVC #3 for food-growing containers. Also avoid unknown plastics, brittle old bins, painted interiors, containers with a chemical smell, and anything that held cleaners, solvents, oils, pesticides, herbicides, pool chemicals, or construction materials. A recycled bucket is fine for ornamentals when its history is unknown, but do not use it for herbs and vegetables.
Food-safe starting material does not mean the plastic will last forever outside. UV exposure breaks down plastic over time. Inspect containers at least once a season for chalking, cracks, splits, leaning sides, blocked drainage holes, and sharp edges. Retire containers before they fail under wet soil load.
Drainage, Soil, and Heat: The Three Details That Decide Success
Drainage
Most plastic garden containers need drainage holes. Without them, roots can drown, mosquitoes can breed, algae can grow, and runoff can stain nearby surfaces. Drill several 1/4-inch to 1/2-inch holes in the base or low sidewall. For self-watering containers, include an overflow hole 1 to 2 inches above the reservoir bottom.
What’s actually slowing this PC down?
Pick the symptom - the matching free tool is one click away.
After drilling, keep the holes open. Set containers on pot feet, pavers, strips of rot-resistant material, or plant caddies. Avoid leaving saucers full of water. A saucer can protect a deck or balcony surface for a short time, but standing water is bad for roots and can create staining or pest issues.
Soil
Use potting mix, not native garden soil. Potting mix is designed to hold moisture while maintaining air space. Yard soil often compacts in containers, drains poorly, and becomes heavy. If you need better moisture retention, use mulch on the surface, choose a larger container, or use a self-watering insert instead of packing the container with dense soil.
Heat
Plastic containers dry faster than in-ground beds, especially in full sun, wind, roof gardens, and deck locations. Black plastic absorbs heat and can stress roots during summer. Use larger containers, mulch, light-colored exterior surfaces, and grouped layouts to reduce water stress. You can paint or wrap the outside of a dark container with a light, breathable finish, but keep coatings off interior soil-contact surfaces unless the product is rated safe for that use.
Independent reader supportYour contribution helps us test, update, and keep practical guides available for everyone.Deck, Balcony, Patio, and Drainage Safety
This is where a construction company looks at container gardening differently than a general garden list. A single bucket is rarely a structural concern. A cluster of saturated tubs, trellises, and water reservoirs can be.
PC Slower Than It Used to Be?
A free scan shows the junk files, broken settings and background clutter dragging Windows down - then fixes them in one click.Free scan · Windows 10 & 11Outdated Drivers Are Slowing You Down
One free scan finds every outdated or missing driver and matches the right update for your exact hardware.Free scan · exact hardware matchWet containers get heavy fast. A 5-gallon bucket can weigh 35 to 55 pounds when filled and watered. Large storage totes, livestock-style tubs, and built-in plastic planter boxes can exceed 100 pounds each. If you place several in one small area, you create a concentrated load.
On decks, place large containers near posts, beams, or bearing points when possible, and distribute weight instead of clustering everything in one corner. Do not hang heavy planters from guardrails unless the rail system is designed for that load. Guardrails are life-safety components, not general-purpose planter supports.
Water also needs a route. Container runoff can stain decking, promote algae, soak stair treads, drip onto lower spaces, or flow back toward siding and foundations. Keep containers slightly elevated, leave airflow below them, and check runoff after the first heavy watering. If water is tracking toward the house, correct that immediately.
Rank #3

- 🌱 PERFECT FOR ALL PLANTS Versatile all-purpose potting mix designed for indoor plants, outdoor gardening, seeds, herbs, flowers, and vegetables. Ideal for beginners and experienced growers.
- 💧 MOISTURE RETENTION + FAST DRAINAGE Balanced formula retains essential moisture while allowing excess water to drain quickly, helping prevent overwatering and root rot.
- 🌿 IDEAL SEED STARTER MIX Lightweight, nutrient-rich soil provides the perfect environment for seed germination and strong root development.
- 🪴 READY TO USE Pre-mixed and ready straight out of the bag—no additional blending required. Perfect for pots, containers, raised beds, and garden use.
- 🌼 PROMOTES HEALTHY GROWTH Supports root aeration and nutrient absorption to encourage vibrant plants, stronger stems, and improved growth.
For balconies, rooftop terraces, shared buildings, townhomes, and HOA communities, check rules before installing large planters, irrigation reservoirs, railing containers, or anything visible from the street. Permits are usually not required for small movable container gardens, but permanent built-in planters, deck modifications, new hose bibs, drainage work, rooftop installations, and electrical additions for pumps or lights can trigger code, HOA, or building-management requirements.
When to DIY and When to Hire a Pro
Most plastic-container garden projects are good DIY work. Drill a bucket, fill a nursery pot, start seeds, build a small herb tote, or make a temporary frost cover yourself. Expect a basic planted container to take 20 to 60 minutes once materials are on hand, not counting shopping time.
Hire a pro when the project affects structure, drainage, plumbing, hardscape, or permanent built-ins. That includes reinforcing a deck for a large container garden, repairing a patio that holds standing water, adding a hose bib, routing irrigation, installing a built-in planter wall, correcting runoff near a foundation, or building a raised platform for heavy tubs. Those projects can move from a $50 garden task into hundreds or thousands of dollars because the work is no longer just gardening.
A practical rule: if the container can be emptied and moved by one person, it is usually a DIY garden item. If it needs framing, anchoring, drainage routing, water-line work, or structural review, treat it like a small construction project.
Seasonal Maintenance Checklist
Inspect plastic garden containers at the start of the season, after major storms, and before winter storage. Check for cracks, chalky plastic, bulging sides, blocked holes, leaning trellises, algae, standing water, stained decking, and runoff paths. Tighten trellis ties, refresh mulch, and replace failing containers before they split.
What’s actually slowing this PC down?
Pick the symptom - the matching free tool is one click away.
At season’s end, empty containers that will not be used through winter. Wet soil expands when frozen, and weakened plastic can crack. Store clean containers out of direct sunlight when possible. Stack only compatible shapes; forcing pots together can split rims and make them hard to separate in spring.
Bottom Line
Plastic containers can make a garden cheaper, more flexible, and easier to expand. The best uses are practical: 5-gallon bucket planters, tote salad beds, self-watering tubs, seed trays, mini-greenhouses, irrigation reservoirs, compost bins, storage, and plant guards. Use safer plastics for food, drill real drainage, fill with potting mix, control heat, and respect the weight of wet soil.
If the containers will sit on a deck, balcony, rooftop, or near the house, plan like a builder. Distribute loads, keep water moving away from the structure, and avoid permanent changes until you know whether code, HOA, or building rules apply. Done that way, plastic containers stop being clutter and become useful garden infrastructure.
Frequently Asked Questions
Which plastic containers are safe for growing vegetables?
For edible gardens, choose clean food-grade containers when possible. HDPE #2 and PP #5 are generally preferred. Avoid PVC #3, unknown plastics, brittle old containers, and anything that held chemicals, cleaners, solvents, pesticides, oil, or construction products.
Do plastic garden containers need drainage holes?
Yes, unless the container is intentionally built as a self-watering planter. A common DIY pattern is several 1/4-inch to 1/2-inch holes in the bottom or low sidewall. Self-watering containers still need an overflow hole about 1 to 2 inches above the reservoir bottom.
Can I use a 5-gallon bucket as a planter?
Yes. A 5-gallon bucket works well for one tomato, one pepper, potatoes, dwarf citrus, herbs, or annual flowers. Drill drainage holes, use potting mix instead of yard soil, and raise the bucket slightly so water can escape.
How heavy is a container garden on a deck or balcony?
A filled and watered 5-gallon bucket commonly weighs about 35 to 55 pounds. Large totes and tubs can exceed 100 pounds once saturated and planted. On decks, distribute containers and place heavier ones near posts or beams when possible.
What soil should I use in plastic containers?
Use potting mix, not native garden soil. Garden soil compacts in containers, drains poorly, and can reduce oxygen around roots. Potting mix is lighter and designed for container drainage and moisture control.
Quick wins for a faster PC:
Fix the driver behind crashes, sound loss and screen glitchesFind Drivers →Clear out junk files and repair common Windows errorsFree Scan →Do I need a permit for container gardens?
Small movable container gardens usually do not need permits. Permanent built-in planters, deck reinforcement, rooftop installations, new plumbing, drainage changes, or electrical additions may require approval, permits, or HOA review.
Quick Recap
Product prices and availability are accurate as of the date/time indicated and are subject to change. Any price and availability information displayed on Amazon at the time of purchase will apply.

