The Tool Desk
Outbyte Driver Updater FREEFix the driver behind crashes, sound loss and screen glitchesFind Drivers →Outbyte PC Repair FREERepair Windows errors before they cause bigger problemsFix Now →An ESP32 connected to a DHT22 can provide an inexpensive, Wi-Fi-connected monitor for indoor temperature and relative humidity. That makes it useful for construction projects, site offices, plant rooms, storage areas, basements, equipment rooms and occupied buildings where trends and alerts matter.
It is not, by itself, a complete indoor-air-quality system. The DHT22 does not measure carbon dioxide, particulate matter, volatile organic compounds, noise, light or occupancy. For those measurements, additional sensors are required.
As an Amazon Associate I earn from qualifying purchases.
What the system does
The DHT22 measures temperature and relative humidity. The ESP32 reads those values, connects to Wi-Fi and sends the data to a local dashboard, MQTT broker, cloud service or custom application.
In a construction or facilities context, the system can help identify:
#1 Best Overall
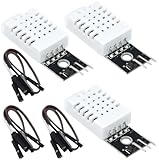
- DHT22 Temperature and humidity sensor:Compatible with for Arduino
- Size:28.2*13.1*5.5mm;Line length:155mm
- Voltage:3-5.5V
- Operating temperature:-40℃ - -80℃
- Commodities include:3Pcs Temperature and humidity sensor;9Pcs Connect Jumpers
- High humidity in basements, bathrooms, storage areas or newly enclosed spaces.
- Temperature conditions that may affect materials, equipment or occupant comfort.
- Ventilation, heating or dehumidification problems.
- Long-term moisture trends that a single inspection would miss.
- Loss of environmental control at a remote property or temporary site office.
It can support ventilation, heating and dehumidification automations, but it should not replace formal moisture testing, building inspections or specialist environmental instrumentation where those are required.
System architecture
DHT22
  │ digital temperature/humidity signal
  ▼
ESP32
  │ Wi-Fi
  ▼
Router or access point
  │
  ├── Home Assistant / ESPHome native API
  ├── MQTT broker
  ├── Adafruit IO or another cloud service
  └── Custom web or mobile application
The ESP32 is a family of boards and chips rather than one standardized product. The original ESP32 includes Wi-Fi, Bluetooth, GPIO, I2C, SPI, UART, ADC and low-power features; exact peripherals, pin layouts and wireless capabilities vary across ESP32, ESP32-S2, ESP32-S3, ESP32-C3 and other variants. Check the documentation for the exact board before selecting pins or firmware settings. Espressif ESP32 datasheet
Choosing the software architecture
ESPHome and Home Assistant
For a Home Assistant installation, ESPHome is usually the shortest route. YAML configuration provides sensor entities, logs and over-the-air updates, while Home Assistant supplies history, dashboards and automations. ESPHome generally recommends its native API for Home Assistant when MQTT is not otherwise needed.
What’s actually slowing this PC down?
Pick the symptom - the matching free tool is one click away.
MQTT
MQTT is a strong choice for multi-device installations or systems that already use an MQTT broker. It allows other clients, dashboards and applications to consume the readings. A minimal ESPHome configuration is:
mqtt:
  broker: 192.168.1.20
  username: !secret mqtt_username
  password: !secret mqtt_password
Replace the broker address and credentials with those used by the deployment, and configure TLS where appropriate. If MQTT is enabled without using ESPHome’s native API, review ESPHome’s reboot behavior: the device can reboot after 15 minutes without a native-API client unless the API component is removed or its reboot timeout is disabled. See the ESPHome MQTT documentation.
Custom firmware or a cloud dashboard
Arduino/C++ firmware is preferable when the project needs a custom protocol, application or cloud endpoint. An ESP32 web server is useful for a local demonstration, but it requires more work for authentication, historical storage and multi-device management.
Hosted services such as Adafruit IO simplify dashboards and remote access, but introduce account, service availability, privacy, API-limit and possible recurring-cost considerations. A local Home Assistant or MQTT deployment keeps more of the data on site but requires a local host and maintenance.
Rank #2

- Main Chip: AOSONG AM2302 High Sensitive Temperature Humidity Sensor
- Single-bus digital signal output, bidirectional serial data
- With fixing screw hole, convenient to install and fixed
- Temperature range: -40 to 80 degree celsius, Temperature measurement accuracy: +/- 0.5℃ degree celsius
- Humidity measuring range: 0~100%RH, Humidity measurement accuracy: ±2%RH
Components
- ESP32 development board matched to the selected firmware board definition.
- DHT22 or AM2302 temperature-and-humidity sensor.
- Approximately 4.7 kΩ pull-up resistor, unless the sensor module already includes one.
- Breadboard and jumper wires for a prototype.
- Reliable USB cable and power supply.
- Ventilated enclosure for permanent installation.
- Optional Home Assistant host, MQTT broker, display, CO2 sensor or particulate sensor.
DHT22 and AM2302 are commonly associated designations, but verify the exact module and its supplied datasheet. The DHT22 uses a single-wire digital protocol; it is not a Dallas/Maxim 1-Wire bus. Background information is available in Adafruit’s DHT guide.
Wiring the DHT22
| DHT22 pin | Connection |
|---|---|
| VCC | ESP32 3.3 V |
| DATA | A suitable digital GPIO |
| NC | Leave unconnected |
| GND | ESP32 GND |
Connect the pull-up resistor between DATA and 3.3 V. ESPHome gives approximately 4.7 kΩ as a recommendation, with roughly 1 kΩ to 10 kΩ often workable depending on the module and wiring. Some breakout boards include a resistor already. If so, adding another may cause problems; ESPHome documents a pullup: false option for modules with an onboard pull-up.
GPIO4 is used in the example below, not as a universal recommendation. Confirm the pin on the specific development board and avoid pins used for boot strapping, flash connections, USB or onboard peripherals. Refer to the ESP32 datasheet.
ESPHome implementation
This example creates temperature and humidity entities and updates them once per minute:
esphome:
  name: indoor-environment-monitor

esp32:
  board: esp32dev

wifi:
  ssid: !secret wifi_ssid
  password: !secret wifi_password

logger:

api:

ota:
  - platform: esphome

sensor:
  - platform: dht
    pin: GPIO4
    model: DHT22
    temperature:
      name: "Indoor Temperature"
      unit_of_measurement: "°C"
      accuracy_decimals: 1
    humidity:
      name: "Indoor Humidity"
      unit_of_measurement: "%"
      accuracy_decimals: 1
    update_interval: 60s
esp32dev and GPIO4 are examples only. Board definitions and OTA syntax can change between ESPHome releases, so validate the configuration against the installed version. The DHT component supports explicit DHT22 selection, update intervals and separate temperature and humidity entities. See the current ESPHome DHT documentation.
Sampling and recorded data
Adafruit specifies a maximum DHT22 sampling rate of 0.5 Hz—approximately one new reading every two seconds. That is a limit, not a recommendation for every installation. A 60-second interval is a sensible default for most rooms; 10–60 seconds suits more responsive dashboards, while five minutes reduces traffic for slowly changing spaces. ESPHome’s DHT component defaults to 60 seconds.
Record at least:
- Timestamp.
- Temperature and relative humidity with units.
- Device identifier and location.
- Sensor validity or error state.
- Wi-Fi and power status where available.
Dew point and absolute humidity can be calculated from temperature and relative humidity, but the DHT22 does not measure them directly. Useful analysis includes trends, time above a humidity threshold and duration of sensor or network outages.
Rank #3
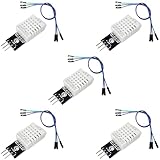
- DHT22 Temperature and Humidity sensor module for Arduino, Raspberry Pi, ESP32, ESP8266
- Easy to connect: With a built-in resistor, No need to solder or breadboard
- Working voltage: DC 3.3V-5V
- Tutorials for Arduino, ESP32, ESP8266, Raspberry Pi Pico, and MicroPython are provided => Search for: DIYables DHT22
- DHT22 temperature and humidity sensor works with Arduino, ESP32, ESP8266, Raspberry Pi, or any 5V or 3.3V microcontroller.
Alerts and dashboards
A useful dashboard should show the current values, historical graphs, device availability and the location of each sensor. Examples of alerts include:
Free tools Windows power users keep installed
One-click scans. No signup required.
- Humidity above a room-specific limit.
- Humidity below a configurable limit.
- Temperature outside an agreed range.
- No valid sensor reading for a defined period.
- ESP32 disconnected from Wi-Fi.
- Low supply voltage, if the hardware supports measurement.
Use persistence and hysteresis rather than alerting on one sample. For example, require high humidity to persist for several minutes before notifying, then clear the alert at a lower reset threshold. This avoids nuisance alerts caused by brief disturbances or measurement noise.
Installation and sensor placement
Placement can affect practical results as much as the nominal sensor specification. Install the sensing element where air can circulate, but keep it away from:
- The ESP32 voltage regulator, USB interface and other heat-producing components.
- Direct sunlight, radiators, heaters and hot pipework.
- Supply or extract vents and strong drafts.
- Humidifiers, showers, plant misters and wet surfaces.
- Direct water spray, condensation and chemical exposure.
Use a ventilated enclosure rather than a sealed box. Protect the electronics in damp rooms without blocking the sensor’s exposure to room air. Keep data wires short where possible; long or noisy runs are more prone to invalid readings.
Arduino/C++ implementation path
A code-based implementation should install the ESP32 board support package, add a DHT library and its required sensor-abstraction dependency, select the DHT22 model and configure the chosen GPIO. The firmware should then:
Do these 3 things before closing this tab:
1Clear out junk files and repair common Windows errors2Fix the driver behind crashes, sound loss and screen glitches3Repair Windows errors before they cause bigger problems- Connect to Wi-Fi with a timeout and retry strategy.
- Read no faster than the DHT22’s supported interval.
- Reject invalid or NaN readings.
- Publish values with units, timestamps and a device identifier.
- Reconnect after Wi-Fi or cloud-service outages.
- Avoid blocking indefinitely in the main loop.
Use an explicit unavailable state when readings fail rather than silently displaying stale data. Local buffering can preserve samples during short network outages, while a controlled restart or watchdog can recover from a genuinely stuck device without concealing recurring wiring or power faults.
Independent reader supportYour contribution helps us test, update, and keep practical guides available for everyone.Accuracy, calibration and limitations
Adafruit lists the DHT22 at 3–5 V, −40 to 80 °C, ±0.5 °C temperature accuracy, 0–100% relative-humidity range, 2–5% relative-humidity accuracy and a maximum sampling rate of 0.5 Hz. The product page also lists a maximum conversion current of 2.5 mA. These are sensor or supplier specifications, not a guarantee of system accuracy. DHT22 specifications
Rank #4

- BUILT-IN MODULE DESIGN: Unlike bare DHT22 sensors, this module includes a filtering capacitor and pull-up resistor on the PCB, ensuring stable readings without any additional external components
- HIGH ACCURACY MEASUREMENTS: Measures temperature from -40 to +80 degrees C (plus or minus 0.5 degree accuracy) and humidity from 0 to 100% RH (plus or minus 2-5%) using the proven AM2302 element
- COMES WITH CONNECTING CABLE: Includes a pre-wired cable for direct connection to your microcontroller; simply plug in and start reading sensor data without soldering or breadboard wiring
- 3-PIN SIMPLE INTERFACE: Connects via VCC, DATA, and GND; works with Arduino, ESP32, ESP8266, and Raspberry Pi using any standard digital I/O pin and a single data line protocol
- 3 PACK VALUE SET: Includes 3 DHT22 sensor modules each with a connecting cable; perfect for multi-zone monitoring, classroom projects, or having spares on hand for your builds
Real installations are affected by placement, airflow, self-heating, condensation, contamination, power quality, cable length and sensor ageing. Do not display excessive decimal places as if they represented additional accuracy; one decimal place is generally appropriate for DHT22 values.
For validation, place the sensor beside a known-good reference instrument and allow both to stabilise under the same conditions. Record the offset and environmental conditions. A software correction can compensate for a local, measured offset, but it does not turn the DHT22 into a laboratory instrument.
Troubleshooting
| Symptom | Likely causes | Checks and fixes |
|---|---|---|
| Invalid or intermittent readings | Wrong model, GPIO or wiring; missing pull-up; long/noisy cable; poor ground; excessive polling | Confirm the module datasheet, model and pinout; add or remove the appropriate pull-up; shorten wiring; wait at least two seconds between reads. |
| Temperature is too high | Sensor beside ESP32, regulator or USB circuitry; trapped heat; sunlight | Move the sensor away from the controller and improve ventilation. |
| Humidity is implausibly high | Condensation, water exposure, humidifier or poor airflow | Relocate and ventilate the sensor; inspect for contamination or ageing. |
| Wi-Fi disconnects | Weak 2.4 GHz coverage, wrong credentials or inadequate recovery logic | Check coverage and credentials; implement retries; expose an unavailable state; investigate power before adding automatic restarts. |
| Boot or power failures | Weak supply, voltage drop, boot-strapping pin conflict or GPIO conflict | Use a reliable supply and cable; check the exact board documentation; avoid restricted pins and isolate high-current loads. |
Security and privacy
Use strong, unique Wi-Fi credentials and protect OTA updates with authentication. For MQTT, use authenticated accounts and TLS where the deployment requires it. Keep the broker, Home Assistant host and ESP32 devices on a controlled network or suitable VLAN, and avoid exposing the device directly to the public internet. Treat cloud dashboards as third-party services whose availability, privacy terms, pricing and API limits may change.
When to choose another sensor
| Need | Better direction |
|---|---|
| Low-cost teaching project or basic room trends | DHT22 is reasonable. |
| Temperature, humidity and pressure | BME280 over I2C or SPI; ESPHome documents default address 0x77 and alternative 0x76. BME280 integration |
| More polished or repeatable temperature/humidity monitoring | SHT3x/SHT31-class I2C sensor, subject to the exact part and module. |
| Ventilation or occupancy assessment | Add a dedicated CO2 sensor. |
| Dust or PM2.5 monitoring | Add a dedicated particulate-matter sensor. |
| Fast response, precision, long cable runs or condensation exposure | Select a sensor and installation method designed for those conditions rather than relying on a DHT22. |
The BME280 adds pressure and uses a more conventional I2C or SPI interface. SHT3x/SHT31-class devices are often a stronger temperature-and-humidity choice, while CO2 and particulate sensors are essential if the project makes broader indoor-air-quality claims.
Expansion options
Once the basic monitor is stable, add multiple room nodes, calculated dew point, a local display, OTA maintenance, outage reporting and automation outputs. Battery operation is possible only with careful power design: active Wi-Fi can dominate consumption, so the ESP32’s low-power capabilities do not automatically guarantee long battery life.
For multiple DHT22 sensors, give each sensor its own suitable GPIO rather than treating them as devices on a Dallas 1-Wire bus. If a larger installation needs a cleaner shared-bus design, consider I2C sensors while checking address limits and module quality.
Quick Recap
Product prices and availability are accurate as of the date/time indicated and are subject to change. Any price and availability information displayed on Amazon at the time of purchase will apply.