Do these 3 things before closing this tab:
1Clear out junk files and repair common Windows errors2Scan for outdated or missing drivers - takes under a minute3Repair Windows errors before they cause bigger problemsSome links on this page are affiliate links: if you buy through them we may earn a commission, at no extra cost to you.
A good shop air system is one of those upgrades you appreciate every time you reach for a hose. Instead of dragging a 50-foot line across the floor, you have air where the work happens: near the garage door for tires, at the bench for blow guns and nailers, at the lift or service bay for impacts, and in a cleaner branch for paint, plasma cutting, or CNC equipment.
The short answer: plumb your shop for air with pipe that is specifically rated for compressed air, size the main line for your compressor CFM and total run length, use top takeoffs with drip legs and drains, isolate compressor vibration with a rated flex connector, and never use ordinary PVC, CPVC, or water PEX for exposed compressed-air lines.
As an Amazon Associate I earn from qualifying purchases.
On our job sites and in our own service spaces, we treat compressed air as a pressure system, not as casual garage plumbing. Air stores energy. A water leak makes a mess. A failed compressed-air line can rupture violently, especially when brittle plastic pipe is involved. The safest systems are planned before parts are bought: compressor location, electrical feed, pipe material, line size, moisture control, shutoffs, outlets, and test procedure all matter.
This guide is written for homeowners, farm shops, serious garage builders, and light commercial shop owners who want a system that works the first time and does not create a hidden safety problem above the workbench.
#1 Best Overall

- [Heavy Duty] Our air compressor line 200 feet (with Pressure Gauge) kit features a three-layer HDPE pipe (HDPE-AL-HDPE) crafted from copper and nickel for unparalleled leak-proof pressure performance. With smooth interior walls, our piping rolls outshine traditional iron or PVC piping, ensuring rust-free operation and heightened efficiency. It reliably maintains pressure at 200 psi@73F / 160 psi@140F and meets ASTM F1282, F1974 standards.
- [Flexible Fittings & Pipes] The FIDEURSUS air line kit boasts a 1/4” NPT port on the front & right front of the manifold, complemented by 1/2“ NPT ports on the top, left front, and back, as well as a 3/8 NPT port at the bottom (for connecting the Drain valve), catering to diverse needs. Equipped with 1/4“ & 1/2” couplers, the flexible 3/4-inch pipe bends easily to desired shapes with a bending radius of 6-8 inches. For tighter bends, an L-Fitting can be added in the middle.
- [Ideal for Shop & Garage] Engineered for easy installation in a range of settings, from small shops and farms to expansive manufacturing facilities, our Semi-Flexible Compressed Air Tubing delivers clean compressed air, inert gas & vacuum. Its straightforward installation allows for planned positioning of the air compressor and desired compressed air outlet location.
- [Adaptable Layout] Our pipes are flexible, enabling various layouts and inspiring creativity. Equipped with two types of anchors, our system can be easily installed on drywall, brick walls, ceilings, or even within walls. Enjoy the corrosion resistance of HDPE pipes, which can be painted in your preferred color and even buried in soil.
- [Easy Installation] No glue or welding necessary during installation. Basic accessories come included, requiring only a screwdriver & two adjustable wrenches. Follow our step-by-step instructions for seamless setup and operation. Our customer service team is available 24/7 to assist with any product-related queries.
Start With the Air Demand, Not the Pipe
The biggest mistake is designing the system around tank gallons. A 60-gallon tank sounds capable, but the tank is only stored air. The compressor pump and motor determine sustained output. For layout and pipe sizing, start with the tool that uses the most continuous SCFM at 90 psi.
Common homeowner stationary 60-gallon compressors are often rated around 155 to 175 psi maximum pressure and roughly 7.9 to 11.5 SCFM at 90 psi. That is enough for many intermittent tools: nailers, tire inflation, blow guns, light impacts, and short bursts of grinding. It may not keep up with continuous sanding, sandblasting, plasma cutting, or production painting.
Write down the air demand for your real tools:
- Framing nailer: often 2 to 4 CFM, intermittent
- Impact wrench: commonly 4 to 8 CFM, intermittent
- Die grinder: often 5 to 10 CFM, more continuous
- DA sander: commonly 10 to 15+ CFM, continuous
- Small blast cabinet: often 10 to 20+ CFM, continuous
- Paint gun: commonly 8 to 14+ CFM, with clean/dry air needs
- Plasma cutter: varies widely, often 4 to 8+ CFM, dry air required
If your most demanding tool needs 12 CFM at 90 psi and your compressor produces 10 CFM at 90 psi, piping will not fix that. Good piping can reduce losses, but it cannot create compressor capacity. In that case, decide whether the tool is occasional-duty, whether you can work in cycles, or whether the compressor should be upgraded before you spend money on pipe.
Use the Right Pipe Material for Compressed Air
Do not use ordinary PVC pipe for exposed shop air. OSHA has stated that PVC pipes are prohibited for above-ground transportation of compressed air and gases unless encased in shatter-resistant material, and OSHA’s hazard guidance says PVC pipe should not be used to transport compressed air. Oregon OSHA gives similar practical guidance: system parts must be adequate for the pressure, design specifications should be retained, and plastic pipe must be manufacturer-designed for compressed air.
The practical issue is failure mode. PVC can become brittle with age, impact, sunlight, oil exposure, and temperature changes. When water pipe cracks under water pressure, it usually leaks. When brittle plastic fails under compressed air, it can shatter.
Good choices for small shops include purpose-made aluminum compressed-air pipe, copper tube, black iron or steel, galvanized steel in some applications, and listed compressed-air plastic or HDPE-aluminum systems where the manufacturer specifically rates the product for compressed air. The words “rated for pressure” are not enough. You want documentation that says the system is intended for compressed-air service.
Free tools Windows power users keep installed
One-click scans. No signup required.
| Material | Best Fit | Typical Pros | Watchouts |
|---|---|---|---|
| Aluminum compressed-air pipe | Garages, shops, commercial bays | Clean interior, light weight, easy layout changes, purpose-built fittings | Higher material cost than budget kits; use manufacturer fittings |
| HDPE-aluminum compressed-air kits | DIY garages and light shops | Flexible runs, affordable 100-ft kits, faster installation | Must be specifically rated for compressed air; protect from damage |
| Copper Type L or similar approved copper | Permanent finished shops | Clean air, corrosion resistance, professional appearance | Material and labor can add up quickly; soldering/press skills required |
| Black iron or steel | Durable industrial-style systems | Strong, familiar to pipefitters, widely available | Threading labor, weight, corrosion scale, harder future changes |
| Ordinary PVC, CPVC, water PEX | Do not use for exposed shop air | Cheap and easy to find | Unsafe or not appropriate unless specifically designed and listed for compressed air |
For most homeowner garages and light commercial work bays, a 3/4-inch main with shorter 1/2-inch drops is a common starting point. That is not a universal rule. The right size depends on compressor CFM, distance to the farthest outlet, fittings, couplers, and tool demand. Before ordering, check the pipe manufacturer’s sizing chart for your expected CFM and run length.
Plan the Layout Like a Small Mechanical System
A good shop air layout has three goals: deliver enough air, keep water out of tools, and make service simple. Sketch the building before buying a kit. Mark the compressor, panel location, doors, bench, lift, hose reels, paint area, and any equipment that needs dry air.
Most home garages benefit from at least two or three drops. A practical 2-car garage setup might include one outlet near the overhead door for tires and cleaning, one above or beside the workbench, and one ceiling or wall-mounted hose reel near the center of the bay. A larger detached shop may need five to eight drops, especially if it has a lift, welding area, woodshop tools, or a paint/blast corner.
Loop Main vs Straight Run
A straight main works in a small garage where the farthest outlet is close to the compressor. A loop main is better for larger shops and multiple bays because air can feed an outlet from two directions. That reduces pressure drop and makes the system feel stronger at the farthest drop.
Rank #2

- 【All in One】You will get a complete compressed air piping system, including aluminum blocks with brass valves and plugs, tee fittings, L tubing fittings, straight fittings, and a complete accessory package: bevel tool, tubing cutter, tubing clips, teflon tape, gloves, expansion screws, o-rings and split rings for replacement. No need to buy additional accessories, one kit solves all your problems
- 【Triple-Layer Defense】HDPE-Aluminum-HDPE air compressor line, the inner and outer HDPE layers provide smooth flow channels and corrosion resistance, the middle aluminum layer enhances the strength of the pipe body, improve the anti-aging effect of pipelines. It also allows for highly flexible layout design and results in a clean, professional appearance
- 【Unmatched Sealing Reliability】Our garage air line kit utilize reinforced compression fittings, made from precision brass with nickel-plated to ensure maximum strength. Combining the dual sealing properties of ferrules and double o-rings, provides far superior resistance to vibration and shock compared to standard fittings. When properly installed, they deliver no leakage and high system integrity
- 【Easy to Install】The ompressed air tubing kit includes all necessary components and a detailed, easy-to-follow installation guidelines. With only basic tools like a wrench and screwdriver, you can complete the installation quickly and effortlessly. Even in complex scenarios, one kit can meet most of your needs for building a compressed air pipeline system
- 【Multiple Application Scenarios】Boeray air compressor line kit is a is reliable industrial transfer tubing. You can use it for various layouts, installing it on walls, suspending from ceilings, or even burying it underground. Ideal for shops, garages, farms, some workshops or manufacturing facilities, or any other places that require compressed air pipelines
For example, in a 24-by-30-foot garage, a 3/4-inch line across one long wall with three drops may be enough. In a 40-by-60-foot shop with work happening on both sides, a loop around the perimeter is usually worth the extra pipe and fittings. The extra material cost may be a few hundred dollars, but it can save years of frustration with weak air at the last bay.
Keep the Compressor Connection Flexible
Do not pipe the compressor directly into rigid wall pipe. Compressors vibrate. That vibration can fatigue fittings and stress the first section of pipe. Use a rated flexible connector between the compressor outlet and the hard piping, followed by a shutoff valve and a union or serviceable fitting arrangement.
We also like to be able to isolate sections. A shutoff at the compressor is mandatory in our view. In a bigger shop, add valves before branches so one damaged coupler or filter does not take the entire air system offline.
Moisture Control Is Where Many DIY Systems Fail
Compressed air carries moisture. As hot air leaves the compressor and cools in the pipe, water condenses. If the system is flat, poorly drained, or fed from the bottom of the main, that water goes straight into hoses and tools.
The basic layout details are simple and effective:
- Slope the main slightly toward drain points where practical.
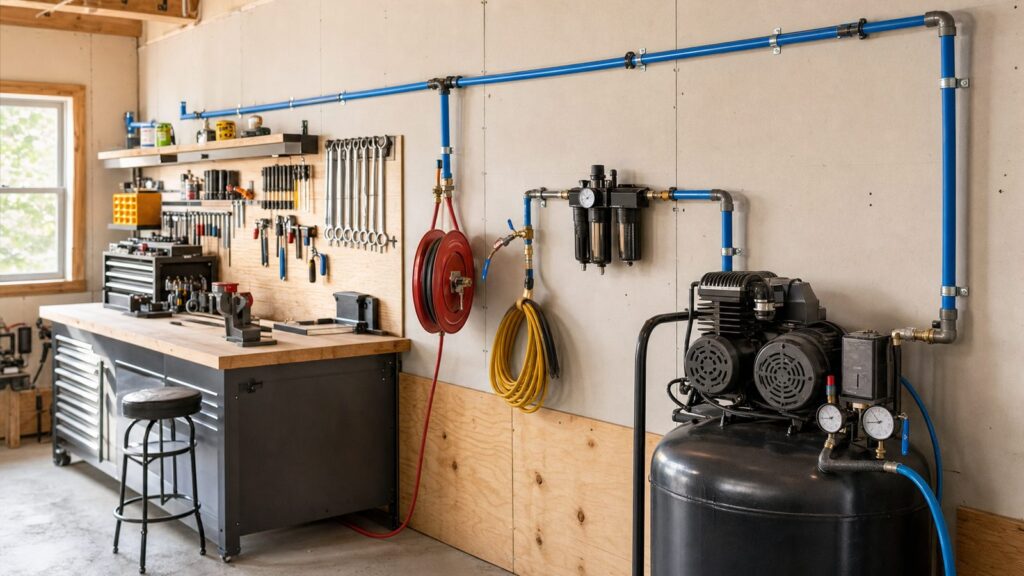
- Use top takeoffs from the main, then turn down to the outlet.
- Extend each drop below the coupler to create a drip leg.
- Put a drain valve at the bottom of each drip leg.
- Install filters and regulators where they can be reached and serviced.
- Drain the compressor tank often, or install an automatic drain if the compressor runs frequently.
A top takeoff matters because water tends to stay along the bottom of the main. If you tee out of the bottom of the line, you invite that condensate into the hose. A top takeoff forces air to rise first, then drop down the wall, leaving more water in the main and drip leg.
For general shop air, a filter-regulator at the outlet may be enough. For paint, powder coating, plasma cutting, CNC spindle air, or anything sensitive to moisture, separate that branch and add better filtration. Depending on the work, that may mean a coalescing filter, refrigerated dryer, desiccant dryer, or point-of-use dryer. Tire inflation and impact tools do not need the same air quality as a paint gun.
Mount filters where bowls are visible and drains are reachable. A perfect filter installed behind storage shelves will not be maintained. Leave clearance around the compressor, too. You need access to the belt guard, intake filter, oil sight glass or drain, tank drain, pressure switch, and safety valve.
Pressure Drop Costs Money
Pressure drop is the difference between the pressure at the compressor and the pressure at the tool while air is flowing. Atlas Copco gives a useful target: keep pressure drop from the compressor discharge to the farthest point under about 0.3 bar, or roughly 4.35 psi.
PC Slower Than It Used to Be?
A free scan shows the junk files, broken settings and background clutter dragging Windows down - then fixes them in one click.Free scan · Windows 10 & 11Crashes, No Sound, or Screen Glitches?
Random freezes, missing sound and display glitches usually trace back to one bad driver. Find and replace yours safely.Free scan · under a minuteThat number matters because the usual response to weak air is turning up the compressor. If the tool needs 90 psi and the system loses 12 psi through undersized pipe, restrictive couplers, and long hoses, the owner may raise the regulator to 102 psi or more. Higher compressor pressure generally means more energy use, more heat, more water, and more wear.
Pipe size is only part of the equation. Long small-diameter hoses, cheap quick couplers, tight elbows, clogged filters, and undersized regulators can all choke the system. We have seen shops install a larger main line, then lose the benefit through tiny couplers and 1/4-inch coiled hoses.
Rank #3

- [Heavy Duty] Our air compressor line 200 feet kit features a three-layer HDPE pipe (HDPE-AL-HDPE) crafted from copper and nickel for unparalleled leak-proof pressure performance. With smooth interior walls, our piping rolls outshine traditional iron or PVC piping, ensuring rust-free operation and heightened efficiency. It reliably maintains pressure at 200 psi@73F / 160 psi@140F and meets ASTM F1282, F1974 standards.
- [Flexible Fittings & Pipes] The FIDEURSUS air line kit boasts a 1/4” NPT port on the front of the manifold, complemented by 1/2” NPT ports on the top, front, and back, as well as a 3/8“ NPT port at the bottom (for connecting the Drain valve), catering to diverse needs. Equipped with 1/4” & 1/2“ couplers, the flexible 3/4-inch pipe bends easily to desired shapes with a bending radius of 6-8 inches. For tighter bends, an L-Fitting can be added in the middle.
- [Ideal for Shop & Garage] Engineered for easy installation in a range of settings, from small shops and farms to expansive manufacturing facilities, our Semi-Flexible Compressed Air Tubing delivers clean compressed air, inert gas & vacuum. Its straightforward installation allows for planned positioning of the air compressor and desired compressed air outlet location.
- [Adaptable Layout] Our pipes are flexible, enabling various layouts and inspiring creativity. Equipped with two types of anchors, our system can be easily installed on drywall, brick walls, ceilings, or even within walls. Enjoy the corrosion resistance of HDPE pipes, which can be painted in your preferred color and even buried in soil.
- [Easy Installation] No glue or welding necessary during installation. Basic accessories come included, requiring only a screwdriver & two adjustable wrenches. Follow our step-by-step instructions for seamless setup and operation. Our customer service team is available 24/7 to assist with any product-related queries.
As a practical standard, keep the main larger than the drops when possible. A 3/4-inch main with short 1/2-inch drops works well in many garages. Use full-flow couplers for high-demand tools. Keep hose lengths reasonable. If a tool runs constantly, give it a dedicated outlet near the work area rather than feeding it through a long hose from across the shop.
Compressor Location and Electrical Requirements
A stationary compressor needs a good location before piping starts. Look for clean intake air, ventilation, service clearance, manageable noise, a solid floor, and easy drain access. Do not hide the compressor in a sealed dusty closet. Starved intake air and poor cooling shorten compressor life.
Many 60-gallon stationary compressors require 230/240V power. Common retail homeowner units start around $900 to $1,300, with larger or two-stage shop compressors often reaching $1,600 to $2,000 or more. The electrical work can be just as important as the air piping. A new 240V circuit may require a properly sized breaker, conductor, receptacle or disconnect, and code-compliant routing from the panel to the compressor location.
Electrical costs vary by panel distance, finished walls, amperage, local rates, and permit requirements. As a planning number, a straightforward 240V outlet or compressor circuit may cost a few hundred dollars, while longer runs, panel work, trenching to a detached shop, or service upgrades can push the electrical side much higher. Confirm the compressor nameplate requirements before wiring. Do not size the circuit from a website photo or a guess.
Commercial shops should also think about compressor intake piping. The compressor needs adequate, clean intake air. Long or restrictive intake piping can reduce performance. If intake air is pulled from another space, confirm the manufacturer’s requirements for size, length, filtration, and temperature.
Realistic 2026 Cost Ranges
For a small garage, the least expensive safe path is usually a purpose-made compressed-air line kit. In 2026, DIY garage/shop piping materials commonly run about $130 to $650+ for 100-foot kits depending on diameter, brand, fittings, and material. Examples include budget 3/4-inch HDPE-aluminum kits around $128.90, home garage kits around $209, MaxLine-style master kits starting around $299, and FastPipe aluminum master kits starting around $649.
What’s actually slowing this PC down?
Pick the symptom - the matching free tool is one click away.
Copper can make a clean, durable system, but the total climbs quickly. Retail 1/2-inch Type L copper has been seen around $7.48 per foot for a short 2-foot piece, with better per-foot pricing sometimes available in longer lengths or through supply houses. Once you add tees, valves, unions, hangers, fittings, solder or press fittings, and labor, copper is rarely the cheapest route.
Labor depends on who installs it and how complex the layout is. Handyman rates commonly run about $50 to $150 per hour. Plumber or pipefitter-type rates commonly run about $60 to $200 per hour by license level, or roughly $75 to $150 per hour as a service rate. A simple wall-mounted kit may be a half-day to one-day job. Threaded steel or copper can take longer.
| Project Type | Typical Scope | 2026 Budget Range |
|---|---|---|
| DIY small garage | 1 to 3 drops, 50 to 100 ft kit, basic drains and couplers | $200 to $700 materials |
| Pro-installed garage system | 2 to 4 drops, clean wall layout, shutoffs, filters, hose reel | $800 to $2,500 installed |
| Detached shop or commercial bay | Loop main, multiple drops, better filtration, dryer, service valves | $2,500 to $7,500+ before compressor replacement |
| Stationary compressor | 60-gallon homeowner/light shop unit | $900 to $1,300 common starting range |
| Larger/two-stage compressor | Higher CFM shop use | $1,600 to $2,000+ common range |
The cheapest installed system is not always the cheapest system to own. If undersized pipe causes pressure drop, if moisture ruins tools, or if the compressor cycles constantly because leaks are ignored, the system keeps charging you after installation.
Permits, Code, and Safety Notes
Residential garage air piping is often treated differently than a commercial compressed-air system, but that does not mean anything goes. Electrical work for a stationary compressor may require a permit. Detached shops may involve trenching, feeder panels, grounding, and local inspection. Commercial spaces may have OSHA exposure, fire code considerations, pressure vessel rules, and insurance requirements.
Quick wins for a faster PC:
Repair Windows errors before they cause bigger problemsFix Now →Scan for outdated or missing drivers - takes under a minuteDriver Scan →The International Fire Code includes requirements for compressed gases, and local jurisdictions may adopt, amend, or enforce those rules differently. If the system is part of a business, used by employees, or installed in a leased commercial bay, ask the authority having jurisdiction and your insurance carrier before assuming a garage-kit approach is acceptable.
Rank #4

- 【All in One】You will get a complete compressed air piping system, including aluminum blocks with brass valves and plugs, tee fittings, L tubing fittings, straight fittings, air hose fittings, and a complete accessory package: bevel tool, tubing cutter, tubing clips, teflon tape, gloves, expansion screws, o-rings and split rings for replacement. No need to buy additional accessories, one kit solves all your problems
- 【Triple-Layer Defense】HDPE-Aluminum-HDPE air compressor line, the inner and outer HDPE layers provide smooth flow channels and corrosion resistance, the middle aluminum layer enhances the strength of the pipe body, improve the anti-aging effect of pipelines. It also allows for highly flexible layout design and results in a clean, professional appearance
- 【Unmatched Sealing Reliability】Our garage air line kit utilize reinforced compression fittings, made from precision brass with nickel-plated to ensure maximum strength. Combining the dual sealing properties of ferrules and double o-rings, provides far superior resistance to vibration and shock compared to standard fittings. When properly installed, they deliver no leakage and high system integrity
- 【Easy to Install】The compressed air line kit includes all necessary components and a detailed, easy-to-follow installation guidelines. With only basic tools like a wrench and screwdriver, you can complete the installation quickly and effortlessly. Even in complex scenarios, one kit can meet most of your needs for building a compressed air pipeline system
- 【Multiple Application Scenarios】Boeray compressed air tubing kit is a is reliable industrial transfer tubing. You can use it for various layouts, installing it on walls, suspending from ceilings, or even burying it underground. Ideal for shops, garages, farms, some workshops or manufacturing facilities, or any other places that require compressed air pipelines
Keep product documentation. Save pipe pressure ratings, temperature ratings, manufacturer installation instructions, compressor manual, regulator/filter ratings, and any inspection paperwork. A safe air system is not just strong on day one; it is understandable to the next person who services it.
Basic safety practices include:
- Use pipe and fittings rated for compressed air at the system pressure and temperature.
- Do not exceed the lowest-rated component in the system.
- Install a pressure relief valve where required and never defeat the compressor safety valve.
- Support pipe at the spacing required by the manufacturer.
- Protect lines from vehicle impact, sharp edges, heat, and UV exposure where applicable.
- Pressure-test and leak-check before regular use.
- Label maximum working pressure where helpful, especially in shared or commercial shops.
When to DIY vs When to Hire a Pro
A careful homeowner can install many purpose-made garage compressed-air kits. If you are mounting pipe on open walls, following the manufacturer’s instructions, using rated parts, and staying within a simple 1 to 3 drop layout, DIY can make sense. Budget a full Saturday for a small garage if you are organized, or a weekend if you are adding hose reels, filters, and a cleaner layout.
Hire a pro when the work touches permanent electrical wiring, the compressor requires a new 240V circuit, the shop is commercial, the system serves employees, the piping will be concealed, the layout is large enough to need formal sizing, or the tools require clean/dry air for production work. Also hire help if you are using copper or threaded steel and do not already have the equipment and experience to make reliable joints.
Recommended Free Tools
For commercial readers, we recommend a compressed-air audit before expanding. Leak detection, pressure-drop measurement, storage review, dryer sizing, and layout review often cost less than buying a bigger compressor. Many shops have enough compressor but lose performance through leaks, restrictions, poor piping, or wet air.
A Practical Installation Sequence
A clean installation follows a deliberate order. First, confirm compressor CFM, maximum pressure, electrical requirements, and location. Second, map the outlets around the work. Third, choose pipe material and diameter using the manufacturer’s sizing chart. Fourth, plan drains, top takeoffs, filters, regulators, valves, and service points. Fifth, install the compressor connection with a rated flex hose. Sixth, mount the main and drops with proper support. Seventh, pressure-test, leak-check, and document the system.
During layout, avoid placing couplers directly over electrical panels, benches full of sawdust, or finished surfaces where oil and water discharge will be a problem. Put outlets at a comfortable working height, often around 48 to 60 inches above the floor for wall drops. Ceiling hose reels should be located so the hose reaches the work without crossing walk paths more than necessary.
At each drop, the preferred pattern is main line overhead, takeoff from the top, pipe down the wall, tee to the coupler or filter-regulator, then continue the pipe lower to a drain valve. That lower section is the drip leg. For a garage, 6 to 12 inches below the outlet is often enough to create a useful collection point, provided it is drained regularly.
The Tool Desk
Outbyte Driver Updater FREEFix the driver behind crashes, sound loss and screen glitchesFind Drivers →Outbyte PC Repair FREEClear out junk files and repair common Windows errorsFree Scan →After installation, bring the system up to pressure and listen. Use a leak-detection solution on joints and couplers. Check again the next day after the system sits overnight. A compressor that kicks on when nobody used air is telling you there is a leak or a check valve issue. Fix leaks early. Small leaks become permanent operating cost.
Common Mistakes to Avoid
The first mistake is using unsafe pipe because it is cheap. PVC, CPVC, and ordinary water PEX do not belong in exposed compressed-air service unless a specific manufacturer’s system is designed and rated for that use. The second mistake is undersizing the main. If you are debating between a 1/2-inch main and a 3/4-inch main for a real shop, the larger main is often the better long-term choice.
The third mistake is ignoring water. A beautiful pipe layout without top takeoffs, drip legs, drains, and proper filtration will still send moisture into tools. The fourth is putting one filter at the compressor and assuming every outlet now has dry air. Air cools in the piping after that filter, and more water can condense downstream.
Best Value

- [Heavy Duty] Our air compressor line 300 feet (with Pressure Gauge) kit features a three-layer HDPE pipe (HDPE-AL-HDPE) crafted from copper and nickel for unparalleled leak-proof pressure performance. With smooth interior walls, our piping rolls outshine traditional iron or PVC piping, ensuring rust-free operation and heightened efficiency. It reliably maintains pressure at 200 psi@73F / 160 psi@140F and meets ASTM F1282, F1974 standards.
- [Flexible Fittings & Pipes] The FIDEURSUS air line kit boasts a 1/4” NPT port on the front & right front of the manifold, complemented by 1/2“ NPT ports on the top, left front, and back, as well as a 3/8 NPT port at the bottom (for connecting the Drain valve), catering to diverse needs. Equipped with 1/4” & 1/2“ couplers, the flexible 3/4-inch pipe bends easily to desired shapes with a bending radius of 6-8 inches. For tighter bends, an L-Fitting can be added in the middle.
- [Ideal for Shop & Garage] Engineered for easy installation in a range of settings, from small shops and farms to expansive manufacturing facilities, our Semi-Flexible Compressed Air Tubing delivers clean compressed air, inert gas & vacuum. Its straightforward installation allows for planned positioning of the air compressor and desired compressed air outlet location.
- [Adaptable Layout] Our pipes are flexible, enabling various layouts and inspiring creativity. Equipped with two types of anchors, our system can be easily installed on drywall, brick walls, ceilings, or even within walls. Enjoy the corrosion resistance of HDPE pipes, which can be painted in your preferred color and even buried in soil.
- [Easy Installation] No glue or welding necessary during installation. Basic accessories come included, requiring only a screwdriver & two adjustable wrenches. Follow our step-by-step instructions for seamless setup and operation. Our customer service team is available 24/7 to assist with any product-related queries.
The fifth mistake is relying on long rubber hoses instead of pipe. Hoses are convenient at the work point, but they create pressure loss, clutter, trip hazards, and wear. A properly sized hard-piped main gets volume close to the work; the hose should be the final flexible connection, not the entire distribution system.
The sixth mistake is forgetting service. Compressors, filters, dryers, regulators, and drains need access. If you have to dismantle shelves to drain the tank, it will not happen often enough.
Bottom Line
Plumbing your shop for air is a worthwhile upgrade when it is treated with the same respect as any other pressure system. Use compressed-air-rated pipe, avoid PVC and other unsafe plastics, size the main for CFM and distance, manage moisture with top takeoffs and drains, and verify electrical and code requirements before installing a stationary compressor.
For a typical garage, expect $200 to $700 in DIY materials or roughly $800 to $2,500 for a pro-installed small system. For a larger shop with a loop main, multiple drops, filtration, dryer, and commercial-duty layout, $2,500 to $7,500+ is a realistic planning range before compressor replacement. Spend the money where it matters: safe pipe, adequate main size, good drains, serviceable valves, and clean air where the work requires it.
Frequently Asked Questions
Can I use PVC pipe for shop air?
No. Ordinary PVC should not be used for exposed compressed-air piping. OSHA guidance warns against PVC for compressed air because brittle pipe can rupture violently. Use pipe specifically rated for compressed-air service.
What size air line should I run in a garage shop?
Many garages use a 3/4-inch main with shorter 1/2-inch drops, but the correct size depends on compressor CFM, run length, fittings, and tool demand. Check the pipe manufacturer’s sizing chart before buying.
How many air drops does a home shop need?
Most home garages work well with 2 to 3 drops: one near the door for tires, one near the bench, and one hose reel or central work area. Larger shops may need separate drops for lifts, paint, blasting, or CNC equipment.
Does a 60-gallon compressor need 240V power?
Many stationary 60-gallon compressors require 230/240V power. Confirm the compressor nameplate before installation and hire a licensed electrician when a new circuit, disconnect, or panel work is needed.
How much does it cost to plumb a shop for air?
A small DIY garage system typically costs about $200 to $700 in materials. A pro-installed garage system often runs $800 to $2,500. Larger detached or commercial shops can run $2,500 to $7,500+ before compressor replacement.
Do I need an air dryer in my shop air system?
Not always. Basic shop air may only need drains and filter-regulators. Paint, plasma cutting, CNC spindle air, and moisture-sensitive tools usually need better drying, such as coalescing filtration, desiccant, or a refrigerated dryer.
Quick Recap
Product prices and availability are accurate as of the date/time indicated and are subject to change. Any price and availability information displayed on Amazon at the time of purchase will apply.

