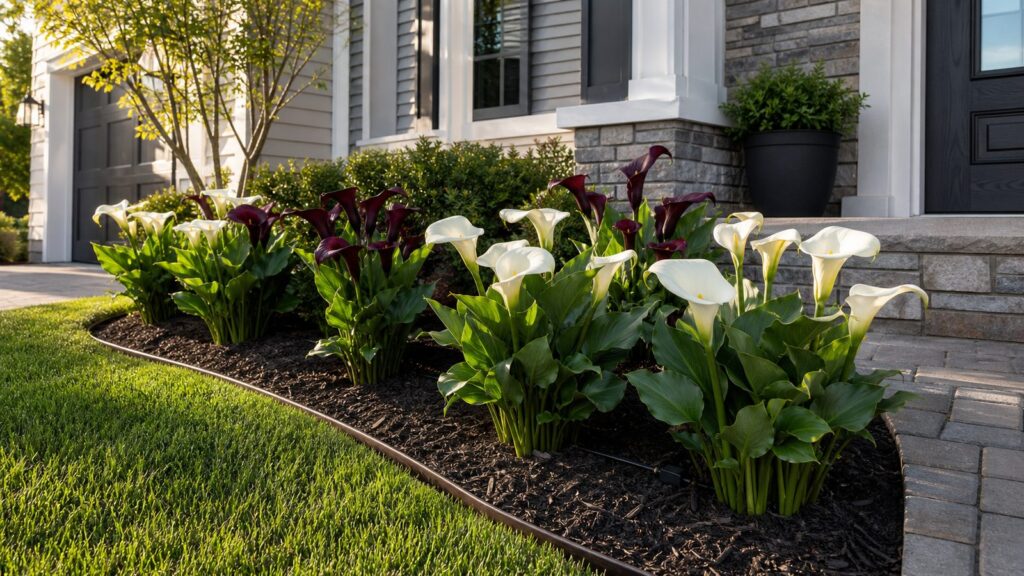
Calla lilies are one of the fastest ways to add a polished, high-end look to a porch, patio, entry bed, or bright indoor room. The key is understanding what they are: not true lilies, but tender rhizomatous plants in the Zantedeschia genus. Treat them like a moisture-loving tropical bulb with limits, not like a shrub, and they will reward you with clean trumpet-shaped blooms and strong upright foliage.
For most U.S. homeowners, the short answer is this: plant calla lily rhizomes outdoors in spring after frost, when the soil is warming toward about 65 degrees F. Give them rich soil, full sun to part shade, steady moisture, and drainage that does not leave the crown sitting in stagnant mud. In USDA Zones 8-10, many callas can return as perennials. In colder zones, grow them as annuals, plant them in containers, or lift and store the rhizomes before a hard frost.
As an Amazon Associate I earn from qualifying purchases.
On our job sites, we treat callas as a finish-detail plant. They are not the backbone of a landscape plan, but they are excellent where a homeowner wants color without a major construction project: flanking steps, softening a patio edge, filling a raised planter, or adding a seasonal focal point near an entry. The mistakes we see most often are simple ones: planting too early, overwatering a poorly drained bed, letting irrigation spray the house or hardscape, cutting the foliage down too soon, or keeping indoor callas wet all winter when they need rest.
Free tools Windows power users keep installed
One-click scans. No signup required.
What Calla Lilies Need Before You Plant
Calla lilies grow from rhizomes or tuberous rhizomes. That storage structure is the plant’s battery. If it goes into cold, wet soil before active growth starts, it can rot. If the foliage is removed too early after flowering, the rhizome does not recharge well for the next season.
#1 Best Overall

- Elegant Blooms – Classic Calla Lilies add timeless beauty and sophistication to any garden or floral arrangement.
- Versatile Planting – Ideal for garden beds, patios, containers, and even as pond or water garden accents.
- Easy to Grow – Adaptable to a variety of soils and climates, Calla Lilies thrive in gardens, borders, or pots with minimal care.
Most landscape callas grow about 1 to 3 feet tall, though some large white forms can get bigger in the right climate. Colored hybrid callas are commonly used in containers and seasonal beds. White calla lilies, especially Zantedeschia aethiopica, can be more vigorous in mild, wet regions, which is useful in some sites and a real problem in others.
Plan the planting around four conditions:
- Warmth: Wait until frost danger has passed and soil is warm. In cold regions, that often means late spring rather than the first warm weekend.
- Light: Full sun works in mild climates. In hot Southern and Southwestern sites, morning sun with afternoon shade is usually more reliable.
- Moisture: Keep the soil evenly moist during active growth, but do not create a sour, anaerobic planting hole.
- Drainage: Callas tolerate moist soil better than many bulbs, but stagnant water still causes rot.
One practical test before planting: after a normal irrigation cycle or rain, watch the bed. If water is still ponded after 5 to 6 hours, fix the grade, loosen the soil, add organic matter, or choose containers instead. That test matters even more near foundations, patios, walks, and retaining walls. A flower bed should not solve a plant problem by creating a building problem.
Where Calla Lilies Work Best Outdoors
Calla lilies are at their best where their shape can be seen. A single rhizome in a big bed often looks thin. Groups of 3, 5, or 7 rhizomes read as intentional and give enough foliage mass to look designed. For a narrow entry bed, a row of 5 plants spaced 12 to 18 inches apart can frame a walk without feeling crowded. For a larger bed, use clusters spaced 18 to 24 inches apart, then underplant with lower annuals or mulch cleanly around them.
Good Outdoor Locations
- Large patio containers with drainage holes
- Raised planters where the soil mix can be controlled
- Entry beds with morning sun
- Irrigated borders that do not overspray siding, stucco, windows, or pavement
- Rain-garden edges where the soil is moist but not constantly stagnant
Locations to Avoid
- Low spots that stay soggy for days
- Foundation beds where irrigation pushes water toward the house
- Areas where roof runoff pounds directly onto the crown
- Uncontained wet sites in regions where white calla lily is invasive
- Dog runs, cat-accessible patios, or children’s play zones where plant chewing is likely
In parts of coastal California and riparian or wetland areas, Zantedeschia aethiopica can spread by seed and rhizomes moved in soil or garden waste. For those projects, we would discuss noninvasive alternatives or keep callas in containers where spent flowers, soil, and rhizomes can be managed responsibly.
How to Plant Calla Lily Rhizomes Outdoors
Start with firm rhizomes. They should feel solid, not soft, hollow, moldy, or foul-smelling. Cheap stock is not a bargain if half of it is already rotting. In 2026, common calla rhizomes and bulbs run roughly $2 to $15 or more per rhizome depending on cultivar, size, pack quantity, and season. A 6-pack at a big-box store may land around $25, or about $4.16 per plant. Named or specialty varieties from bulb suppliers often run around $20 to $50 or more per small pack.
Step-by-Step Planting
- Wait for the right timing. Plant after the last expected frost, when nights are reliably above freezing and the soil is warming. In many colder U.S. zones, that is mid to late spring.
- Prepare the bed. Loosen soil 8 to 10 inches deep. Mix in compost to improve water-holding capacity and drainage. Heavy clay may need raised planting or a wider amended bed, not just a small amended hole.
- Set the depth. Many gardeners plant calla rhizomes about 4 to 6 inches deep, but some suppliers recommend shallower planting with about 2 inches of cover depending on rhizome size and cultivar. Follow the package for the stock you bought. When in doubt, avoid burying small rhizomes too deeply in cool soil.
- Space properly. Use 12 to 24 inches between plants. Compact container varieties can sit closer; larger landscape types need more room.
- Water in once. Settle the soil around the rhizome, then keep it lightly moist until growth appears. Do not flood the bed daily before roots are active.
- Mulch lightly. Use 1 to 2 inches of mulch, pulled back slightly from emerging stems. Mulch helps even out moisture and reduces splash on leaves.
Expect shoots in a few weeks under warm conditions. Bloom timing depends on cultivar and climate. Many colored hybrids flower in summer. Some white calla forms bloom around early to midsummer, while other species and hybrids can push later into summer.
Soil, Drainage, and Irrigation Details That Prevent Rot
Calla lilies like rich, moist soil, but that phrase gets misunderstood. Moist does not mean sealed clay, standing water, or a planter with no drain hole. The best setup is soil that holds enough water for steady growth but still has air space around the roots.
Recommended Free Tools
For beds, build around these specs:
- Loosen the bed 8 to 10 inches deep before planting.
- Add 2 to 3 inches of compost over poor soil and blend it into the top 6 to 8 inches.
- Keep finished grade sloping away from the house at roughly 1/4 inch per foot where the bed is near a foundation.
- Keep mulch below weep screeds, siding clearances, and wood trim.
- Do not let sprinkler heads hit windows, doors, stucco, siding, or paved walks.
drip irrigation is usually better than overhead spray for callas. It puts water at the root zone, reduces leaf wetness, and wastes less water. That matters because U.S. residential outdoor water use is nearly 8 billion gallons per day, and inefficient irrigation can waste as much as half of that. If you are already opening a planting bed near a patio or walkway, a simple drip line under mulch is often worth the modest added cost.
For most beds, start with deep watering 1 to 2 times per week during active growth, then adjust for rainfall, soil type, sun exposure, and heat. Containers dry faster and may need water every day during hot spells. The goal is evenly moist soil, not a fixed calendar.
Growing Calla Lilies in Containers
Containers are often the cleanest way to grow callas. They give you control over soil, drainage, winter storage, and placement. They also make sense for renters, colder climates, and regions where in-ground planting is not appropriate.
Use an 8 to 12 inch pot for one rhizome or small nursery plant. For a fuller patio display, use a 14 to 18 inch container with 3 rhizomes, depending on mature size. Every pot needs drainage holes. A decorative cachepot is fine only if the plant sits in a draining inner pot and excess water is dumped from the outer container.
Do these 3 things before closing this tab:
1Repair Windows errors before they cause bigger problems2Scan for outdated or missing drivers - takes under a minute3Clear out junk files and repair common Windows errorsA basic DIY container setup in 2026 often runs $25 to $75:
- Rhizome or plant: $4 to $35
- 8 to 12 inch pot with drainage: $10 to $40
- Potting mix: $5 to $15
- saucer: $3 to $10
- Bulb or bloom fertilizer: $5 to $15
Use a quality potting mix, not heavy garden soil. Plant at the depth recommended for your rhizome size, water thoroughly, and place the pot where it gets bright light. Outdoors, morning sun and afternoon shade is a dependable patio placement in hot climates.
Indoor Calla Lily Care
Indoors, calla lilies need bright indirect light, drainage, even moisture during active growth, and a dormancy period after flowering. The dormancy piece is where many homeowners lose the plant. Callas are often sold blooming in pots, then treated like evergreen houseplants. They decline because the rhizome never gets a proper rest.
Indoor Light and Temperature
Set the plant near a bright window, but avoid harsh hot glass in summer. An east-facing window is often ideal. A south or west exposure may work with sheer light or a little distance from the pane. Normal household temperatures are fine while the plant is growing, but avoid cold drafts and heat registers.
Indoor Watering
During active growth and bloom, water when the top inch of mix begins to dry. Let excess water drain fully. Do not leave the pot standing in water. After bloom, gradually reduce watering as foliage yellows. Once the leaves die back, keep the rhizome barely dry through dormancy.
A Practical Indoor Dormancy Calendar
If you buy or start a calla in spring, it may bloom in late spring or summer. After flowering, remove spent blooms but keep healthy leaves. Let the plant continue growing for several weeks so the rhizome rebuilds energy. When leaves yellow naturally, reduce watering. Give the rhizome about 8 to 10 weeks of rest in a cool, dry, dark, frost-free place. Then repot if needed, resume light watering, and move it back into bright light.
Rank #2

- BEST BULBS: Calla Lilies are a garden and container favorite. Easy to grow and the curious blooms last all season.
- AMAZING GARDEN COLOR: Add this stunner mix to you garden or containers and be rewarded with the beauty of its blooms all season
- NON-GMO: Good for the environment and bees and Monarch Butterflies like these alot!
- CZ GRAIN GUARANTEE: We guarantee these trees to grow fast and change the scenery!
For a head start on outdoor color, start rhizomes indoors 6 to 8 weeks before your outdoor planting window. Keep them warm and bright, then move the pots outside after frost danger has passed.
Fertilizer, Deadheading, and Seasonal Maintenance
Calla lilies do not need aggressive feeding. Too much nitrogen produces big leaves at the expense of flowers. Use a low-nitrogen bulb or bloom fertilizer such as 5-10-5 or 5-10-10 in spring, following the label rate. For containers, a diluted liquid bloom fertilizer can work during active growth, but do not keep feeding once the plant is moving toward dormancy.
Outdated Drivers Are Slowing You Down
One free scan finds every outdated or missing driver and matches the right update for your exact hardware.Free scan · exact hardware matchWindows Errors? Fix Them Before They Spread
Repair common Windows errors and clear accumulated junk for a smoother, more stable PC - no reinstall needed.Free scan · no reinstallRemove spent flowers by cutting the flower stem near the base. This keeps the plant clean and reduces seed formation. Do not remove healthy leaves just because the flowers are finished. Those leaves are still feeding the rhizome. Cut foliage only after it yellows or collapses naturally.
In humid areas, avoid overhead watering late in the day. Wet foliage overnight increases disease pressure. If leaves become spotted, yellow, or mushy, check watering, air circulation, and crown condition before adding more fertilizer.
Winter Care: Leave, Lift, or Store
In USDA Zones 8-10, many calla lilies can stay in the ground if drainage is good and the cultivar is suited to the area. Mulch can help moderate soil temperatures. In colder zones, plan to lift the rhizomes before a hard frost or grow them in containers that can be moved.
How to Lift and Store Rhizomes
- After the first light frost or when foliage yellows, cut stems back to a few inches.
- Dig carefully outside the clump so you do not slice the rhizome.
- Shake off loose soil. Do not wash aggressively unless you need to inspect for rot.
- Let rhizomes cure in a dry, shaded, ventilated place for several days.
- Store in peat, vermiculite, paper bags, or open trays in a cool, dark, dry, frost-free space.
- Check once or twice over winter and discard anything soft or moldy.
The storage area should be cool but not freezing. A dry basement shelf, insulated garage cabinet, or utility space can work if temperatures stay stable. Do not store rhizomes in sealed plastic with moisture trapped inside.
The Tool Desk
Outbyte PC Repair FREERepair Windows errors before they cause bigger problemsFix Now →Outbyte Driver Updater FREEFix the driver behind crashes, sound loss and screen glitchesFind Drivers →Costs: DIY Calla Lilies vs Professional Planting
Calla lilies can be inexpensive as a weekend project or part of a larger landscape scope. The difference is usually not the plant itself. Cost rises when the work includes bed construction, grading, edging, irrigation, drainage correction, or hardscape restoration.
| Project Type | Typical 2026 Cost | What It Usually Includes |
|---|---|---|
| Single DIY container | $25-$75 | Rhizome or small plant, 8-12 in. pot, potting mix, saucer, fertilizer |
| Blooming nursery pot | $15-$35+ | Small established plant; larger decorative or florist-grade pots cost more |
| DIY 10-20 sq. ft. grouping | $60-$250 | Rhizomes, compost, mulch, simple edging, possible drip parts |
| Professional gardening labor | $33-$47/hr typical; $60-$88/hr for experienced specialists | Planting, cleanup, seasonal bed work, small layout adjustments |
| Landscaper labor | $50-$100/hr | Broader landscape installation, grading, irrigation, edging, soil prep |
| Flower-bed installation | $4.50-$13.50/sq. ft.; full projects often $1,000-$3,000 | Bed layout, soil work, edging, mulch, plants, and sometimes irrigation |
For a small front-entry calla grouping, a homeowner can often stay under $250 in materials if the bed already drains well. If the bed needs regrading, stone edging, drip irrigation, or work around a patio, the project moves into landscape-contractor territory quickly.
When to DIY vs When to Hire a Pro
DIY is a good fit when you are planting containers, refreshing an existing bed, or adding a small grouping in soil that already drains well. The work is straightforward: buy firm rhizomes, amend the soil, plant after frost, water consistently, and lift or protect them at season’s end.
Hire a pro when the planting area touches drainage, grading, irrigation, or hardscape. We get cautious when a homeowner wants a wet-loving plant beside a foundation, on the uphill side of a patio, next to basement walls, or inside a planter tied into masonry. In those cases, the plant choice is only one piece of the job. Water needs a path that does not damage the structure.
A professional is also worth considering if you are installing a new flower bed larger than about 50 square feet, adding drip irrigation to an existing zone, working around low-voltage lighting, or building raised planters. Irrigation work can trigger local requirements for backflow prevention, permits, inspections, or licensed installation depending on your municipality and the connection point. Before tying new irrigation into a domestic water line, check local code and utility requirements.
Independent reader supportYour contribution helps us test, update, and keep practical guides available for everyone.Safety Notes for Pets, Kids, and Sensitive Sites
Calla lilies are toxic to dogs and cats because they contain insoluble calcium oxalates. Chewing the plant can cause oral irritation, burning of the mouth, tongue, and lips, drooling, vomiting, and difficulty swallowing. That does not mean every homeowner must avoid them, but placement matters.
Use containers on raised surfaces, fenced patios, or low-traffic ornamental beds if pets are curious chewers. Do not plant them along a dog run, beside a pet water bowl, or where toddlers commonly explore plants by hand and mouth. Wear gloves if you have sensitive skin, and wash hands after cutting stems or handling rhizomes.
Dispose of trimmings responsibly. In regions where callas can spread, never dump rhizomes or garden waste into natural areas, drainage channels, wetlands, or vacant lots.
Rank #3

- Planting Method: Prior to sowing, it is recommended to soak the seeds in lukewarm water for approximately 24 hours. Plant in well-draining soil at a depth about 1-2 times the seed's diameter. Keep the soil consistently moist until germination occurs.
- Planting Method: Sow seeds outdoors after the last threat of spring frost has passed. During germination, provide bright, indirect light and maintain consistent moisture in the soil, avoiding both waterlogging and complete drying out.
- Use: The blooms are well-suited for fresh-cut indoor floral arrangements. Their sturdy stems and long vase life add an elegant touch to home decor.
- Use: When planted in groups, Calla Lilies serve as excellent decorative plants for flower borders, garden edges, or beside water features, offering striking linear form and color contrast.
Troubleshooting Common Calla Lily Problems
No Flowers
The usual causes are too much nitrogen, not enough light, immature or undersized rhizomes, crowding, or skipped dormancy. Move containers into brighter indirect light or morning sun, switch to a low-nitrogen bloom fertilizer, and let the plant rest after foliage yellows.
Yellow Leaves During Active Growth
Yellow leaves can come from overwatering, underwatering, poor drainage, or normal aging. Check the soil before reacting. If it smells sour or stays wet for days, drainage is the problem. If it pulls away from the pot edge and feels dusty, water more deeply.
Soft or Mushy Rhizomes
This is usually rot. Remove affected material and do not replant soft, foul-smelling rhizomes. Recheck bed drainage, planting depth, and watering frequency before replacing them.
Leaf Scorch
In hot climates, afternoon sun can burn foliage and stress the plant. Shift containers to morning sun and afternoon shade, or use callas under taller plantings that provide filtered light after lunch.
What’s actually slowing this PC down?
Pick the symptom - the matching free tool is one click away.
Best Practical Planting Plan for Homeowners
For the average homeowner, the most reliable calla lily setup is a cluster of 3 rhizomes in a 14 to 18 inch container or a group of 5 to 7 rhizomes in an amended entry bed with drip irrigation. Plant in spring after frost, keep the soil evenly moist, feed lightly with 5-10-5 or 5-10-10 fertilizer, deadhead spent blooms, and leave the foliage until it yellows. In cold zones, lift and store the rhizomes before a hard frost. Indoors, give bright indirect light and a real 8 to 10 week rest period after the growing cycle.
Calla lilies are not difficult, but they are specific. Give them warmth, drainage, steady moisture, and seasonal rest, and they can deliver the kind of clean, architectural color that makes a small landscape upgrade look intentional rather than improvised.
Frequently Asked Questions
Are calla lilies indoor or outdoor plants?
They can be either. Outdoors, calla lilies grow well in warm-season beds and containers. Indoors, they need bright indirect light, a pot with drainage, steady moisture while growing, and a dry rest period after flowering.
Do calla lilies come back every year in the US?
In USDA Zones 8-10, many calla lilies can return as perennials if drainage is good. In colder zones, treat them as annuals, grow them in movable containers, or lift and store the rhizomes before a hard frost.
Quick wins for a faster PC:
Repair Windows errors before they cause bigger problemsFix Now →Scan for outdated or missing drivers - takes under a minuteDriver Scan →When should I plant calla lily bulbs or rhizomes?
Plant outdoors after the last frost when soil has warmed, ideally near 65 degrees F. In cold regions, you can start rhizomes indoors 6 to 8 weeks before outdoor planting season.
How much sun do calla lilies need?
Calla lilies grow in full sun to part shade. In hot Southern and Southwestern climates, morning sun with afternoon shade is usually better than all-day sun.
Are calla lilies poisonous to pets?
Yes. Calla lilies are toxic to dogs and cats and can cause mouth irritation, drooling, vomiting, and difficulty swallowing if chewed. Keep them away from pets that investigate plants.
How much does it cost to plant calla lilies?
A DIY container usually costs about $25-$75 in 2026. A small DIY bed may cost $60-$250 in materials. Professional flower-bed work commonly ranges from $4.50-$13.50 per square foot, with larger full projects often around $1,000-$3,000.
Do these 3 things before closing this tab:
1Repair Windows errors before they cause bigger problems2Fix the driver behind crashes, sound loss and screen glitches3Clear out junk files and repair common Windows errorsQuick Recap
Product prices and availability are accurate as of the date/time indicated and are subject to change. Any price and availability information displayed on Amazon at the time of purchase will apply.

