Outdated Drivers Are Slowing You Down
One free scan finds every outdated or missing driver and matches the right update for your exact hardware.Free scan · exact hardware matchPC Slower Than It Used to Be?
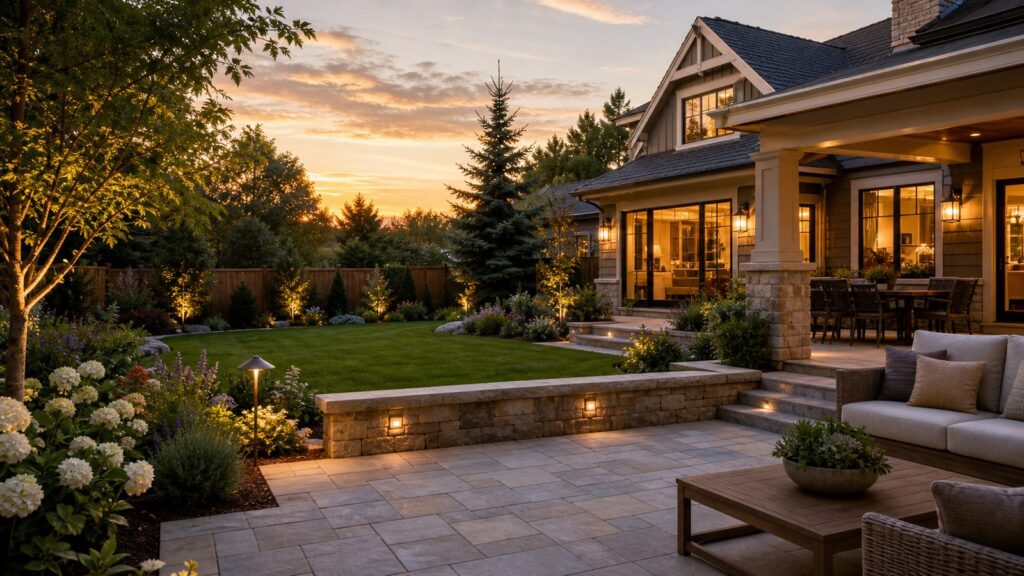
A free scan shows the junk files, broken settings and background clutter dragging Windows down - then fixes them in one click.Free scan · Windows 10 & 11A strong garden photo is not just a pretty flower close-up. For a homeowner, builder, or landscape contractor, it should show how the outdoor space works: where people enter, how the patio connects to the house, how beds frame views, how drainage and edging were handled, and why the finished project is worth the investment.
On our job sites, the best outdoor images usually come from three things: clean preparation, good timing, and a shot list. Camera gear matters, but it matters less than mowing the lawn, sweeping the patio, straightening furniture, waiting for the right light, and photographing the space from angles that explain the design.
As an Amazon Associate I earn from qualifying purchases.
If you want the short version: photograph gardens early in the morning, late in the afternoon, or under bright overcast skies. Clean the site the day before. Shoot wide, medium, and detail views. Keep fences, walls, pergolas, and deck rails level. If the photos will be used for marketing, confirm licensing, drone rules, and permits before anyone shows up with a camera.
Start With the Purpose of the Photos
Before choosing a lens or walking the garden, decide what the images need to do. A homeowner documenting seasonal blooms has a different goal than a contractor building a case study for a patio, retaining wall, outdoor kitchen, or landscape lighting project.
#1 Best Overall

- 16MP Sensor: Captures detailed photos with a CMOS sensor for everyday shooting
- Optical Zoom: 4x optical zoom with a 27mm wide angle lens for flexible framing indoors or outdoors
- Full HD Video: Records 1080p video for travel clips, family moments, or simple vlogging
- Memory Support: Works with Class 10 SD, SDHC, or SDXC cards up to 512GB
- LCD Screen and Battery: 2.7in LCD screen with 2 AA alkaline batteries for convenient on-the-go use
For personal use, the goal may be simple: capture the garden at peak bloom, document plant combinations, or keep before-and-after records. For construction and landscaping use, the photos need to prove value. That means showing layout, workmanship, circulation, material transitions, lighting, drainage decisions, and how the finished space relates to the home.
We usually think in zones:
- Approach: driveway, front walk, gate, or first view from the street.
- Entry: threshold, steps, walkway, planting at the door, porch, or side-yard access.
- Main outdoor room: patio, deck, pergola, pool area, fire feature, seating, dining, or outdoor kitchen.
- Planting beds: foundation planting, borders, raised beds, trees, shrubs, perennials, and seasonal color.
- Circulation: paths, stepping stones, stairs, gravel walks, lawn panels, and transitions between spaces.
- Details: stone joints, paver pattern, lighting fixtures, irrigation, edging, gates, railings, masonry, water features, and planting texture.
- Views back to the house: the angle that shows how the outdoor work improves daily living.
That structure keeps you from taking 80 versions of the same flower and missing the one image that explains the whole project.
Prepare the Garden Like a Jobsite, Not a Snapshot
Garden photography rewards clean edges. A $4,000 patio, a $40,000 outdoor living project, and a $400,000 landscape renovation can all look careless if the hose is still across the walk, the furniture cushions are crooked, or the mulch line is ragged.
We prefer to prep the day before the shoot, then do a 30-minute touch-up right before camera time. That avoids rushing while the light is good.
Pre-Shoot Cleanup Checklist
- Mow the lawn 24 to 48 hours before the shoot so clippings settle and tire marks fade.
- Edge walks, beds, patios, and driveway borders.
- Sweep patios, decks, steps, pool coping, walkways, and porches.
- Blow leaves and grit out of paver joints and deck corners.
- Hide hoses, trash bins, buckets, toys, tools, plant tags, bags of soil, extension cords, and temporary irrigation parts.
- Wipe tables, railings, glass doors, outdoor counters, grills, and fire-feature caps.
- Remove dead blooms, broken stems, yellowing leaves, and obvious weeds.
- Refresh mulch edges where they have washed into turf or hardscape.
- Straighten chairs, cushions, umbrellas, planters, and rugs.
- Turn on fountains, fire bowls, pool features, low-voltage lighting, and irrigation only when they help the image.
For newly completed landscapes, patience helps. Many planting beds look better two to six weeks after installation, once plants recover from transplanting, mulch has settled, and disturbed soil no longer looks fresh. Sod often photographs better after its first or second mowing, provided the seams have closed and irrigation has been dialed in.
Use the Right Light for the Result You Want
The best time to photograph a garden is usually early morning, late afternoon, or bright overcast weather. Midday sun is the hardest condition because it creates blocked shadows, shiny leaves, washed-out flowers, and bright sky that overpowers shaded beds.
Morning light is excellent for front yards, east-facing entries, dew on plants, and quiet garden scenes. Late afternoon and golden hour are better for warm patio images, outdoor living spaces, backlit grasses, and lifestyle shots with lights turned on. Overcast days are underrated. They produce even exposure, richer plant color, and fewer harsh shadows on stone, siding, and foliage.
Free tools Windows power users keep installed
One-click scans. No signup required.
Backlighting is especially useful in gardens. When the sun is low and behind the subject, ornamental grasses, seed heads, translucent petals, and young leaves can glow. The key is to avoid pointing directly into a blown-out sky unless you are intentionally creating a silhouette.
Bracket High-Contrast Scenes
Outdoor spaces often have a bright sky and shaded planting beds in the same frame. If your camera or phone allows it, bracket exposures: one darker frame for the sky, one normal frame, and one brighter frame for the shadows. Blend carefully or choose the best single exposure. The goal is a natural image, not a heavy HDR look where every shadow and highlight is flattened.
For phones, tap to expose for the main subject, then adjust exposure slightly darker if the sky is blowing out. Wipe the lens first. A dirty phone lens can make patio lights and bright leaves smear across the frame.
Build a Complete Shot List
A useful garden photo set needs scale changes. Do not try to show the whole property in every frame. A finished outdoor project is easier to understand when the viewer sees the big picture, the routes through the space, the plant combinations, and the construction details.
Quick wins for a faster PC:
Clear out junk files and repair common Windows errorsFree Scan →Scan for outdated or missing drivers - takes under a minuteDriver Scan →For a residential garden or landscape project, a good baseline shot list is 25 to 40 final images. You may shoot 150 to 300 frames to get there, but the delivered set should feel intentional.
Wide Establishing Shots
Start with 4 to 8 wide images. These show the house, lawn, beds, patio, pool, walls, driveway, or major landscape zones. Keep vertical lines straight. If a fence, pergola, deck rail, retaining wall, or roofline is tilted, the image will feel amateur even if the plants look good.
For real estate-style documentation, wide exterior packages often fall around $150 to $350 nationally in 2026. That can work for basic property images, but it usually does not include the slower styling, seasonal return visit, detailed hardscape coverage, or broad commercial license a builder or landscaper may need.
Rank #2

- 16MP Sensor: Captures detailed photos with a CMOS sensor for everyday shooting
- Optical Zoom: 5x optical zoom with a 28mm wide angle lens for flexible framing indoors or outdoors
- Full HD Video: Records 1080p video for travel clips, family moments, or simple vlogging
- Memory Support: Works with Class 10 SD, SDHC, or SDXC cards up to 512GB
- Rechargeable Battery: Included LB-012 lithium-ion battery charges in the camera over USB with the supplied adapter in about 2 hours; charge it for at least 4 hours before first use to maximize battery life
Mid-Range Garden Views
Mid-range views are where gardens usually come alive. These images show plant masses, path edges, seating areas, raised beds, steps, boulders, water features, and the way one zone leads to another. Shoot from standing height, seated height, and low height. A camera 24 to 36 inches above the ground often makes paths and planting beds feel more immersive.
Use leading lines where they already exist: paver joints, bed edges, railings, steps, gravel paths, lawn borders, and water channels. Shoot through foreground foliage when it adds depth, but keep the main subject readable.
Detail and Close-Up Images
Details matter because they show care. Capture leaves, flowers, bark, stone texture, paver patterns, mortar joints, gate hardware, lighting fixtures, irrigation emitters, drainage channels, steel edging, stair nosing, coping, and transitions between materials.
For contractors, details should not be random. A close-up of a drip irrigation line, clean edging, or properly pitched drain can help a homeowner understand why one landscape bid costs more than another.
Show the Built Environment, Not Just the Plants
Garden photography often fails when it treats the landscape as separate from the house. In real life, outdoor spaces are built environments. Patios need proper slope. Walls need clean caps. Steps need safe proportions. Beds need drainage. Lighting needs fixture placement. Plants need enough room to mature.
When photographing a finished project, include the construction decisions that make the garden function. A 4-foot-wide main path feels generous in a front entry sequence. A 30- to 36-inch secondary garden path may be enough for occasional use. Patio dining areas need enough room for chairs to pull back, often 3 feet beyond the table edge. Steps, seat walls, and raised planters should read level and intentional in the frame.
Photograph the materials in context. If the project includes a paver patio, show the pattern and border course. If there is a retaining wall, show how it meets grade and planting. If the project includes low-voltage lighting, capture both the fixture during daylight and the effect at dusk. If irrigation or drainage was a meaningful part of the work, include one or two images that show how it was solved.
Captions should identify design decisions, not just plant names. Instead of only writing “hydrangea and boxwood,” a better caption might explain that a low evergreen hedge keeps winter structure while flowering shrubs soften the paver walk in summer.
Understand Seasonality Before You Schedule
A garden has no single final date. Hardscape may be complete in April, but the planting may peak in June, ornamental grasses may look best in September, and landscape lighting may photograph best after leaves have filled in.
The USDA’s updated 2023 Plant Hardiness Zone Map is based on 30-year annual extreme minimum temperature averages. It divides the country into 10-degree Fahrenheit zones and 5-degree Fahrenheit half-zones. That matters because bloom timing, winter damage, plant size, and seasonal color vary significantly by region.
For a serious landscape portfolio or construction case study, capture the same project in three conditions when possible:
- Fresh completion: clean hardscape, new beds, visible construction quality, and tidy lines.
- Peak seasonal growth: fuller planting, stronger color, and a more natural sense of maturity.
- Evening lighting: path lights, wall lights, step lights, fire features, pool lights, and indoor-outdoor connection.
If you can only schedule one shoot, choose the garden’s best seasonal moment rather than the contractor’s last day on site. A one-month delay can make a major difference in how new planting photographs.
Choose Gear That Matches the Job
You can take professional-looking garden photos with a smartphone if the site is clean, the light is good, and the composition is disciplined. A newer phone is enough for social media, homeowner records, simple blog images, and many website uses. The limitations show up with large prints, heavy cropping, low-light twilight scenes, wide architectural views, and close-up plant detail.
Do these 3 things before closing this tab:
1Scan for outdated or missing drivers - takes under a minute2Repair Windows errors before they cause bigger problems3Fix the driver behind crashes, sound loss and screen glitchesA tripod is one of the best low-cost upgrades. It keeps lines straight, improves low-light sharpness, and makes before-and-after images easier. For construction case studies, fixed-position before-and-after photos are much more convincing when the viewpoint is identical. Mark the location with a plan note, a GPS photo reference, a stake, or a measured distance from a permanent feature.
Rank #3

- Latest Digital Camera Built-in Fill Light : This compact digital camera is paired with a powerful CMOS processor and image stabilization to help you take & record the most exciting moments in 44 MP quality images & FHD 1080P quality videos anywhere, anytime. Plus, there is also a built-in fill light to help you take high quality pictures even in low light&dark settings, making this the perfect camera for all indoors/outdoors situations.
- Long-Lasting Battery Life & 16X Digital Zoom :This point and shoot camera will retain its battery charge even after long use. The controls and functions are easy to operate making this the perfect choice for children, teens and younger. This kids camera supports 16x digital zoom, you can zoom in or out the subject by pressing the W/T button for taking still photos to zoom in or out on distant objects and capture all the details you need.
- Multifunctional & Portable Digital Camera: This cheap digital camera is slim enough to fit in your pocket. You'll easily be able to take it with you on all your indoor/outdoor activities and adventures and ideal for beginners, children and teenagers. This kids digital camera is equipped with 20 filters, anti-shaking, self-timer, continuous shooting, date stamp, time-lapse recording, smile capture, internal MIC and speaker (recording sound videos), great for your daily photography needs.
- WEBCAM & PAUSE FUNCTION : More than just a FHD 1080p digital camera, it also works as a webcam for video calls and vlogging. Connect the camera to the computer, press shutter and power button at the same time and the camera will automatically turn on webcam mode for all your video calling and live streaming needs. The pause function allows you to pause when seeing playback videos.
- A Must Have Photography Device : This digital camera with SD card made from high-quality materials, this retro camera is safe and durable. Perfect for all ages to develop & improve their photographic abilities and observation skills. Our dedicated and experienced 24/7 support team is available for all after purchase troubleshooting, questions and technical help.
For interchangeable-lens cameras, useful garden lenses include a wide-angle lens for patios and outdoor rooms, a standard zoom for general coverage, and a macro lens for plant and material details. A circular polarizer can reduce glare on leaves, water, glass, and wet stone, but it must be used carefully on wide skies because it can make blue tones uneven.
Garden Photography Cost Guide for 2026
Costs vary based on the size of the property, the number of final images, licensing, travel, timing, drone work, retouching, and whether the photographer returns for peak bloom or dusk lighting. For homeowners, a simple exterior session may be enough. For builders and landscapers, the right budget is usually tied to marketing value and usage rights.
| Option | Typical 2026 Cost | Best For | Watchouts |
|---|---|---|---|
| DIY smartphone photography | $0 if using an existing phone; optional tripod, phone clip, reflector, microfiber cloth, kneeling pad, and editing app add modest cost | Personal records, social posts, progress photos, simple garden documentation | Limited low-light quality, less control over wide views and close-ups, easy to distort vertical lines |
| DIY camera setup | Varies widely; biggest cost drivers are camera body, macro lens, wide-angle lens, tripod, polarizer, and editing software | Hobbyists, serious homeowners, contractors building an internal image library | Lens choice gets expensive quickly, especially macro, tilt-shift, and high-end wide-angle lenses |
| General professional photographer | About $200 average per session; common professional range around $100 to $500; student photographers often $40 to $110 per hour; high-end pros around $170 to $500+ per hour | Small gardens, homeowner projects, basic exterior images | May not understand landscape sequencing, hardscape details, or commercial licensing needs |
| Real-estate-style exterior package | Commonly around $150 to $300 or $150 to $350 nationally; experience-based photo-only tiers around $110 to $300 | Basic property documentation, listings, simple exterior views | Usually faster and less detailed; may not include styling, seasonal timing, return visits, or broad commercial use |
| Professional landscape or garden project shoot | Often about $500 to $2,000 per project; high-end photographers can exceed $2,000; day rates can reach about $2,500 | Landscapers, builders, architects, outdoor living contractors, portfolio projects | Confirm image count, retouching, twilight timing, drone add-ons, and licensing before booking |
| Commercial or editorial garden shoot | Can exceed standard project pricing due to scouting, assistants, styling, travel, weather holds, rush delivery, licensing, and multiple seasonal visits | Advertising, print brochures, magazines, large campaigns, premium portfolio work | Usage rights and production scope drive the budget as much as camera time |
If you are hiring, ask for a written estimate that separates shoot time, editing, number of final images, licensing, drone work, travel, rush delivery, and extra visits. That makes bids easier to compare.
Recommended Free Tools
When to DIY and When to Hire a Pro
DIY is the right choice when the photos are for personal reference, informal social media, maintenance records, plant tracking, or early project documentation. A homeowner with a clean phone lens, good light, and a tripod can produce useful images for $0 in camera cost.
Hire a professional when the images will represent a business, sell a high-value project, support a website portfolio, appear in ads, go into printed brochures, or be shared with builders, designers, suppliers, or media partners. For a contractor, the cost of a proper $500 to $2,000 project shoot can be reasonable if the images help win even one serious lead.
Professional help is also worthwhile when the property is difficult to shoot. Tight side yards, reflective pools, shaded patios against bright skies, complex grade changes, large estates, and twilight lighting all require more control than casual photography.
Legal, Permit, Drone, and Photo Rights Notes
For private residential work, get permission from the property owner before photographing, and get written approval before using the images for marketing. If people are recognizable, use a model release for commercial use. If neighbors’ properties are visible, avoid intrusive angles and respect privacy.
What’s actually slowing this PC down?
Pick the symptom - the matching free tool is one click away.
Photo Ownership and Licensing
Hiring a photographer does not automatically transfer copyright. In most cases, the photographer owns the copyright unless a written agreement says otherwise. Businesses should confirm whether the license covers website galleries, social media, ads, print brochures, award submissions, third-party sharing with manufacturers or subcontractors, and future use.
For photographers registering image copyrights, current U.S. Copyright Office fees list $55 for group registration of published or unpublished photographs. A proposed July 2026 fee schedule would raise that group photo registration fee to $85 if adopted. For most homeowners this is not necessary, but businesses and photographers should understand the option.
Public Gardens, Parks, and Permits
Permit rules depend on the location and use. Many National Park Service photography and filming activities with eight or fewer people and hand-carried gear do not require a permit if they meet the listed conditions, but permits may be required when activity impacts resources, visitors, operations, or uses models, sets, or larger equipment. Some parks charge application or cost-recovery fees when permits are required; one current NPS example lists a $75 non-refundable application fee.
Botanical gardens, university gardens, municipal parks, and private estates can each have their own rules. Before scheduling a commercial shoot, check the site’s current policy, fees, tripod rules, drone restrictions, insurance requirements, and whether professional photography must be booked in advance.
The Tool Desk
Outbyte Driver Updater FREEFix the driver behind crashes, sound loss and screen glitchesFind Drivers →Outbyte PC Repair FREEClear out junk files and repair common Windows errorsFree Scan →Drone Photography
Drone images can be excellent for showing a garden’s layout, pool placement, retaining walls, patios, roofline relationships, drainage patterns, and lot context. They also add compliance issues. FAA drone registration is $5 and valid for three years. Commercial drone operations generally require a certificated Part 107 remote pilot. Remote ID, airspace authorization, privacy, property access, and insurance should all be handled before the shoot.
For a contractor, the simplest path is often to hire a licensed drone operator and confirm that the deliverables and usage rights are included in the agreement.
Independent reader supportYour contribution helps us test, update, and keep practical guides available for everyone.Safety Rules for Construction and Landscape Sites
A garden shoot on an active or recently completed jobsite is still a jobsite. We do not step over open trenches, climb retaining walls, walk on uncured concrete, lean over pool edges, stand under active equipment, or move barriers just to get a better angle.
Rank #4

- 16MP Sensor: Captures detailed photos with a CMOS sensor for everyday shooting
- Optical Zoom: 5x optical zoom with a 28mm wide angle lens for flexible framing indoors or outdoors
- Full HD Video: Records 1080p video for travel clips, family moments, or simple vlogging
- Memory Support: Works with Class 10 SD, SDHC, or SDXC cards up to 512GB
- Rechargeable Battery: Included LB-012 lithium-ion battery charges in the camera over USB with the supplied adapter in about 2 hours; charge it for at least 4 hours before first use to maximize battery life
Basic safety rules apply:
- Confirm the site is safe for photography before inviting a homeowner, photographer, or stylist onto it.
- Keep people off newly placed concrete, fresh mortar, unstable soil, and incomplete stairs.
- Do not place tripods where crews, homeowners, or delivery drivers can trip over them.
- Watch wet stone, mossy steps, pool decks, slopes, and loose gravel.
- Use proper ladders or platforms instead of climbing walls, planters, railings, or furniture.
- Keep cords and lighting equipment away from water features, pools, and irrigation spray.
- Do not photograph around operating machinery unless the operator and site lead have cleared it.
If the photo requires access that feels questionable, skip the angle. No marketing image is worth a fall, a damaged finish, or a safety incident.
Recommended Free Tools
Editing: Keep the Garden Believable
Editing should make the photo match the real experience of the garden. Straighten lines, correct white balance, recover highlights, lift shadows slightly, remove small distractions when appropriate, and crop for a cleaner composition. Avoid oversaturating greens and flowers. Artificial color makes plants look plastic and can misrepresent the finished work.
For construction documentation, be careful with retouching. Removing a temporary hose is reasonable. Removing a drainage inlet, changing paver color, hiding a slope problem, or making plants look larger than installed can become misleading. The image should sell the quality of the work without inventing work that is not there.
A Practical One-Day Garden Shoot Schedule
For a typical residential garden, patio, or outdoor living project, this schedule works well:
- Day before, 60 to 120 minutes: mow, edge, sweep, weed, clean furniture, wipe glass, hide loose items, and confirm access.
- Shoot morning, 30 minutes: final sweep, turn on water features if needed, check cushions, open umbrellas only if they help the composition, and review the shot list.
- Early light, 60 to 90 minutes: shoot front approach, entries, east-facing spaces, shaded beds, and detail images.
- Midday or overcast window, 45 to 90 minutes: shoot plant combinations, hardscape details, irrigation, drainage, and covered spaces.
- Late afternoon, 60 to 90 minutes: shoot patios, seating, paths, backlit plants, and views toward the house.
- Twilight, 30 to 45 minutes: shoot landscape lighting, fire features, pool lights, path lights, and indoor-outdoor connection.
Not every project needs a full day. But even a two-hour shoot benefits from this thinking: prep first, then wide shots, mid-range views, details, and evening atmosphere if lighting is part of the project.
Final Takeaway
Mastering garden photography is mostly about respect for the work. Clean the site. Wait for good light. Photograph the space in a sequence that explains how it functions. Include the hardscape, not just the flowers. Show scale, circulation, details, and seasonal character. Handle permissions, licensing, drone rules, and safety before the camera comes out.
For homeowners, that approach creates better records and better memories. For builders and landscapers, it creates images that do more than look attractive. They explain the craftsmanship, planning, and construction value behind the finished outdoor space.
Frequently Asked Questions
What is the best time of day to photograph a garden?
Early morning and late afternoon are usually best because the light is softer and warmer. Bright overcast days are also excellent for even exposure and saturated plant color. Avoid harsh midday sun when possible.
Can I take professional-looking garden photos with a smartphone?
Yes, especially for web, social media, and personal documentation. Clean the lens, use a tripod or stable support, shoot in soft light, keep hardscape lines level, and build a mix of wide, medium, and detail shots.
Windows Errors? Fix Them Before They Spread
Repair common Windows errors and clear accumulated junk for a smoother, more stable PC - no reinstall needed.Free scan · no reinstallCrashes, No Sound, or Screen Glitches?
Random freezes, missing sound and display glitches usually trace back to one bad driver. Find and replace yours safely.Free scan · under a minuteHow much does professional garden photography cost in 2026?
Basic exterior or real-estate-style shoots often run about $150 to $350. Professional landscape project photography commonly ranges from about $500 to $2,000, with high-end or commercial shoots exceeding $2,000.
Do I need a permit to photograph a public garden or park?
It depends on the location, crew size, equipment, and commercial use. Some small hand-carried shoots do not require permits, but public gardens, parks, and National Park Service sites may require approval or fees for certain activity.
Can I use a drone for garden photography?
Yes, but drone use brings FAA, privacy, insurance, and property-access requirements. FAA registration is $5 and valid for three years, and commercial drone work generally requires a Part 107 certificated pilot.
Who owns the photos if I hire a photographer?
Hiring a photographer does not automatically transfer copyright. The contract should spell out whether you can use the images on your website, social media, ads, print materials, award entries, and third-party partner galleries.
Quick Recap
Product prices and availability are accurate as of the date/time indicated and are subject to change. Any price and availability information displayed on Amazon at the time of purchase will apply.




