Recommended Free Tools
Use two kinds of evidence when you need to know whether a foundation is moving: a crack gauge records relative displacement at one crack, while an elevation survey measures vertical change at several points against a stable benchmark. A gauge can show widening, closing, shear or offset, but it cannot establish whether the whole building is settling. Elevation checks can reveal a settlement or heave pattern, but only when the benchmark network is stable and the leveling run closes within its expected error.
The dependable approach is to document both datasets on a repeatable schedule, attach uncertainty to every result, and have a structural engineer or licensed land surveyor interpret changes that are rapid, persistent or accompanied by distortion. Monitoring records change; they do not by themselves prove the cause, predict failure or select a repair.
As an Amazon Associate I earn from qualifying purchases.
What each monitoring method actually measures
A crack gauge compares the position of two points on opposite sides of a crack. The reading is local: it describes relative movement at that crack in the directions the gauge can measure. A mechanical grid gauge can show horizontal and vertical displacement and, depending on its layout, changes that indicate shear or out-of-plane movement. The Unified Facilities Criteria (UFC 3-220-10, 2022 with a 2025 change) describes this type of gauge as a way to monitor the magnitude and direction of movement over time.
The Tool Desk
Outbyte Driver Updater FREEScan for outdated or missing drivers - takes under a minuteDriver Scan →Outbyte PC Repair FREERepair Windows errors before they cause bigger problemsFix Now →An elevation survey compares the height of selected foundation or structural points with a reference benchmark. Several points are observed in a connected network so you can see whether one corner, a wall line or the entire structure is changing relative to stable ground. ASTM D6598-19 describes settlement points observed from an external benchmark or from an internal reference system supported on unyielding soil or rock.
#1 Best Overall

- Cracks monitoring Tell tales crack monitors Simple and cool analog crack monitor device.
- ±1 mm (±0.04") tick marks on X-Y axes; ±0.5 mm (±0.02") discrimination
- ±20 mm (±0.79") horizontal and ±10 mm (±0.38") vertical range
- High-quality polymer with easy-to-read measurement grid
- Crack monitoring scale is used to monitor the cracks in the walls and how they evolved along the measured time.
These methods answer different questions:
| Question | Crack gauge | Elevation checks |
|---|---|---|
| Where is the measurement made? | Across one crack or joint | At multiple points tied to a benchmark network |
| Primary movement detected | Relative opening, closing, shear or offset at the crack | Vertical settlement or heave relative to control |
| Best use | Tracking a known crack and testing whether it changes | Testing whether movement is localized or part of a broader foundation pattern |
| Main vulnerability | Local material behavior, poor installation and inconsistent readings | Unstable benchmarks, closure error and instrument or field error |
| What it cannot establish alone | The cause of movement or the safety of the structure | The cause of settlement or a repair design |
When the decision involves safety, combine the two. A crack that changes while elevations remain stable may reflect local shrinkage, thermal movement or a localized defect. A coordinated elevation change at several points, especially when accompanied by crack widening or vertical offset, is stronger evidence of foundation movement than either observation alone.
Plan the monitoring before attaching anything
Make the area safe
Do not enter or occupy an area that is visibly unstable. Keep people away from walls that are bulging, severely distorted or shedding material. Water intrusion, rapidly changing cracks, binding doors or windows, and damaged structural members warrant professional advice rather than a do-it-yourself monitoring project. A gauge is an observation device, not a safety certification.
Define the decision you need to make
Write down what the monitoring must resolve: whether a crack is still changing, whether movement is seasonal, whether one part of the foundation is settling relative to another, or whether a repair has stabilized the structure. The decision determines the points, the reading interval and the accuracy needed. There is no universal homeowner threshold that applies to every building, soil, material or survey method; a change matters when it exceeds measurement uncertainty and would alter a safety or repair decision.
Outdated Drivers Are Slowing You Down
One free scan finds every outdated or missing driver and matches the right update for your exact hardware.Free scan · exact hardware matchPC Slower Than It Used to Be?
A free scan shows the junk files, broken settings and background clutter dragging Windows down - then fixes them in one click.Free scan · Windows 10 & 11Keep one controlled record
Use one log for dates, times, readings, photographs, weather and site conditions. Record the material (concrete, masonry, drywall or wood), crack location, orientation and any nearby changes such as new moisture, grading work or excavation. Keep the same units throughout the project.
How to install and read a crack gauge
1. Document the starting condition
Photograph the full wall and a close view of the crack before installation. Mark the crack ends with a removable pencil mark or another method that will remain identifiable, and describe its location by room, wall and distance from fixed features. Note whether the crack is in concrete, masonry, drywall, wood or another material.
Measure the initial crack width with a crack-width comparator and record the value, date, temperature, moisture and recent weather. The BUILDERA CRACKMON 224R data sheet illustrates inch and metric scales, readings from 0.10 to 3.56 mm at its specified comparator marks, and a rule range up to 50 mm. Those ranges describe that comparator; they are not a claim that every crack or gauge can be measured to the same limits.
2. Choose sound mounting surfaces
Install the gauge across the crack so each half is fixed to a different side. Do not bridge loose, hollow, crumbling or delaminating material: movement of the mounting surface can be mistaken for movement of the crack. Remove only material necessary to obtain a sound attachment surface and follow the gauge manufacturer’s instructions for adhesive, pins, cure time and allowable substrate.
Quick wins for a faster PC:
Clear out junk files and repair common Windows errorsFree Scan →Fix the driver behind crashes, sound loss and screen glitchesFind Drivers →A mechanical grid gauge uses two overlapping pieces. The UFC description says the pieces may be attached with epoxy or pins so relative horizontal and vertical movement can be read over time. Place the grid so the reference lines are visible and the reading axes are aligned with the directions you intend to track. Photograph the installed gauge and note its orientation.
Rank #2

- The Cracks Gauges Set is a strong and Stable measurement tool for monitorings cracks.
- Produced of acrylicy Component, this Cracks Gauges monitor is wear resistance and not easily breakable.
- Suitable for enthusiasts and Professional, this precise Measuring Tool is perfect for measuring space and monitorings Cracks development.
- This Cracks Gauges monitor can be used in various situation such as home improvement projects and interior decoration.
- Whether a professional or a homeowner, this Monitorings Device is a must get tool for detecting wall deformations and cracks.
3. Establish a repeatable reading method
Read the same axes from the same viewing position and, as far as practical, under similar lighting. Parallax can change an apparent line intersection, so look straight at the grid rather than from an angle. Record the horizontal and vertical values separately and describe whether the crack is opening, closing or offsetting.
At every reading, capture:
- date and time;
- gauge values and units;
- a photograph showing the full gauge and a close-up of the marks;
- indoor and outdoor temperature where relevant;
- recent rain, freeze, drought, groundwater or plumbing events;
- new distress such as staining, bulging, spalling or changes in door and window operation.
Use a consistent interval selected for the building’s risk and the professional advice you receive. A single reading cannot establish a trend. More frequent observations may be appropriate after a visible change or a major weather or site event, but the interval should be documented rather than changed casually.
4. Separate reversible cycles from a persistent trend
Temperature and moisture can make materials expand, contract or move seasonally. Compare readings taken under like conditions and plot the values against time and weather. A widening-and-closing cycle that returns toward its prior position is different from a persistent one-direction change. A trend chart should show the raw readings, not just a smoothed line that could hide a short acceleration.
5. Escalate when the pattern changes
Contact a structural professional promptly if displacement increases rapidly, a crack branches or new cracks appear, a wall moves out of plane, doors or windows begin binding, water enters, or structural members visibly distort. Bring the complete log and photographs. Do not remove a gauge or fill a crack before the professional has documented it unless immediate safety work is required.
How to design and perform elevation checks
1. Select stable control and monitoring points
Use at least one reference benchmark outside the suspected deformation zone and several monitoring points on the foundation or structure. USACE guidance recommends placing benchmarks close enough to reduce systematic error but far enough outside the movement zone to remain stable. If the suspected movement extends widely, a surveyor may need more than one independent control point or an external network.
Monitoring points should be permanent, clearly identified and physically tied to the feature being evaluated. ASTM D6598-19 calls a settlement point an accessible survey point that settles with a selected soil horizon within or below an embankment. For a building investigation, the surveyor will specify point types and locations appropriate to the foundation and soil conditions.
2. Establish a documented baseline
A licensed land surveyor should set the point descriptions, initial elevations, instrument heights and route. Photograph or sketch every point, including offsets from corners and other fixed features, so later crews occupy the same physical locations. Record the benchmark description in enough detail that its stability can be checked independently.
What’s actually slowing this PC down?
Pick the symptom - the matching free tool is one click away.
The baseline is more than a list of elevations. It includes the observation date, instrument and prism or staff information, weather, sight lengths, setup locations and the method used to compute elevations. Without that context, a later difference may be impossible to distinguish from a change in procedure.
Rank #3
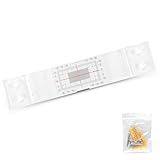
- Advanced Crack Monitoring:Our crack monitor offers precise measurement capabilities, enabling you to monitor cracks with unparalleled accuracy. Detect issues early and take proactive measures to safeguard your surroundings.
- Ultra-Precision Measurements:With ±1 mm (±0.04") tick marks on both X-Y axes and ±0.5 mm (±0.02") discrimination, you can trust our device for the most detailed and reliable measurements.
- Versatile Range:Covering ±20 mm (±0.79") horizontally and ±10 mm (±0.38") vertically, the MUTOOP Crack Monitor ensures comprehensive coverage for monitoring cracks in any direction.
- High-Quality Polymer Build:Crafted from high-quality polymer, our monitor is not only durable but also easy to read, thanks to the clear measurement grid. It's built to withstand the test of time.
- Time-Tested Crack Monitoring:Use the MUTOOP Crack Monitor's scale to track crack evolution in your walls over time. Stay informed about their development and take action when needed.
3. Close the leveling run
Start and finish on the same stable control, or use a documented double-run or loop design. USGS guidance identifies closed single-run loops and double-run spur traverses as reliable approaches and recommends redundant observations. Closing the run quantifies closure error; it does not make an inconsistent survey accurate.
Ask for the closure error and the acceptance criterion in the survey report. A point should not be labeled as having moved merely because its computed elevation differs from the baseline. The difference must exceed the repeatability and uncertainty of the network, and the reference benchmark itself must be credible.
4. Control instrument and field errors
USGS guidance recommends averaging direct and reverse observations, taking redundant instrument-height measurements, performing daily horizontal and vertical collimation checks, and completing annual electronic distance measurement (EDM) checks on calibrated baselines. Keep sight lengths and setup geometry consistent where practical, and note wind, heat shimmer, vibration, traffic and poor visibility.
Free tools Windows power users keep installed
One-click scans. No signup required.
For the USGS trigonometric-leveling specifications, the named equipment targets are a total station with angular uncertainty of ±5 arc-seconds or better and EDM uncertainty of ±3 mm + 3 ppm. The same 2020 guidance states that electronic distance measurements in the described field techniques generally do not exceed 500 feet. These are specification values for that surveying approach, not a promise that every site or instrument will achieve them.
5. Compute changes and uncertainty
Report each monitoring point’s elevation change relative to the control, the observation date, the closure error and an estimated measurement uncertainty. Show the sign convention: for example, whether a positive value means a higher elevation or an upward movement. Include the network diagram so readers can see which points are compared.
When a change is close to the uncertainty, classify it as indeterminate rather than as settlement or heave. If the benchmark may have moved, re-observe from an independent control or extend the network before drawing a foundation conclusion.
How to combine crack and elevation data
| Observed pattern | Most useful interpretation | Next action |
|---|---|---|
| Crack changes; elevations remain within survey uncertainty | Movement is localized, material-related or too small for the elevation network to resolve | Continue repeatable gauge readings and have a professional inspect if the crack is active or distress is visible |
| Several foundation points change in a consistent pattern; crack also widens or offsets | Evidence supports broader settlement or heave rather than an isolated surface crack | Have a structural engineer interpret the pattern and specify additional investigation |
| Elevations change at one point only; benchmark or closure is questionable | Survey or control instability may explain the apparent movement | Recheck the benchmark, instrument checks and closed-run calculations |
| Crack opens and closes with weather; no persistent elevation trend | Seasonal or reversible movement is plausible | Compare like weather conditions and continue the documented series |
| Rapid displacement, new cracks, out-of-plane movement or water intrusion | Potentially significant distress regardless of the numerical trend | Keep people clear and obtain prompt structural advice |
Look for agreement in location, direction and timing. A crack gauge may show horizontal opening while the elevation network shows one corner lowering. That combination is more informative than either value alone, but it still does not identify the soil mechanism, drainage cause or repair without further investigation.
How often should you check?
Technical guidance cited here does not establish one universal homeowner interval. The appropriate cadence depends on the speed of observed change, the consequences of movement, the building’s construction and the quality of the monitoring system. Set the interval with the professional who defines the decision criteria, then keep it consistent enough to reveal a trend.
Rank #4
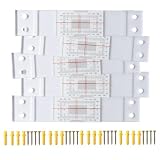
- HOW TO TRACK WALL SHIFTS ACCURATELY? This Concrete Crack Monitor provides 20mm horizontal and 10mm vertical tracking range.
- DO YOU NEED PRECISE MEASUREMENT? The Crack Monitor features 1mm tick marks and 0.5mm discrimination for structural safety.
- IS IT EASY TO INSTALL ON SURFACES? Simply align the crosshair over the gap and secure the 5 PCS kit with screws or adhesive.
- WILL IT WITHSTAND OUTDOOR CONDITIONS? Built from high quality material to ensure clear readability in harsh environments.
- WHAT SCENARIOS IS IT SUITABLE FOR? Ideal for home foundations and commercial properties requiring long term structural data.
Use event-triggered observations when the project plan calls for them: after a newly observed crack change, unusual moisture or groundwater conditions, excavation near the foundation, or a repair intended to stabilize movement. Record why an extra reading was taken so it is not confused with a routine interval. If readings are skipped, note the gap rather than interpolating a value.
Independent reader supportYour contribution helps us test, update, and keep practical guides available for everyone.Equipment and records
Crack-monitoring equipment
- Crack-width comparator for the initial and follow-up width measurement.
- Mechanical grid gauge sized and rated for the substrate and movement directions.
- Sound adhesive or approved pins, plus cleaning and marking materials compatible with the substrate.
- Camera or phone held at a repeatable distance and angle.
- Ruler or scale in photographs and a weather log.
The CRACKMON 224R data sheet is an example of a comparator with inch and metric scales and a trend-chart workflow for concrete, masonry, wood and steel cracks. A mounted CRACKMON 4020A is described by its manufacturer for foundation, concrete, masonry and stucco applications. Treat these as product examples: verify the current instructions, substrate limits and measurement range before installation.
Elevation-survey equipment and deliverables
- Stable benchmarks and permanently identified monitoring points.
- Level, total station or other equipment selected by the surveyor for the required precision.
- Staff, prism and accessories with recorded identification and calibration status.
- Field notes showing setup locations, heights, direct and reverse observations and weather.
- A network sketch, adjusted elevations, closure error and uncertainty statement.
Ask the surveyor to provide both the raw or summarized observations and the adjusted results. A table of final elevations without closure and uncertainty information is insufficient for deciding whether a small difference is real.
A practical monitoring-log format
Use one row per observation and retain the original photographs. The following fields prevent the most common ambiguity:
| Field | What to enter |
|---|---|
| Point or gauge ID | Permanent label and exact wall, corner or benchmark description |
| Date and time | Local date and time, including the time zone for multi-party projects |
| Measurement | Gauge axis values or surveyed elevation, with units and sign convention |
| Reference | Gauge installation orientation or benchmark/control used |
| Conditions | Temperature, moisture, recent rain, freeze, drought, groundwater or site work |
| Quality information | Photograph ID, instrument check, closure error or other uncertainty indicator |
| Observed distress | New cracks, offset, bulging, leakage, sticking doors or windows and changes in finishes |
| Action | Routine reading, repeat measurement, surveyor review or structural escalation |
Common failure modes and how to correct them
The gauge is attached to weak material
If one side of the gauge pulls loose, the reading describes adhesive or substrate failure rather than crack movement. Photograph the failure, do not reset the zero without preserving the old record, and have the gauge relocated to sound material.
Readings are taken from different angles
Parallax can create an apparent shift in the grid. Re-photograph from the same position, use a simple positioning mark or stand, and read the same reference lines each time.
The reading interval changes with no explanation
Irregular spacing makes seasonal cycles and acceleration harder to see. Keep the planned interval, record missed observations and label event-triggered readings separately.
A benchmark is assumed stable because it is convenient
A benchmark inside the suspected movement zone can move with the building. Use an external control outside that zone, check it against another control when possible and document why it is considered stable.
Best Value

- Included Components: Unlike standard crack monitors, this updated version features two integrated pre-set pegs that supports you to instantly position and secure both sliding plates at the correct starting point
- Key Specifications: Discrimination down to 0.5mm ( 0.02") helps reliable tracking of wall cracks over time
- Practical Operation: Tracks both horizontal ( 20mm / 0.79") and vertical ( 10mm / 0.38") movements
- Construction Details: Made of polymer with a clear measurement grid; The transparent top plate features a fine crosshair cursor, overlapping a millimeter-calibrated bottom plate for quick, accurate readings
- Handling Details: Each unit includes a crack record sheet to log measurements over time
The survey does not close
An open run cannot reveal its accumulated error. Repeat or redesign the observations as a closed loop or documented double run, investigate setup and instrument checks, and report the closure error instead of suppressing it.
A small numerical change is treated as proof
Subtracting two elevations or gauge readings does not remove uncertainty. Compare the change with repeatability, closure error, environmental conditions and benchmark stability before calling it movement.
When you need a surveyor and when you need an engineer
A licensed land surveyor is the right professional to establish a benchmarked, closed elevation network, select survey methods, perform instrument checks and report adjusted elevations and uncertainty. Ask for point descriptions and a repeatable route so another qualified crew can reproduce the work.
A structural engineer interprets whether the spatial and time pattern is consistent with structural distress, identifies what additional observations are needed and specifies repair or stabilization work. A surveyor can measure movement without deciding whether a wall is safe; an engineer can assess structural implications without replacing a properly controlled survey.
Use both disciplines when the question involves occupied-space safety, rapid change, distorted structural elements, significant water entry or a repair decision.
Limits of monitoring
Monitoring documents what changed at the observed locations. It does not prove whether the cause is soil consolidation, moisture variation, thermal movement, drainage, construction activity or another mechanism. It cannot predict failure from a single reading, certify that a building is safe or determine a repair method.
ASTM D6598-19 expressly states that its guide does not replace education, experience or professional judgment. The same principle applies to crack gauges: a neat trend chart is useful evidence, but interpretation belongs in the context of the building, its materials, the soil and the consequences of further movement.
Do these 3 things before closing this tab:
1Clear out junk files and repair common Windows errors2Scan for outdated or missing drivers - takes under a minute3Repair Windows errors before they cause bigger problemsFor a defensible conclusion, preserve the baseline, repeat the same measurements, show the uncertainty, verify the benchmark and escalate visible or rapid distress. That combination distinguishes a meaningful movement trend from a number produced by inconsistent observation.
Quick Recap
Product prices and availability are accurate as of the date/time indicated and are subject to change. Any price and availability information displayed on Amazon at the time of purchase will apply.

