Quick wins for a faster PC:
Fix the driver behind crashes, sound loss and screen glitchesFind Drivers →Repair Windows errors before they cause bigger problemsFix Now →Make cabinet molding by combining simple router-table and table-saw profiles, then test the arrangement against the cabinet before cutting the final stock. A set of labeled, rearrangeable samples helps you judge the molding’s scale in context instead of relying on a fixed proportion.
Plan the molding with a sample set
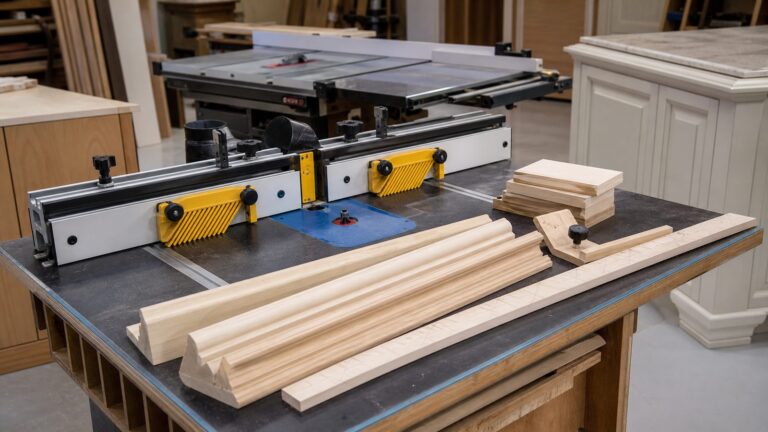
Craig Ruegsegger’s WOOD magazine demonstration starts with same-length pieces of ordinary 1-by-4 stock. He routes a different profile into each piece, labels it by bit or shape, and cuts grooves so the samples can be joined and rearranged into molding combinations. This makes it easier to compare options before machining the cabinet’s final molding.
- Cut several equal-length sample pieces from 1-by-4 stock.
- Route a different profile into each piece and label it.
- Cut grooves into the samples so they can be assembled and rearranged.
- Try combinations, step away, and look again with fresh eyes.
- Compare the mockup with the cabinet carcass or a full-size mockup to judge whether the molding looks too bulky or fits the cabinet’s scale.
There is no universal golden proportion for a custom molding. Choose a combination that suits the cabinet and looks right to you. The sample set is useful precisely because you can change the design before committing final stock.
Choose profiles that work together
A compound molding can combine several straightforward shapes: dentil, chamfer, round-over, bead, ogee, and cove. Consider the visual transition you want, the cutter available, how the piece will be supported, and whether the finished molding needs extra glue surface.
#1 Best Overall

- BENCHTOP ROUTER TABLE DESIGN: This table router features a large aluminum top for extended work area, durability and precision
- RIGID ALUMINUM MOUNTING PLATE: Pre-Drilled router plate for compatibility with a variety of routers and for above-table height adjustment
- EXTRA TALL ALUMINUM FENCE: This portable router table fence has adjustable faceplates and featherboards to maximize precision and versatility
- DEDICATED STANDARD DUST-COLLECTION PORT: Wood router fits standard 2-1/2 in. vacuum hoses for debris-free operation to help keep your work area clean
- EASY-TO-USE ADJUSTABLE FEATHERBOARDS: For a router table with router, attach to fence and table, providing additional guidance and kickback protection
| Profile | How it is made | Design or setup note |
|---|---|---|
| Dentil | Repeated shallow dado-like recesses in a raised field, cut on the table saw. | Use an auxiliary fence and indexing key to space repeated cuts. |
| Chamfer | A chamfer bit on the router table; 45- and 60-degree bits are common examples. | The demonstration also notes that other angles can be made by tilting the table-saw blade. |
| Round-over | A round-over bit on the router table. | The sample demonstration shows 1/4-, 3/8-, and 1/2-inch radii; these are examples, not a required set. |
| Bead | A beading bit forms a rounded portion with fillets above and below. | With careful fence and height settings, the rounded portion can also serve as a round-over. |
| Ogee or Roman ogee | An ogee bit forms connected curved sections, sometimes separated by a small flat. | Reversing the profile produces the Roman ogee example. |
| Cove | A cove bit forms a concave curve on the router table. | A cove can be used alone or as one part of a compound molding. |
Bit height, fence position, and workpiece orientation affect how much of a cutter engages the wood. The same bit can produce more than one useful shape when you change those settings, so test the setup on scrap before routing your samples or final pieces.
Cut a table-saw dentil profile
In the WOOD magazine example, dentil molding has raised fields separated by shallow, dado-like recesses. For one 2-to-1 layout, Ruegsegger uses a 3/4-inch raised field and a 3/8-inch recess. Those dimensions illustrate his design; they are not a standard you must follow. The demonstration also mentions a 1-to-1 variation.
Rank #2

- Ultra-portable design – Features folding legs for fast setup and easy storage
- Easy click router mounting system – Provides easy bit changes and no leveling
- Laminated MDF top – Helps users make smooth and precise cuts
- Onboard storage – Ideal for holding router bits and spare parts
- No assembly required – Comes preassembled
- Set up an auxiliary fence and indexing jig for the dado-blade cuts, following the saw and blade manufacturers’ instructions.
- Cut a slot in the auxiliary fence for the indexing key. Glue in a key shorter than the cut depth so the stock can remain flat against the fence.
- Position the key to establish the spacing of the raised fields, then test the indexing action and spacing on scrap.
- Make the repeated shallow recesses in a wide strip, or work on edge only when the setup and support are suitable for the stock and saw.
- If the design allows, rip the profiled blank into narrower molding strips after the recesses are cut.
Making several strips from one grained piece can preserve a matched appearance. A wider edge can also provide more glue surface when the molding is attached. The indexing approach is a demonstrated method, not a substitute for a complete safety procedure or the saw’s instructions.
Route profiles from wide stock
When the design permits, route the profile into a wide blank and rip the molding strip to its final width afterward. The wider workpiece gives you more control, keeps your hands farther from the bit, and can reduce chatter. It may also let you preserve matched grain across multiple strips cut from the same blank.
Do these 3 things before closing this tab:
1Repair Windows errors before they cause bigger problems2Fix the driver behind crashes, sound loss and screen glitches3Clear out junk files and repair common Windows errorsRank #3

- Cabinet-style router-table design features a smooth laminated top and is ideal for stability, storage, and dust management
- Rigid aluminum mounting plate predrilled for compatibility with variety of routers and for above-table router height adjustment
- Extra tall aluminum fence has adjustable MDF faceplates and featherboards to maximize precision and versatility
- Two dedicated dust-collection ports with one port at the fence and one at the cabinet for maximum dust management
- Easy-to-use adjustable featherboards attach to fence and table, providing additional guidance and kickback protection
- Feed against the bit’s rotation. Woodcraft warns that climb-cutting can push stock away from the fence and pull it from the operator’s grasp.
- Build the profile in stages. Use multiple light or incremental passes where appropriate rather than forcing a deep cut in one pass.
- Support the work. Keep the workpiece supported against the fence and use appropriate push aids, guards, and featherboards as required by the tool and cutter instructions.
- Test on scrap. Confirm the profile, fence position, cutter height, and feed before cutting the sample or finished blank.
For a separate cove-making example, Woodsmith describes cutting a shallow kerf on the table saw, routing the cove in several shallow passes, then ripping the finished molding to width. The exact approach depends on the cutter and machine setup; it does not make one fence, throat plate, or cutter arrangement interchangeable with another.
Independent reader supportYour contribution helps us test, update, and keep practical guides available for everyone.Use specialized crown-molding cutters only with their instructions
CMT’s instructions for its specialized crown-molding set describe milling the cove while the stock has its greatest mass, supporting the stock between fences, then finishing the flanking profiles on the router table. They call for multiple light cuts, featherboards, a guard, and push blocks. This is guidance for that cutter system and its specified configuration—not a general setup for every saw or router table.
Rank #4

- ABOVE THE TABLE ROUTER LIFT - Gain convenient access to adjusting the router bits with the Above Table Adjustment.
- DUAL SIDED INTEGRATED BIT STORAGE - Protect and store router bits with a dual-sided quick latch integrated bit storage case, which saves time and provides a central location for easy to lose bits.
- PRECISE AND SMOOTH ROUTING - Router table features a smooth 26" x 16" MDF table, durable aluminum miter gauge slot, and router mounting plate to easily guide longer work pieces.
- LARGE FENCE - The fence measures 24 inches long and is complete with adjustable MDF face plates for smooth operation with taller work pieces.
- TWO FEATHERBOARDS - Two adjustable router edge guides attach to the fence and router table to provide additional guidance and protection against kickback.
Confirm that the cutter, machine, fence, support arrangement, and guards are compatible, and follow the complete instructions for the actual equipment in use. If you are unfamiliar with the operation, CMT advises studying the technique in a woodworking class or book before attempting it.
Quick Recap
Sources
- WOOD magazine, “Make Cabinet Moldings on the Router Table and Tablesaw” (page updated June 25, 2025; transcript from a 2017 Weekend With WOOD class).
- Woodcraft, “How to Set Up a Router Table.”
- CMT Orange Tools, “Using your Crown Molding Set” instructions.
- Woodsmith, “Make Custom Moldings,” published September 22, 2016.
Product prices and availability are accurate as of the date/time indicated and are subject to change. Any price and availability information displayed on Amazon at the time of purchase will apply.
What’s actually slowing this PC down?
Pick the symptom - the matching free tool is one click away.