Do these 3 things before closing this tab:
1Fix the driver behind crashes, sound loss and screen glitches2Clear out junk files and repair common Windows errors3Scan for outdated or missing drivers - takes under a minuteBuild a flat base that rides smoothly in your saw’s miter slots, then attach a rear fence that you can adjust until test cuts are square. The fence—not the sled’s outline or a quick visual check—is what determines whether your crosscuts are 90 degrees.
What a crosscut sled does—and what you need
A crosscut sled carries a workpiece across the table saw blade while runners guide it through the miter slots. A basic design has four parts: a flat base, two close-fitting runners, a rear fence that registers the workpiece, and a front rail that ties the base together.
Choose dimensions for your saw and the stock you actually cut. Fine Woodworking illustrates a roughly 16-by-24-inch base made from 3/4-inch MDF, but that is an example, not a universal specification. A compact sled is easier to store and handle; a wider sled can support wider stock but needs adequate table and outfeed support. See Fine Woodworking’s simple sled plan for its design example.
Materials and tools
- Flat, stable sheet stock for the base, such as the 3/4-inch MDF used in Fine Woodworking’s example.
- Straight hardwood for runners and the rear fence.
- Stock for a front rail, plus screws or bolts appropriate to your design.
- A reliable square, measuring tools, and a saw suitable for sizing the parts.
- Optional stop hardware, such as T-track, only if repeat-length cuts are useful for your work.
Measure your saw’s miter slots rather than assuming a nominal size. The sled must be supported over its full travel, and the base should remain flat while it moves.
The Tool Desk
Outbyte Driver Updater FREEFix the driver behind crashes, sound loss and screen glitchesFind Drivers →Outbyte PC Repair FREERepair Windows errors before they cause bigger problemsFix Now →#1 Best Overall

- Precision Crosscut Miters: Achieve clean, accurate 90° to 45° cuts with this table saw crosscut sled; ideal for repeatable crosscuts, miters, and woodworking jigs that demand accuracy, stability, and smooth control
- Smooth Phenolic Base: 1/2" thick phenolic sled base glides effortlessly in standard miter slots without swelling or warping; more durable than plywood, making it a reliable table saw sled for long-term shop use
- Telescoping Flip Stop: Extruded aluminum fence extends from 25" to 38-1/4" to support long stock; includes Micro-Adjust Fence Flip Stop for precise length control when cutting cabinet parts and furniture components
- Safe Clean Cuts: Adjustable miter bar eliminates side-to-side play, while the Bit-Saver Hold-Down Clamp secures workpieces safely; replaceable zero-clearance insert supports fibers for reduced tearout
- What’s Included: Crosscut sled base & fence; adjustable miter bar; micro-adjust flip stop; Bit-Saver hold-down clamp; extension work support; jig handle; replacement zero-clearance insert; hardware pack
Build the base and fit the runners
- Size and check the base. Cut the base to suit your common work and available table. Check it for flatness and confirm that it will remain supported throughout the cut. Do not copy a published dimension without checking your saw and workspace.
- Fit the runners to the slots. Place runner stock in the miter slots. Woodcraft’s method uses shims to bring the runners close to flush with the table, then temporarily fastens the base in position. Aim for a close fit that slides freely without sideways play.
- Attach the base. With the runners aligned in the slots, fasten the base to them. Before proceeding, slide the assembly through its travel. If it binds, find and smooth the high spot; do not force the sled.
- Add the front rail. Attach a rail across the front edge to tie the base assembly together. Keep it clear of the blade’s travel.
- Mount the rear fence loosely. Position the fence across the back of the sled where it can register the workpiece. Keep its fasteners adjustable: Fine Woodworking describes a bolted fence, while Woodcraft describes a pivot screw with an oversized clearance hole to allow small angular changes.
Woodcraft’s crosscut-sled guide describes runner fitting and an adjustable fence approach.
Calibrate the fence to make square cuts
Set up with the saw off and follow the manufacturer’s instructions for securing it during adjustment. Use a reliable square against the flat blade plate, not a tooth; teeth can make the reference misleading. This check is a starting point, not a substitute for a test cut.
Rank #2

- Table Saw Sled Kit: You will receive 2 UHMW miter bars for table saw (17 in), 2 universal T-tracks (12 in), 1 star knob and bolt, 1 round washer, and 15 screws, fitting most standard table saw slots( Note: wooden sled not include).
- Well made: T-tracks are made of solid extruded aluminum and the table saw runners are made of UHMW linear polyethylene, durability, and smooth, surface burrs-free.
- Safe and Efficient: The crosscut sled for table saw aids in precise cutting, meeting various cutting needs, prevents measurement and cutting errors, and enhances safety and efficiency.
- Low Friction: UHMW miter bars for table saw are ideal for use as crosscut sled guide rails, and have low friction and stability without expansion or contraction due to environmental changes.
- Function: Table saw sled kit is perfect for crosscutting, repeat length cutting, and small cuts, stabilizing workpieces, included knobs and bolts can be used as simple stop blocks for consistent cuts without frequent adjustments to measure fence distance.
- Make a test cut. Use a wide board with parallel edges and cut it with the sled. Keep the fence adjustable.
- Flip one half edge-for-edge. Bring the two freshly cut ends together and compare the cut edges. This setup makes any angular error easier to see because the mismatch is doubled.
- Make a small fence correction. If the edges diverge, loosen the fence enough to adjust it by a small amount. Repeat the cut-and-flip check rather than relying on visual estimation alone.
- Secure the fence. Once repeated test cuts bring the edges together squarely, tighten the fasteners. Recheck after tightening in case the fence shifted.
Woodcraft details the square and test-cut calibration method in its crosscut sled instructions.
Use the sled without creating a cutoff trap
Use the sled for crosscutting and the rip fence for ripping. Do not use the rip fence as a length stop for a crosscut while the sled is guiding the work: the offcut can become trapped between the sled and rip fence. Oregon State University’s shop training explicitly distinguishes these operations and warns against that trapped-cutoff arrangement.
What’s actually slowing this PC down?
Pick the symptom - the matching free tool is one click away.
Rank #3

- Crosscut Sled For Table Saw: This miniature cross cut sled lets you use your table saw to cut small parts to length. Our crosscut sled includes a miter track stop that limits the forward travel of the sled.
- Table Saw Crosscut Sled is Great for? Our table saw fence system is great for cutting dowels, tenon stock, and small moldings at a precise 90° angle, with little to no tear-out.
- Zero-Clearance Support: This sled system features zero-clearance support, which reduces the chance of small pieces getting stuck between the blade and throat plate, or falling through entirely.
- Extremely Durable: Our aluminum table saw sled runners are ideal for constant repetitive use. This zero clearance table saw insert does not absorb moisture and will not swell up over time due to exposure.
- This Crosscut Sled for Wood Fits Most Table Saws: A small plastic ramp on one side of the kerf carries the drop-off piece away from the blade. The rear-mounted blade guard is adjustable to fit most table saws for woodworking.
A stop block can make repeated lengths convenient, but place it so the cutoff remains free rather than being pinched against the rip fence. Optional extension fences or T-track can help support longer stock; add them only when the saw table and any outfeed support can safely handle the workpiece.
Independent reader supportYour contribution helps us test, update, and keep practical guides available for everyone.Work safely around the blade
A sled improves workpiece support and control; it does not cover the blade or eliminate kickback risk. OSHA identifies blade contact at the point of operation and kickback as table-saw hazards. Its instruction is direct: “Keep hands out of the line of the cut.”
Rank #4

- PRECISION & STABILITY - If you own a table saw, you likely need to make smaller cuts or repetitive cuts. A crosscut sled for a table saw enhances precision and stability, ensuring accurate cuts. Our tablesaw sled can make small and cross cuts easier, assisting with consistent length cuts during your projects.
- ADJUSTABLE RAILS - Comes complete with a stop block and adjustable rails. The adjustable aluminum tracks fit most table saws with standard 3/4” x 3/8” miter slots. This table saw crosscut sled kit ensures precision, making small cuts not only effortless, but also safe. ❗ DOES NOT FIT RYOBI TABLE SAW SLOTS ❗
- COMPOSITE STOP BLOCK - The crosscut table saw sled kit features a composite stop block that won't damage the saw blade upon contact. It can be positioned on either side of the sled, making it perfect for achieving consistent cut lengths repeatedly. The sled measures approximately 18” long by 16” wide.
- CROSSCUT PANELS UP TO 13-1/2" WIDE - This cross cut sled for a table saw can handle both small pieces and panels up to 13-1/2" wide, delivering straight line crosscuts that miter saws can't achieve. It's the ideal crosscut sled kit for a variety of projects, providing a reliable mid-length crosscut solution.
- MEASURE YOUR SLOTS BEFORE ORDERING - Features adjustable aluminum tracks that fit most table saws with standard 3/4” x 3/8” miter slots. Please note that these tracks are incompatible with Ryobi and some other models. Measure your slots before ordering to ensure a proper fit for your table saw.
- Keep hands outside the blade’s cut line, and use a push stick for small pieces when appropriate.
- Use the guard and safety devices specified for your particular saw; follow its current manual and applicable shop rules.
- Support the stock and the cut pieces, stand to the side of the blade, and wait for the blade to stop before reaching near it.
- Avoid crosscutting long boards on a table saw when the operation requires considerable hand pressure near the blade or creates hazards for others. OSHA calls out this concern in its table-saw guidance.
Read OSHA’s table-saw safety guidance and, for a facility-specific example separating ripping and crosscutting, Oregon State University’s table-saw training rules.
Quick Recap
Best Value
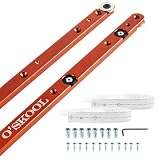
- Expansion collars help reduce sled play: Fine-tune each expansion collar from above with the included hex key to reduce side-to-side movement without removing the bars, helping crosscut and table saw sleds track more smoothly through the miter slot
- Rounded Entry for Smoother Setup: The rounded leading end helps each runner enter the miter slot with less catching during setup, making repeated test fits easier when building crosscut sleds, taper sleds, and woodworking jigs
- Two Mounting Methods with Top Access: Attach the bars from above with 1/4"-20 machine screws or from underneath with wood screws; top access holes let you reach the collar adjustments after the sled is assembled
- Check Your Miter Slot Before Ordering: Made for standard 3/4" x 3/8" T-shaped and U-style slots and not for 5/8" slots; remove the retaining discs for a non-T-shaped straight slot as shown in the instructions
- Two 430mm Bars for Sled and Jig Builds: Use the pair for crosscut sleds, table saw sled runners, taper or jointer sleds, and compatible router-table jigs; includes mounting hardware, hex key, templates, and instructions
Product prices and availability are accurate as of the date/time indicated and are subject to change. Any price and availability information displayed on Amazon at the time of purchase will apply.




