To install an air admittance valve under a sink, first verify local approval and the existing drain layout, then fit a correctly sized valve to the vent-side piping. The valve must remain upright, accessible, unobstructed, and high enough above the drain. AAVs are code-dependent venting devices—not universal replacements for roof vents.
The short answer: you can install an air admittance valve (AAV) under a sink by cutting into the vent-side piping, solvent-welding a pipe-compatible adapter, and installing a listed valve upright, accessible, and high enough above the drain. But an AAV is not automatically legal everywhere and is not a universal replacement for a roof vent. Before cutting the pipe, confirm that your locally adopted plumbing code permits an individual or branch AAV for this sink, whether a permit or inspection is required, and which valve size and fixture-unit capacity apply.
As an Amazon Associate I earn from qualifying purchases.
What an air admittance valve does
An AAV is a one-way mechanical vent. When draining water creates negative pressure in the waste piping, the valve opens and admits air. That reduces the pressure difference that could siphon water out of the sink’s P-trap.
When the pressure is neutral or positive, the valve closes by gravity and helps seal the vent opening against sewer gases entering the room. It admits air; it does not relieve positive pressure or back pressure in the drainage system. That is why an under-sink AAV should not be described as eliminating every required vent to the outdoors.
#1 Best Overall

- Complies to ASSE Standard 1050 and 1051
- For use as a secondary vent
- One size approved to handle up to 3" vent pipe
- Opens/closes as needed by building's plumbing system
- Rated 20 DFU?s for venting DWV 2? and smaller
Check the code before you install one
Plumbing rules are controlled by the code adopted and amended by your city, county, or state—not simply by the model code printed in an installation guide. Ask your local building or plumbing department:
- Is an individual or branch AAV permitted for this sink and dwelling type?
- Is a plumbing permit or inspection required?
- Are there local amendments, restrictions, or approved-product requirements?
- Does the existing drain arrangement qualify as a fixture drain or horizontal branch drain that may be vented with an AAV?
The 2024 International Residential Code recognizes individual and branch AAVs under Section P3114 when its conditions are satisfied. In that model-code framework, the valve must conform to ASSE 1051, serve fixtures on the same floor level that connect to a horizontal branch drain, be within the permitted vent length, and be installed at least 4 inches above the horizontal branch drain or fixture drain. The 2024 International Plumbing Code also recognizes individual, branch, circuit, and stack AAV applications under Section 918, but local adoption and amendments determine what applies at your property.
At least one stack vent or vent stack must extend outdoors in the overall plumbing system under the IRC. An individual or branch AAV does not relieve back pressure, so it should not be used as a blanket substitute for the required outdoor venting system.
Free tools Windows power users keep installed
One-click scans. No signup required.
Follow both the locally adopted code and the valve manufacturer’s instructions. If the two requirements differ, use the more restrictive requirement unless your plumbing authority directs otherwise.
Where an under-sink AAV belongs
An AAV belongs on the vent side of the drainage arrangement—not in place of the P-trap and not as a repair for a leaking, blocked, or incorrectly configured drain. The valve must be:
- Accessible: you must be able to inspect and replace it without opening a wall or removing permanent construction.
- Able to draw air: do not seal it inside an airtight box or block its air-inlet area.
- Upright: follow the product instructions; Oatey’s guidance, for example, calls for the valve to remain within 15 degrees of vertical.
- High enough: for an individual or branch AAV under the IRC conditions described above, the valve is at least 4 inches above the horizontal branch drain or fixture drain. This is a minimum above the relevant drain—not a universal cabinet-height rule.
- Above insulation where applicable: where insulation is present, maintain at least 6 inches of clearance above it when required by the applicable installation guidance.
Inside a sink cabinet can be a suitable location if the valve remains upright, ventilated, accessible, and compliant with local rules. A permanently sealed cabinet panel or inaccessible wall cavity is not an acceptable location.
Choose the valve and fittings
Do not buy a valve based only on the phrase “under-sink AAV.” First identify:
The Tool Desk
Outbyte PC Repair FREEClear out junk files and repair common Windows errorsFree Scan →Outbyte Driver Updater FREEScan for outdated or missing drivers - takes under a minuteDriver Scan →Rank #2

- Terminate The Vent Pipe with 2x superior sealing capability
- Prevents sewer gas and odors from escaping
- Can be used for 1-1/2" to vent individual, branch and stack vents
- Can be added to vent in pump waste and sewer ejector systems
- Standard Compliance: ASSE 1050, ASSE 1051
- The actual pipe outside diameter and nominal size.
- Whether the piping is PVC, ABS, or another material.
- Every fixture served by the vented branch.
- The valve’s listed capacity in drainage fixture units (DFUs).
- Whether the valve is listed to the applicable standard—individual and branch valves commonly need ASSE 1051 conformity under the cited IRC provisions.
- Whether the product and installation are approved by your local plumbing authority.
A single lavatory or kitchen sink may have a different drainage load from a sink with a disposal, and a branch serving multiple fixtures has a larger load still. Choose a valve whose rated capacity covers the actual connected fixtures and whose connection matches the vent piping.
Before buying: confirm your pipe material, connection diameter, DFU capacity, ASSE listing, and local approval. A 1-1/2-inch air admittance valve is a common under-sink size, but 1-1/2 inches is not a universal answer. The valve, adapter, and existing pipe must all be compatible.
Materials and tools
Materials
- A listed individual or branch air admittance valve sized for the connected vent and fixture-unit load.
- A pipe-compatible AAV adapter or approved fitting.
- Matching PVC primer and cement for PVC pipe, or the specified ABS cement system for ABS pipe.
- Thread seal tape if the manufacturer specifies it for the valve’s threaded connection.
- A short section of matching vent pipe if the existing layout needs an extension.
Tools
- Plastic pipe cutter or fine-tooth saw.
- Tape measure and marker.
- deburring tool, utility knife, or suitable tool for chamfering the cut end.
- Protective gloves and eye protection.
- Bucket and towels for residual water.
Use products intended for the actual pipe material. PVC primer and cement are not interchangeable with ABS cement, and a valve’s nominal connection size does not prove that its adapter fits the existing pipe.
How to install an air admittance valve under a sink
1. Clear the cabinet and inspect the existing drain
Remove stored items and place a bucket and towels beneath the trap. Inspect the P-trap, drain arm, branch connection, and existing vent arrangement before making any cut. Make sure you have identified the vent side of the system and are not about to cut the sink’s trap arm in a way that changes the required trap or drainage configuration.
Recommended Free Tools
If the work will disturb supply-side components, close the fixture shutoff valves as appropriate. The water supply does not normally need to be disconnected merely to install the vent valve, but keeping the cabinet dry makes inspection easier.
2. Confirm the location and measurements
Dry-fit the proposed adapter and valve, then measure the available space. Confirm all of the following before cutting:
- The valve can be installed upright and within the manufacturer’s permitted angle.
- The valve will be at least 4 inches above the horizontal branch drain or fixture drain where that code requirement applies.
- Any applicable clearance above insulation is maintained.
- The valve will remain accessible for inspection and replacement.
- The valve’s air inlet will not be blocked by the cabinet, stored items, insulation, or another fitting.
- The modified piping will preserve the required drainage slope and will not interfere with the P-trap or cabinet doors.
If you cannot achieve these conditions, do not solve the problem by mounting the valve sideways, burying it, or placing it below the drain. Change the layout or use a conventional venting solution approved for the installation.
3. Mark and cut the pipe
Mark the cut location only after checking the adapter’s insertion depth and the valve’s overall height. Leave enough straight pipe for the fitting to seat fully, while preserving access and the intended slope.
Rank #3

- Sure-Vent air admittance valve with PVC Sch. 40 adapter
- Use as an alternative to a secondary vent in a DWV system
- Vents up to 160 DFU Branch or 24 DFU Stack
- One size approved to handle 1-1/2 in.–2 in. vent pipe
- Protective sleeve provides grip for installation and keeps valve free from debris
Cut the pipe squarely with a plastic pipe cutter or a suitable fine-tooth saw. Remove burrs from the inside and outside of the cut, and lightly chamfer the end if required by the fitting or cement instructions. A rough or angled cut can prevent full insertion and create a weak or leaking joint.
4. Join the adapter to the pipe
Use an adapter designed for both the valve connection and the existing pipe material. For PVC, follow the primer-and-cement procedure printed on the products. For ABS, use the specified ABS cement system; do not substitute PVC cement simply because the pipe diameter appears the same.
Apply the joining products as directed, insert the pipe fully into the fitting, and use the recommended twisting motion if the product instructions call for it. Hold the joint in position as directed while it sets. Allow the solvent-welded joint to cure for the time stated on the cement label before stressing it or running water through the modified piping.
5. Install the AAV
If the adapter has a male threaded connection, apply thread seal tape only if the valve instructions specify it. Wrap it in the direction that tightens the tape as the fitting is threaded together, keeping tape away from the first thread so it cannot enter the valve.
Thread the valve into the adapter by hand and tighten only as directed. Do not use excessive force: over-tightening can damage the valve or adapter. Finish with the valve upright, within the specified angle, accessible, and with its air-inlet area unobstructed.
6. Let the joint cure, then test the installation
After the solvent-welded connection has cured for the label-specified time, run water through the sink while watching every joint. Check the threaded connection, solvent-welded joints, drain arm, trap, and any nearby connection that may have been disturbed.
Fill the sink partway and drain it. The manufacturer-recommended checks are:
Rank #4
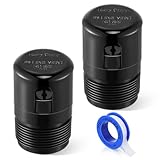
- 1-1/2 Inch NPT ABS In Line Vent: This 1-1/2'' NPT ABS in line vent can replace any secondary plumbing vent which protecting the traps of lavatory sinks, bathroom basins, tubs, showers or washing machines; It helps prevent sewer gas from entering your home, no more suffering from the smelly sewer gas caused by garbage disposal
- Durable ABS Construction: Made of durable and strong ABS material, it is durable and able to withstand stress without cracking, also has good resistance to various chemicals, including acids, alkalis, and oils, though it can be affected by strong liquid, which can use for a long time
- How it Works: Air admittance valves are operated by gravity; When water and waste move down a drain line, it creates negative air pressure in the pipe; This negative pressure lifts the sealing washer and lets air in, which allows the waste to drain away freely; When the negative pressure ceases, the sealing washer falls back in place; Earlier versions of this device were spring operated; Such units are still available but are unreliable and don't meet code in most areas
- Easy to Install: The sealing disc of the vent must be at least 6 inches above the top of the trap arm; To ensure that this requirement is met, you can extend the tube using a sliding joint; An angle installation of no more than 15 inches from the vertical direction is acceptable; After determining the placement, you can install the Air Admittance Valve on the PVC drain line
- Warm Tips: The vents must be easily inspected or replaced; If mounted inside a wall, a simple access panel must be provided; Important note: This item is only applied as an auxiliary ventilation device; Every drainage system that uses vents must have a main vent to the atmosphere, which should be located to facilitate the ventilation of the toilet bowl
- No moisture or active leakage at any joint.
- Water drains without persistent gurgling.
- The sink does not drain unusually slowly after the installation.
- No sewer-gas odor develops around the valve or inside the cabinet.
- The valve remains upright and accessible after the cabinet contents are replaced.
These checks do not replace any DWV testing, inspection, or permit closeout required by your adopted code. Where testing must occur before concealment or before the system is placed in service, follow that requirement.
Quick wins for a faster PC:
Clear out junk files and repair common Windows errorsFree Scan →Fix the driver behind crashes, sound loss and screen glitchesFind Drivers →Repair Windows errors before they cause bigger problemsFix Now →Common installation mistakes
| Mistake | Why it matters |
|---|---|
| Installing the AAV below the horizontal branch drain or fixture drain | It may fail the applicable height requirement and can put the valve in an unsuitable location. |
| Mounting the valve horizontally or at an excessive angle | The internal mechanism may not operate as designed; follow the manufacturer’s vertical-orientation instruction. |
| Hiding the valve behind a sealed panel or inside an inaccessible wall | AAVs need air and must remain available for inspection and replacement. |
| Blocking the air inlet | The valve cannot admit air effectively if the inlet is obstructed. |
| Using PVC cement on ABS, or ABS cement on PVC | The joining system may be incompatible and the joint may fail. |
| Choosing a valve without checking DFU capacity | The valve may be undersized for the sink, disposal, or other fixtures on the branch. |
| Assuming a 1-1/2-inch valve fits every sink | Nominal size, actual pipe dimensions, adapter type, listing, and local approval still need to match. |
| Treating the AAV as a replacement for every outdoor vent | AAVs do not relieve positive back pressure, and the overall plumbing system may still require a stack vent or vent stack outdoors. |
| Skipping required DWV testing or inspection | The installation may not satisfy the permit or code process even if the sink drains normally. |
Troubleshooting after installation
Sewer-gas odor
An odor can mean the valve is not sealing, the valve is defective, the installation is not approved for the configuration, or another trap or drain connection is allowing gas into the cabinet. Inspect the valve and surrounding joints. If the valve is suspected of failing, follow the manufacturer’s inspection and replacement instructions rather than permanently sealing it or adding another valve beside it.
Gurgling or slow drainage
These symptoms can result from inadequate venting, an incorrectly positioned valve, an obstructed drain, or a failed AAV. First check for a drain obstruction and confirm that the valve is upright, unobstructed, accessible, correctly sized, and installed at the required height. If the problem persists, the underlying drain layout may not be suitable for an AAV.
Leaks at the adapter or threaded connection
Do not continue tightening a plastic threaded connection indefinitely. Excessive force can crack the fitting or valve. Stop the water, dry the area, identify whether the leak is from the solvent-welded joint or threaded connection, and remake or replace the affected component according to the product instructions.
The valve is inaccessible after the cabinet is assembled
Correct the access problem now. A valve that cannot be inspected or replaced is in the wrong location, even if it currently works. Do not conceal it behind permanent construction without confirming that the local code and manufacturer’s instructions expressly allow the arrangement.
Do these 3 things before closing this tab:
1Clear out junk files and repair common Windows errors2Fix the driver behind crashes, sound loss and screen glitches3Repair Windows errors before they cause bigger problemsWhen to use a plumber instead
Get a licensed plumber or ask the local plumbing authority before proceeding if the sink serves multiple fixtures, the existing piping is difficult to identify, the work involves a wall or floor drain, the building has unusual venting, the valve cannot meet the height or access requirements, or local approval is unclear. A plumber is also the safer choice if cutting the existing drain could affect an occupied unit below or a shared building drainage system.
The most important distinction is between a straightforward, code-approved retrofit and an attempt to use an AAV to conceal a defective or fundamentally unsuitable drainage layout. The valve should correct a permitted venting arrangement—not compensate for a blocked drain, missing trap, improper slope, or unapproved configuration.
Best Value

- One size approved to handle 1-1/2 in.–2 in. vent pipe
- Protective sleeve provides grip for installation and keeps valve free from debris
- 100% functionally tested at 1/4 in. H2O and 30 in. H2O, ensuring trouble-free performance
Pre-installation checklist
- Local code permits this individual or branch AAV application.
- Permit and inspection requirements are understood.
- The valve is listed to the applicable standard and approved locally.
- The valve’s nominal size and DFU capacity match the pipe and connected fixtures.
- The adapter and joining products match PVC, ABS, or the actual pipe material.
- The planned location is at least 4 inches above the relevant horizontal branch drain or fixture drain where required.
- Any applicable clearance above insulation is maintained.
- The valve can remain within the manufacturer’s vertical-orientation limit.
- The valve will be accessible and able to draw air.
- The broader plumbing system still has any outdoor vent required by the adopted code.
- Required DWV testing or inspection will be completed.
Frequently Asked Questions
Is an air admittance valve under a sink legal everywhere?
An AAV may be permitted for an individual or branch sink vent, but legality depends on the plumbing code adopted and amended by your city, county, or state. Check local permit and inspection requirements before installation. Even where permitted, an AAV does not replace every outdoor vent in the plumbing system.
What size AAV do I need for a sink?
A common under-sink connection is 1-1/2 inches, but that is not a universal size. Confirm the actual pipe diameter, adapter configuration, connected fixtures, DFU capacity, applicable listing, and local approval before buying.
Outdated Drivers Are Slowing You Down
One free scan finds every outdated or missing driver and matches the right update for your exact hardware.Free scan · exact hardware matchWindows Errors? Fix Them Before They Spread
Repair common Windows errors and clear accumulated junk for a smoother, more stable PC - no reinstall needed.Free scan · no reinstallHow high should an AAV be installed under a sink?
The valve should be installed upright and accessible, with its air inlet unobstructed. Under the IRC conditions described here, an individual or branch AAV is installed at least 4 inches above the horizontal branch drain or fixture drain. Follow the manufacturer’s angle and clearance instructions as well.
Can an AAV replace a roof vent?
No. An AAV admits air when negative pressure develops, but it does not relieve positive back pressure. The overall plumbing system may still require a stack vent or vent stack extending outdoors.
How do I know if an under-sink AAV has failed?
Persistent sewer-gas odor, gurgling, or slow drainage can indicate a failed or incorrectly installed valve, an obstructed drain, or inadequate venting. Inspect the installation and follow the manufacturer’s replacement instructions; do not simply add another valve without correcting the underlying problem.
The Bottom Line
An under-sink AAV is a practical venting option only when local code permits it and the valve is correctly sized, listed, upright, accessible, unobstructed, and installed at least 4 inches above the relevant drain where that requirement applies. It admits air but does not relieve back pressure or replace every outdoor vent. Confirm the code, permit requirements, pipe material, adapter, and DFU rating before cutting the pipe.
What’s actually slowing this PC down?
Pick the symptom - the matching free tool is one click away.
Quick Recap
Product prices and availability are accurate as of the date/time indicated and are subject to change. Any price and availability information displayed on Amazon at the time of purchase will apply.




