Inspect a geodesic or otherwise unusual-shaped house by tracing the complete path rainwater should follow: roof covering, seams and laps, penetrations, roof-to-wall transitions, and the drainage outlet. Then inspect the corresponding interior surfaces for stains, damp or softened insulation, and rot. The shape alone does not prove that water drains correctly, and an interior stain does not necessarily mark the exterior entry point.
Because official guidance addresses roof water management generally rather than geodesic homes specifically, interpret every observation through the house’s actual plans, materials, seams, flashing details, and concealed assembly. Work only from safe, accessible positions; record areas you could not examine; and use a qualified roofer or building-envelope professional when access, concealed damage, or diagnosis exceeds a visual inspection.
As an Amazon Associate I earn from qualifying purchases.
Why an unusual shape changes the inspection
A geodesic dome, faceted roof, polygonal house, or other nontraditional form may not have familiar features such as a conventional ridge, valley, or straight eave. That changes where water can collect and how it reaches the ground, but it does not change the basic requirement: the roof and its flashing must form a continuous water-control system that sheds water away from the building.
Free tools Windows power users keep installed
One-click scans. No signup required.
The U.S. Department of Energy’s Building Science Education guidance describes roof water management as a layered assembly. Water-control materials should overlap in “shingle fashion” or otherwise be sealed so water drains rather than collecting at a joint. On a faceted or curved structure, each facet, panel joint, membrane seam, fastener line, and transition has to be understood as part of that drainage path.
#1 Best Overall
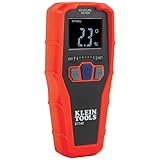
- WATER LEAK DETECTOR detects relative moisture content from leaks and flooding
- PINLESS MOISTURE METER measures relative moisture content in building materials
- NONDESRUCTIVE DETECTION up to 3/4-Inch deep using Electromagnetic field (EMF) technology
- USE ON DRYWALL, MASONRY, HARDWOOD, AND SOFTWOOD; calibrated for these materials only
- REVERSE-CONTRAST DISPLAY for easy viewing of reading and nine LED bars to indicate moisture range
Do not assume that a dome drains properly simply because it has no conventional valley. Conversely, do not treat every visible joint as a defect: some joints are designed seams, while others may be open, displaced, corroded, or improperly flashed. The house’s construction drawings, roof-system documentation, previous reports, and repair records are the best way to distinguish intended details from damage.
Prepare before going outside
Collect the house-specific documents
Start with information that explains how this particular roof was built and repaired. The Environmental Protection Agency recommends reviewing previous inspection and maintenance information before an inspection. Gather:
- Original plans or as-built drawings showing the roof geometry and drainage route.
- Roof-system documentation identifying the covering, underlayment, membrane, panels, shingles, coatings, or other materials.
- Details for flashing at windows, skylights, vents, flues, chimneys, equipment brackets, and roof-to-wall joints.
- Prior inspection reports, leak calls, invoices, warranties, and repair records.
- A history of when leaks appear, including whether they follow wind-driven rain, prolonged rainfall, snowmelt, or maintenance work.
If documents conflict with what you see, note the discrepancy rather than guessing which description is correct. A later addition, replacement covering, or improvised repair may have changed the original drainage design.
Plan a safe inspection position
Do not climb a roof when its slope, surface, weather, height, fragility, or condition makes access unsafe. Curved and faceted surfaces can create unusual footing, abrupt changes in slope, hidden edges, and slippery areas. Use ground-level views, windows, interior access panels, binoculars, or photographs taken from a safe position when those provide enough information. Do not remove covering, flashing, insulation, or interior finishes merely to make a visual inspection more extensive.
Before starting, identify how you will reach each intended observation point, how you will avoid damaging the roof, and how you will leave the area safely. If a section cannot be reached without unacceptable risk, mark it as unexamined. A complete report distinguishes visible conditions from assumptions about concealed areas.
Follow the water: a step-by-step exterior inspection
1. Map the intended drainage path
Use the plans and a walk-around observation to determine where rainwater should travel from the highest accessible surfaces to the ground. On an unusual-shaped house, that route may run across multiple facets, around a curved membrane, through a gutter at a nonstandard edge, or into a drain designed for a specific low point.
Rank #2
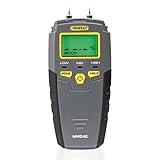
- HUMIDITY SENSOR: Our handy meter tool can quickly determine what level of remediation is needed to keep your family safe from black mold. High levels of dampness that go untreated are the leading cause of harmful fungus growth in the home.
- WATER LEAK DETECTOR: Finding the moisture content in your wood or drywall is the first step in early prevention. Continuously check and test suspicious water stains around the house so you can determine whether the area is wet or has already dried. Low, medium and high moisture tones and on-screen icons, Reading HOLD button
- MOISTURE READER: The mold test features large 0.3" high digits in a backlit LCD for quick and easy detecting. Our mildew scanner includes extra 8mm stainless steel pins, a protective cap that doubles as a calibration checker, and a “9V” battery.
- MOLD TESTER: For an accurate test read, stick the stainless steel pins into the surface of what you're measuring. The gauge has a broad range of 5 - 50% for wood and 1.5 - 33% for building materials such as concrete and drywall.
- GENERAL TOOLS: We're a recognized leader in designing and developing specialized precision tools dedicated to delivering exceptional customer service. We encourage artisans and DIYers to work smarter, measure better, and repair more productively.
Look for places where the path changes direction or narrows. Water may be held at a joint, directed toward a penetration, or forced beneath an upper layer when a lower layer does not extend far enough. The Building America Solution Center’s guidance on flashing penetrations emphasizes that roof assemblies depend on continuous water-control layers rather than isolated patches.
2. Examine the roof covering and its attachment
From a safe position, inspect the visible covering for deterioration, displacement, cracking, punctures, corrosion, missing pieces, exposed fasteners, and places where a panel, shingle, tile, or membrane edge no longer lies as intended. Compare similar sections: a single irregular seam may deserve more attention than a repeated, uniform detail that matches the plans.
Do not pull on a covering or press a questionable area to test it. Record the material, the location, the orientation of the surface, and whether the condition is dry, wet, stained, or recently repaired. Debris and vegetation can conceal defects and may hold moisture against the roof. Note whether they are blocking a designed drainage route or collecting at a joint.
3. Check seams, laps, and panel joints
Seams and laps are expected on many unusual roofs, but they must shed water continuously. Inspect for open or separated laps, lifted edges, failed sealant, displaced joining pieces, corrosion along fasteners, and repairs that stop short of the full water path. A seam that looks sound at its upper end may still direct water into a lower joint if the overlap is reversed or interrupted.
Look at the upper and lower sides of each accessible joint. Water should be directed over the lower layer, not behind it. Where the construction uses multiple facets, check whether adjacent faces meet with a continuous flashing or membrane detail. Photograph the entire joint and a close view so its position can be found later.
The Tool Desk
Outbyte PC Repair FREEClear out junk files and repair common Windows errorsFree Scan →Outbyte Driver Updater FREEFix the driver behind crashes, sound loss and screen glitchesFind Drivers →4. Inspect penetrations and attached equipment
Vents, flues, chimneys, skylights, pipes, antennas, solar equipment, brackets, and other penetrations interrupt the roof’s water-control layers. Examine the penetration itself, the surrounding flashing, fasteners, sealants, and the way upper layers overlap lower ones. Look for corrosion, cracked or missing sealant, gaps, loose components, staining, and water paths that terminate at the opening.
Rank #3

- WOOD MOISTURE METER: Prevent water and moisture build-up with our humidity reader. It can quickly determine what level of remediation is needed to keep your family safe. High levels of dampness that go untreated can cause hazardous living conditions.
- PROTECT YOUR WORK SURFACE: This tool has no pins, so it won't mar, scratch, or damage walls. It features auto-calibrating, a 2" diagonal backlit LCD screen, a 3-color LED bar graph, a hold button, and an audible alert for fast and accurate detection.
- DEEP READER: It can read the levels up to 3/4" (19mm) deep into the surface with a broad measurement range of 0 to 53% for softwood, 0 to 35% for hardwood, and relative readings for wallboard, drywall, and masonry.
- MOLD DETECTOR: Early prevention is vital when stopping mold formation. Check and test suspicious water stains around the house to determine if the area is wet or has already dried. It includes an out-of-range alarm and a low 9V battery alert.
- GENERAL TOOLS: We have been a recognized leader in the innovation, design, and development of specialized precision tools for many years. We encourage craftspeople, artisans, and DIYers to work smarter, measure better, and increase productivity.
The Building America Solution Center states: “Any of these penetrations represent a weak spot in the roof’s armor where water could leak into the building, with the potential to cause significant damage over time.” Read the full penetration-flashing guidance for the principle that flashing should integrate with surrounding water-control layers and direct water out.
Do not treat a bead of sealant as proof that a penetration is correctly flashed. Sealant can be part of a designed detail, but it can also be a temporary repair. The relevant question is whether the complete assembly provides a durable, continuous route for water to leave the roof.
5. Examine roof-to-wall and other transitions
Where a roof facet, curved surface, dormer, vertical wall, skylight curb, or extension meets another element, inspect the transition for compatible layers, flashing, open joints, and trapped debris. These locations combine different planes and materials, so movement, settlement, or an earlier alteration can interrupt the drainage path.
What’s actually slowing this PC down?
Pick the symptom - the matching free tool is one click away.
Check both sides of an accessible transition: the surface that receives rain and the lower surface that should carry it away. Look for staining below the joint, lifted edges, exposed underlayment, corrosion, or a channel that ends against a wall instead of discharging beyond it. If the transition is concealed, document that limitation rather than inferring its condition from the exterior appearance.
6. Look for blocked or redirected drainage
Remove nothing unless you are authorized and can do so safely without damaging the roof. Instead, record leaves, branches, nests, ice, sediment, or other debris that may obstruct a drain, gutter, scupper, or low point. Note whether vegetation is rooted in accumulated material or whether water marks show repeated ponding.
A roof’s unusual geometry can hide low points from a ground-level view. Use the plans and visible outlets to check whether water has a continuous route. If a drain, gutter, or discharge point is inaccessible, mark it unexamined and recommend an assessment by someone equipped to reach it safely.
Rank #4

- 🌲【Accurate and fast measurements reveal hidden water leaks】: It has 2 high-precision pins that can penetrate the surface to be tested and quickly measure moisture content to estimate potential moisture increase throughout the home. COCZOW moisture meter is the ideal tool for measuring moisture.
- 🌲【Professional Wood Moisture Meter】: 6 calibrated scales. Our moisture meter is a great tool for manufacturers, floorers, inspectors and wood suppliers to quickly and easily measure moisture content (% Mc). You can quickly determine if the moisture content is low (5-12%), medium (12-17%) or high (17-60%). Checking moisture content prevents wood from cracking and warping.
- 🌲【Widely Used】: PM6811A moisture meter is ideal for carpentry, building construction, agricultural restoration and floor laying. Measure moisture content of wood products such as hardwood floors, cabinets, furniture, lumber, lath, beams, plywood, panels, composite boards, window frames, forestry wood, coils, building materials, etc.
- 🌲【User-friendly】: With LCD backlight, the backlight color is divided into three types of green, yellow and red, or display the moisture content of different measurement types. Hold function, maximum/minimum moisture measurement function and 5-minute automatic shutdown function (no power supply required).
- 🌲【Why choose COCZOW Wood Moisture Meter】: LED display function, large measuring range (wood: 2.0%-75.0%. Building materials: 1.5-30%), durable stainless steel needle, heat insulation, light weight and easy to carry. Get professional and accurate results with Peakmeter Wood Moisture Tester.
Inspect the house from indoors
Start with the rooms below suspected drainage paths
Follow the exterior map inside. Check ceilings, upper walls, window and skylight surrounds, attic or roof-space surfaces, and the underside of roof joints where access is available. Look for water stains, peeling or damaged finishes, damp or softened insulation, discoloration around fasteners, and signs of rot.
Crashes, No Sound, or Screen Glitches?
Random freezes, missing sound and display glitches usually trace back to one bad driver. Find and replace yours safely.Free scan · under a minuteWindows Errors? Fix Them Before They Spread
Repair common Windows errors and clear accumulated junk for a smoother, more stable PC - no reinstall needed.Free scan · no reinstallThe Department of Energy’s Building Science Education material on sealing penetrations explains why openings can allow moisture into the building. An indoor symptom can therefore be evidence of infiltration or of damage that followed it, but it does not prove that the exterior entry point is directly above the stain. Water can travel along a membrane, framing member, insulation layer, or finish before becoming visible.
Use moisture observations carefully
Record whether a material is dry, damp, soft, swollen, stained, or visibly deteriorated, and note the date and recent weather. A handheld moisture meter may be an optional aid when visible signs suggest that accessible interior materials should be checked. It is an editorially practical aid, not a prescribed test or a substitute for diagnosing the roof entry point. Readings vary with material, temperature, salts, and the instrument, so document the material tested and use the result as supporting information.
Do not open a finished ceiling or wall solely because a meter gives an unusual reading. If structural rot, persistent dampness, electrical risk, or extensive concealed damage is suspected, stop the visual inspection and arrange a qualified evaluation.
Independent reader supportYour contribution helps us test, update, and keep practical guides available for everyone.Record what you found and what you could not see
A useful inspection record lets another professional connect an interior symptom with the exterior assembly without treating an assumption as a fact. For each observation, note the location, roof element, weather context, method of viewing, visible condition, and any related interior evidence.
Do these 3 things before closing this tab:
1Scan for outdated or missing drivers - takes under a minute2Clear out junk files and repair common Windows errors3Fix the driver behind crashes, sound loss and screen glitches| Record | What to include | Why it matters |
|---|---|---|
| Location | Facet, panel, seam, penetration, transition, room, ceiling, or wall; include a photograph and orientation where possible. | Unusual geometry makes a precise location more useful than a general label such as “roof leak.” |
| Weather context | Recent rain, wind-driven rain, snowmelt, temperature changes, and whether the surface was dry during the visit. | Moisture may be intermittent, and a dry inspection cannot establish how the assembly behaves during rain. |
| Method | Ground observation, safe roof access, interior view, attic view, photograph, or optional moisture-meter reading. | Readers can distinguish direct observations from indirect indications. |
| Condition | Open lap, displaced covering, corrosion, debris, stain, damp insulation, soft material, rot, or no visible defect. | Specific descriptions help target repairs and avoid replacing sound areas unnecessarily. |
| Unexamined area | Any surface, drain, cavity, or transition not safely accessible or visible. | A visual inspection cannot establish the condition of a concealed or inaccessible assembly. |
Keep photographs in sequence: a wide image establishes the roof face or room, a medium image identifies the assembly, and a close image shows the defect or symptom. Do not edit out surrounding features that help locate the observation.
Best Value

- FIND HIDDEN WALL MOISTURE EARLY — Check suspicious drywall and building surfaces after a leak, water stain, or other moisture concern. Detect abnormal moisture before a small issue develops into more extensive damage and costly repairs
- CHECK BEFORE YOU REPAIR — Don't rely on a wall looking or feeling dry. Use the moisture meter to check questionable areas before painting, repairing, or covering the surface, helping you make decisions based on actual moisture readings.
- CHECK FIREWOOD BEFORE YOU BURN — Test firewood before placing it in your fireplace or wood stove. Knowing the moisture level of your firewood helps you choose wood that is ready for burning and avoid relying on appearance alone.
- PIN-TYPE TESTING FOR DIRECT MEASUREMENTS — The contact pins penetrate the material to measure moisture inside wood and building materials. This makes it useful for checking areas where surface conditions may not tell the whole story.
- ONE TOOL FOR TWO IMPORTANT HOME CHECKS — Keep it ready for two practical jobs: checking walls for hidden moisture and checking firewood before burning. A simple way to make informed decisions before a moisture problem becomes expensive or wood goes into the fireplace.
Understand what a visual inspection can and cannot prove
A visual inspection can identify visible deterioration, discontinuities, blocked drainage, and interior effects consistent with moisture. It cannot certify that a roof is watertight, reveal every concealed defect, or establish a leak source merely from the location of a stain. The EPA’s 2013 Moisture Control Guidance for Building Design, Construction and Maintenance treats inspection and maintenance as part of moisture control, not as a guarantee that hidden conditions do not exist.
Do not report “no leak” when no defect was visible on a dry day. Report instead what was examined, how it was examined, and whether any signs of moisture were present. If the source remains uncertain, say that the symptom is consistent with water entry but that the exterior entry point was not established.
When to bring in a professional
Arrange a qualified roofer or building-envelope professional when the roof cannot be reached safely, when the covering or flashing is fragile, when water continues to appear without a visible exterior defect, or when rot and other structural damage are suspected. The most useful professional is one who can explain how their experience applies to the house’s actual geometry and materials.
Quick wins for a faster PC:
Scan for outdated or missing drivers - takes under a minuteDriver Scan →Clear out junk files and repair common Windows errorsFree Scan →When requesting help, compare:
- Experience with the specific roof covering, membrane, panel, shingle, or flashing system installed on the house.
- Experience working on curved, faceted, dome, or otherwise nonstandard roof geometry.
- The proposed access and safety plan, including how inaccessible areas will be reported.
- The diagnostic method and its limits: visual review, targeted opening, moisture investigation, or another test appropriate to the assembly.
- A written scope that identifies the locations to be examined, photographs or report deliverables, and whether repairs are excluded.
- How the professional will separate an observed defect from a suspected but unconfirmed leak path.
Ask whether any proposed water test is appropriate for the particular assembly and what damage-prevention controls will be used. Do not assume that a routine home inspection includes water testing or a roof-watertightness certification.
Local inspection rules may limit the scope
Inspection requirements vary by jurisdiction. As one specific example, New Mexico Regulation 16.66.7 NMAC, amended through 2022 as indicated in its section header, requires a home inspector to describe examination methods and areas that were not examined. The rule also illustrates that a home inspector is not universally required to perform a water test or warrant or certify a roof. This is a New Mexico example, not a statement of law everywhere; check the rules and contract that apply where the house is located.
A practical inspection checklist
- Obtain plans, roof-system information, maintenance records, prior reports, and repair history.
- Identify the covering, seams, laps, penetrations, transitions, drains, gutters, scuppers, and discharge points.
- Choose safe observation positions and list every area that cannot be examined.
- Trace the intended water path from the highest accessible surface to the ground.
- Inspect covering condition, debris, vegetation, corrosion, displaced pieces, and exposed fasteners.
- Examine seams and laps for separation, failed sealant, reversed or interrupted overlaps, and incomplete repairs.
- Inspect vents, flues, chimneys, skylights, equipment brackets, and other penetrations for integrated flashing.
- Check roof-to-wall and other plane-changing transitions for open joints, trapped water, and flashing continuity.
- Inspect interior ceilings, walls, roof spaces, insulation, and framing for stains, dampness, softness, and rot.
- Record weather, methods, photographs, visible findings, interior symptoms, and unexamined areas.
- Escalate unsafe access, concealed damage, persistent unexplained moisture, or uncertain diagnosis to a qualified professional.
Sources and technical limits
The general water-management principles in this guide come from the U.S. Department of Energy’s Building America Solution Center guidance on flashing penetrations, Building Science Education guidance on sealing penetrations, and its explanation of a water-managed roof assembly. Moisture-control and inspection-scope context comes from the EPA’s 2013 guidance and the jurisdiction-specific New Mexico regulation.
Those sources provide general roof and moisture guidance, not a geodesic-specific testing protocol. No geodesic- or unusual-shaped-house leak-frequency, failure-rate, or repair-cost statistic is established here. The house’s own plans and assembly details remain decisive.
Quick Recap
Product prices and availability are accurate as of the date/time indicated and are subject to change. Any price and availability information displayed on Amazon at the time of purchase will apply.

