The Tool Desk
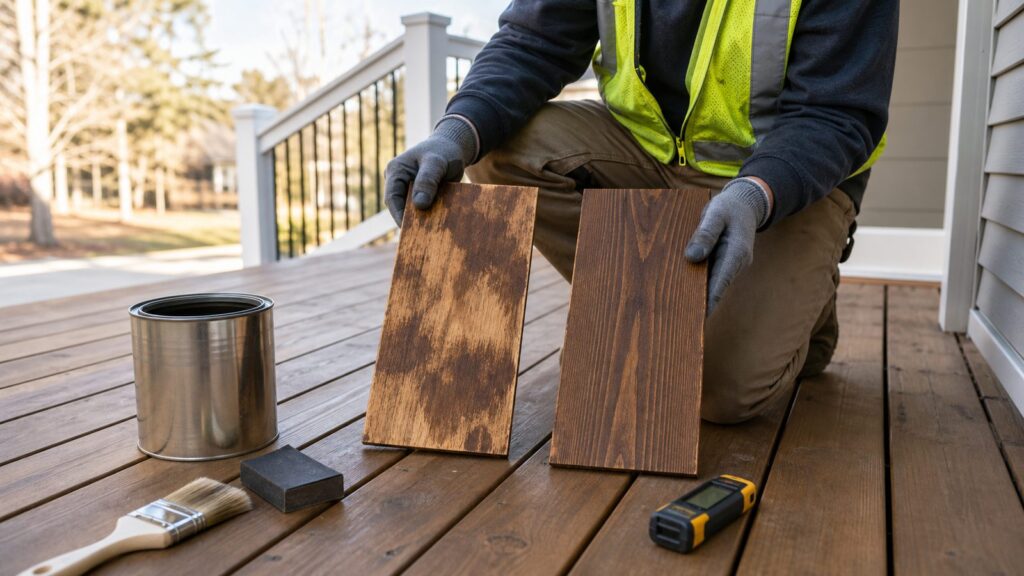
Outbyte Driver Updater FREEScan for outdated or missing drivers - takes under a minuteDriver Scan →Outbyte PC Repair FREEClear out junk files and repair common Windows errorsFree Scan →Blotchy stain happens when wood absorbs stain unevenly. Some areas drink in pigment deeply and turn dark; other areas resist stain and stay light. Adding more stain rarely solves it. Most of the time, it makes the dark spots darker and leaves the light spots looking just as wrong.
On our job sites, we treat blotchy stain as a diagnosis problem before we treat it as a finishing problem. The right fix depends on whether the issue is wood species, sanding, moisture, old coating, end grain, sun exposure, or contamination. A pine bookshelf, a maple cabinet face, and a weathered deck can all look blotchy, but they do not get fixed the same way.
As an Amazon Associate I earn from qualifying purchases.
The short version: for interior bare wood, prevent blotch with consistent sanding, dust removal, test samples, compatible pre-stain conditioner, gel stain, dye, or a sealed color layer. For decks, prevent blotch with proper cleaning, brightening, drying, sanding where needed, shade, correct temperature, and the right stain opacity. If the stain is already sealed under polyurethane, varnish, or an exterior clear coat, the durable fix is usually to strip or sand back and refinish.
PC Slower Than It Used to Be?
A free scan shows the junk files, broken settings and background clutter dragging Windows down - then fixes them in one click.Free scan · Windows 10 & 11Crashes, No Sound, or Screen Glitches?
Random freezes, missing sound and display glitches usually trace back to one bad driver. Find and replace yours safely.Free scan · under a minuteWhy Wood Stain Turns Blotchy
Wood is not a uniform sponge. Even within one board, grain density changes from earlywood to latewood, around knots, near end grain, and where the surface was compressed by milling. Stain follows those differences. Pigment stain settles into open pores and softer fibers. Dense grain and sealed areas take less color.
#1 Best Overall

- Pre-stain wood conditioner preps wood for even color
- Easy to use, water-based formula dries fast for quick project completion
- Low odor wood conditioner prevents blotching on soft woods and ensures a high quality finish
- Cleans up with soap and water; great for use on furniture, cabinets, trim, wood floors and more
- Apply to bare wood before Varathane Wood Stain for best results
That is why blotch is common on soft or unevenly porous woods. Pine, fir, alder, aspen, birch, and maple are high-risk species. They can look smooth and clean before staining, then turn patchy as soon as pigment hits the surface. End grain is even more absorbent because the stain is entering the open ends of the wood fibers. Without extra prep, end grain can turn several shades darker than the face grain.
Exterior decks add more variables. Weathered boards do not absorb evenly after months or years of UV exposure, foot traffic, mildew, previous coatings, dirt, and pressure-washing marks. A deck board shaded by a grill or outdoor rug may stain differently than the same species exposed to sun and rain. If one board is new and the next is 12 years old, do not expect transparent stain to make them identical.
Diagnose the Cause Before You Fix It
Before sanding everything down, look closely at the pattern. Blotch tells you what went wrong if you know how to read it.
Quick wins for a faster PC:
Clear out junk files and repair common Windows errorsFree Scan →Scan for outdated or missing drivers - takes under a minuteDriver Scan →Dark random patches
Random dark patches usually point to uneven absorption. This is common on pine, fir, birch, maple, alder, and other blotch-prone woods. It can also happen when a deck has mixed weathering or when boards were sanded unevenly.
Dark board ends or edges
When the ends of boards, trim pieces, stair treads, or deck boards are much darker than the faces, the end grain absorbed too much stain. The fix is usually sanding end grain one or two grits finer than the face grain or lightly sealing it before staining.
Light streaks or shiny areas
Light streaks often mean something blocked absorption: old finish, mill glaze, glue, wax, cleaning residue, silicone, or oil. On decks, leftover old stain is a common culprit. If water beads on a bare-looking surface, stain may not penetrate evenly.
Lap marks
Lap marks show up as stripes, stop-start lines, or darker bands where wet stain overlapped stain that had already started to dry. On decks this often happens when stain is applied in direct sun, at midday, or across too many boards at once.
Raised fuzzy grain
Fuzzy grain usually comes from aggressive pressure washing, water-based prep products, or sanding with too coarse a grit. Stain catches that texture and makes the surface look rough, dull, and uneven.
How to Prevent Blotchy Stain on Interior Wood
Interior wood gives you the most control. You can work under steady temperature, sample the finish, and slow the process down. That is where blotch prevention should be deliberate.
Sand consistently, not aggressively
Most stain problems start before the can is opened. Sand with the grain and use the same sanding sequence over the whole piece. For many furniture and trim projects, a practical sequence is 120 grit, then 150 grit, then 180 grit. On some hardwoods, stopping at 180 or 220 grit is enough. Sanding one rail to 120 grit and another to 220 grit can create visible color differences because the rougher area absorbs more pigment.
Do not skip corners, edges, and profiles. Stain exposes inconsistent prep immediately. After sanding, vacuum thoroughly and wipe with a clean cloth appropriate for the finish system. Avoid oily rags, silicone-containing cleaners, or household dusting sprays before staining.
Recommended Free Tools
Always make a sample board
On our finish work, we test on actual offcuts when possible. The sample should use the same wood, same sanding sequence, same conditioner, same stain, same dry time, and same topcoat. A stain that looks warm under shop lighting can look green, orange, or muddy once polyurethane or water-based clear coat goes over it.
If you do not have scrap, test inside a cabinet, under a shelf, behind a trim return, or in another hidden spot. A 3-inch test patch can save you from stripping an entire built-in.
Use pre-stain conditioner on blotch-prone wood
Pre-stain conditioner partially seals the thirsty fibers so the stain absorbs more evenly. It is especially useful on pine, fir, alder, aspen, birch, and maple. Conditioner does not make difficult wood behave like walnut, and it can lighten the final color slightly, but it gives you a more controlled starting point.
Follow the product window closely. For a typical water-based conditioner, the process is: apply to bare wood, allow about 1 to 5 minutes of penetration, wipe off excess, wait 15 to 30 minutes, lightly sand raised grain, remove dust, then stain within the recommended time window. Oil-based conditioner products have different timing, so read the label before committing to a full piece.
Consider gel stain instead of liquid wiping stain
Gel stain is heavier-bodied than traditional liquid stain. It sits closer to the surface and does not penetrate as deeply, which gives better color control on blotch-prone woods. We often look at gel stain when a homeowner wants color on pine, maple, birch, fiberglass doors, or previously finished wood that has been properly scuffed or sealed.
The tradeoff is appearance. Gel stain can look more like a controlled color layer and less like a deep penetrating stain. That can be exactly what you want on difficult wood. Apply thin coats, wipe evenly, and allow proper dry time before topcoating.
Do not ignore end grain
End grain is a stain sponge. For furniture, trim, shelves, stair parts, and exposed board ends, sand end grain one or two grits finer than the face grain. If the faces stop at 180 grit, test end grain at 220 or 320 grit. On some projects, a light sealer or glue-size approach can reduce over-absorption, but it must be tested because too much sealing can make the ends look pale.
Rank #2

- Pre-stain wood conditioner preps wood for even color
- Easy to use, water-based formula dries fast for quick project completion
- Low odor wood conditioner prevents blotching on soft woods and ensures a high quality finish
- Cleans up with soap and water; great for use on furniture, cabinets, trim, wood floors and more
- Apply to bare wood before Varathane Wood Stain for best results
How to Prevent Blotchy Deck Stain
Decks are harder than interior wood because the surface has history. Sun, rain, cleaners, old coatings, foot traffic, fasteners, mildew, and moisture all affect absorption. A good deck stain job is mostly prep and timing.
Clean, brighten, dry, then stain
A reliable deck process is clean, rinse, brighten if needed, dry, sand problem areas, remove dust, then stain. Cleaning removes dirt, mildew, old residue, and weathered fibers. Brightener helps restore wood pH and color after many cleaners, especially on cedar, redwood, and pressure-treated lumber.
Pressure washing can help, but it is not a magic reset. Too much pressure can leave wand marks, lap patterns, or fuzzy grain. On many residential decks, a fan tip, moderate pressure, and controlled distance are safer than trying to blast the surface clean. If the washer raises fibers, let the deck dry and sand the fuzz before staining.
Use a moisture meter
Guessing dryness is one of the most expensive deck-staining mistakes. A board can look dry on the surface while still holding moisture below. Use a pin or pinless moisture meter and check several boards, including shaded areas, stair treads, and boards near the house. Many exterior stain systems want dry wood, commonly around 12 to 15 percent moisture content or within the product’s stated limit.
After washing, plan on at least 24 to 48 hours of drying in good weather. Dense shade, cool temperatures, high humidity, or recent rain can extend that. If the deck is damp, stain may sit on the surface, dry unevenly, peel early, or turn blotchy.
What’s actually slowing this PC down?
Pick the symptom - the matching free tool is one click away.
Stay out of direct midday sun
Hot sun can flash-cure deck stain before it penetrates evenly. That creates lap marks, shiny patches, and short finish life. Most exterior stains perform best around 50 to 90 degrees Fahrenheit, with roughly 70 degrees being an ideal working condition. Avoid cold surfaces, heavy humidity, rain threats, and hot boards that have been baking in the sun.
Work with the shade. On a large deck, that may mean staining rails in the morning, floor boards later, and stairs when they are not in direct sun. Do not start a 400-square-foot deck at noon in August and expect a calm finish.
Work in manageable sections
On deck floors, stain one or two boards at a time from end to end. Keep a wet edge. Do not stop in the middle of a board unless there is a natural break. On rails, finish full balusters, posts, or rail sections rather than leaving random stop marks.
If you spray deck stain, back-brush or back-pad it. Spraying alone often leaves lap patterns or stain sitting unevenly on the surface. Back-brushing drives the stain into the wood and evens out puddles before they dry.
Do these 3 things before closing this tab:
1Repair Windows errors before they cause bigger problems2Scan for outdated or missing drivers - takes under a minute3Clear out junk files and repair common Windows errorsChoosing the Right Stain Opacity
Stain opacity is not just a design choice. It is a problem-solving tool. The more transparent the stain, the more it shows the actual condition of the wood. The more opaque the stain, the more it hides mismatch, repairs, aging, and old blotch.
| Stain Type | Best Use | Blotch Control | Tradeoff |
|---|---|---|---|
| Clear or toner | Uniform premium wood in good condition | Low | Shows grain and defects; needs frequent maintenance |
| Semi-transparent | Good boards with modest color variation | Moderate | Still reveals patchiness, repairs, and end-grain darkening |
| Semi-solid | Older decks with mixed boards or mild blotch | High | Hides more grain and changes the natural look |
| Solid stain | Weathered decks, visible repairs, major mismatch | Very high | Looks closer to paint and can peel if prep is poor |
For a new cedar or redwood deck with consistent boards, a transparent or semi-transparent finish can look excellent. For a 15-year-old pressure-treated deck with replaced boards, sun-gray areas, and old coating ghosts, a semi-solid or solid stain may be the honest choice. Trying to force transparent stain to hide mismatched wood usually ends in disappointment.
How to Fix Blotchy Stain That Already Happened
The fix depends on whether the stain is still raw, partly dry, fully dry, or sealed under a topcoat.
If the stain is still wet
Wipe off excess immediately with clean rags, working with the grain. Feather heavy areas into lighter areas. If the stain has pooled in corners, profiles, or deck-board gaps, remove it before it skins over. On decks, back-brush the wet area to even out absorption.
Do not keep brushing once the stain starts getting tacky. That usually makes drag marks and lap lines worse.
If the stain is dry but not sealed
You may have a few options. For mild unevenness, a second controlled coat or a darker gel stain may reduce contrast, but test first. A second coat of penetrating stain is not a guaranteed fix because dark areas often get darker too.
For moderate blotch on interior wood, scuff sanding and applying a gel stain or toner may help. For serious blotch, sand back to bare wood and redo the prep. On decks, the practical fix may be cleaning, brightening, sanding, and restaining with a more opaque product.
If the stain is sealed under clear coat
There is no reliable wipe-on miracle once blotchy stain is buried under polyurethane, varnish, or a cured exterior clear finish. The clear coat blocks correction. You can sometimes disguise small color differences with tinted topcoat, but that takes skill and can muddy the finish.
Free tools Windows power users keep installed
One-click scans. No signup required.
The durable repair is usually to remove the clear coat and stain, then restart: strip or sand, clean the surface, condition or seal as needed, restain, and topcoat again. That is slower, but it avoids building more finish over a failed color layer.
Rank #3

- Ideal for use on interior wood furniture, cabinets, doors, trim, floors and paneling
- Oil-based formula penetrates deep into wood to provide better appearance after staining
- Dries to the touch in 1-2 hours and covers between 110-220 sq. ft. per quart
- Wood sealing provides allows for an even, deeper stain
- Works with any oil-based stain
Costs to Fix or Prevent Blotchy Deck Stain in 2026
Interior furniture and trim costs vary too much to price cleanly because the labor depends on profiles, finish type, and whether stripping is needed. Deck staining has more useful national price ranges.
In 2026, professional deck staining commonly runs about $550 to $1,250 nationally, with many standard projects clustering near an $850 average. A broader real-world range is about $100 to $1,465, where the low end reflects small touch-ups or simple DIY work and the high end reflects larger decks with more prep. Marketplace booked projects can run higher, roughly $873 to $1,897 nationally, with a typical project around $1,281.
| Deck Work Scope | Typical 2026 Cost | What Drives the Price |
|---|---|---|
| Light clean and recoat | $150-$750 | Small deck, good existing condition, minimal sanding |
| Standard professional staining | $550-$1,250 | Cleaning, normal prep, one stain system, average deck size |
| Per-square-foot pro pricing | $2-$5 per sq ft | Rails, stairs, access, stain type, number of coats |
| 300 sq ft deck clean and stain | $450-$1,950 | Board condition, rail complexity, regional labor |
| Strip and restain restoration | $750-$2,450 | Old coating removal, sanding, brightening, heavier labor |
| Pressure washing before staining | $100-$600 | Common average near $150, depending on size and condition |
DIY material costs are lower, but mistakes get expensive. Cleaner, brightener, stain, brushes, pads, rollers, sandpaper, masking materials, drop cloths, gloves, and disposal supplies can be modest compared with labor. But if the deck turns blotchy and needs stripping, sanding, and a switch to a more opaque product, the total cost can pass the price of hiring a good crew in the first place.
When to DIY and When to Hire a Pro
DIY makes sense when the project is small, accessible, and not already sealed under a failed finish. A small pine shelf, a testable trim piece, a single tabletop, or a ground-level deck in decent condition can be a reasonable homeowner project if you are patient with prep and testing.
Hire a pro when the finish is already sealed and needs stripping, when the deck has railings and stairs, when old coatings are peeling, when boards are unevenly weathered, or when the project is visible enough that a restart would be costly. A 12-by-16-foot deck with simple floor boards is one thing. A 500-square-foot raised deck with stairs, railings, lattice, and mixed old and new boards is a different job.
We also recommend bringing in help when color matching matters. Matching new stair treads to existing oak flooring, blending repaired cabinet doors, or making replaced deck boards disappear under semi-transparent stain takes more than reading the stain label.
Safety, VOC Rules, and Permit Notes
Stain work has real safety issues. Oil-based stain rags can heat as they dry and may ignite if left in a pile. Lay oily rags flat outdoors to dry according to the product label, or place them in a water-filled metal container with a tight lid until disposal. Keep stain away from ignition sources, use ventilation, and wear gloves and eye protection.
VOC rules also affect what products are available. Federal and state architectural coating rules limit volatile organic compounds in many coatings, and states such as California can have stricter requirements. That means the stain your friend used in another state may not be sold in your area, or the formula may differ. Buy products that are legal for your location and compatible with your prep, conditioner, stain, and topcoat system.
Deck staining itself usually does not require a permit. Structural repair can. If fixing a blotchy deck turns into replacing joists, posts, beams, ledger connections, stairs, guards, or a large number of deck boards, check with your local building department before starting. Many jurisdictions treat structural deck work differently from maintenance. Rail height, stair geometry, guard spacing, ledger attachment, footing depth, and load paths are code issues, not cosmetic details.
A Practical Checklist Before You Open the Stain Can
For interior wood, confirm the species, sand consistently, remove dust, test on scrap, use conditioner when appropriate, and verify compatibility between conditioner, stain, and topcoat. Watch the product timing. If the label says stain within a certain window, do not condition on Friday and stain on Sunday.
For decks, check the forecast, clean the surface, brighten where needed, let the wood dry, verify moisture with a meter, sand raised grain or old coating edges, and stain in shade within the product’s temperature range. Plan traffic control too. Many deck stains need at least 24 hours to cure, and oil-based stains may need up to 72 hours. Homeowners commonly need to stay off the deck for 24 to 48 hours depending on temperature and humidity.
PC Slower Than It Used to Be?
A free scan shows the junk files, broken settings and background clutter dragging Windows down - then fixes them in one click.Free scan · Windows 10 & 11Crashes, No Sound, or Screen Glitches?
Random freezes, missing sound and display glitches usually trace back to one bad driver. Find and replace yours safely.Free scan · under a minuteThe best stain job is not the darkest color or the most expensive can. It is the finish system that matches the wood, the exposure, the prep level, and the amount of visual correction needed. Blotch is preventable when you respect absorption. When it has already happened, the honest repair is to identify the cause, remove or control the failed layer, and refinish with a system that fits the wood in front of you.
Frequently Asked Questions
Why did my wood stain turn out blotchy?
The wood absorbed stain unevenly. Common causes include blotch-prone species such as pine, fir, birch, maple, alder, or aspen; inconsistent sanding; end grain; old finish residue; moisture; dirt; or stain drying too fast in sun or heat.
Can I fix blotchy stain without sanding everything off?
Sometimes, if the stain is dry but not sealed, you can reduce mild blotch with gel stain, toner, or a more opaque finish. If the blotch is severe or sealed under polyurethane or varnish, sanding or stripping back and refinishing is usually the durable fix.
Does pre-stain wood conditioner really work?
Yes, when used on the right wood and within the product’s timing window. It helps reduce uneven absorption on soft or porous woods, but it can also make the final color lighter, so always test on scrap first.
Should I use gel stain on pine or maple?
Gel stain is often a good choice for pine, maple, birch, and other blotch-prone woods because it does not penetrate as deeply as thin wiping stain. It gives better color control, though the look is more like a controlled color layer.
Why does my deck stain look uneven after drying?
Deck stain often dries unevenly because of old coating residue, weathered boards, moisture, pressure-washing marks, direct sun, lap marks, or mixed board ages. Cleaning, brightening, drying, moisture testing, sanding, and correct stain opacity all matter.
Do I need a permit to repair a deck before staining it?
Staining usually does not require a permit, but structural repairs may. If you are replacing posts, joists, beams, ledger connections, stairs, guards, or major deck sections, check with your local building department before starting.
Quick Recap
Product prices and availability are accurate as of the date/time indicated and are subject to change. Any price and availability information displayed on Amazon at the time of purchase will apply.
Recommended Free Tools

