Windows Errors? Fix Them Before They Spread
Repair common Windows errors and clear accumulated junk for a smoother, more stable PC - no reinstall needed.Free scan · no reinstallCrashes, No Sound, or Screen Glitches?
Random freezes, missing sound and display glitches usually trace back to one bad driver. Find and replace yours safely.Free scan · under a minuteFor an edge-to-edge panel glue-up, tighten clamps only enough to close the joints. Dry-fit and arrange the boards first, distribute clamps along the panel, tighten them gradually, and use cauls if needed to keep the faces aligned. Follow the adhesive label for working time, clamping time, and suitable use.
What to prepare before applying glue
A reliable glue-up starts with joints that fit, not with extra clamp force. Titebond advises that mating pieces fit tightly and that glued surfaces be free of saw marks and burnishing. Clamps should bring a sound joint together; they should not be used to pull poorly fitting edges into alignment.
- Lay the boards out in their final order and mark them so you can reassemble them quickly.
- Dry-fit the edges. Check that they meet without visible gaps and without needing clamp force to pull them into place.
- Stage the clamps, cauls, and any protective material before opening the glue. Choose clamps with enough reach for the panel and arrange enough to spread pressure along its length.
How to space and position clamps
For a typical panel, position clamps across its width at regular intervals along its length. Titebond’s wood-glue brochure suggests spacing clamps 8–12 inches apart and placing them 1.5–2 inches in from the side. These are manufacturer guidelines, not a universal formula for clamp count or a guarantee of pressure at every joint; adapt the layout to the panel and the clamps you have.
Alternate clamps above and below the panel where the setup allows. This can help balance the forces and reduce the tendency for the panel to bow. Make sure each clamp bears squarely and can apply force across the panel without slipping.
What’s actually slowing this PC down?
Pick the symptom - the matching free tool is one click away.
#1 Best Overall
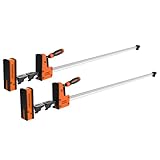
- RIGID STEEL BAR: This JORGENSEN 50-inch parallel clamp features a compact, industrial-grade steel bar that resists flexing under pressure, ideal for woodworking, furniture repairs, and cutting board assembly where even pressure matters
- POWERFUL CLAMPING FORCE: The upgraded steel screw thread delivers up to 2200 lbs of consistent clamping force, keeping workpieces secure and preventing warping during precise glue-ups, cabinet assembly, and other woodworking projects
- QUICK CLAMP-TO-SPREADER: The sliding jaw can be quickly reversed without tools, instantly converting the clamp into a spreader, making it versatile for clamping or separating tasks in DIY, carpentry, and home projects
- ERGONOMIC & SAFE OPERATION: An ergonomic soft-grip handle allows for controlled, high-torque tightening by hand, while a quick-release trigger enables safe repositioning without losing alignment, especially useful during glue-ups on drawers or frames
- SMART ACCESSORIES & DESIGN: The newly designed Soft Landing System prevents the sliding jaw from falling when carried vertically. This 2-pack bar clamp set also includes a 2-in-1 glue separator and clamp stand, elevating the bar off the surface to stay clean and stable. Replacement jaw pads are available for added protection and improved glue resistance
How to apply glue and tighten the clamps
- Apply the adhesive as its label directs, including its open and assembly time. Work at a pace that lets you assemble the panel before the glue begins to set.
- Bring the boards together in order and place them in the staged clamps.
- Tighten gradually and evenly, moving along the panel rather than fully tightening one clamp at a time. Check that each joint closes as pressure comes on.
- Stop when the joints are closed. Maximum force is not the goal; excessive tightening is not a substitute for a good dry fit.
Titebond Original Wood Glue lists general clamping-pressure ranges of 100–150 psi for softwoods, 125–175 psi for medium woods, and 175–250 psi for hardwoods. These are product guidance, not a hand-clamp torque setting. Titebond’s brochure gives different ranges—100–150 psi for soft woods such as pine and poplar, 150–200 psi for medium woods such as cherry and birch, and 200–300 psi for hard woods such as oak and maple. Because the figures vary by document and guidance, do not treat any one range as universal: use only enough pressure to close the joint and consult the instructions for your specific adhesive.
How to keep the board faces aligned
Watch the panel faces as you tighten. If one board starts to sit higher or lower than its neighbor, adjust the setup before the glue sets. Cauls—straight pieces placed across the panel—can help keep the faces aligned and the assembly flat. Woodcraft describes applying even pressure along taped caul surfaces so they contact the panel. Cauls are an aid, not a requirement for every glue-up; use them when the stock or setup needs help controlling alignment.
Rank #2

- RIGID STEEL BAR: This JORGENSEN 36-inch parallel clamp features a compact, industrial-grade steel bar that resists flexing under pressure, ideal for woodworking, furniture repairs, and cutting board assembly where even pressure matters
- POWERFUL CLAMPING FORCE: The upgraded steel screw thread delivers up to 2200 lbs of consistent clamping force, keeping workpieces secure and preventing warping during precise glue-ups, cabinet assembly, and other woodworking projects
- QUICK CLAMP-TO-SPREADER: The sliding jaw can be quickly reversed without tools, instantly converting the clamp into a spreader, making it versatile for clamping or separating tasks in DIY, carpentry, and home projects
- ERGONOMIC & SAFE OPERATION: An ergonomic soft-grip handle allows for controlled, high-torque tightening by hand, while a quick-release trigger enables safe repositioning without losing alignment, especially useful during glue-ups on drawers or frames
- SMART ACCESSORIES & DESIGN: The newly designed Soft Landing System prevents the sliding jaw from falling when carried vertically. This 2-pack bar clamp set also includes a 2-in-1 glue separator and clamp stand, elevating the bar off the surface to stay clean and stable. Replacement jaw pads are available for added protection and improved glue resistance
How long to leave the panel clamped
Clamp and cure times depend on the adhesive and conditions, so the product label takes precedence. Titebond’s FAQ, retrieved in 2026, says most of its wood glues should hold an unstressed joint clamped for 30 minutes to an hour. It advises keeping stressed joints clamped for 24 hours and not stressing new joints for at least 24 hours. Do not assume those timings apply to a different glue formula; follow that product’s instructions.
Independent reader supportYour contribution helps us test, update, and keep practical guides available for everyone.Choosing clamps for a panel glue-up
Match clamp capacity and reach to the panel dimensions, and choose a jaw style that can apply force squarely. The practical goal is enough clamps to distribute pressure along the panel at regular intervals. The cited guidance does not establish a single correct clamp count or a tested best model. Cauls can be made from suitable straight stock if you need help keeping the faces aligned; a proprietary accessory is not necessary by default.
Quick Recap
Best Value

- Parallel Clamping Faces: These bar clamps for woodworking provide even pressure and accurate alignment during gluing or assembly, keeping the workpiece firmly in place
- 1500 lbs Clamping Force: These bar clamps handle daily woodworking and assembly tasks, securely holding wood, furniture, cabinets, other wood products, and steel for cutting, joining, and installation work
- Strong Materials: These wood clamps for woodworking feature PA6 handles reinforced with 30% glass fiber for added strength under heavy tightening. The 45# carbon steel bar provides strong bend and wear resistance for smooth long-term use
- Workpiece-Friendly Pads: These F clamps use soft rubber clamping pads for better grip than standard hard pads, helping avoid dents or cracks on the workpiece surface
- 2-in-1 Design: These clamps for woodworking switch to spreading mode by reversing the jaws for internal support and correction. Clamping mode is ideal for panel gluing and assembly, allowing each tool to handle multiple tasks
Rank #4

- High-quality Materials: The jaws of our bar clamps is made of cast iron, sturdy and not easy to deform. The slide bar is constructed from 45# carbon structural steel, ensuring long-lasting and crack-proof performance
- 36-inch Large Jaw Opening: Our bar clamps for woodworking are ideal for various standard-sized woods. The 36-inch length provides users with more adjustment space during operation, resulting in precise positioning of the workpiece
- 600lbs Load Limit: These wood clamps for woodworking can easily handle various daily processing and assembly tasks, securely fixing to cut, join, and install wood, wood products (such as tables, chairs, cabinets), and steel materials
- Simple and Easy to Use: With a clear and detailed user manual, our F clamps allow for effortless operation throughout the process, making the processing efficient and time-saving
- Extended Rod: The extended rod design of our woodworking clamps can meet the operating range requirements of different thicknesses. You can use it in more scenarios, increasing the frequency of use.
Rank #3

- 1. The complete set includes 4pcs 6" bar clamps,2pcs 12" bar clamps and 2pcs 6" spring clamps, which can meet different needs.
- 2. 6" clamps are suitable for spreaders up to 11-9/64" and 12" clamps are suitable for spreaders up to 17-21/64", which can provide customers with more choices.
- 3. Strong nylon body and high-quality hardened steel bar have good impact resistance and can fully withstand the high frequency of use at the construction site.
- 4. Quick-change button design allows the F-Clamp to also function as a spreader. Just push the red button,remove the jaws,then reverse it and put it back in place to get the spreader you want.
- 5. With up to 150 lbs of squeeze capacity and metal ratchet construction,our pole clamps are perfect for woodworking and home repairs. Lightweight yet strong and durable,it can be used for a long time. Pad features a flexible material and a non-slip texture that enhances the overall clamping force. The quick release design makes your functions easier.
Product prices and availability are accurate as of the date/time indicated and are subject to change. Any price and availability information displayed on Amazon at the time of purchase will apply.