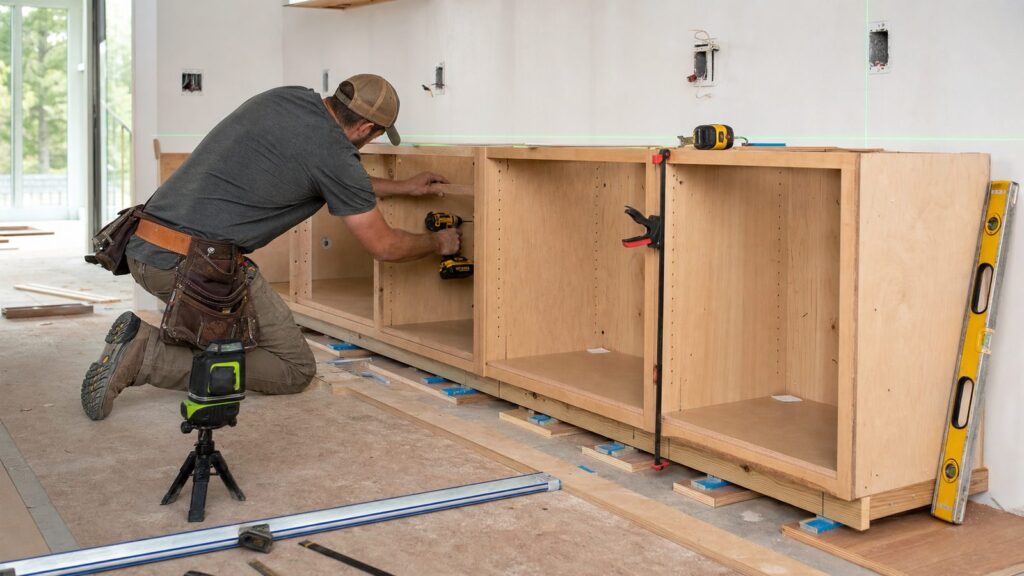
A lower cabinet base is the structural platform or cabinet box that supports base cabinets, creates the toe-kick recess, keeps the cabinet run level, and transfers countertop and storage loads to the floor. For most kitchens, the target is a 34 1/2-inch cabinet height before the countertop, which usually finishes at about 36 inches with a typical 1 1/2-inch countertop. Standard base cabinet depth is commonly 24 inches before doors and drawer fronts.
If you are building one cabinet for a laundry room, garage, office, or workshop, an integrated toe-kick cabinet is usually practical. If you are building a full kitchen run on an older floor, a separate ladder base or plinth is often the better professional method because it can be leveled once, then the boxes can sit on a flat, continuous platform.
On our job sites, the difference between a cabinet base that looks decent on day one and one that still works years later is rarely fancy joinery. It is layout, leveling, fastening, moisture detailing, and leaving enough room for appliances, fillers, plumbing, and future service access.
What a Lower Cabinet Base Actually Does
A lower cabinet base has four jobs. It supports the cabinet, creates the toe space, establishes the finished cabinet height, and gives the installer a reliable plane to level the rest of the run.
Free tools Windows power users keep installed
One-click scans. No signup required.
#1 Best Overall

- Accessories for DIY furniture, cabinets ect, Widely Applied to a humid environment room like kitchen, bathroom, to prevent ground water corrosion cabinet
- Unique design of adjustable height, just turn with your finger! It's much faster than filling in gaps with wood
- Perfect Solve the problem of uneven floors, Suitable for kick line 3-7/8"-5-1/8" high
- They are durable, Each leg can support 330 lbs
- Easy Install, Adjustable Height. Including 72 screw
In kitchen work, that base also affects countertop installation, dishwasher fit, range openings, sink plumbing, and the reveal lines between doors and drawers. A 1/4-inch error at the floor can become a visible countertop problem 10 feet away.
The two common approaches are an integrated toe-kick cabinet and a separate ladder base. With an integrated toe-kick, the cabinet sides are notched or built with a recessed bottom. With a separate ladder base, the cabinet boxes are built as simple square boxes and then set on a framed platform.
A common toe-kick is about 4 inches high and 3 inches deep. That recess lets a person stand close to the counter without leaning forward. For utility cabinets, shop cabinets, or built-ins that do not need a kitchen-style stance, the toe-kick can be adjusted, but in a kitchen we treat those dimensions as the baseline unless the design or accessibility requirements say otherwise.
Standard Dimensions and Planning Targets
Start with the finished condition and work backward. Most kitchen base cabinets are planned around a finished counter height of about 36 inches. If the countertop is 1 1/2 inches thick, the cabinet box and base assembly should land at 34 1/2 inches. If the countertop is thinner or thicker, adjust the cabinet height before cutting parts.
Do these 3 things before closing this tab:
1Repair Windows errors before they cause bigger problems2Scan for outdated or missing drivers - takes under a minute3Clear out junk files and repair common Windows errorsTypical planning dimensions are:
- Cabinet height before countertop: 34 1/2 inches
- Finished counter height: about 36 inches
- Cabinet depth without fronts: 24 inches
- Toe-kick height: about 4 inches
- Toe-kick recess: about 3 inches
- Carcass plywood: 3/4-inch cabinet-grade plywood
- Back panel: often 1/4-inch plywood, or 1/2-inch where extra fastening strength is needed
- Nailers, stretchers, and rails: 3/4-inch plywood strips or solid hardwood
Before cutting, confirm the exact dimensions of the sink, dishwasher, range, refrigerator panels, drawer hardware, door overlay, and countertop overhang. A dishwasher opening commonly needs a clean, square space and enough height after flooring is installed. If you build the cabinet run too low or trap the dishwasher under the counter, service becomes a problem later.
We use a story stick whenever a run has more than one cabinet. A story stick is a marked strip of plywood or straight lumber that carries the repeated dimensions: cabinet height, toe-kick height, rail locations, drawer openings, filler widths, and finished reference lines. It reduces cumulative tape-measure errors, especially when several people are working on the same installation.
Integrated Toe-Kick vs. Separate Ladder Base
Both methods work. The right choice depends on the floor, the size of the run, and how much adjustment you need during installation.
| Base Type | Best Use | Advantages | Watchouts |
|---|---|---|---|
| Integrated toe-kick cabinet | Single cabinets, shop cabinets, short built-ins, newer level floors | Fewer parts, clean one-piece cabinet, efficient for repeated boxes | Harder to correct if the floor is badly out of level; each cabinet must be scribed or shimmed carefully |
| Separate ladder base or plinth | Full kitchen runs, remodel floors, long walls, uneven slabs or old framing | Fast to level once; cabinet boxes sit on a flat platform; easier to scribe to the floor | Adds a separate build step; layout must account for finished toe-kick and end panels |
For a single lower cabinet base, an integrated toe-kick is usually fine. For a kitchen wall with several cabinets, we prefer a separate ladder base when the floor is noticeably uneven. Remodel floors are rarely perfect. A 12-foot wall can easily be 1/2 inch or more out of level, and the cabinet run still has to accept a straight countertop.
Quick wins for a faster PC:
Fix the driver behind crashes, sound loss and screen glitchesFind Drivers →Clear out junk files and repair common Windows errorsFree Scan →Scan for outdated or missing drivers - takes under a minuteDriver Scan →The separate base also makes it easier to protect the cabinet boxes from minor floor moisture. The plinth can be sealed, shimmed, and fastened before the finished boxes are installed.
Tools and Materials
For a professional-quality lower cabinet base, use cabinet-grade material rather than construction sheathing. Construction plywood can be warped, full of voids, and difficult to finish cleanly. MDF can be useful in dry, painted components, but it is not our first choice near sinks, dishwashers, exterior walls, or slab floors where moisture risk is higher.
Materials
- 3/4-inch cabinet-grade plywood for sides, bottom, deck, shelves, and structural panels
- 1/4-inch plywood for backs, or 1/2-inch plywood where the back contributes to strength
- 3/4-inch plywood or hardwood strips for stretchers, nailers, and face-frame parts
- Wood glue rated for interior cabinetry
- 1 1/4-inch cabinet screws or pocket screws for box assembly
- 2 1/2-inch to 3-inch cabinet installation screws for fastening into studs or blocking
- Shims, preferably composite shims in damp-prone areas
- Edge banding, face-frame stock, or finished end panels as needed
- Primer, clear finish, paint, or prefinished plywood for interior durability
- Sealant or waterproof coating for exposed plywood edges near sinks and dishwashers
Tools
- Table saw, track saw, or circular saw with a straightedge guide
- Miter saw for rails, face frames, and plinth parts
- Drill/driver and countersink bit
- Clamps long enough to pull cabinet sides and face frames flush
- 4-foot level and laser level
- Stud finder and pencil
- Combination square and framing square
- Pocket-hole jig, doweling jig, or preferred cabinet joinery system
- Jigsaw or oscillating tool for plumbing and utility cutouts
- Scribe tool or compass for walls and floor irregularities
If you do not already own a saw system, clamps, drill/driver, laser, and joinery jig, the tool cost can exceed the material cost for one cabinet. That is one reason a single DIY cabinet can be satisfying but not always cheaper than buying a stock base cabinet.
Step 1: Measure the Room and Find the Floor High Point
Do not start base cabinet installation from an arbitrary corner. Start from the high point of the floor.
Set a laser level or long level and check the floor along the entire cabinet run. Mark the highest spot. From that point, measure up to the planned top of the cabinet box, commonly 34 1/2 inches before countertop. Strike a level reference line around the wall. That line is your control point for the rest of the job.
Rank #2

- 【Adjustable Leveling Feet】- The adjustable height is 0-2 inches, which can meet your various needs. In addition, the base with a plastic protective cover can protect the floor and prevent moisture from entering the feet.
- 【Package Includes】- The leg leveler kit includes 4pcs leg levelers, 16 screws, 1 allen wrench and 1 nut wrench. It is the best way to quickly and easily fixing the level of all types of furniture.
- 【Premium Quality】- Our heavy duty furniture leg leveler is made of 2mm galvanized steel, which is rust-proof and durable. Each one can support 333lb.
- 【Easy to Install】 - You can use the screws to install the leg levelers in a few minutes, and the allen wrench and nut wrench helps to adjust the height effortlessly.
- 【Wide Application】- It is widely used for leveling heavy furniture, suitable for shelving units, cabinets, furniture feet, workbenches, cabinets, beds and bookcases, and can also be used outdoors.
Next, locate and mark every wall stud. Mark them above the cabinet height so the marks remain visible when the boxes are in place. If the wall is open during a remodel, install solid blocking where cabinet fasteners, island panels, or heavy drawer bases will need support.
Also check the walls for square. Measure diagonals where practical, and place a long straightedge against the wall. Bowed drywall, old plaster, and out-of-square corners are normal in remodel work. Plan fillers and scribe strips instead of assuming the room will cooperate.
Step 2: Choose the Cabinet Construction Method
For a lower cabinet, the simplest strong box uses two sides, a bottom deck, a back, top stretchers, and either a face frame or frameless front edge treatment. The bottom can be raised above the toe-kick or set on a separate ladder base.
For an Integrated Toe-Kick
Cut the cabinet sides to include the toe-kick notch. A common notch is 4 inches high by 3 inches deep at the front bottom corner. The cabinet bottom sits above that recess, and the front toe-kick area is later covered with finished toe board.
This method works well for one cabinet because the toe-kick is part of the cabinet. It is less forgiving across a long run because each cabinet side reaches the floor and must be shimmed or scribed individually.
For a Separate Ladder Base
Build the cabinet boxes square, without toe-kick notches. Then build a separate ladder frame from plywood strips or straight lumber. The ladder base is usually about 4 inches tall and set back about 3 inches from the cabinet face. For a 24-inch-deep cabinet, the plinth depth may be about 21 inches so the front recess remains open for the toe-kick.
On long runs, we build the ladder base first, level and shim it from the high point, fasten it securely, and then set the cabinet boxes on top. The result is a flatter plane and cleaner cabinet reveals.
Outdated Drivers Are Slowing You Down
One free scan finds every outdated or missing driver and matches the right update for your exact hardware.Free scan · exact hardware matchPC Slower Than It Used to Be?
A free scan shows the junk files, broken settings and background clutter dragging Windows down - then fixes them in one click.Free scan · Windows 10 & 11Step 3: Cut the Cabinet Parts
Measure twice, cut once is not enough for cabinetry. Cabinet parts need to be cut consistently. If one side panel is 1/16 inch taller than another, the box can rack, the face frame can fight you, and the countertop line can show the error.
For a basic 24-inch-deep lower cabinet, common parts include:
- Two side panels from 3/4-inch plywood
- One bottom deck from 3/4-inch plywood
- One back panel from 1/4-inch or 1/2-inch plywood
- Front and rear top stretchers from 3/4-inch plywood strips
- Optional nailer strips at the back for wall fastening
- Optional face frame rails and stiles from hardwood or plywood
- Finished toe-kick board, scribe strips, fillers, and end panels
If you are making drawers, decide that now. Drawers need accurate interior width, slide clearance, and strong side panels. Deep lower shelves are cheaper, but drawers and pull-outs are much easier to use. In many kitchens, the best upgrade is not more cabinet boxes; it is better access inside the lower cabinets.
Step 4: Assemble the Box Square and Flat
Dry-fit the cabinet parts before glue or screws. Check that the bottom deck sits square to both sides and that the back does not force the box out of alignment. Clamp before fastening.
Recommended Free Tools
Use glue and screws, pocket screws, dados, confirmat screws, or another cabinet-appropriate method. The exact joinery matters less than square parts, full bearing, and clean clamping. Fasteners should pull the panels tight without splitting edges or leaving proud screw heads that interfere with drawers or shelves.
Install the back panel square. A back panel does more than close the cabinet. It helps keep the box from racking. If the cabinet will carry a heavy countertop, sink, or wide drawers, use adequate stretchers and nailers so loads are transferred through the sides and into the wall or base.
Rank #3

- Heavy-Duty Support: Each adjustable cabinet leveling leg supports up to 330 lbs, providing stable support for kitchen cabinets, bathroom vanities, closets and furniture.
- Adjustable Height: Easily adjusts from 3.1"-4.3" (80-110 mm) for precise cabinet leveling on uneven floors.
- Easy Installation: Includes mounting brackets for fast installation on new or existing cabinets and furniture. Fits cabinets requiring an adjustable height range of 80-110 mm (3.1"-4.3").
- Wide Applications: Ideal for kitchen cabinets, bathroom vanities, closets, laundry rooms, garage cabinets and furniture projects. Perfect for leveling cabinets on uneven surfaces.
- Durable Construction: Made from high-strength engineering plastic for long-lasting performance, moisture resistance and reliable everyday support. Designed for 80-110 mm (3.1"-4.3") adjustable height applications.
For finished interiors, prefinished plywood is worth considering. Lower cabinets take abuse from pans, cleaning bottles, trash pull-outs, and plumbing work. A durable interior surface saves time and looks cleaner than trying to finish deep cabinet interiors after assembly.
Step 5: Build and Level the Ladder Base
If you are using a separate base, build it slightly smaller than the cabinet footprint so the toe-kick recess and finished end details work. A typical kitchen plinth for 24-inch-deep cabinets is about 21 inches deep, leaving a 3-inch front recess. Height is commonly 4 inches.
Assemble the ladder base with crossmembers every 16 to 24 inches, depending on load and layout. Add support under cabinet partitions, sink bases, and appliance-adjacent panels. Keep the frame square and flat.
Place the base on the floor and shim it from the high point. Use the level reference line on the wall to confirm the top of the base is consistent. Fasten shims so they cannot work loose, then fasten the base to the floor where appropriate and to wall framing where possible. Avoid fastening into utilities. In slab conditions, confirm what is below before drilling.
Do not install the finished toe-kick skin until the cabinets are set, aligned, fastened, and checked. Toe-kick trim should finish the work, not hide a structural leveling problem.
Step 6: Set, Clamp, and Fasten the Cabinets
Set the first cabinet at the high point. Bring its top to the level reference line. Shim under the cabinet or base as needed. Check level front to back and side to side, then check plumb at the face.
What’s actually slowing this PC down?
Pick the symptom - the matching free tool is one click away.
For a run of cabinets, clamp neighboring boxes together before final wall fastening. Align the face frames or frameless front edges so reveals are consistent. Fasten cabinets to each other through face frames or box sides using appropriate screws. Predrill where needed to avoid splitting or pulling parts out of alignment.
Once the run is aligned, fasten into studs or blocking with cabinet installation screws. Do not rely on drywall anchors for base cabinets carrying countertops, drawers, stone tops, sinks, or appliances. Fasteners should hit solid framing. If the wall layout does not provide good fastening points, add blocking during the remodel or use a fastening strategy approved for the wall assembly.
After fastening, recheck appliance openings. Confirm dishwasher width and height, range width, refrigerator panel clearance, door swings, drawer pulls, and countertop overhang. It is much easier to adjust before countertops are templated.
Moisture, Plumbing, and Utility Details
Sink bases and dishwasher-adjacent cabinets need better moisture detailing than dry storage cabinets. Seal exposed plywood edges, including plumbing cutouts, bottom edges near the floor, and any notches made for supply or drain lines. Raw plywood edges absorb water quickly and can swell or delaminate.
The Tool Desk
Outbyte Driver Updater FREEFix the driver behind crashes, sound loss and screen glitchesFind Drivers →Outbyte PC Repair FREERepair Windows errors before they cause bigger problemsFix Now →Cut plumbing openings only as large as needed. Oversized holes weaken the back or deck and leave sloppy gaps around pipes. Keep access to shutoff valves, cleanouts, dishwasher connections, and electrical junctions. Never bury a junction box, valve, or cleanout behind a permanent cabinet panel without access.
Inside sink bases, we like a durable floor surface: sealed plywood, a removable liner, or a waterproof mat with raised edges. Small leaks are common over the life of a kitchen. The goal is to make a minor leak visible and manageable before it ruins the cabinet.
If the cabinet run touches an exterior wall, confirm insulation, air sealing, and pipe freeze protection. Cabinet installation should not create a cold pocket around water lines.
Rank #4

- Heavy-Duty Support: Each adjustable cabinet leveling leg supports up to 330 lbs, providing stable support for kitchen cabinets, bathroom vanities, closets and furniture.
- Adjustable Height: Easily adjusts from 4.7"-5.9" (120-150 mm) for precise cabinet leveling on uneven floors.
- Easy Installation: Includes mounting brackets for fast installation on new or existing cabinets and furniture. Fits cabinets requiring an adjustable height range of 120-150 mm (4.7"-5.9").
- Wide Applications: Ideal for kitchen cabinets, bathroom vanities, closets, laundry rooms, garage cabinets and furniture projects. Perfect for leveling cabinets on uneven surfaces.
- Durable Construction: Made from high-strength engineering plastic for long-lasting performance, moisture resistance and reliable everyday support. Designed for 120-150 mm (4.7"-5.9") adjustable height applications.
Safety, Codes, and Permits
Building a cabinet box by itself is usually treated as finish carpentry. But kitchen work often touches systems that are regulated. Moving a sink, dishwasher, gas line, range hood, wall, outlet, island feed, or lighting circuit can trigger permits and inspections.
Electrical rules also change by jurisdiction. In 2026, some areas may still be enforcing older electrical code cycles while others are under newer provisions. Island and peninsula receptacle requirements have changed in recent National Electrical Code cycles, so do not assume an old kitchen layout remains compliant when the remodel scope changes.
For accessibility-sensitive projects, check applicable requirements before building. Accessible kitchens may require knee clearance, clear floor space, reach ranges, removable base cabinets, or different cabinet configurations. Fair Housing, ABA, ADA-related standards, and local rules can affect multifamily, public, commercial, and certain adaptable dwelling units.
The practical rule is simple: cabinet replacement may be cosmetic, but changing the mechanical, electrical, plumbing, gas, structural, or accessibility condition is different. Call the local building department before opening walls or moving services.
Independent reader supportYour contribution helps us test, update, and keep practical guides available for everyone.2026 Cost Expectations
A DIY lower cabinet base can cost far less in materials than professional custom cabinetry, but the comparison changes when tools, finish quality, drawers, installation time, and site conditions are included.
Recommended Free Tools
| Scope | Typical 2026 Cost Range | Best Fit |
|---|---|---|
| DIY single lower cabinet base | Varies mainly by plywood grade, hardware, finish, and tools already owned | Garage, laundry, workshop, office, or one-off storage cabinet |
| DIY full base cabinet run | Material cost can be controlled, but tool time and mistakes add up quickly | Experienced DIYer with saw setup, clamps, layout skills, and time |
| Professional cabinet installation | About $486 to $736 per cabinet for installation in May 2026 national estimates | Purchased cabinets, remodel installation, countertop-ready alignment |
| Built cabinets | About $1,256 to $1,534 per cabinet in May 2026 national build-cost estimates | Site-built or custom work where fit and finish matter |
| Installed kitchen cabinets by linear foot | Roughly $80 to $800 per linear foot across stock, RTA, semi-custom, and custom tiers | Budget planning for full kitchens |
| Custom cabinetry | Commonly about $500 to $1,200 per linear foot, with premium work higher | High-end kitchens, inset doors, complex drawers, appliance panels, custom finishes |
A 40-linear-foot kitchen can land roughly between $4,000 and $32,000 depending on cabinet grade and scope. That wide range is real. Stock cabinets with simple installation are a different project than inset custom cabinetry with finished ends, integrated panels, pull-outs, soft-close hardware, and a site-finished paint system.
The biggest cost drivers are local labor rates, plywood or hardwood grade, number of drawers, soft-close hardware, face-frame versus frameless construction, inset versus overlay fronts, finish quality, appliance panels, plumbing and electrical cutouts, uneven floors, and whether countertops or appliances must be removed and reset.
When to DIY and When to Hire a Pro
DIY makes sense when the cabinet is isolated, the finish expectations are reasonable, and the project does not involve moving utilities. A laundry room base, garage cabinet, office built-in, or shop storage run is a good learning project. You can control the schedule, use durable materials, and accept minor cosmetic imperfections.
DIY becomes harder in a finished kitchen. Cabinet runs must align with countertops, appliances, walls, floors, plumbing, electrical, trim, and finished flooring. Mistakes are expensive because they affect other trades. A countertop template can be delayed by one cabinet that is out of level or one appliance opening that is too tight.
Do these 3 things before closing this tab:
1Scan for outdated or missing drivers - takes under a minute2Clear out junk files and repair common Windows errors3Fix the driver behind crashes, sound loss and screen glitchesHire a carpenter, cabinet installer, or cabinet shop when the room is out of square, the floor is uneven, the work includes stone countertops, the design has many drawers or inset fronts, or the cabinets must match existing millwork. Bring licensed trades in when plumbing, electrical, gas, ventilation, or structural work changes.
For homeowners, the best middle path is often to hire the cabinet layout and installation while choosing stock or semi-custom boxes to control cost. For a custom kitchen, pay for accurate field measurements and shop drawings. That money is cheaper than rebuilding cabinets after countertop templating fails.
Common Mistakes to Avoid
The most common mistake is starting in a corner without finding the floor high point. That creates a run that climbs or falls, leaves uneven toe-kick gaps, and makes countertop installation harder.
Another common mistake is treating each cabinet as an isolated box. Cabinets in a run have to read as one built-in assembly. Use a level line, clamp boxes together, align reveals, and fasten cabinets to each other before final wall fastening.
Best Value

- HEAVY DUTY - They are durable, Each leg can support about 330 lbs
- SET OF 12PCS - It including 12pcs Adjustable Cabinet Feet ,12 toe kick clipsand and all the necessary fasteners
- EASY ADJUSTABILITY - Unique design of adjustable height, just turn with your finger
- EASY INSTALLATION - Included Toe kick clips. Just attach the back of the kick and snap it in place
- HARD PLASTIC MATERIAL -Rust-proof, Corrosion-proof and Durable, Suitable for long-term use in humid environments
Do not use construction-grade plywood in wet-prone areas and expect it to behave like cabinet material. Do not leave raw plywood edges around sink plumbing. Do not fasten cabinets only to drywall. Do not forget appliance openings, door swings, fillers, countertop overhangs, or service access.
Also avoid installing toe-kick trim too early. Leveling and fastening come first. Trim comes after the structure is right.
A Practical Build Sequence
For a clean lower cabinet base project, follow this order:
- Confirm finished cabinet height, countertop thickness, appliance dimensions, and toe-kick requirements.
- Measure the room, find the floor high point, and strike a level reference line.
- Mark studs, utilities, appliance openings, fillers, and scribe locations.
- Choose integrated toe-kick construction for simple cabinets or a separate ladder base for longer remodel runs.
- Cut cabinet parts from 3/4-inch cabinet-grade plywood using repeatable stops or a story stick.
- Assemble the cabinet boxes square, with proper stretchers, backs, nailers, and finished interior surfaces.
- Build, level, shim, and fasten the ladder base if using one.
- Set cabinets from the high point, clamp boxes together, align faces, and fasten cabinet to cabinet.
- Fasten the run into studs or blocking with cabinet installation screws.
- Seal wet-area edges, make clean utility cutouts, check appliance openings, and install finished toe-kick and fillers.
That sequence keeps the work controlled. It also prevents the usual remodel problem where the cabinets look acceptable by themselves but do not work with the countertop, dishwasher, range, or walls.
Crashes, No Sound, or Screen Glitches?
Random freezes, missing sound and display glitches usually trace back to one bad driver. Find and replace yours safely.Free scan · under a minutePC Slower Than It Used to Be?
A free scan shows the junk files, broken settings and background clutter dragging Windows down - then fixes them in one click.Free scan · Windows 10 & 11Final Builder Notes
A lower cabinet base is not complicated, but it is unforgiving. The box must be square. The base must be level. The toe-kick must be planned before cutting. The wall fastening must hit framing. Wet areas must be sealed. Appliance openings must be protected.
For one cabinet, build carefully and use the project to sharpen your layout skills. For a full kitchen, treat the base cabinets as part of the whole room. The cabinets, counters, plumbing, electrical, flooring, and appliances all have to land in the same finished plane. That is where professional planning pays for itself.
Frequently Asked Questions
What is the standard height and depth for a lower kitchen cabinet base?
Most kitchen base cabinets are 34 1/2 inches high before the countertop and finish at about 36 inches with a typical 1 1/2-inch countertop. Standard depth is commonly 24 inches before doors and drawer fronts.
Should I build an integrated toe-kick or a separate ladder base?
Use an integrated toe-kick for a single cabinet or short run on a level floor. Use a separate ladder base for longer cabinet runs or remodels with uneven floors because it is easier to level one continuous platform first.
What plywood thickness should I use for lower cabinet bases?
Use 3/4-inch cabinet-grade plywood for the cabinet sides, bottom, structural panels, stretchers, and decks. A 1/4-inch plywood back is common, though 1/2-inch can be better where the back adds strength or fastening support.
How do you level base cabinets on an uneven floor?
Find the floor high point first, strike a level reference line around the wall, then shim cabinets or a ladder base up to that line. Start at the high point, clamp cabinets together, align the faces, and fasten into studs or blocking.
Do I need a permit to build or replace lower kitchen cabinets?
Cabinet replacement alone is often treated as finish work, but permits may be required if you move plumbing, electrical, gas, ventilation, walls, windows, or anything structural. Always check your local building department before changing utilities or opening walls.
How much does it cost to build or install base cabinets in 2026?
May 2026 national estimates put cabinet installation around $486 to $736 per cabinet and cabinet building around $1,256 to $1,534 per cabinet. Full kitchen cabinet projects commonly range from about $80 to $800 per linear foot depending on stock, semi-custom, custom, labor, finish, and site conditions.
The Tool Desk
Outbyte PC Repair FREERepair Windows errors before they cause bigger problemsFix Now →Outbyte Driver Updater FREEFix the driver behind crashes, sound loss and screen glitchesFind Drivers →