Some links on this page are affiliate links: if you buy through them we may earn a commission, at no extra cost to you.
To make a cabinet drawer that actually works, start with the cabinet opening and the drawer slides, not the wood. The drawer box has to be sized for the opening width, cabinet depth, face-frame or frameless construction, drawer-front style, slide clearance, and expected load. If you build the box first and buy hardware later, you are guessing.
On our job sites, the difference between a drawer that feels custom and one that binds is often less than 1/16 inch. That is why good cabinet drawers are measured carefully, cut square, assembled flat, and installed with the slides parallel from front to back. This guide walks through the full process: how to measure, choose materials, calculate drawer size, build the box, install slides, attach the drawer face, and decide when DIY stops being cheaper than hiring a finish carpenter or cabinet shop.
As an Amazon Associate I earn from qualifying purchases.
Start With the Drawer Type and Slide Hardware
Before cutting plywood, choose the drawer slide. Slide type controls the drawer-box width, depth, bottom clearance, notching, mounting blocks, and sometimes the exact position of the drawer bottom.
For most kitchen and bathroom cabinets, there are two common choices: side-mount ball-bearing slides and concealed undermount slides. Side-mount slides are easier for many homeowners because the math is simple: most require about 1/2 inch of clearance on each side. That usually means the drawer box is 1 inch narrower than the clear cabinet opening. For example, a 21-inch opening usually gets a 20-inch-wide drawer box when using standard side-mount slides.
Undermount slides look cleaner because the hardware is hidden below the drawer. They also pair well with soft-close, full-extension drawers. The tradeoff is precision. Undermount systems use brand-specific deductions, notches, locking clips, bottom recesses, and rear clearance requirements. Do not assume one undermount slide installs like another. Use the manufacturer’s instructions for the exact model in your hand.
#1 Best Overall

- ★ 10 pairs of 22 inch,mounting screws included (extra screws offered for spare use). Attention: the mounting brackets are not included,please buy separately if need it.
- ★ Side mounted Steel ball-bearing action creats silent working.22'' in length.1.77'' in width.0.5'' in thickness.
- ★ Zinc Plated and made of solid cold rolled steel.Rust resistant for your lifetime use.
- ★ Black buckle on the third channel makes easy removal for installation.Nylon rubber produces less noise at closing and opening,creating a silent life environment for your family.
- ★ Guide for Choosing Size of Drawer Slides:To determine which size of slides are good for your drawer, please measure the length of the drawer without the frame board. And if the length is not even, please choose 1 inch shorter. The length of slides can't be longer than the cabinet case depth.And face frame cabinets will require a rear mounting bracket, whereas for faceless cabinets the slides are mounted directly on the side.
For a kitchen base cabinet, full-extension slides are usually worth the added cost. They let you reach the back of a deep drawer without digging blindly. Most residential drawer slides are rated around 75 to 100 pounds per pair, with premium and heavy-duty slides available at 125 pounds or more. For pots, pans, tools, pantry goods, or wide rollout trays, we generally look for a 100-pound rating minimum and build the drawer bottom accordingly.
Measure the Cabinet Opening Like a Carpenter
Accurate drawer work starts with measuring the cabinet, not trusting the cabinet label. A “24-inch cabinet” rarely means a 24-inch drawer opening. Face frames, hinges, side panels, nailers, and out-of-square boxes all reduce the usable space.
Measure the clear opening width in three places: top, middle, and bottom. Use the smallest number. Then measure depth from the inside front edge to the first obstruction at the back. In a sink base or older kitchen, watch for plumbing, gas lines, disposal parts, outlets, rear nailers, or uneven cabinet backs. For rollout drawers behind doors, also check hinge clearance and door swing. A rollout may need to be slightly narrower than the opening so it does not hit the hinges.
Next, check whether the cabinet is square. Measure diagonally from upper left to lower right, then upper right to lower left. If the two diagonal measurements differ by more than about 1/8 inch in a typical base cabinet opening, plan to correct the slide plane with shims or blocking. Do not build a crooked drawer to match a crooked cabinet. The drawer box should be square; the installation should compensate for the cabinet.
Simple Drawer Sizing Worksheet
Use this worksheet before buying material:
- Opening width: Measure top, middle, and bottom. Use the smallest dimension.
- Opening height: Leave clearance above the drawer box, especially for undermount slides and drawer fronts.
- Cabinet depth: Measure front to back and subtract for rear obstructions.
- Cabinet style: Face-frame cabinets may need rear brackets or blocking; frameless cabinets usually mount slides directly to cabinet sides.
- Slide type: Side-mount, undermount, center-mount, or specialty heavy-duty slide.
- Drawer front: Inset fronts require tighter reveals than overlay fronts.
- Load: Light utensils, heavy cookware, pantry goods, tools, or file storage.
For side-mount slides, a common formula is: drawer-box width = clear opening width minus 1 inch. For undermount slides, use the published deduction from the slide manufacturer. For depth, choose a slide length that fits inside the cabinet and build the drawer box to match that slide system. Common kitchen slide lengths include 18, 20, 21, and 22 inches, but the correct size depends on the actual cabinet depth and obstructions.
What’s actually slowing this PC down?
Pick the symptom - the matching free tool is one click away.
Choose the Right Drawer Materials
Cabinet drawers take more abuse than shelves. They are pulled, slammed, loaded unevenly, and exposed to spills. Material choice matters.
A strong practical setup is 1/2-inch or 5/8-inch cabinet-grade plywood for the drawer sides, front, and back, with a 1/4-inch to 3/8-inch plywood bottom captured in grooves or recessed and fastened from below. For heavier utility drawers, 3/4-inch cabinet-grade plywood is a reasonable upgrade. Premium drawers often use 5/8-inch solid maple or birch sides with dovetail joinery and 3/8-inch plywood bottoms.
Big-box 2026 pricing for birch plywood has commonly landed around $60 for a 1/2-inch 4-by-8 sheet and around $75 for a 3/4-inch birch sheet, though cabinet-grade and lumberyard material can vary widely by region and grade. Avoid warped, bowed, or void-filled plywood. Bad plywood saves a few dollars and costs you time when the drawer twists or the screw edges break out.
For kitchen drawers, we prefer stable plywood over low-grade solid wood unless the drawer is being built as a premium hardwood dovetail box. Plywood moves less with humidity, stays flatter, and gives predictable results. Under sinks, in bathrooms, and in laundry rooms, seal the drawer interiors. Water vapor and occasional leaks can swell raw wood quickly.
Recommended Free Tools
Drawer Joinery Options
You do not need dovetails for every drawer, but you do need square, strong joinery. Choose the joint based on tools, budget, and how visible the drawer will be.
| Joinery Type | Best Use | Pros | Watchouts |
|---|---|---|---|
| Butt joints with screws and glue | Basic shop drawers, utility cabinets, budget remodels | Fast, simple, minimal tooling | End-grain screw holding is weaker; needs accurate predrilling |
| Rabbet joints | Most DIY cabinet drawers | Better alignment and glue surface than a plain butt joint | Requires a table saw, router, or dado setup |
| Dado or lock-rabbet joints | Repeated drawer batches | Strong, repeatable, clean assembly | Setup time matters; test cuts are required |
| Dovetail joints | Premium kitchen, bath, and built-in cabinetry | Very strong and high-end appearance | More expensive; usually best ordered or made with proper jigs |
For a homeowner with a table saw and router, rabbets and a captured bottom are a good balance. For a high-end kitchen with exposed drawer sides, a shop-built dovetail box may be smarter than spending a weekend tuning jigs for one or two drawers.
Rank #2

- 【High quality, more durable】 The drawer slides is made of 1.2mm thickness high quality cold rolled steel and industrial solid steel ball,which take 100,000 times push-pull tests without damage. The maximum load weight is up to 100lbs. REGUDA is committed to produce sturdy and durable drawer slides .Besides the quality,we also focused on after-sales service,any quality or installing problem please feel free to contact us.
- 【Anti-rust ,Smooth work】The anti-rust ability and oxidation resistance of our slides is superior to the others because of the special electrophoretic coating surface treatment; Industrial grade solid steel ball inside,which not only minimize frictional resistance to keep the sliding more smooth and quiet,and also effectively increase the load-carrying capacity of slides.
- 【Full extension; Detachable design】 “The 3-fold full extension”means the drawer can be pulled out completely,so that the entire drawer to be accessed easily. For instance: Slides length:16"(400mm)—Fully extended length: 32"(800mm),the same goes for the slides of other size; There is a White plastic buckle on the back of slides, the 3rd/inner track can be separated by pressing it, which mean the drawer screwed on the 3rd track can be installed and detached by your will easily.
- 【installation notes】 Choose the size of the rails according to the depth of the drawer,the length of drawer≥length of slides,the tolerance 0”-1”/25mm is okay. The slides is side mounted,the space between drawer and cabinet wall need to be 12.5mm/0.5in each side(total 25mm/1in). One set includes a pair of slides with mounting screws included.
How Much It Costs to Build Cabinet Drawers in 2026
Drawer cost depends on size, material, slide type, finish, and whether you already own tools. A basic plywood drawer may cost about $25 to $75 in materials if you already have saws, clamps, glue, drill bits, and a square. A soft-close plywood drawer is more often about $45 to $120 or more, depending on plywood grade, slide brand, drawer size, and whether clips, brackets, or special screws are included.
Drawer slides create a wide cost range. Economy side-mount slides can be under $20 per pair. Common soft-close side-mount or undermount slides often run about $20 to $40 or more per pair. Premium undermount hardware can be $30 to $50 or more before locking clips, rear brackets, screws, tax, or shipping.
Ordering custom drawer boxes online commonly lands around $40 to $140 per drawer for dovetail boxes, with price driven by size, species, finish, notching, and bottom thickness. Prefabricated rollout or drawer kits with soft-close undermount hardware can start around $44 per kit, but larger sizes, solid wood, finish, and shipping raise the final number.
| Option | Typical 2026 Cost | Best For |
|---|---|---|
| DIY basic plywood drawer | $25-$75 per drawer | Utility areas, budget upgrades, experienced DIYers with tools |
| DIY soft-close plywood drawer | $45-$120+ per drawer | Kitchen and bath upgrades where fit and feel matter |
| Online custom dovetail box | $40-$140 per drawer | Premium look, consistent sizing, reduced shop time |
| Prefabricated rollout kit | Often starts around $44 per kit | Adding pull-outs to existing base cabinets |
| Installed drawer remodel | About $150-$500 per linear foot | Multi-drawer kitchens, rollouts, custom storage systems |
| Finish carpenter labor | About $40-$100 per hour nationally | Fitting, scribing, repairs, custom fronts, difficult installs |
There is a practical break point. If you need one drawer for a laundry cabinet, DIY can make sense. If you need 18 drawers in a kitchen with inset fronts, soft-close undermount slides, matching faces, and old out-of-square cabinets, a cabinet shop or finish carpenter may be the less expensive path after mistakes, tool time, and material waste are counted.
Tools and Supplies You Will Need
For clean cabinet drawers, use tools that help you repeat dimensions. The basics are a table saw or track saw, miter saw or crosscut sled, drill/driver, countersink bit, clamps, tape measure, combination square, pencil, wood glue, brad nailer or screws, sandpaper, and a level. A router or dado blade is useful for bottom grooves and rabbets. For batches, stop blocks, spacer blocks, and a story stick save time and reduce layout errors.
Typical drawer parts include two sides, a front, a back, a bottom panel, a decorative drawer face, drawer slides, pull or knob, screws, glue, and finish. For a soft-close undermount drawer, add locking clips, rear brackets if needed, and any slide-specific screws or notching requirements.
Quick wins for a faster PC:
Fix the driver behind crashes, sound loss and screen glitchesFind Drivers →Clear out junk files and repair common Windows errorsFree Scan →Scan for outdated or missing drivers - takes under a minuteDriver Scan →Use proper eye and hearing protection when cutting sheet goods. Support full plywood sheets so they cannot tip, pinch the blade, or fall off the saw. Keep hands away from narrow rips; use push sticks and safe setups. If you are cutting many parts, label every piece as it comes off the saw. A stack of nearly identical drawer sides can get confusing quickly.
Step-by-Step: How to Make a Cabinet Drawer
1. Confirm the Final Drawer Dimensions
Start with your worksheet. For a side-mount slide example, assume the clear cabinet opening is 21 inches wide, 22 1/2 inches deep, and 7 inches tall. If the slide requires 1/2 inch per side, build the drawer box 20 inches wide. If using a 21-inch slide, make sure the drawer depth and cabinet clearance match the slide instructions. Leave enough height clearance so the drawer box, slide, and drawer face do not rub.
For undermount slides, stop and follow the slide template. The drawer may need a recessed bottom, a specific back notch, holes for locking clips, and an exact inside width. This is where many DIY drawers fail.
2. Cut the Drawer Parts Square
Cut the two sides exactly the same length. Cut the front and back exactly the same length. If the paired parts are not identical, the drawer will fight you during glue-up. For a 20-inch-wide drawer using 1/2-inch side material with front and back captured between the sides, the front and back pieces would be 19 inches long. If your joinery changes, the cut list changes.
Batch work carefully. When we build repeated drawers, we set a stop block and cut all matching parts without moving the setup. That gives better consistency than measuring every piece separately.
Rank #3

- 🔇 Installation Notes : Slides Length: 14" (350mm)— Fully Extended Length: 28" (700mm)📦— Suitable for Drawers: Internal depth ≥ 15"🧩— Quantity: 1 pair (2 pieces) .💡 Key Tips: ① Choose rail size based on drawer depth → Drawer length ≥ Slide length.Tolerance allowed: 0.7in/20mm - 2in/50mm. ② Space Requirement: 0.5in gap between drawer & cabinet wall (left + right = total 1in). 🔧Easy to install with included hardware – perfect for smooth drawer operation! ✨
- 🔇 Maximum Load Capacity: 100 LBS🏋️♂️1.5mm high-density cold-rolled steel construction supports up to 100 lbs, maintaining stability and safety even under heavy loads. It passes 100,000+ full-load opening-closing tests for long-lasting durability🛡️.Dual design of solid ball bearings and dual springs ensures smooth, quiet gliding while enhancing load-bearing capacity and enabling noise-free soft close🤫.
- 🔇 Soft Close Drawer Slides ✨ Equipped with a pure copper core hydraulic damper, our drawer slides enable automatic, slow closure—no slamming or loud bangs 🛡️.Simply give the drawer a gentle push, then walk away. It will self-close the last few centimeters smoothly and quietly on its own.Enjoy a soft, comfortable, and noise-free drawer experience that elevates your home’s tranquility 😌!
- 🔇 Child Safety Feature:👶Crafted with pure copper construction and dual-spring design, our drawer slides feature a buffered auto-slow close function. It effectively reduces the risk of little fingers getting pinched! A slight extra pull is required to open the drawer—preventing accidental sliding and making it hard for toddlers to access on their own.💖 Double protection ensures maximum safety for your kids, creating a warm and secure home environment for the whole family!
- 🔇 3-Fold Full Extension & Detachable:✨3-fold Full Extension Soft Close Drawer Slides fully extend the drawer completely 📤, giving you easy access to every item—no more fumbling in the back.Press the back plastic buckle 🎯 to quickly separate the 3rd track, making drawer detachment and installation smooth and hassle-free whenever you need!
3. Cut the Bottom Groove or Prepare a Recessed Bottom
A captured bottom sits in grooves cut into the drawer sides, front, and sometimes back. A common groove is sized for 1/4-inch or 3/8-inch plywood and placed about 1/2 inch up from the bottom edge. The groove depth should be enough to hold the panel securely without weakening the side.
For wide or heavy drawers, avoid flimsy 1/4-inch bottoms unless they are well supported. A 3/8-inch bottom or a recessed 1/2-inch bottom is better for heavy cookware, tools, or pantry storage. Wide drawers sag first in the bottom panel, not always at the side joints.
4. Dry Fit Before Glue
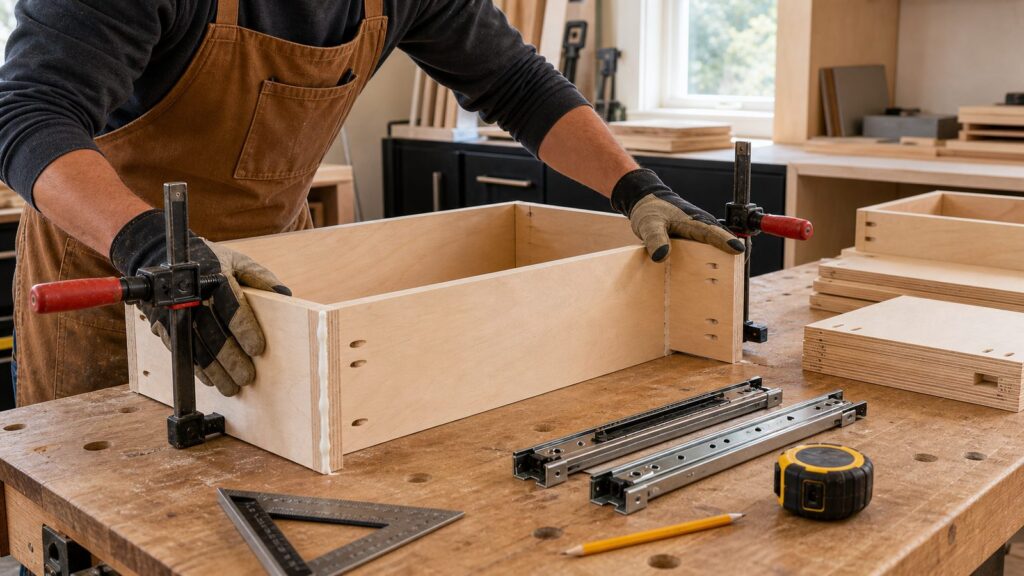
Assemble the drawer without glue. Check that the bottom panel fits, the sides are flush, and the box sits flat. Measure diagonally across the drawer box. If both diagonals match, the box is square. If they do not, adjust the clamps before glue sets.
Free tools Windows power users keep installed
One-click scans. No signup required.
Skipping the dry fit is one of the most expensive small mistakes in cabinet work. Once a drawer box is glued out of square, slides will magnify the problem.
5. Glue, Clamp, and Fasten
Apply glue to the joints, assemble the box, and clamp it on a flat surface. Recheck diagonal measurements. Fasten with screws, brads, or narrow crown staples depending on the joint and material. Predrill near plywood edges to avoid splitting. Wipe glue squeeze-out before it hardens.
Do not overdrive screws into plywood edges. It weakens the joint and can push the box out of square. The goal is firm, aligned, and flat.
6. Sand and Seal
Break sharp edges with 150- to 180-grit sandpaper. Sand visible edges cleanly, but do not round over areas that need to register against slides or drawer faces. Seal the drawer with a clear water-based finish, lacquer, shellac, or another cabinet-appropriate coating. In damp locations, seal all sides of the bottom panel and the inside corners.
Do these 3 things before closing this tab:
1Scan for outdated or missing drivers - takes under a minute2Repair Windows errors before they cause bigger problems3Fix the driver behind crashes, sound loss and screen glitches7. Install the Slides
Mount slides level, parallel, and in the same plane front to back. In frameless cabinets, slides often screw directly to the cabinet side. In face-frame cabinets, you may need rear mounting brackets or blocking so the slide is fully supported. The front and rear of the slide must line up; a sagging rear bracket will make the drawer bind or self-close poorly.
Use a spacer block or jig for repeat drawers. For a stack of drawers, a story stick helps maintain consistent heights and reveals. Install one drawer and test it before drilling every slide in the cabinet.
8. Attach and Align the Drawer Face
The drawer box is the working part. The drawer face is the finished visual part. Set the drawer face after the box slides correctly.
Rank #4

- 【Heavy Duty 100 lb Capacity】 BAIDICE full extension drawer slides are built with 1.0mm cold-rolled steel and dual industrial-grade ball bearings, supporting up to 100 lbs—40 lbs more than standard slides. The precision ball bearing mechanism ensures smooth gliding even under heavy loads, while the built-in rubber crash pad keeps operation as quiet as 35 decibels.
- 【Full Extension & Detachable Design】 The 3-section foldable structure allows drawers to open completely for easy access to every corner. A detachable buckle at the back of each side mount slide rail makes installation and removal quick and hassle-free—ideal for both new cabinet builds and replacing worn-out slides.
- 【Installation Note】 Color: Black; Qty: 1 pair. Length: 10"(254mm), full extension lengths: 20"(508mm), suitable for drawers with inner depth ≥ 10"-12". Left side mount clearance: 0.5" (12.7mm), right side mount clearance: 0.5" (12.7mm). Please push the inner ball bearing to the top of the slide first, and then install it to the slide. There are 8 screws in the card box of the product. We provide a detailed installation video in the listing.
- 【Premium Anti-Rust Coating】 Unlike ordinary slides that corrode over time, BAIDICE side mount drawer slides feature a special electrophoretic coating that delivers superior rust resistance and oxidation protection. The wear-resistant rubber crash pad prevents collision damage, extending service life even in humid kitchens and bathrooms.
- 【Versatile Side Mount Application】 BAIDICE ball bearing drawer slides fit a wide range of cabinetry and furniture—kitchen cabinets, bathroom vanities, bedroom dressers, office file drawers, pantry shelves, workshop tool chests, and garage storage. Available in 8 to 24 inch lengths with 1 pair, 5 pairs, and 10 pairs options to fit any drawer size.
For overlay fronts, use spacer blocks to hold consistent gaps. For inset fronts, be more exact: 1/16-inch to 1/8-inch reveals are common, but the entire cabinet has to support that level of precision. Temporarily clamp or use double-sided tape to position the front, then fasten from inside the drawer box. Drill for pulls or knobs after the face is aligned.
The Tool Desk
Outbyte Driver Updater FREEScan for outdated or missing drivers - takes under a minuteDriver Scan →Outbyte PC Repair FREERepair Windows errors before they cause bigger problemsFix Now →Adding Pull-Out Drawers to Existing Cabinets
Pull-out drawers are one of the most useful upgrades for older base cabinets. They make pots, lids, cleaning supplies, and pantry items easier to reach without replacing the whole cabinet run.
The key is measuring the usable opening with the doors open. Hinges and face-frame lips often reduce the clear width. If the pull-out tray is too wide, it will rub the hinge or door. We usually keep rollout drawers slightly narrower than the opening when the cabinet has doors, especially in older face-frame cabinets.
Do not make rollout trays too deep. A deep base cabinet may measure 23 inches inside, but plumbing, gas lines, outlets, rear nailers, and disposal parts can shorten the usable space. In a standard base cabinet, a rollout drawer often stops a few inches short of the back unless the cabinet is clear and square.
Independent reader supportYour contribution helps us test, update, and keep practical guides available for everyone.Common Mistakes That Make Drawers Bind or Sag
The most common mistake is buying slides after the drawer is built. Slide clearance is not universal. Side-mount, undermount, center-mount, inset, overlay, face-frame, and frameless layouts all use different deductions.
Crashes, No Sound, or Screen Glitches?
Random freezes, missing sound and display glitches usually trace back to one bad driver. Find and replace yours safely.Free scan · under a minuteWindows Errors? Fix Them Before They Spread
Repair common Windows errors and clear accumulated junk for a smoother, more stable PC - no reinstall needed.Free scan · no reinstallThe second mistake is trusting one measurement. Cabinet openings can be narrower at the back than the front, out of level, or twisted. Measure width in three places, check depth on both sides, and compare diagonals. If the cabinet is out of square, shim the slide plane rather than forcing the drawer box to compensate.
Other common problems include using warped plywood, cutting the bottom too loose, overloading slides, mounting slides slightly out of parallel, forgetting handle clearance, and using thin bottoms for wide drawers. Soft-close slides are less forgiving than basic hardware. A small alignment error can keep the soft-close mechanism from engaging correctly.
Permits, Safety, and Remodeling Limits
Replacing or adding drawer boxes by itself usually does not require a building permit in many US jurisdictions because it is finish carpentry inside existing cabinets. That changes when the drawer work is part of a larger kitchen or bath remodel. Moving plumbing, electrical, gas lines, walls, ventilation, or structural components can trigger permits and inspections. Local rules vary by city and county, so check with your building department before starting a remodel that goes beyond cabinet interiors.
Be especially cautious under sinks, near dishwashers, around ranges, and in laundry rooms. Do not notch around gas lines or electrical wiring casually. If a rollout drawer conflicts with a shutoff valve, outlet, drain, or appliance connection, shorten the drawer or redesign the storage. Access to shutoffs and service points matters more than gaining two extra inches of drawer depth.
What’s actually slowing this PC down?
Pick the symptom - the matching free tool is one click away.
When to DIY and When to Hire a Pro
DIY cabinet drawers make sense when the project is limited, the drawer fronts are simple overlay style, the cabinets are reasonably square, and you already own accurate tools. A homeowner with a table saw, clamps, square, drill, and patience can build basic plywood drawers for a laundry room, garage, pantry, or a few kitchen rollouts.
Best Value

- Premium Soft-Close for a Quiet Home: Equipped with a metal hydraulic damper for durability and a gentle, self-closing action. The double spring design effectively minimizes noise, creating a peaceful and quiet environment for your family
- High Quality Material & Smooth Glide:Built from high-grade cold-rolled steel with a corrosion-resistant zinc finish for water and rust resistance.Solid ball bearings on both sides ensure effortlessly smooth and quiet drawer operation for years of reliable use
- Full Extension & Complete Installation Kit: Full extension design provides complete access to drawer contents. Complete Hardware: Includes 12 flat-head mounting screws (14.6 mm length) per pair, along with clear instructions for easy setup. Dimensions: 22” L (558mm) x 1.77” W (45mm) x 0.5” Th (12.7mm). Load Capacity: 100 lbs
- Anti-Drop Lock & Quick-Release: Features a dual safety lock to prevent accidental drawer detachment. The one-touch quick-release lever allows for effortless drawer removal, simplifying cleaning and content
- Complete 10-Drawer Solution with Reliable Support: This set includes 10 pairs of slides, ready to upgrade 10 standard drawers with each pair individually wrapped in a sturdy box. Backed by Homdiy's professional service commitment, contact us for any needs—we ensure a satisfactory solution from unboxing to long-term use
Hire a pro when the drawer fronts are inset, the cabinet run is highly visible, the kitchen has multiple drawer stacks, the existing cabinets are old or out of square, or the drawers will carry heavy loads. Also hire help when the work involves matching stain, repairing cabinet boxes, modifying face frames, or working around plumbing, electrical, or gas connections.
Professional carpenter rates in 2026 commonly run about $40 to $100 per hour nationally, with an average around $50 per hour, and skilled cabinet or finish work can be higher in expensive markets. Cabinet installation labor benchmarks often range from about $50 to $450 per linear foot depending on stock versus custom work, removal, scribing, site conditions, and finish level. For drawer-heavy kitchen remodels, installed drawer systems may land around $150 to $500 per linear foot, from budget rollouts to high-end custom work.
The value of a pro is not just speed. It is repeatability. On a full kitchen, small errors compound across every reveal, slide, and drawer face. A professional setup uses jigs, stop blocks, story sticks, and tested hardware clearances so the final result looks intentional.
Final Builder Notes
A good cabinet drawer is simple only after the planning is done. Select the slide first, measure the real opening, choose material based on load, build the box square, and install the slides parallel. If you are building several drawers, make one test drawer or mock-up spacer before batching all the parts. That one step can save an entire sheet of plywood and several hours of rework.
For most homeowners, the best drawer upgrade is a 1/2-inch or 5/8-inch plywood box, a properly supported 3/8-inch bottom, and full-extension soft-close slides rated for the load. For premium kitchens, hardwood dovetail boxes and concealed undermount slides give the finished feel people expect from custom cabinetry. Either way, the drawer has to be built to the cabinet and the hardware, not to a generic plan.
Frequently Asked Questions
What size should I make a cabinet drawer box?
Measure the clear cabinet opening, then subtract the clearance required by your drawer slides. For many side-mount slides, the drawer box is about 1 inch narrower than the opening because the slides need about 1/2 inch per side. Undermount slides use brand-specific deductions, so follow the manufacturer’s instructions.
What kind of plywood is best for cabinet drawers?
For most cabinet drawers, use 1/2-inch or 5/8-inch cabinet-grade birch, maple, or Baltic birch plywood for the box. Use a 1/4-inch to 3/8-inch plywood bottom for light to medium drawers, and upgrade to thicker bottoms for wide or heavy drawers.
Free tools Windows power users keep installed
One-click scans. No signup required.
Are undermount drawer slides better than side-mount slides?
Undermount slides look cleaner and are common in higher-end soft-close drawers, but they require more exact drawer sizing, notching, clips, and installation tolerances. Side-mount slides are easier to install and often cost less, but the hardware is visible when the drawer is open.
How much clearance do drawer slides need?
Many side-mount ball-bearing slides need about 1/2 inch of clearance on each side. Undermount slides vary by brand and model, so use the published clearance, notch, and bottom-recess specs for the specific hardware.
How much does it cost to build or replace cabinet drawers in 2026?
A basic DIY plywood drawer often costs about $25 to $75 in materials if you already own tools. A DIY soft-close drawer is more often $45 to $120 or more. Custom ordered dovetail boxes commonly run about $40 to $140 per drawer, while installed drawer remodels can range from about $150 to $500 per linear foot.
Do I need a permit to add or replace cabinet drawers?
Replacing drawer boxes alone usually does not require a permit in many areas because it is finish carpentry. Permits may be required if the work is part of a larger remodel involving plumbing, electrical, gas, walls, ventilation, or structural changes. Check your local building department before starting broader kitchen or bath work.
Quick Recap
Product prices and availability are accurate as of the date/time indicated and are subject to change. Any price and availability information displayed on Amazon at the time of purchase will apply.

