What’s actually slowing this PC down?
Pick the symptom - the matching free tool is one click away.
A small, simple paver patio can sometimes be built in a day if the site is ready, materials are on hand, access is clear and helpers are available—but it is not a dependable one-day promise. Excavation, compacting the base, laying pavers, cutting, edging and joint finishing all take time. The Home Depot describes paver installation as a weekend project, and the jointing product’s directions may delay when the surface is ready to use.
Is a one-day paver patio realistic?
Treat one day as a stretch goal for a small, uncomplicated footprint—not a schedule guarantee. The Home Depot’s installation guide calls laying pavers a project that “takes about one weekend to complete”; that is a retailer estimate, not a measured average or guarantee. Your schedule depends on the patio’s size, soil, excavation, number of cuts, number of helpers, delivery and finishing requirements.
- A one-day attempt is most plausible when the footprint is small and level, access is easy, materials are delivered and staged, and a helper can share the work.
- Allow more time for difficult digging, a sloping yard, a large area, many cuts, poor weather or a jointing product with specific activation and curing instructions.
- Simple patterns such as running bond or jack-on-jack generally require less cutting than herringbone or pinwheel, according to Lowe’s patio guide.
Before digging, check local building-code and HOA requirements, call 811 to have underground utilities marked, and plan access for material delivery and removal of excavated soil. Lowe’s advises checking local rules and utility locations before starting.
Gather materials and tools before you start
Have the pavers, compactable base aggregate, bedding material, edge restraints and stakes or fasteners, and the chosen jointing sand ready. Useful tools include a shovel, stakes and string or marking paint, a level or other grade-checking setup, rake, tamper or plate compactor, screed guides and board, rubber mallet, broom, and hose with spray attachment. A plate compactor is faster for a substantial area; a hand tamper may be practical for a small one. Consider renting compaction or cutting equipment for a one-time project.
Do these 3 things before closing this tab:
1Repair Windows errors before they cause bigger problems2Scan for outdated or missing drivers - takes under a minute3Clear out junk files and repair common Windows errors#1 Best Overall

- RUBBER STEPPING STONES: Elevate your outdoor space with these lightweight simulated flagstone rubber pavers that offer the timeless beauty of real stone without the heavy lifting.
- DURABLE: Made from recycled rubber, these stepping stones outdoor are heavy enough to stay put in place and durable to withstand all weather condition.
- ANTI-SLIP SURFACE: These pathway stones are carefully designed with a non-slip surface, ensuring safety and stability as you walk across them even during wet or rainy conditions.
- NATURAL LOOKING: Perfect for creating enchanting walkways or paths in gardens and backyards while its grey color blends in with surrounding foliage for a natural-looking pathway.
- EASY TO USE: The paving stones can simply be placed wherever you choose so are fantastically easy to install with instant results and make a fantastic low maintenance paver.
If cuts are needed, add a suitable masonry saw or concrete-cutting blade. Wear gloves, eye protection, hearing protection and a respirator when cutting concrete pavers, as Lowe’s recommends.
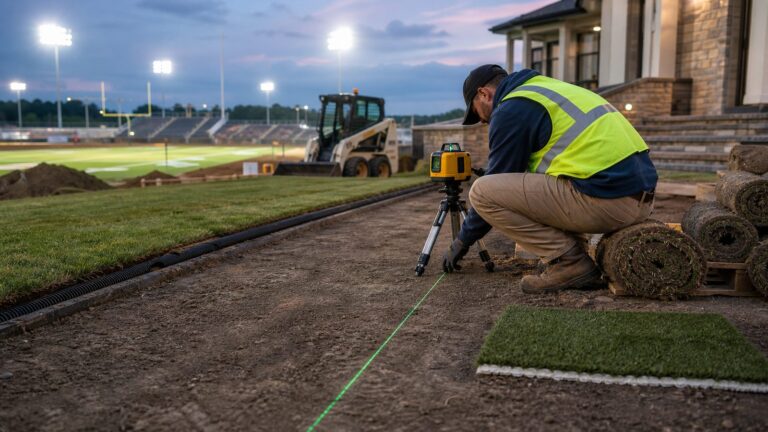
Mark the footprint and plan drainage
Mark the patio dimensions and check a rectangular layout for square by comparing its diagonals. Set a consistent grade so water drains away from the house or other structure; do not assume one slope figure fits every site. The cited guides give different examples: QUIKRETE specifies 1/4 inch per 12 feet, The Home Depot gives about 1 inch per 8 feet, Lowe’s describes about a 1-inch drop per 4 feet, and Unilock recommends 1.5–2%. These are source-specific recommendations, not a single universal code value. Check local conditions and the requirements for the paver system you select.
Use stakes and string to establish the intended finished height and slope before excavation. Keep the layout and grade consistent across the footprint, and check that water will not be directed toward the building.
Rank #2

- Easy DIY Landscape Upgrade: Create garden paths, backyard walkways, patio access, and outdoor play areas with lightweight Redu-material stepping stones that install quickly without digging or tools.
- Simple Installation & Low Maintenance: Place directly over grass, dirt, gravel, mulch, or a compacted base for an instant landscaping update, then clean easily with a garden hose when needed.
- Durable Year-Round Use: Weather-resistant recycled rubber construction withstands rain, frost, and seasonal temperature changes without cracking, making these pavers ideal for year-round outdoor use.
- Comfortable, Walking Surface: Textured walking surface provides added traction while the rubber material offers a comfortable step and helps reduce muddy footprints in outdoor spaces.
- Outdoor Décor: Proudly made in North America from recycled rubber tires, these reusable stepping stones provide a sustainable landscaping solution with a realistic natural stone appearance.
Excavate and compact the base
Excavate deeply enough to fit the paver thickness plus the specified base and bedding layers. Base recommendations vary with soil, climate and installation system: Belgard describes a typical compacted aggregate base of 4–6 inches, with depth depending on soil type and application. Lowe’s uses a 6-inch example and notes that colder climates may need a deeper base. QUIKRETE’s guide gives 2–4 inches of gravel for its described project. These are not interchangeable prescriptions; follow your paver manufacturer’s current instructions and account for site conditions and local requirements.
- Remove soil and organic material to the planned depth, maintaining the drainage grade.
- Spread the selected aggregate evenly. Compact it firmly, working in layers as appropriate for the installation system.
- Check grade and firmness as you go. A loose or uneven foundation can undermine the finished surface; bedding sand is not a substitute for a properly prepared base.
For its system, Unilock describes placing aggregate in layers and making at least three compactor passes per layer. Treat that as Unilock’s system-specific direction, not a rule for every paver or site.
Screed an even bedding layer
Spread the selected bedding material over the compacted base and screed it to an even surface using straight guides and a board. Belgard calls for at least 1 inch of bedding sand; QUIKRETE’s guide allows 1–2 inches. Use the selected system’s specification rather than combining the figures. Recheck the planned grade, and avoid walking on the finished screeded bed because footprints can disturb the level surface.
Rank #3

- Durable & Easy: These 15.5" stepping stones are made of weatherproof resin, so they can withstand rain, hail, UV rays, and cold temperatures. They also feature four ground stakes for secure installation, making them perfect for patios, walkways, and gardens.
- Versatile & Stylish: Enhance your outdoor space with these textured stepping stones, available in beige limestone or slate grey. They're ideal for walkways, garden pathways, and even adding a touch of elegance to grassy or muddy areas.
- Stable & Secure: Each stepping stone comes with four ground stakes that provide extra stability and help prevent movement. Simply push the stakes into the ground for a secure installation that won't shift or sink.
- Lightweight & Easy Installation: No need for heavy lifting! These lightweight stepping stones are simple to install. Just clear the area, level the surface, and push the stakes into the ground.
- US-Made Quality: We are a USA-based company committed to providing high-quality products. These stepping stones are designed and manufactured in the USA, ensuring you receive durable and reliable outdoor decor.
Lay pavers and make any cuts
Start from a straight edge or corner. Set each paver in place without dragging it across the bedding layer, keep joints consistent, and check alignment as the field grows. A simple pattern and dimensions planned around the paver size can reduce cuts. If a cut is necessary, secure the piece and use suitable masonry-cutting equipment with the recommended protective gear.
Restrain the edges and finish the joints
Install edge restraints along exposed edges using the restraint maker’s directions; they help keep the pavers stable. Sweep the selected jointing sand into the joints and remove loose sand and dust from the surface before activating polymeric sand.
Recommended Free Tools
Activation and curing are product-specific. QUIKRETE’s cited instructions call for a fine mist and hourly dampening for three hours, while Lowe’s describes light spraying and a 24-hour cure. Follow the label for the actual jointing product and the conditions on site. The patio may not be ready for use when the pavers are laid if the jointing material needs time to cure.
Quick Recap
What to check before calling the patio finished
- The pavers sit evenly, joints are consistent and exposed edges are restrained.
- The finished grade carries water away from the structure.
- Jointing material was applied and activated exactly as its product instructions require.
- The surface has had the cure time specified by the product before it is used.
Product prices and availability are accurate as of the date/time indicated and are subject to change. Any price and availability information displayed on Amazon at the time of purchase will apply.