What’s actually slowing this PC down?
Pick the symptom - the matching free tool is one click away.
Build a workshop around the work you want to do: list your projects, map the tools and materials they require, and plan setup, storage, dust control, fire safety, and power before settling on a structure or layout. There is no universal workshop size or floor plan; local rules and the equipment you use should shape the build.
1. Decide what the workshop needs to make easy
A useful workshop is one where you can begin a project without first clearing a bench, hunting for a tool, or improvising a place to put materials. Treat “inspiring creativity” as a practical design goal: make the next step in your usual work visible and easy to start.
Write a project and equipment brief
List the projects you expect to make, the materials they use, and the tools each project requires. Note which tools are stationary, which need to be carried to the work, and which produce dust, heat, noise, or fumes. Include space for material handling and temporary work-in-progress, not only the machines themselves.
Use that list to identify needs before choosing a footprint. The evidence available does not establish an authoritative minimum size or a layout that suits every home shop, so avoid sizing by a generic plan that may not fit your equipment, site, or projects.
#1 Best Overall
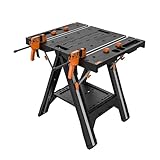
- FOLD AND GO: More than just a workbench for garage use, the Pegasus goes anywhere you need extra support . It’s easy to pop open for set up, it folds down compact to save on storage space, and fits under your arm for comfortable carrying
- TWO-IN-1 DESIGN: Seamlessly transition between a workbench and a sawhorse to tackle projects of all sizes
- HEAVY-DUTY SUPPORT: As a portable workbench, it offers a high load-bearing capacity up to 300 lbs. As a sawhorse, it supports an impressive 1000 lbs. From bulky lumber to potted plants and bikes to heavy equipment, Pegasus can handle the pressure
- EASILY EXPANDABLE: If you need more room, simply add another Worx support table—such as the Pegasus, the Sidekick, or Clamping Sawhorse. They’re all the same height and use the same connectors for seamless attachment
- LARGE SURFACE AREA: With a surface size of 31" × 25" and a working height of 32", this folding work table provides enough space to suit a variety of applications, from staining and woodworking to painting and repairs
Map work zones and movement
Sketch the sequence of a typical project: where stock arrives, where it is measured and cut, where parts are assembled, and where finishing or cleanup happens. Place tools according to that workflow, leaving practical routes to move materials and room to operate each machine as its maker specifies. Keep frequently used hand tools and supplies near their point of use; store less-used materials elsewhere so the main work surface stays available.
Before committing to a layout, mark proposed tool footprints and working areas on the ground or in a simple drawing. Check door and access needs, the path for bringing in long or bulky materials, and whether a machine can be serviced or moved without dismantling the shop. These are planning checks rather than prescribed dimensions.
Rank #2

- Perfect for woodworkers, mechanics, and DIYers
- 60 x 20-inch rubberwood tabletop supports up to 300 pounds with a total workbench capacity of 600 pounds
- Four drawers, and lower shelf provide organized storage
- Built-in 7-1/2-inch capacity vise with included bench dogs for versatile clamping
- Backed by a two-year warranty
2. Resolve site and construction questions before building
Confirm what is allowed on your property
Setbacks, zoning, permits, and building requirements depend on your location and the details of the project; a general workshop plan cannot establish them. Contact your local planning or building department before selecting a structure or beginning construction. Ask specifically about the proposed location, intended use, and any electrical work.
Choose a structure only after the brief and site checks
A purpose-built structure, a shed adapted for work, and a kit can involve different trade-offs in cost, durability, delivery, and suitability for local requirements. No particular kit or structure can be recommended from the available evidence. Compare options against your project brief and the answers from local authorities, rather than assuming a product marketed as a workshop will meet your needs or local rules.
Free tools Windows power users keep installed
One-click scans. No signup required.
Rank #3

- 2-in-1 Worktable: Portable work table is easy to switch between the sawhorse and the workbench, which can adapt to a variety of work scenarios, making your work more convenient
- 500 LBS Load Capacity: 2-in-1 clamping worktable and sawhorse feature quick clamps and holding pegs, supporting up to 500 lbs as a table and up to 1000 lbs as a sawhorse. Its aluminum leg frame provides superior strength compared to other workbenches
- Height Adjustable: Folding workbench can be adjusted at six different heights - from 30" to 35", catering to diverse work scenarios such as garages, lawns, and gardens. This height-adjusting feature allows you to handle projects at different levels
- Set Includes: 1-pack worktable; 2-pack 12” medium-duty E-Z HOLD bar clamps; 2-pack 6” light-duty E-Z HOLD bar clamps; 2-pack large bench dogs; 2-pack small bench dogs; 2-pack safety straps. Every accessory is designed for added flexibility to use
- Easy To Carry: The workmate's collapsible design folds flat for easy transportation and storage in a car, garage, or storage room. The hassle-free breakdown and folding mechanism make moving between jobs or locations effortless
Plan access, weather protection, lighting, ventilation, and the location of power and dust collection as part of the structure. If the work involves finishing products or other fumes, account for their handling and ventilation needs rather than treating the room as storage alone.
3. Make dust control part of the layout
Capture dust close to the tool
Wood dust is both a health concern and a fire hazard. OSHA identifies exhaust ventilation as the principal engineering control for wood dust and says collection is best done at the point of operation when feasible. Sanders, routers, and shapers can produce fine dust, so consider collection access when placing these tools and choose an extractor compatible with the tools and their ports. See OSHA’s wood-dust guidance and its fire and explosion guidance.
Rank #4
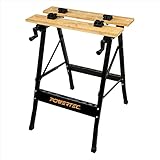
- INCLUDES: (1) Portable Bench Tool Stand with Bamboo Table Top, and (4) Bench Dogs
- FUNCTION: This multi-functional workbench tabletop accommodates a wide variety of woodworking projects, including clamping, cutting, painting and can used as a vise tool or sawhorse
- PREMIUM FEATURES: A portable design with fully adjustable vise panels for project versatility, a built in storage rack for your tools, plus an imprinted metric & imperial measurements and protractor scale for optimum accuracy
- BUILD: Flaunting a heavy duty steel frame and premium bamboo work top, this foldable work stand weighs an impressively lightweight 11 pound construction
- WEIGHT CAPACITY: Able to hold up to 220 lbs
Those sources support source capture and maintenance as decision criteria; they do not specify a suitable collector capacity for every home shop or rank consumer models. Check the connection and maintenance requirements of each tool and collection system before buying.
Keep the system maintained and dust from accumulating
Plan for regular inspection and cleaning of the exhaust system, along with routine housekeeping. OSHA warns against using compressed air to blow accumulated dust because it can create a hazardous dust cloud. Follow the equipment maker’s cleaning and maintenance instructions, and use a cleanup method appropriate to the dust and equipment rather than dispersing it into the room. OSHA’s fire and explosion guidance covers these precautions.
Outdated Drivers Are Slowing You Down
One free scan finds every outdated or missing driver and matches the right update for your exact hardware.Free scan · exact hardware matchWindows Errors? Fix Them Before They Spread
Repair common Windows errors and clear accumulated junk for a smoother, more stable PC - no reinstall needed.Free scan · no reinstallBest Value

- Instant Workspace Anywhere: Ready to work in just 30 seconds with no assembly required, this lightweight worktable is perfect for DIY projects, home improvements, and job sites.
- Robust & Spacious: With a large work surface supporting up to 1,000 lbs. and 12" clamps that can be installed horizontally or vertically, you can tackle heavy-duty tasks with ease and keep your materials secure for any job.
- Versatile Design: Ideal for miter saws, woodworking, and various other tasks, the quick-opening and folding system ensures seamless storage and transport, allowing you to set up and pack up quickly.
- Durable & Weather-Resistant: Constructed from weather-resistant polypropylene and heavy-duty resin with aluminum legs, this workbench won’t rust, peel, or dent for reliable performance in any environment.
- Made For Your Life: For over 75 years, Keter has invented, created, designed, and built products inspired by how people live to make their day-to-day lives better. Innovation has been at the heart of our success, enabling us to design lifestyle solutions for in and around the home in ways only WE can.
4. Plan for fire hazards and finishing materials
A woodworking shop can bring combustible wood and sawdust together with ignition sources and flammable finishes, adhesives, or solvents. Keep those materials stored appropriately and separated from ignition sources. Decide where finishing supplies will be kept and how they will be used before the shop fills with tools and offcuts; follow the product labels and applicable local requirements. OSHA explains these fire and explosion hazards in its woodworking guidance.
Woodworking also carries injury and health risks, including cuts, amputations, eye injuries, wood dust, and chemicals used in finishing. Match protective equipment to the specific task and hazard. PPE is not a substitute for machine safeguards, ventilation, or safe work practices; OSHA’s woodworking hazards overview describes the broader hazard categories.
5. Plan power for the actual equipment
Make an equipment list before electrical work: include each machine and its stated electrical requirements, where it will sit, and how it will be connected. Have a qualified electrician determine the installation needed for your location and equipment. Do not treat workplace safety guidance as a complete residential wiring specification.
OSHA’s woodworking electrical guidance highlights grounding machines, labeling breakers and fuse boxes, and keeping cords and plugs in good repair. The agency’s construction standard, 29 CFR 1926.304(a), requires fixed power-driven woodworking tools within its scope to have a disconnect that can be locked or tagged off. These are workplace or construction provisions, not a substitute for checking the residential requirements that apply where you live. OSHA’s electrical-hazards guidance provides the related safety context.
Quick wins for a faster PC:
Fix the driver behind crashes, sound loss and screen glitchesFind Drivers →Repair Windows errors before they cause bigger problemsFix Now →6. Build and set up in a sequence that protects the workflow
- Document the work. Finish the project, materials, tool, storage, and utility brief before settling the layout.
- Check the site and rules. Ask the local planning or building department about the location and proposed construction, then resolve requirements for electrical work with a qualified professional.
- Choose the structure and layout. Compare structure options against the site answers and the space needed to operate, maintain, and move the listed tools and materials.
- Arrange essential systems. Plan power, lighting, ventilation, point-of-operation dust capture, finishing-material storage, and access before installing equipment.
- Set up and test one work area at a time. Install the core tools and storage for a common project, confirm that materials can move through the workflow, and adjust the arrangement before filling the shop with secondary equipment.
- Establish maintenance habits. Keep collection equipment maintained, prevent dust accumulation, and keep cords, plugs, and machine safeguards in suitable condition.
7. Use the shop as a working prototype
After completing a few projects, note where setup stalls: tools that are awkward to reach, materials that block movement, or dust-producing equipment that is difficult to connect to extraction. Change storage and work zones around those observations before adding more machines. A workshop can evolve with its owner; the first layout need not be permanent.
Quick Recap
Product prices and availability are accurate as of the date/time indicated and are subject to change. Any price and availability information displayed on Amazon at the time of purchase will apply.




