Recommended Free Tools
A half-lap joint joins two boards by removing approximately half the thickness from the mating area of each piece. The recessed sections overlap to restore the assembly to roughly one-board thickness, creating a broad face-grain glue surface and useful resistance to twisting. The most reliable method—whether you use a dado set, router, or hand tools—is to test the cut in matching scrap until the assembled faces are flush.
A half-lap joint joins two boards by removing approximately half the thickness from the mating area of each piece. The two recessed sections then overlap, restoring the assembly to roughly the thickness of one board. Unlike a simple butt joint, a half-lap presents a broad face-grain-to-face-grain area for glue and provides some mechanical resistance to twisting.
As an Amazon Associate I earn from qualifying purchases.
Half-laps are useful for face frames, cabinet doors, workbench leg frames, outdoor furniture, large and mirror frames, heavy doors, and internal furniture web frames. They are relatively easy to lay out and repeat, but they leave visible end grain at the joint and must be cut to an accurate depth. For most shop work, the best workflow is to cut a test joint in matching scrap, adjust the depth until the faces are flush, and only then cut the project parts.
What a half-lap joint is—and is not
In a true half-lap, material is removed from both mating pieces. If each board is 3/4 inch thick, each recess will nominally be 3/8 inch deep. When the parts overlap, the combined thickness returns to approximately 3/4 inch.
#1 Best Overall

- Premium Blades: Drop forged CR-V steel with heat-treated edges ensures sharp precision and long-lasting durability, can be used to make finish or paring cuts on wood surfaces, as well as cut mortises
- Beveled Edge for Versatility: 25° Bevel edge for woodworking multi-purpose use, ideal for soft wood, hard wood, and laminated wood products
- Ergonomic PVC Handle: HURRICANE wood chisel set with Lightweight yet durable regular size impact PVC Handle, feels natural in your hand for everyday fixes, yet tough enough for mallet strikes—great for door locks or DIY use
- Safety & Portability: This four sizes (1/4"; 1/2"; 3/4"; and 1") chisel set with blade guards protects edges during storage
- Widely Function: this HURRICANE wood chisel set empowers beginners to tackle DIY projects while meeting the demands of hobbyists & Home use
Half-laps can be made in several configurations:
- End half-lap: The recess is cut at the end of each board for a corner or end-to-end connection.
- Middle or cross half-lap: The recess is cut in the middle of each member so they cross one another. Cutting only one member creates a common T-joint version.
- Mitered half-lap: The shoulders are mitered for a more decorative frame joint.
A rabbeted frame joint, tabled lap, modified lap, and Swedish half-lap may use different geometry and distribute loads differently. Do not assume that every joint described casually as a “lap joint” is a true half-lap.
Why use a half-lap?
Large glue area
The main advantage is the broad face-grain bonding surface. Face grain generally provides a more useful glue surface than joining the end grain of one board to the edge or face of another. In a published joint torture test, WOOD Magazine reported that half-laps led the tested joints in shear strength, تحمل more than twice the force of the next strongest joint in that test series. That result should not be treated as a universal strength rating: actual performance changes with wood species, grain direction, dimensions, fit, adhesive, surface preparation, clamping, and loading direction.
Mechanical resistance to twisting
The overlapping shoulders help resist twisting, particularly when the joint is captured by surrounding parts. A half-lap does not automatically stop the pieces from lifting apart, however. Glue, screws, pegs, or another retention method is normally required unless the surrounding design mechanically traps the joint.
Simple layout and repeatability
The geometry is straightforward: establish the shoulder locations, remove half the stock thickness, and bring the two parts together. A table saw with a suitable dado setup or a router fixture can produce repeated joints efficiently. Hand tools can also make excellent half-laps when the layout and fitting are careful.
Where half-lap joints work well
Common applications include:
- Cabinet face frames and shop-cabinet door frames
- Workbench leg frames and stretchers
- Outdoor furniture, when the adhesive and finish are suitable for the exposure
- Large frames and mirror frames
- Heavy doors
- Internal web frames in dressers and other furniture
Choose another joint when concealing the joint is more important than speed or exposed strength. Traditional half-laps show end grain on both sides of the connection. A mortise-and-tenon, dowel, biscuit, or carefully made miter may be preferable for a highly visible frame, although each has its own strength, tooling, and layout trade-offs.
How to cut half-laps on a table saw
A stacked dado set is the conventional fast method for removing the wide section of waste. Before installing or using one, verify that your specific saw, arbor, throat plate, guard, and manufacturer instructions permit dado blades. Some saws do not. For example, the Festool KAPEX KS 120 supplemental manual warns against installing dado blades because of arbor and guard limitations.
Rank #2

- Premium Wood Chisel Set for Woodworking – Includes 6 bevel edge chisels (1/4", 1/2", 3/4", 1", 1-1/4", 1-1/2") made from durable Cr-V steel with a 28° edge. Ideal for wood carving, furniture making, cabinet work, and detailed woodworking projects.
- Professional Sharpening Kit – Comes with a double-sided sharpening stone (120/240 grit) and an adjustable honing guide to keep chisels razor sharp. Perfect for beginners and professionals who need consistent cutting angles and smooth finishes.
- Ergonomic Non-Slip Handles – Designed with PP+TPR handles for comfort and control. The nickel-plated strike cap allows use with a hammer or mallet, while the shock-absorbing grip reduces hand fatigue during long woodworking sessions.
- Organized Storage & Blade Protection – Includes a sturdy storage case for easy carrying and organization. Each chisel has a protective blade guard to prevent accidental cuts and preserve sharp edges, making it safe and travel-friendly.
- Complete DIY Woodworking Tool Kit – This 10-piece chisel set comes with 6 chisels, 2 carpenter pencils, a sharpening stone, and a honing guide. A must-have hand tool set for carpenters, woodworkers, home improvement, and DIY enthusiasts.
Tools and setup
- Table saw approved for the intended blade setup
- A stacked dado blade set or another suitable cutting method
- Square miter gauge, preferably with an auxiliary wooden fence
- Matching scrap stock for test cuts
- Push stick or other appropriate workholding aid
- Eye and face protection and effective dust collection
An auxiliary wooden fence on the miter gauge supports the workpiece and helps reduce chip-out on the trailing side. A stop or stop block can establish the shoulder location for end laps. For a middle T-joint or cross-lap, use two stops so the blade removes waste only between the marked limits. This also improves consistency when making several identical parts.
Outdated Drivers Are Slowing You Down
One free scan finds every outdated or missing driver and matches the right update for your exact hardware.Free scan · exact hardware matchWindows Errors? Fix Them Before They Spread
Repair common Windows errors and clear accumulated junk for a smoother, more stable PC - no reinstall needed.Free scan · no reinstallStep-by-step table-saw method
- Measure the actual stock. Do not assume a board labeled 3/4 inch is exactly 3/4 inch. Measure the thickness of the production stock and the scrap.
- Mark the face sides. Clearly mark which face of each mating part is the reference face. The parts must be oriented correctly so the recessed surfaces meet.
- Mark the shoulder boundaries. For an end lap, mark where the recess begins. For a middle or T-joint, mark both ends of the waste area.
- Set the blade below the stock. Begin near half the measured thickness, but treat the setting as an approximation until it has been checked with scrap.
- Make a test cut. Cut the scrap with the same face orientation, blade setup, fence or stop position, and feed method intended for the project.
- Test the assembled pair on a flat surface. The faces should be flush, the joint should not rock, and the recessed surfaces should have continuous contact.
- Adjust in small increments. If the joint is proud, increase the cut depth slightly. If it sits below the surrounding faces, the cut is too deep and the production parts may be unusable without correction.
- Cut the production pieces. Use the established stops and keep the marked reference faces consistent.
- Make successive passes when appropriate. Remove waste in controlled passes rather than forcing an unnecessarily wide cut in one operation.
For an end half-lap, the fence or stop arrangement controls the shoulder. For a middle joint, the stops must prevent the blade from extending beyond the two intended boundaries. Keep the workpiece supported and do not place hands in line with the blade.
Getting the depth right
Depth is the critical variable. A nominal “half thickness” setting is only a starting point because stock thickness, blade setup, saw alignment, and measurement error all affect the result.
| Test result | Likely cause | Correction |
|---|---|---|
| Joint sits proud of the surrounding faces | Recesses are too shallow | Increase the cut depth slightly and retest |
| Joint sits below the surrounding faces | Recesses are too deep | Reduce the cut depth; recutting cannot restore removed material |
| Joint rocks on a flat surface | Uneven bottom, ridges, debris, or inconsistent stock thickness | Clean the recess, inspect the blade setup, and retest with matching stock |
| Shoulders do not meet evenly | Incorrect stop position, face orientation, or workpiece movement | Recheck the reference marks and stop arrangement using scrap |
Do not skip the scrap joint. A production cut that is only slightly too deep can leave a visible depression and weaken the shoulder. Sneak up on the final depth with small adjustments.
Router-table and handheld-router methods
A router table with a straight bit is a useful alternative when a dado set is unavailable or does not leave a sufficiently flat surface. Use a bit with the correct shank for the router collet, operate it within the bit’s rated speed, secure the fence, and make trial cuts before touching the project stock. A handheld router can also follow a securely clamped straightedge or edge guide, but the guide must not move and the workpiece must be firmly supported.
For repeatable work, a half lap joint jig can simplify registration and workholding. The Rockler Router Table Half Lap Jig is designed for regular and mitered half-laps and is stated by the manufacturer to include registration pins, zero-clearance inserts, a sacrificial backer, hold-down hardware, a center-marking feature, and a clear guard. Its stated capacity is stock up to 2-3/4 inches wide and 1 inch thick, and it is intended for router tables with a standard 3/8-by-3/4-inch miter slot within the manufacturer’s specified distance range. Check those limits against your stock, table, router, and bit before buying or using it. The product specifications establish the manufacturer’s design and compatibility claims; they do not independently prove identical results on every setup.
A router-based setup is not automatically safer than a table saw. Keep the guard and fence clear of the bit, use the fixture’s hold-downs or an appropriate push method, disconnect power before changing depth or making adjustments, and follow the router and table manufacturer’s instructions.
Rank #3

- Thick metal strike cap with flat surface for effective strikes
- Durable construction with lacquered blade to help protect against corrosion
- Tempered, carbon-steel blade with long lasting edge
- Lightweight design with ergonomic handle
Hand-tool and bandsaw approaches
Half-laps can be cut without a dado set. A practical hand-tool workflow uses careful marking, a backsaw to define the shoulders and remove most of the waste, and chisels or a router plane to bring the recess to its final depth. Work to the layout lines gradually and check the mating pieces often.
Another option is a two-stage table-saw-and-bandsaw process, depending on the stock and the equipment available. The important principles remain the same: mark both limits, support the work securely, remove waste conservatively, and finish the recess so the mating surfaces are flat and accurately positioned. Hand and machine methods are both viable; the best choice depends on workpiece size, repetition, available equipment, and operator skill.
Quick wins for a faster PC:
Clear out junk files and repair common Windows errorsFree Scan →Fix the driver behind crashes, sound loss and screen glitchesFind Drivers →Surface preparation and fitting
Dado blades can leave small score marks or ridges across the bottom of a half-lap. Lightly sand or otherwise clean those ridges before glue-up. The goal is to improve continuous contact without changing the overall depth or making the fit loose. Sanding away blade marks was specifically associated with better bonding areas in WOOD Magazine’s joint testing.
Before applying adhesive, check the joint dry:
- Place the assembly on a flat surface.
- Confirm that the two faces are flush.
- Check for rocking, gaps, and high spots.
- Make sure the shoulders close without excessive force.
- Confirm that the parts are oriented correctly and that the grain direction is appropriate for the design.
A joint that requires heavy clamping pressure to close is not a good joint. Correct the fit before adding glue. Avoid sanding one mating surface deeper than the other; that can create a tilted or uneven assembly.
Glue-up and clamping
Apply adhesive to the mating surfaces, bring the pieces together, and clamp directly over the joint. For an end lap, additional clamps may be needed to pull the shoulders flush in both directions. Use scrap pads beneath clamp jaws to protect finished faces and check that clamping pressure has not shifted the parts out of alignment.
For an interior project, an interior wood glue such as Titebond Original Wood Glue is one suitable example for porous materials. The manufacturer states that it cleans up with water and is sandable, but it is not intended for exterior use or locations where moisture is likely. Select the adhesive based on the project’s actual exposure; a general interior glue is not a universal outdoor recommendation.
The Tool Desk
Outbyte Driver Updater FREEScan for outdated or missing drivers - takes under a minuteDriver Scan →Outbyte PC Repair FREEClear out junk files and repair common Windows errorsFree Scan →Outdoor or moisture-exposed half-laps also require suitable stock, adhesive, fasteners or mechanical reinforcement where appropriate, and a finish and detailing strategy that limits water collection. The joint shape alone does not make an assembly weatherproof.
Rank #4
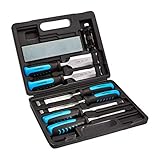
- 8-piece wood carving chisel set includes 6x chisels 1/4 inch (6mm), 1/2 inch (13mm), 3/4 inch (19mm), 1 inch (25mm), 1-1/4 inch (32mm) and 1-1/2 inch (38mm), 1x honing guide and 1x sharpening stone (120/240 grit)
- Heat treated, chrome vanadium steel alloy blades with narrow side bevels
- Comfortable contoured handles reduce hand strain and improve accuracy
- Blow-molded storage case keeps tools organized and secured
Safety and dust control
Cutting a half-lap with a table saw, dado set, router, or bandsaw is a machine operation with real hazards. Follow the tool manufacturer’s manual and use the guard, riving or anti-kickback equipment, hold-downs, and push devices that apply to your machine.
- Disconnect power before changing blades or bits, adjusting depth, moving stops, or clearing waste.
- Keep hands out of the cut line and use a push stick for small or narrow stock.
- Support long, wide, or awkward workpieces so they cannot pivot or fall during the cut.
- Wear suitable eye and face protection against flying particles.
- Keep guards and fences correctly positioned and do not defeat a safety device to make a cut.
- Use local dust extraction close to the point where dust is produced and maintain the collection system.
OSHA identifies table-saw contact, kickback, and flying particles as hazards, and identifies wood dust as a respiratory and skin hazard. Dust collection helps control airborne dust, but it is not a substitute for guarding, safe workholding, ventilation, and appropriate personal protection.
Independent reader supportYour contribution helps us test, update, and keep practical guides available for everyone.Common mistakes
Cutting production parts before testing
Even a carefully measured half-depth can be wrong on the actual machine. Use matching scrap and the same reference-face orientation.
Free tools Windows power users keep installed
One-click scans. No signup required.
Mixing up the face sides
One mating piece may need to be cut face-up and the other face-down. Mark the faces before setup so both recesses end up on the intended sides.
Removing too much material at once
Wide aggressive cuts can increase tear-out and make the setup harder to control. Use controlled passes and a supported workpiece.
Leaving blade ridges in the joint
Ridges reduce effective contact. Clean them lightly, but do not sand until the joint becomes loose or changes depth.
Best Value

- EZARC premium set of wood chisel includes a variety of sizes, 1/4”(6mm), 3/8”(10mm), 1/2”(12mm), 5/8”(16mm), 13/16”(20mm), and 1”( 25mm), to cater to all your woodworking needs. Whether you're a seasoned woodworker or just starting out, this set is sure to impress.
- All chisels were made from fine-grained, nicely tempered chrome-vanadium steel with a hardness of HRC60 for long-lasting sharpness and ensuring a smooth finish.
- Beech wooden is a hard and dense wood species, making it highly resistant to wear and tear. This means that your chisel handle will last for years to come, even with frequent use. Finally, beech wood is a renewable resource, making it a more environmentally friendly option compared to synthetic materials.
- The carpentry chisel is precisely beveled ground at 25 degrees with an extremely sharp edge which can be used immediately after opening the package, easily cut mortises, shave rough surfaces, chop out corners and scrape off the glue with effortless.
- Professional chisel carefully packed in a wooden box, easy to store and transport. Ideal gift for beginners, hobbyists and professional wood artists.
Assuming glue solves poor fit
Glue fills neither a badly rocking joint nor a major gap reliably. A flush, stable dry fit is the starting point for a strong glue-up.
Using an interior adhesive outdoors
Verify the adhesive’s exposure rating. Titebond Original Wood Glue, for example, is documented for interior use and not for exterior or moisture-prone locations.
Choosing the best method
| Method | Best suited to | Advantages | Limitations |
|---|---|---|---|
| Table saw with dado set | Repeated straight half-laps and suitably sized stock | Fast, easy to repeat, efficient for wide cuts | Requires compatible saw and careful depth setup; may leave score marks |
| Router table with straight bit | Clean, controlled cuts and users without a dado setup | Can leave a smooth bottom and works with dedicated fixtures | Requires correct bit, table, guarding, workholding, and capacity |
| Handheld router and guide | Large assemblies or occasional joints | Portable and flexible | Guide movement and depth control can affect accuracy |
| Hand tools | One-off work, traditional work, or pieces unsuitable for machines | No power machinery required; precise in skilled hands | Slower and dependent on careful marking and fitting |
| Bandsaw-assisted method | Selected stock and shop setups where waste can be removed in stages | Useful alternative when other tooling is unavailable | Requires a controlled, accurate finishing operation |
Half-lap joint checklist
- Confirm that a true half-lap suits the appearance and load requirements.
- Measure actual stock thickness.
- Mark reference faces and shoulder boundaries.
- Verify machine, arbor, blade, bit, guard, and fixture compatibility.
- Cut matching scrap first.
- Adjust depth until the dry joint is flush, stable, and fully supported.
- Clean blade ridges without loosening the joint.
- Apply an adhesive appropriate to the exposure conditions.
- Clamp directly over the joint and protect finished surfaces.
- Allow the adhesive to cure according to its manufacturer’s instructions before stressing the assembly.
Frequently Asked Questions
What is the difference between a half-lap and a rabbeted lap?
A half-lap removes approximately half the thickness from both mating pieces. When the recessed sections overlap, the assembled joint returns to roughly the thickness of one board. A rabbeted lap or modified lap may remove material from only one piece or use different geometry.
Are half-lap joints strong?
Yes, when the joint is accurately fitted and the adhesive, grain orientation, clamping, and design are appropriate. Half-laps provide a broad face-grain glue area and can resist twisting, but the published strength comparisons are test-specific rather than universal ratings.
How deep should a half-lap joint be?
Use matching scrap, set the cut near half the measured stock thickness, assemble the test pieces on a flat surface, and adjust in small increments. The finished test should be flush, stable, and fully supported without rocking.
Do these 3 things before closing this tab:
1Repair Windows errors before they cause bigger problems2Fix the driver behind crashes, sound loss and screen glitches3Clear out junk files and repair common Windows errorsWhat is the best tool for cutting half-lap joints?
A stacked dado set is usually the fastest table-saw option, provided the particular saw and arbor are approved for dado blades. A router table with a straight bit, a guided handheld router, a bandsaw-assisted process, or hand tools can also work.
Do I need a half-lap joint jig?
Not necessarily. A true half-lap can be cut with common shop tools, but a dedicated jig can improve registration and repeatability for router-table work. Always check the jig’s stated stock capacity and compatibility with your table, router, and bit.
Can I use a half-lap joint outdoors?
Use an adhesive rated for the project’s exposure. Titebond Original Wood Glue is documented for interior porous-material projects and is not intended for exterior or moisture-prone locations.
The Bottom Line
A well-made half-lap joint is simple, strong in the right loading direction, and highly repeatable: remove half the actual thickness from each mating piece, verify the fit on matching scrap, clean the bonding surfaces, and use adhesive and clamping suited to the project. Its visible end grain and need for accurate machine setup are the main reasons to choose another joint.
What’s actually slowing this PC down?
Pick the symptom - the matching free tool is one click away.
Quick Recap
Product prices and availability are accurate as of the date/time indicated and are subject to change. Any price and availability information displayed on Amazon at the time of purchase will apply.

