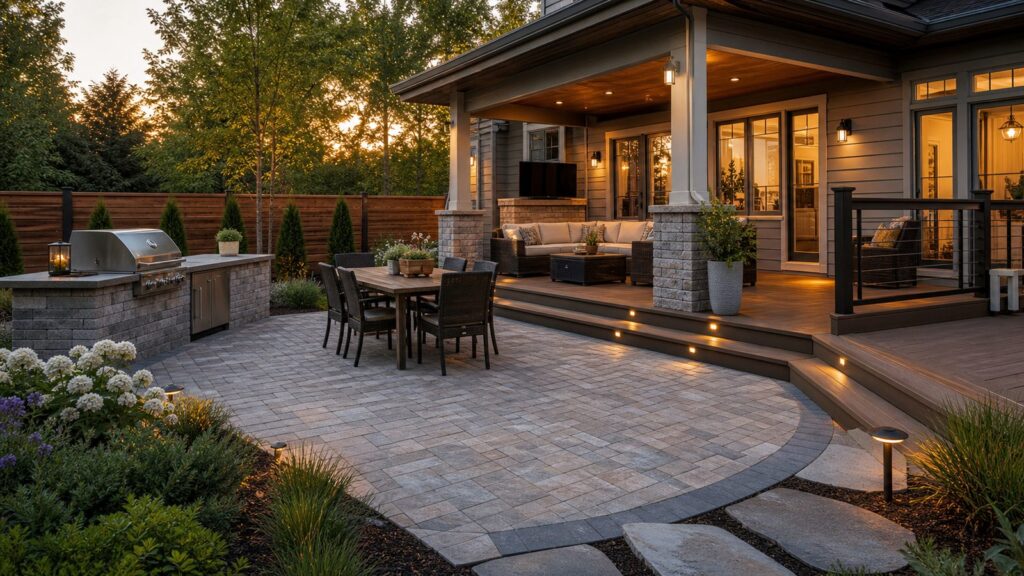
The best way to extend your outdoor living space is not to buy more patio furniture. It is to make the space outside your house work like a real room: level underfoot, properly drained, shaded where needed, wired safely, sized for actual furniture, and connected to the way your family cooks, eats, relaxes, and entertains.
For most homeowners, the strongest outdoor upgrades start with one of four moves: extend a patio, build or expand a deck, add a covered area, or screen in an existing porch. From there, features like an outdoor kitchen, fire pit, privacy screen, lighting, built-in storage, and weather protection can make the space more useful throughout the year.
As an Amazon Associate I earn from qualifying purchases.
On our job sites, the difference between a backyard that gets used and one that looks good for one season usually comes down to planning. We look first at sun, slope, drainage, door locations, utilities, privacy, and traffic flow. Finishes come later. That order prevents expensive mistakes, especially when concrete, pavers, framing, gas, electrical, or roof work is involved.
Recommended Free Tools
Start With A Budget Ladder Before Choosing Features
Outdoor living projects can range from a weekend refresh to a full backyard transformation. The right starting point depends on how much structure you need, how much site work is required, and whether utilities or permits are involved.
#1 Best Overall

- Superior Quality Materials: This 4x4 pergola brackets feature a 90° right angle gusset plate design and weather-proof performance and a stable frame,so you do not have to worry about the attack and damage to storms and wind.
- Long-lasting durability: Made from 13-gauge solid steel, these pergola hardware boast stability and indestructibility. precision welding techniques ensure resistance against breakage and deformation, enhancing the pergola's stability. ensuring long-lasting durability for years of use.
- Rust and Corrosion Resistance: This pergola kit is made of constructed from galvanized steel and coated with durable paint, and then powder coated - far superior to paint alonerust-resistant powder coating. It prevents rust, maintaining their shine over the long term.
- Easy Installation: 4x4 post bracket equipped with high-quality screws and expansion bolts,installation is swift and straightforward,requiring no intricate steps. following the instructions provided in our user manual, you can quickly secure wood posts, saving time and effort.
- Wide Application: Designed for actual 3.5x3.5 inch wood post bases. Comes with 3/8 inch concrete anchor bolts for secure installation. Suitable for wood or concrete surfaces, providing sturdy support for various applications such as gazebos, patios, and porch railings.
| Budget Range | Good Fits | Typical Complexity | Permit Likelihood |
|---|---|---|---|
| Under $5,000 | Furniture layout, gravel sitting area, small paver extension, privacy panels, low-voltage lighting, planters, storage benches | Low to moderate | Low, unless electrical, gas, grading, or setback rules apply |
| $5,000-$20,000 | Concrete or paver patio, pergola kit, dining zone, fire pit area, lighting plan, simple grill island | Moderate | Moderate, especially for hardscape area, gas, electrical, or structures |
| $20,000-$60,000 | Deck expansion, screened porch, covered patio, custom pergola, outdoor kitchen, drainage corrections | High | High for decks, roofs, porches, utilities, and structural work |
| $60,000+ | Multi-level deck, pavilion, full outdoor kitchen, fireplace, retaining walls, integrated lighting, landscaping, stormwater work | High | Very high; engineering and multiple inspections may be needed |
Cost ranges move quickly because of site conditions. A flat yard with easy access, good drainage, and nearby utilities is very different from a sloped yard that needs retaining walls, demolition, long gas runs, or stormwater management. Before setting a final budget, confirm setbacks, easements, HOA requirements, impervious-surface limits, utility locations, frost-depth footing requirements, and local deck or roof code rules.
1. Extend The Patio With Concrete, Pavers, Or Stone
A patio extension is often the simplest way to gain usable square footage at ground level. Current installed patio pricing commonly runs about $5-$40 per square foot. Small 80-100 square foot patios may land around $400-$4,000, while 400 square feet or more can run roughly $2,000-$16,000, depending on material, excavation, base prep, drainage, and access.
For size, a two-chair coffee area can work in about 8 by 10 feet. A dining table for six usually needs closer to 12 by 14 feet so chairs can pull out without falling off the edge. A combined grill, dining, and lounge layout often needs 300-500 square feet to feel intentional rather than crowded.
What’s actually slowing this PC down?
Pick the symptom - the matching free tool is one click away.
Builder Notes
Concrete is cost-effective and clean, but it needs proper base prep, control joints, slope, and air-entrainment where freeze-thaw conditions apply. Pavers cost more but are easier to repair and handle movement well when installed over a compacted base with edge restraint. Natural stone looks excellent but is usually more labor-intensive and less forgiving if the base is rushed.
We typically plan patios with a minimum slope of about 1/8 to 1/4 inch per foot away from the house, depending on surface and drainage strategy. If downspouts empty into the patio area, solve that first with extensions, drains, or regrading. Do not pour a finished slab over a water problem.
2. Build Or Expand A Deck
Decks are ideal when the house sits above grade, the yard slopes away, or the main living area is already elevated. National 2026 deck-cost sources commonly place installed deck projects around $30-$60 per square foot, with composite and PVC builds often higher. Small to mid-size composite or PVC decks often fall around $10,000-$30,000, mid-range projects around $30,000-$60,000, and premium multi-level or feature-heavy decks around $60,000-$100,000.
Composite decking commonly runs about $15-$32 per square foot installed, with materials around $5-$18 per square foot and labor around $10-$14 per square foot. Railings, stairs, hidden fasteners, framing repairs, elevation, and waterproofing below the deck can push the final number well beyond simple square-foot averages.
What To Plan Before Framing
Decks trigger code requirements quickly. Guards, stairs, ledger attachment, lateral load connections, footing depth, beam spans, joist spans, and handrails all matter. In many jurisdictions, an elevated deck attached to the home requires a permit. If the deck is freestanding, elevated, large, or near a property line, still check local rules before building.
A usable deck should be sized around furniture, not just available wall length. Plan at least 3 feet of circulation around dining furniture where possible. For stairs, avoid placing the bottom step directly into a fence, planting bed, or narrow walkway. The deck should connect people naturally to the yard, not trap them at the house.
3. Add A Covered Patio Or Pavilion
A roof is one of the most valuable upgrades for outdoor living because it changes when the space can be used. Shade helps in hot climates, rain protection extends the season, and a covered area makes lighting, fans, heaters, and furniture more practical.
Covered patios vary widely in cost because they can be anything from a simple roof over an existing slab to a fully engineered structure with footings, framing, roofing, gutters, ceiling finish, electrical, and tie-ins to the home. A basic attached cover may start in the low five figures, while larger pavilions and roofline-integrated projects commonly move into the $25,000-$60,000+ range.
Attached Versus Freestanding
An attached roof can look seamless and use the house as part of the structure, but it must be flashed correctly and designed for roof loads, wind, snow where applicable, drainage, and existing wall conditions. A freestanding pavilion can reduce some attachment issues but still needs proper footings, bracing, and setbacks.
We pay close attention to water. A covered patio that dumps roof runoff onto a slab, walkway, or foundation wall creates long-term trouble. Gutters, downspout routing, splash blocks, drains, and grading should be part of the plan, not an afterthought.
4. Install A Pergola Or Retractable Shade System
A pergola is a good middle step between open patio and full roof. Current cost guides commonly put pergolas around $2,100-$6,000, with an average near $4,000. Kits may run roughly $550-$4,000, while custom wood, aluminum, motorized louvers, lighting, electrical, and footings increase cost.
Rank #2
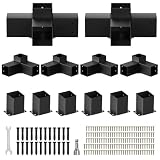
- 3-Way & 4-Way Pergola Brackets Kit: Upgraded 3-way & 4-way right-angle pergola brackets boost pergola stability in harsh weather. Designed for 4"x4" (actual 3.5"x3.5") sizes, the 4x4 pergola brackets are weather-resistant and sturdy, with no need to worry about storm or wind damage
- Long-lasting Use & Strong:This pergola brackets kit, made of heavy-duty galvanized steel and 2mm thickened steel, is extremely sturdy. Advanced welding prevents breakage and deformation, effectively extending its service life.
- Easy to Install:The 4x4 pergola brackets kit are equipped with high-quality screws and expansion bolts. Each gazebo bracket features pre-drilled holes, enabling quick and straightforward installation. All accessories included in the package help you assemble quickly and easily.
- Super Rust Resistance: This pergola brackets kit is crafted from high-quality steel with black powder coated. This dual protection endows the pergola gazebo kit with excellent rust resistance; even after long-term exposure to harsh weather, it can effectively resist rusting.
- Widely Applications: This pergola bracket is suitable for patios, balconies, courtyards, parks, outdoor camps, decks, and lawns. Additionally, the 4x4 pergola kits can also serve as a wooden post reliable support for pergolas, pavilions, sheds, garden furniture.
Pergolas work best when they are designed for the sun angle. A structure that looks good at noon may do little during late-afternoon heat. Before choosing orientation, watch the space at breakfast, lunch, and dinner hours. If the west sun is the problem, vertical shade, side screens, or a louvered system may matter more than overhead rafters.
Free tools Windows power users keep installed
One-click scans. No signup required.
When A Pergola Needs More Planning
Footings are where many pergola projects go wrong. Posts set on thin patio slabs can shift, crack the slab, or fail in high wind. In freeze-thaw regions, footings may need to extend below frost depth. If the pergola attaches to the house, the ledger and flashing details deserve the same seriousness as other exterior structural work.
5. Screen In A Porch
A screened porch gives you bug control, shade, rain protection, and a more finished outdoor room without fully enclosing the space like a sunroom. Depending on existing conditions, screened porch projects can range from a modest conversion to a major structural build. Many projects land in the $15,000-$45,000+ range, with higher costs when a new roof, foundation, electrical, ceiling finish, flooring, or structural repairs are needed.
If you already have a roofed porch with sound framing, the project may involve screen panels, door, trim, electrical updates, ceiling fan blocking, and flooring repairs. If you need a new porch from scratch, the scope starts to look more like an addition: footings, framing, roof tie-in, stairs, guards, drainage, and inspections.
Details That Matter
Good screen rooms are built to handle water. Wind-driven rain will enter, so flooring needs slope, drainage, and appropriate materials. Electrical devices should be rated for damp or wet locations as required. Fans need proper boxes. Doors should swing and latch cleanly without interrupting furniture layouts.
Crashes, No Sound, or Screen Glitches?
Random freezes, missing sound and display glitches usually trace back to one bad driver. Find and replace yours safely.Free scan · under a minutePC Slower Than It Used to Be?
A free scan shows the junk files, broken settings and background clutter dragging Windows down - then fixes them in one click.Free scan · Windows 10 & 11For comfort, plan a screened porch at least 12 feet deep if you want a dining table or full seating group. Narrow porches can still work, but they are better for a bench, pair of chairs, or reading area.
6. Add An Outdoor Kitchen Or Grill Island
An outdoor kitchen can be as simple as a built-in grill with counter space or as complete as a sink, refrigerator, storage, side burner, trash pullout, venting, lighting, and roof cover. Current 2026 ranges are broad: many outdoor kitchens fall around $5,000-$50,000, while custom-built projects often average about $13,000-$17,000 before premium appliances and utility upgrades. In many markets, quality built-in kitchens commonly start closer to $15,000-$35,000, with premium builds above that.
The most useful outdoor kitchens usually include at least 24-36 inches of landing space near the grill, a noncombustible base around heat appliances, weather-resistant cabinetry, task lighting, and a clear path to the indoor kitchen. If plumbing is expensive or winterization is a concern, skip the sink and invest in counter space, storage, and lighting first.
Permit And Safety Notes
Gas, electrical, plumbing, drainage, ventilation, and roof clearance can all trigger permits and inspections. Built-in grills need manufacturer clearances. Gas appliances need shutoffs and proper connections. Electrical outlets in outdoor and wet areas need GFCI protection and approved covers. If the kitchen is under a roof, ventilation and heat clearance become even more important.
The Tool Desk
Outbyte PC Repair FREERepair Windows errors before they cause bigger problemsFix Now →Outbyte Driver Updater FREEFix the driver behind crashes, sound loss and screen glitchesFind Drivers →We also plan access panels. Every valve, connection, outlet, and drain should remain serviceable after the stone, panels, or cabinet faces go in.
7. Create A Fire Pit Or Outdoor Fireplace Area
Fire features make outdoor spaces feel usable in shoulder seasons, but they must be placed carefully. A simple portable fire pit area may cost under $1,000 if the surface and clearances already work. A built-in gas fire pit often lands in the $3,000-$10,000+ range depending on gas run, ignition, masonry, drainage, and seating. Outdoor fireplaces can move into the $10,000-$30,000+ range, especially with footings, chimney work, stone, or roof integration.
Keep flames away from traffic paths, overhanging branches, fences, siding, low combustible covers, and furniture. Use the manufacturer’s listed clearances and local code requirements. Do not assume a gas fire pit is safe under a covered patio unless that specific unit is listed and installed for that condition.
Design For Real Use
A comfortable fire pit zone usually needs a diameter of at least 12-16 feet for chairs and circulation. Seat walls should generally be around 18 inches high and deep enough to sit comfortably. If smoke is a concern, study prevailing wind before choosing the location.
8. Define A True Outdoor Dining Room
A dining zone is one of the most practical outdoor upgrades because it does not require plumbing or major structure to be useful. What it does require is enough room, a stable surface, shade, and lighting.
Rank #3

- 🔩【Complete DIY Pergola Kit – 3-Way & 4-Way Brackets + Post Bases】 This pergola kit includes 4 three-way corner brackets, 2 four-way center brackets, and 6 post bases for a complete do it yourself pergola build. A true pergola hardware kit covering top to bottom, so you don't need to buy separate gazebo hardware kit components.
- 📐【Precision Fit for 4"x4" Lumber (Actual 3.6" x 3.6")】 Unlike generic pergola bracket kit 4x4 options that fit loose 3.5" wood, this heavy-duty steel pergola bracket kit is precision-engineered for actual 3.6"x3.6" lumber. Perfect for grid-style pergola and modular pergola system builds, eliminating wobble and loose connections.
- 🛡️【Heavy-Duty 2mm Steel Construction – Built to Last】 This metal pergola kit is crafted from thickened 2mm galvanized steel, outperforming standard pergola kits with thinner materials. One of the most reliable heavy duty pergola brackets on the market, delivering rock-solid stability for your outdoor structure.
- 🧰【All-in-One Pergola Kits to Build Yourself – Screws & Anchors Included】 One of the few pergola kits to build yourself that comes complete with all required screws and expansion bolts. No extra hardware store trips. Just unpack this diy gazebo kit and start building your diy pergola right away.
- ☀️【Rust-Resistant Gazebo Hardware Kit for Patio Backyard Garden】 More than just a pergola hardware kit, this weather-ready set features galvanized steel + powder-coated finish. Whether you need a gazebo hardware kit for your patio, a metal pergola kit for your backyard, or a diy pergola for your garden, this kit stands up to rain, sun, and temperature changes.
For a four-person table, plan roughly 10 by 10 feet. For six people, 12 by 14 feet is a better target. For eight people, think closer to 14 by 16 feet or more. Leave at least 36 inches behind chairs where people need to walk.
Place dining close enough to the kitchen door that carrying food is easy. If the grill is nearby, keep the cooking zone out of the main chair path. A dining table directly beside a hot grill feels crowded fast.
9. Add A Separate Lounge Zone
A lounge zone should feel different from a dining area. It needs softer seating, side tables, shade, and enough clearance that people are not stepping over ottomans to move around. For a sofa, two chairs, and a coffee table, plan roughly 12 by 12 feet as a minimum. More generous layouts often need 14 by 16 feet.
Quick wins for a faster PC:
Fix the driver behind crashes, sound loss and screen glitchesFind Drivers →Repair Windows errors before they cause bigger problemsFix Now →Scan for outdated or missing drivers - takes under a minuteDriver Scan →If the lounge area is far from the house, add a reason to go there: a fire feature, view, privacy screen, pergola, or garden wall. Otherwise, the patio right outside the door will usually win.
Material choices matter. Lighter paving stays cooler in hot climates. Composite decking varies by color and product line, but darker boards generally heat up more in direct sun. In coastal areas, use corrosion-resistant fasteners and hardware. In freeze-thaw climates, focus on drainage and movement control before choosing furniture.
10. Add Privacy Screens, Fencing, Or Plantings
Privacy is not always about building a tall fence. Often, the better move is to block one or two specific sightlines: a neighbor’s second-story window, a street view, a utility area, or the angle from a nearby patio.
Options include horizontal wood screens, aluminum panels, masonry seat walls, lattice with vines, evergreen plantings, raised planters, or a combination. Simple privacy panels may cost a few hundred dollars each. Custom fencing, masonry, or integrated planter walls can move into the $3,000-$15,000+ range depending on length, footings, finish, and access.
Check Rules First
Fence height limits, corner visibility rules, HOA guidelines, easements, and property-line requirements vary by location. If a screen is attached to a deck, roof, or retaining wall, wind load becomes part of the design. A screen that acts like a sail needs more than decorative fasteners.
11. Install Low-Voltage Lighting And Smart Controls
Lighting is one of the highest-value outdoor upgrades because it improves safety, appearance, and daily use. A good plan layers path lights, step lights, task lighting at cooking areas, low-glare dining lights, accent lights for walls or plantings, and switched or dimmed zones. One bright floodlight is rarely the right answer.
Basic low-voltage lighting kits can start under $500, while professionally installed systems commonly run $2,000-$6,000+ depending on fixture count, transformer size, controls, trenching, and layout. Step lights, deck lights, post lights, and integrated hardscape fixtures cost more when installed after the deck or patio is finished.
Plan conduit and sleeves before hardscape. Even if you delay lighting, speakers, irrigation, or a future grill island, sleeves under a patio or walkway are cheap before concrete or pavers go in and expensive afterward.
Do these 3 things before closing this tab:
1Clear out junk files and repair common Windows errors2Scan for outdated or missing drivers - takes under a minute3Repair Windows errors before they cause bigger problems12. Integrate Storage, Seating Walls, Planters, And Weather Protection
The most used outdoor spaces have places to put things away. Weatherproof cabinetry, deck boxes, built-in benches, storage walls, trash pullouts, and planters keep cushions, grill tools, toys, firewood, and cleaning supplies from taking over the patio.
Built-in seating can also solve layout problems. Seat walls define edges, keep furniture from drifting, and add overflow seating for gatherings. Plan most seat walls around 18 inches high. If you add cushions, account for the extra height. For storage benches, use hardware and materials designed for outdoor moisture, and provide ventilation so cushions do not mildew.
Weather protection can include outdoor curtains, retractable screens, shade sails, wind panels, heaters, fans, and furniture covers. For permanent heaters, gas lines, or new electrical circuits, bring in licensed trades and confirm clearances.
Rank #4

- Engineered for USA Climates - ORIGLE pergola brackets are crafted with heavy-duty, corrosion-resistant steel and a premium black powder coating to withstand harsh weather conditions. Designed to snugly fit 4x4 post brackets (actual inner dimension: 3.58"x3.58"), these brackets eliminate gaps and ensure a rock-solid hold for your pergola’s structural integrity. Ideal for pergola kit projects in gardens, patios, or backyard retreats.
- Precision Fit, Zero Adjustments - Unlike generic brackets, ORIGLE’s pergola brackets kit is precision-engineered for standard 4x4 lumber. The 3.58"x3.58" inner dimension accommodates slight wood variations while preventing wobbling or shifting—perfect for DIYers seeking professional-grade stability without tedious modifications.
- Innovative Cut-Out Design - ORIGLE pergola brackets feature precision laser-cut openings on both corners, seamlessly blending sleek modern aesthetics with functional excellence. The cut-outs provide real-time alignment visibility—instantly confirming 4x4 post positioning for error-free assembly. Designed to accelerate rainwater drainage and enhance airflow around posts, the openings prevent moisture buildup, protecting wood from rot.
- Unmatched Stability - Transform your garden, courtyard, or balcony into a shaded oasis. ORIGLE pergola brackets support up to 2,500 lbs, ideal for hanging lights, swing chairs, or shade sails. Ideal for Pergola Kit Projects in High-Wind Areas or Heavy Snow Loads.
- 90-Minute DIY Assembly - Pre-drilled holes align perfectly with 4x4 lumber. Kit includes 64 self-tapping screws (M6x40mm) + visual manual—no specialized tools required. Build gazebos, garden arches, or patio shades 3X faster than standard brackets.
When To DIY And When To Hire A Pro
Some outdoor living improvements are good DIY projects for careful homeowners. Others are not worth risking because failures can damage the house, create safety hazards, or cost more to correct than to build properly the first time.
Do these 3 things before closing this tab:
1Fix the driver behind crashes, sound loss and screen glitches2Clear out junk files and repair common Windows errors3Scan for outdated or missing drivers - takes under a minuteGood DIY Candidates
Furniture planning, container plants, small gravel seating areas, simple privacy panels, freestanding planters, low-voltage lighting kits, outdoor rugs, storage boxes, and basic decor are reasonable DIY work for many homeowners. Small paver areas can also be DIY if the homeowner understands excavation, compacted base, edge restraint, slope, and drainage.
Hire A Pro For These Scopes
Bring in a qualified contractor when the plan includes an elevated deck, attached roof, structural pergola, screened porch, retaining wall, new gas line, new circuit, plumbing, outdoor fireplace, hillside work, drainage corrections, or stormwater constraints. Also hire help if the work connects to the house envelope. Flashing, ledger attachment, roof tie-ins, and water management are not cosmetic details.
Permits are not just paperwork. They help confirm that structural loads, setbacks, electrical protection, gas connections, guards, stairs, and drainage are being handled correctly. Requirements vary by city and county, so check locally before ordering materials or scheduling trades.
A Smart Sequence For Extending Outdoor Living Space
The most efficient sequence is simple: map how you want to use the space, confirm constraints, solve drainage, build the structural or hardscape base, rough in utilities, then install finishes and furniture.
Start with a scaled plan. Mark doors, windows, hose bibs, electrical panels, downspouts, property lines, easements, trees, slopes, and views you want to block or preserve. Then place zones for cooking, dining, lounging, fire, shade, storage, and circulation. Keep circulation paths at least 3 feet wide where possible.
Next, confirm the expensive realities: grading, base prep, footings, frost depth, stormwater rules, utility locations, roof drainage, and access for equipment. Finally, choose materials by climate. Freeze-thaw regions need stable bases, drainage, and appropriate concrete. Hot climates need shade, lighter surfaces, ventilation, and UV-resistant products. Coastal areas need corrosion-resistant fasteners and hardware.
If you want the best return on the investment, prioritize usable transitions from the house, patios or decks, covered sitting areas, and lighting before luxury add-ons. Outdoor kitchens, fireplaces, spas, and specialty features can be excellent, but they perform best when the base layout already works.
Final Builder Takeaway
A great outdoor living space is not a collection of features. It is a buildable plan that fits the house, the site, the climate, and the way people actually move through the space.
Free tools Windows power users keep installed
One-click scans. No signup required.
If you are deciding where to start, begin with the ground plane: patio, deck, drainage, and circulation. Then add comfort: shade, privacy, lighting, and weather protection. After that, choose the feature that will get used most, whether that is a dining area, lounge zone, fire feature, screened porch, or outdoor kitchen.
That order keeps the budget focused and gives every dollar a job.
Frequently Asked Questions
What is the most cost-effective way to extend outdoor living space?
For many homes, the most cost-effective starting point is a patio extension, dining zone, privacy improvement, or low-voltage lighting. Installed patios commonly run about $5-$40 per square foot, depending on material and site prep.
Is a deck or patio better for outdoor living?
A patio is usually better for flat yards and lower budgets. A deck is often better when the home sits above grade, the yard slopes, or you want direct access from an elevated room. Decks commonly cost more because of framing, footings, stairs, railings, and code requirements.
Do I need a permit for an outdoor living project?
Possibly. Permits are commonly required for elevated decks, attached roofs, screened porches, electrical work, gas lines, plumbing, retaining walls, and some hardscape or impervious-surface changes. Rules vary by local jurisdiction.
How much space do I need for an outdoor dining area?
Plan about 10 by 10 feet for a four-person table, 12 by 14 feet for six people, and 14 by 16 feet or more for eight people. Leave about 36 inches behind chairs where people need to walk.
What outdoor upgrades add the most everyday value?
The most useful upgrades are usually patios or decks, covered sitting areas, lighting, shade, privacy, and easy transitions from indoor rooms. Higher-cost features like outdoor kitchens and fireplaces work best after the base layout is already functional.
Quick Recap
Product prices and availability are accurate as of the date/time indicated and are subject to change. Any price and availability information displayed on Amazon at the time of purchase will apply.
Quick wins for a faster PC:
Clear out junk files and repair common Windows errorsFree Scan →Fix the driver behind crashes, sound loss and screen glitchesFind Drivers →Repair Windows errors before they cause bigger problemsFix Now →
