What’s actually slowing this PC down?
Pick the symptom - the matching free tool is one click away.
An ESP8266 NodeMCU can absolutely be used to check whether a garage door is open or closed and report garage temperature and humidity. The practical version is simple: a magnetic contact tells the controller the door position, a DHT22 or AM2302 sensor reports climate data, and the ESP8266 sends that information to Home Assistant, MQTT, Blynk, IFTTT, or a small dashboard.
The smart way to build it is to keep the first version read-only. Let it tell you the door was left open for 5, 15, or 30 minutes. Let it warn you when humidity stays high overnight or when freezing temperatures threaten stored liquids. Do not start by wiring a relay that can close a 150- to 250-pound moving door from a phone unless the opener, safety sensors, mounting, and fail-safe logic are designed for that job.
On our garage and remodel projects, the electronics are rarely the hard part. The failures usually come from weak Wi-Fi, loose USB power supplies, tiny window contacts used on vibrating overhead doors, low-voltage wire hanging near tracks, or sensors mounted where sun, drafts, exhaust, or water heater heat ruin the readings. A $25 bench prototype can work well. A durable garage installation needs another $10 to $40 in enclosure, strain relief, cable clips, and basic mounting materials.
As an Amazon Associate I earn from qualifying purchases.
Quick wins for a faster PC:
Clear out junk files and repair common Windows errorsFree Scan →Fix the driver behind crashes, sound loss and screen glitchesFind Drivers →Repair Windows errors before they cause bigger problemsFix Now →What This Project Should Do
A good ESP8266 garage monitor should answer three homeowner questions without guesswork:
- Is the garage door open or closed right now?
- How long has it been in that state?
- Is the garage getting too hot, too cold, or too humid for what is stored inside?
The core parts are inexpensive. An ESP8266 NodeMCU board is commonly about $4 to $12. A DHT22 or AM2302 temperature-humidity sensor is commonly about $4 to $12. A magnetic reed switch can cost $2 to $15 depending on whether it is a bare switch, a small surface contact, or a wide-gap overhead-door contact. Add a 5V USB power supply, cable, terminal blocks, cable clips, and an enclosure, and a basic DIY monitor usually lands around $15 to $60 in 2026.
#1 Best Overall

- Not only it is easy to program for this controller by using the CP2102-USB interface,but also unnecessary to press the flash and reset buttons before each flash operation.
- NodeMcu is an open source Lua based firmware for the ESP8266, ultra low cost wireless modules, development boards for rapid prototyping, integrated with ESP8266 chips.
- The ESP8266 has powerful on-board processing and storage capabilities, and can be integrated with sensors and other application-specific devices through its GPIOs.
- It is compatible with Arduino IDE,works great with the latest Mongoose IoT/Micropython.
- Modern Internet development tools can use the built-in API to instantly put your idea on the fast track.
That price is for monitoring, not a professionally installed smart opener. A commercial retrofit smart garage controller often costs about $30 to $100 before labor. Smart opener equipment commonly ranges from about $159 to $550 depending on drive type, horsepower, battery backup, camera, lighting, keypad, remotes, and smart-home features. Installed smart opener or controller totals commonly land in the $350 to $900-plus range after labor, Wi-Fi setup, safety sensor replacement, old opener removal, and door-condition corrections.
The Basic ESP8266 Garage Door Design
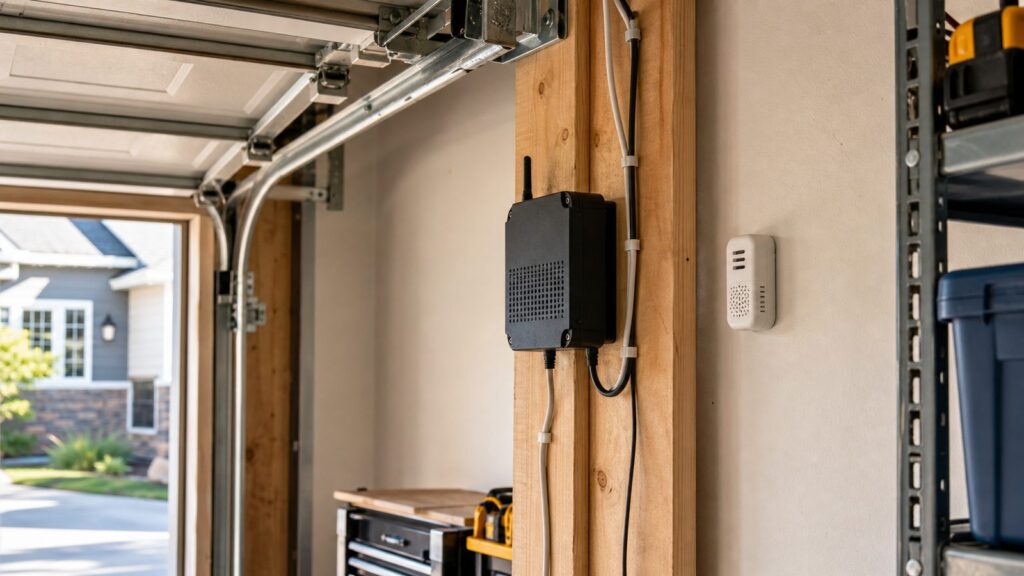
The most dependable layout is straightforward. Mount a magnet on the moving garage door. Mount a reed switch on fixed framing, the jamb, or a stable bracket near the track. Wire the reed switch back to a GPIO pin on the ESP8266 using the internal pull-up resistor. When the magnet lines up with the contact, the circuit changes state and the software reports open or closed.
For sectional overhead doors, we prefer a wide-gap overhead-door contact instead of a tiny window contact. Garage doors flex, vibrate, and move differently across the seasons. A small contact that works on a calm afternoon may chatter during a windy storm or drift out of alignment after the door hardware settles. Wide-gap contacts tolerate more movement and are built for this kind of application.
The ESP8266 should be mounted on fixed framing or a fixed wall surface, not on the moving door, springs, opener rail, or track. Keep every wire clear of rollers, hinges, torsion springs, extension springs, the opener arm, and manual release cord. Use cable staples or clips sized for low-voltage cable, and leave a small service loop at the enclosure so the device can be opened without pulling wires out of terminals.
Typical Parts List
| Component | Typical 2026 Cost | Practical Notes |
|---|---|---|
| ESP8266 NodeMCU board | $4-$12 | Choose a board with reliable USB power and enough documentation for your firmware path. |
| Wide-gap magnetic contact | $8-$15 | Better than a small window contact for a vibrating overhead door. |
| DHT22 or AM2302 sensor | $4-$12 | More useful than a DHT11 when humidity readings matter. |
| 5V USB power supply and cable | $6-$15 | Use a listed supply plugged into a proper receptacle, not a loose charger in an adapter stack. |
| Enclosure and strain relief | $10-$40 | Protects the board from dust, vibration, accidental shorts, and pulled wires. |
| Low-voltage wire, terminals, clips | $5-$20 | Clean wiring is more reliable and easier to troubleshoot later. |
Where to Put the Door Sensor
Sensor placement matters more than the wiring diagram. For a typical sectional overhead door, mount the magnet on the top section or side edge of the door and mount the reed switch on fixed framing where the magnet lines up only when the door is fully closed. That gives the most useful status: closed means actually closed, not halfway down.
A second approach is to detect the fully open position near the horizontal track. That can be useful in some shops or detached garages, but most homeowners care most about whether the door is securely closed. If you only use one contact, make it a closed-position contact.
Recommended Free Tools
Do not fasten electronics to the torsion spring tube, spring brackets, lift cables, bottom brackets, rollers, or hinges. Those parts are not convenient mounting surfaces; they are loaded garage door components. If the installation needs a custom bracket, use light-gauge metal or wood blocking attached to framing, not door hardware.
Temperature and Humidity: Useful, But Only If You Measure the Right Air
A DHT22 or AM2302 sensor can give useful garage temperature and relative humidity readings, especially for attached garages, workshops, home gyms, stored finishes, tools, freezers, batteries, and electronics. It is not a substitute for proper insulation, ventilation, vapor control, or HVAC design, but it gives you trend data that helps decide whether changes are working.
Rank #2

- ESP8266 Breakout Board GPIO 1 into 2 Terminal Screw Board is Fully Compatible with ESP8266 ESP-12E
- GPIO 1 into 2: ESP8266 Breakout Board Can Expand 1 GPIO Pin to 2, Which is Convenient for Users to Reuse Pins for Large-Scale Smart Home Projects
- Double-Layer PCB: ESP8266 Breakout Board is a Double-Layer Board. One Pin is Wired On Both Sides. Therefore, the Circuit is Stable and Highly Reliable
- 2 Type Connections:ESP8266 Breakout Board Designed with Two Connection Methods: Pin Header Connector & Screw Terminal. Just Select Connection According to Your Need
- Convenient to USE: Compared with the Previous Version, Updated Version ESP8266 Breakout Board Has Been Soldered Completely. No Need to Solder Parts,Very Convenient to Use
We like to mount the climate sensor roughly 4 to 6 feet above the floor on an interior wall or protected framing member. Keep it away from direct sun, the main garage door gap, exterior service doors, vehicle exhaust, water heaters, dryers, freezers, and bare masonry that swings hard with outdoor temperature. A sensor inches from a drafty overhead door may tell you more about leakage than the garage itself.
Trends are more useful than a single number. A garage that hits 75 percent relative humidity for 20 minutes after a rainy arrival is different from a garage that sits at 75 percent for eight hours every night. Build alert rules around sustained conditions: high humidity for several hours, freezing temperatures near stored liquids, excessive heat around paints or batteries, and repeated temperature spikes that point to air sealing or ventilation problems.
The Tool Desk
Outbyte Driver Updater FREEScan for outdated or missing drivers - takes under a minuteDriver Scan →Outbyte PC Repair FREEClear out junk files and repair common Windows errorsFree Scan →Software Options: ESPHome, MQTT, Blynk, or a Custom Dashboard
For homeowners already using Home Assistant, ESPHome is usually the cleanest route. It gives you local control, easy sensor entities, simple update paths, and fewer cloud dependencies. MQTT is also reliable if you already run a broker and want flexible dashboards or automations. Blynk and IFTTT can work for phone notifications, but the garage door monitor should not become useless every time a cloud service changes a plan, API, or login flow.
A sensible first set of automations looks like this:
- Door open for 5 minutes: quiet phone notification.
- Door open for 15 minutes: louder notification or household announcement.
- Door open for 30 minutes after 9 p.m.: repeat alert until acknowledged.
- Humidity above 70 percent for 3 hours: check ventilation, wet storage, or water entry.
- Temperature below 35 degrees: warning for liquids, finishes, and garage refrigerator or freezer performance.
- Device offline for 30 minutes: inspect power supply, Wi-Fi, or the enclosure.
The offline alert is not optional in a serious installation. If the device loses power or Wi-Fi, the last reported door state may look normal while the monitor is blind. A good dashboard distinguishes between closed, open, and unavailable.
Costs: DIY Monitor vs Smart Opener vs Professional Installation
The low parts cost is real, but it can mislead homeowners. A read-only ESP8266 monitor is a low-voltage project. A smart opener or relay-controlled closer is a safety-critical door operator project. Those are not the same scope.
| Option | Typical 2026 Cost | Best Fit |
|---|---|---|
| DIY ESP8266 read-only monitor | $15-$60 in parts | Homeowners comfortable with low-voltage wiring, Wi-Fi setup, and basic firmware. |
| DIY monitor with better enclosure and contact | $35-$90 in parts | A more durable setup for a dusty, vibrating, unconditioned garage. |
| Commercial retrofit smart controller | $30-$100 before labor | Homeowners who want an off-the-shelf app and opener compatibility support. |
| Smart opener equipment | $159-$550 | Older opener replacement, quieter belt drive, battery backup, camera, or integrated lighting. |
| Professional opener installation | About $178-$540 labor range, with many jobs around the high-$300s | Opener replacement, safety sensor correction, ceiling mounting, rail setup, and adjustment. |
| Installed smart opener/controller total | $350-$900+ | Complete system with labor, setup, accessories, old unit removal, and possible door corrections. |
Costs rise when the garage is detached, the ceiling is high, the opener outlet is missing or not GFCI protected where required, Wi-Fi is weak, masonry makes routing harder, walls are finished, the door is out of balance, springs are worn, or the opener needs rail extensions or accessory upgrades.
Safety Rules That DIY Tutorials Often Skip
A garage door is one of the largest moving assemblies in a home. The electronics may run at 3.3V or 5V, but the system sits beside springs, rollers, opener force settings, line-voltage receptacles, and entrapment protection. Treat that seriously.
Rank #3

- Built-in Micro-USB, with flash and reset switches, easy to program
- Arduino compatible, works great with the latest Arduino IDE/Mongoose IoT/Micropython
- Data download access to the website: http://www;nodemcu;com
Residential automatic garage door operators are subject to safety requirements that include entrapment protection. Modern systems use inherent reversing functions along with external protection such as photo eyes or edge sensors. Photo eyes are commonly mounted no higher than 6 inches above the floor, and the door should refuse to close or reverse when the beam is blocked. The door should also reverse when it contacts a 1.5-inch object placed on the floor under the door.
Do not bypass photo eyes to make a smart control work. Do not hide a relay inside an opener in a way that defeats the wall button, force settings, travel limits, manual release, or safety reversal. Do not assume remote closing is acceptable just because a relay can short two terminals. The relay is cheap; the liability is not.
For a read-only monitor, the main safety concerns are physical installation and electrical housekeeping. Put the ESP8266 in an enclosure. Use strain relief or cable glands where wires enter. Keep low-voltage wiring away from moving parts. Protect cables where they pass through framing or finished surfaces. Use a proper listed power supply. Do not drill through fire separation assemblies, finished ceilings, or attached-garage walls without understanding how the penetration will be sealed.
Garage Power, GFCI, and Permits
Many garages now require GFCI protection for receptacles, and local code adoption can vary. If your monitor plugs into an existing garage receptacle, do not remove or bypass GFCI protection because a device nuisance-trips. Fix the device, power supply, or moisture problem.
Adding a low-voltage status sensor usually does not trigger the same permitting burden as installing a new opener circuit, moving a receptacle, altering branch-circuit wiring, or modifying a fire-rated separation in an attached garage. That said, permit rules are local. If the work involves line-voltage wiring, new receptacles, concealed cable routes, exterior detached-garage feeds, or opener replacement tied to electrical corrections, bring in a licensed electrician or qualified garage door technician.
For remodels and new garage projects, plan ahead. Rough in a reliable ceiling receptacle for the opener, a low-voltage pathway for sensors, strong Wi-Fi or access point coverage, and blocking for future devices before drywall. Those details cost far less during construction than after the garage is finished.
Outdated Drivers Are Slowing You Down
One free scan finds every outdated or missing driver and matches the right update for your exact hardware.Free scan · exact hardware matchWindows Errors? Fix Them Before They Spread
Repair common Windows errors and clear accumulated junk for a smoother, more stable PC - no reinstall needed.Free scan · no reinstallWhen to DIY vs When to Hire a Pro
Good DIY Scope
A homeowner with basic low-voltage skills can usually handle a read-only ESP8266 monitor. The safe DIY version includes a NodeMCU, magnetic contact, DHT22 or AM2302 sensor, enclosure, USB power supply, and dashboard integration. It does not connect to opener control terminals, does not touch line voltage, and does not interfere with the door hardware.
Plan on 2 to 4 hours for a careful first build if you already understand ESPHome or Arduino-style flashing. Add another hour for mounting, labeling, and testing alerts. The firmware may be quick; the neat physical installation takes time.
Rank #4

- NodeMCU GPIO expansion board
- NodeMCU can be connected through by Pin Header & Screw Terminal
- GPIO 1 INTO 2
Call a Pro
Hire a garage door technician if the door is heavy by hand, will not stay halfway open when disconnected, has frayed lift cables, broken springs, bent tracks, noisy rollers, unreliable reversal, or photo eyes that are missing or taped out of alignment. A smart monitor does not fix a dangerous door.
Hire an electrician if you need a new ceiling receptacle, a garage subpanel change, GFCI or AFCI troubleshooting, concealed line-voltage wiring, trenching to a detached garage, or corrections inside finished walls. Hire a smart-home integrator if you want multiple doors, cameras, local automations, remote access, and family phone permissions configured cleanly.
Installation Checklist We Use on Garage Projects
Before mounting anything, operate the door manually and with the opener. Confirm the photo eyes are present, aligned, and mounted low. Check reversal with a 1.5-inch object. Test the wall button, remotes, keypad, manual release, and battery backup if present. If the door or opener fails basic safety checks, fix that before adding smart monitoring.
For the monitor itself, follow a job-site checklist:
- Choose a fixed mounting location away from tracks, springs, opener arms, water lines, and direct sun.
- Use a wide-gap overhead-door contact and align it with the door fully closed.
- Mount the ESP8266 in an enclosure with strain relief.
- Secure low-voltage wiring with clips and keep it clear of moving parts.
- Place the temperature-humidity sensor where it measures representative garage air.
- Confirm Wi-Fi signal at the enclosure location before final mounting.
- Create alerts for open duration, sustained humidity, freezing temperature, excessive heat, and device offline.
- Label the enclosure with the power source, Wi-Fi network, dashboard name, and installation date.
After installation, test more than once. Open and close the door five full cycles. Watch the dashboard update. Unplug the ESP8266 and confirm the system reports unavailable. Block the photo eyes and confirm the opener behaves correctly. Leave the door open long enough to trigger each alert tier.
Common Problems and Better Fixes
If the door status flickers, suspect sensor alignment, contact type, vibration, or loose terminals before blaming code. A wide-gap contact and firm mounting solve many false open and false closed reports.
Free tools Windows power users keep installed
One-click scans. No signup required.
If temperature readings look wrong, move the sensor. Direct sun, exterior drafts, vehicle heat, water heater heat, and cold masonry can skew data by several degrees. If humidity spikes every morning, compare it with outdoor conditions and look for wet storage, poor air sealing, floor moisture, or ventilation issues.
If the device drops offline, check the power supply and Wi-Fi signal. Garages are hard on wireless devices because metal doors, masonry, distance from the router, and interference all matter. A nearby access point can be a better fix than rewriting firmware. If the garage is detached, plan networking as part of the building system, not as an afterthought.
Best Value

- ESP8266 NodeMCU Lua ESP-12E CP2102 Development Board Module with USB C Type-C Interface, has a wider range of applications.
- Adopting the original brand new CP2102 chip with powerful functions, developing a complete set of tools for ESP8266.
- Built in Tensilica L106 ultra low power 32-bit micro MCU, with main frequency support of 80 MHz and 160 MHz
- Supports RTOS.
- Support many kinds of working modes like STAAP/STA+AP etc, support AT remote upgrade and cloud OTA , and upgrade for Smart Config function etc.
The Bottom Line
An ESP8266 NodeMCU garage door check with temperature and humidity monitoring is a useful, affordable project when it is built as a durable low-voltage monitor. Expect roughly $15 to $60 for basic DIY parts, or closer to $35 to $90 if you buy a better contact, enclosure, terminals, and mounting supplies. That small upgrade is usually worth it in a garage.
The line is opener control. Monitoring is a good DIY project for many homeowners. Remotely closing a garage door belongs in a code-aware, safety-tested system with all entrapment protection intact. If the door, opener, wiring, or Wi-Fi infrastructure is already questionable, fix those fundamentals first. A smart garage should be safer and easier to maintain, not just connected to an app.
Do these 3 things before closing this tab:
1Clear out junk files and repair common Windows errors2Fix the driver behind crashes, sound loss and screen glitches3Repair Windows errors before they cause bigger problemsFrequently Asked Questions
Can I use an ESP8266 NodeMCU to check if my garage door is open or closed?
Yes. The usual setup uses a magnetic reed switch on the fixed frame or track area and a magnet on the moving door. The reed switch connects to an ESP8266 GPIO pin with an internal pull-up, and the ESP8266 reports the open or closed state to Home Assistant, MQTT, Blynk, IFTTT, or a custom dashboard.
How much does a DIY ESP8266 garage door temperature and humidity monitor cost in 2026?
A basic DIY parts list commonly runs about $15 to $60. A more durable installation with a wide-gap overhead-door contact, enclosure, strain relief, terminal blocks, cable clips, and a better power supply can land closer to $35 to $90.
Should I use a DHT11 or DHT22 sensor in a garage?
Use a DHT22 or AM2302 if humidity data matters. DHT11 sensors are cheaper, but they are less accurate and less useful for tracking garage humidity trends, condensation risk, stored materials, and comfort.
Can the ESP8266 also close the garage door remotely?
It can be wired with a relay in some systems, but that changes the project from monitoring to controlling a large moving door. Keep the first version read-only. Add control only if the opener is compatible, all safety sensors remain intact, and the installation follows applicable safety requirements.
Do I need a permit to install a garage door sensor?
A low-voltage read-only sensor usually does not require the same approvals as new electrical wiring, but rules are local. If the work includes a new receptacle, line-voltage wiring, concealed cable changes, detached-garage electrical work, or opener replacement corrections, call the local building department or a licensed electrician.
Where should the temperature and humidity sensor go in the garage?
Mount it about 4 to 6 feet above the floor on a protected interior wall or framing member. Keep it away from direct sun, garage-door gaps, exterior drafts, vehicle exhaust, water heaters, freezers, and bare masonry if you want readings that represent the garage air.
Quick Recap
Product prices and availability are accurate as of the date/time indicated and are subject to change. Any price and availability information displayed on Amazon at the time of purchase will apply.

