Outdated Drivers Are Slowing You Down
One free scan finds every outdated or missing driver and matches the right update for your exact hardware.Free scan · exact hardware matchWindows Errors? Fix Them Before They Spread
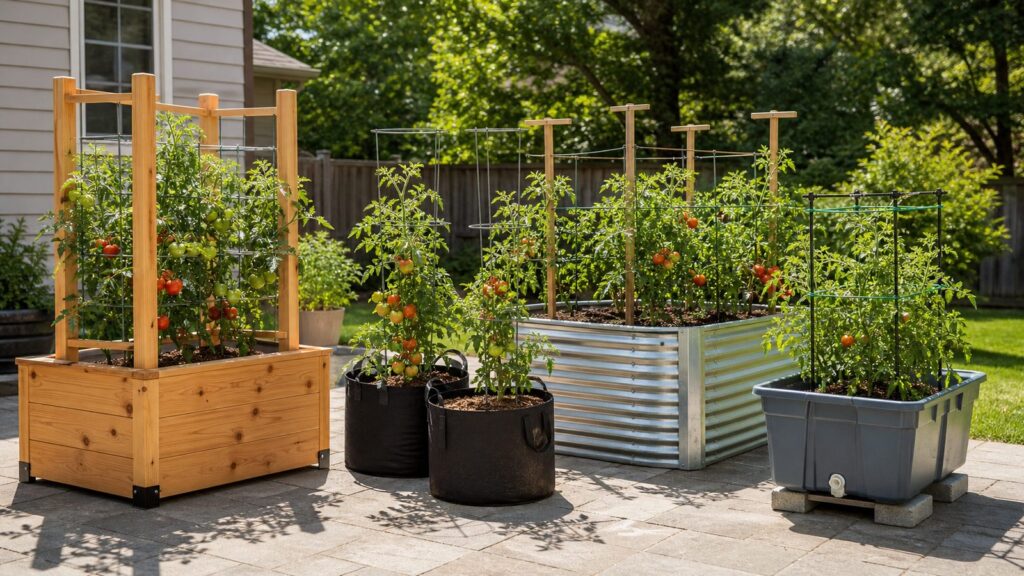
Repair common Windows errors and clear accumulated junk for a smoother, more stable PC - no reinstall needed.Free scan · no reinstallA good tomato planter is not just a cute container with a plant in it. Tomatoes are heavy-feeding, thirsty, top-heavy plants that need root volume, drainage, stable support, and enough sun to produce. If the planter is too small, poorly drained, or too light for the trellis, the project usually fails in July when the plant is loaded with fruit and the weather turns hot.
For most homeowners, the sweet spot is one tomato plant in a 10- to 20-gallon planter, with a cage or trellis installed at planting and a watering plan that does not rely on memory alone. Smaller 5-gallon buckets can work for determinate, patio, or cherry tomatoes, but full-size indeterminate tomatoes do better in 15 to 20 gallons or a raised bed with a tall, well-anchored support.
On our exterior projects, we think about planters the same way we think about any small outdoor build: water has to leave, soil weight has to be supported, materials need to survive weather, and the finished piece should not damage the patio, deck, siding, or fence around it. The 13 DIY tomato planter ideas below are ranked by practical use, not novelty.
As an Amazon Associate I earn from qualifying purchases.
The Tool Desk
Outbyte PC Repair FREEClear out junk files and repair common Windows errorsFree Scan →Outbyte Driver Updater FREEScan for outdated or missing drivers - takes under a minuteDriver Scan →Quick Sizing Rules Before You Build
Start with the tomato variety and work backward. A compact determinate tomato can grow in a smaller container because it reaches a set size and fruits over a shorter window. An indeterminate tomato keeps growing until frost, which means more roots, more water demand, more pruning, and a taller support system.
Use these field rules for planning:
- 5 gallons: Minimum for compact patio tomatoes, dwarf varieties, and some cherry tomatoes. Expect frequent watering in hot weather.
- 10 gallons: Better baseline for one determinate tomato. More forgiving than a bucket and still manageable on patios.
- 15 to 20 gallons: Strong choice for one indeterminate tomato in a container, especially with a tall cage or trellis.
- 18 to 24 inches of pot diameter: A practical target for many container tomatoes.
- 6 to 8+ hours of sun: Needed for strong production. In extreme-heat regions, plan for afternoon shade cloth or a movable planter.
- Drainage holes: Required unless you are using Fabric grow bags or a true self-watering design with an overflow hole.
Install the cage, stake, ladder, or trellis before planting. Once a tomato has filled out, forcing a support into the root zone is harder on the plant and less stable structurally.
#1 Best Overall

- Sturdy & Garden-Ready Material: Made of 300g of thickened nonwoven fabric, these pots are moderately permeable, environmentally friendly, and BPA-free; Ideal for raised beds, patios, and outdoor gardens
- Great Drainage: Nonwoven fabric means the pots do not retain excess water, allowing your roots to breathe for healthier, more vigorous growth
- Durable, Reinforced Handles: While the competition uses flimsy handles that are merely strips of the same fabric the pot is made from, we use serger stitches to sew handles onto the pot so they can support a full bag of soil
- Easy to Move Around Your Garden: Heavy-duty handles and rugged material mean you can move bags full of soil and plants with ease
- Use It for Years: Grow bags prevent circling root structure; Combined with pruning and trimming roots, these bags can be used and reused for years
Soil Volume and Weight Planning
Soil volume is where many DIY tomato planters go wrong. A planter can look large from the outside and still hold too little usable root-zone mix. Large containers also get heavy, especially after rain or irrigation. That matters on balconies, older decks, raised platforms, and rolling planters.
| Planter Size | Approx. Soil Volume | Best Tomato Fit | Planning Note |
|---|---|---|---|
| 5-gallon bucket | 0.67 cu. ft. | Patio, dwarf, compact cherry | Low cost, but dries quickly and needs strong drainage. |
| 10-gallon container | 1.34 cu. ft. | Determinate tomato | Good minimum for a more forgiving patio setup. |
| 20-gallon container | 2.67 cu. ft. | Indeterminate or large determinate | Better moisture buffer; use a serious cage or trellis. |
| 2 ft. x 4 ft. x 1 ft. bed | 8 cu. ft. / 0.30 cu. yd. | 2 to 3 tomato plants | Good narrow raised bed for patios or fence lines. |
| 2 ft. x 4 ft. x 2 ft. bed | 16 cu. ft. / 0.59 cu. yd. | 2 to 3 large tomatoes | Excellent root depth, but weight adds up fast. |
| 4 ft. x 8 ft. x 1 ft. bed | 32 cu. ft. / 1.19 cu. yd. | 6 to 8 tomato plants with spacing | Usually best filled with bulk raised-bed mix, not small bags. |
For containers, use potting mix, not dense garden soil. For larger open-bottom raised beds, bulk raised-bed mix is usually more economical. In 2026, bulk screened topsoil commonly runs about $15 to $55 per cubic yard, while premium raised-bed or garden mixes often land around $40 to $80+ per cubic yard. Enriched local mixes can run roughly $130 to $165 per yard, and delivery often adds $50 to $150 depending on distance and minimum order. Bagged soil is convenient, but it can convert to roughly $50 to $160+ per cubic yard by volume.
13 DIY Tomato Planter Ideas
1. 5-Gallon Bucket Tomato Planter
Best for: Budget builds, renters, first-time growers, compact tomatoes.
Approximate 2026 cost: $10 to $35 per plant.
Difficulty: Easy, 30 to 60 minutes.
A 5-gallon bucket is the cheapest functional tomato planter when it is built correctly. Drill several 1/2-inch drainage holes in the bottom and a few low side holes about 1 inch up from the base so water can escape even if the bucket sits on a flat surface. Add potting mix, plant deeply, and use a compact cage or a 5- to 6-foot stake set at planting.
This is not the best home for a large indeterminate tomato. Use patio, dwarf, determinate, or compact cherry varieties. In hot weather, expect daily watering and add 1 to 2 inches of mulch on top of the soil to reduce evaporation.
Failure prevention: Do not use a bucket with no drainage. A tomato can recover from one dry afternoon faster than it can recover from constantly wet, oxygen-starved roots.
Quick wins for a faster PC:
Scan for outdated or missing drivers - takes under a minuteDriver Scan →Clear out junk files and repair common Windows errorsFree Scan →Fix the driver behind crashes, sound loss and screen glitchesFind Drivers →2. 10- to 20-Gallon Grow Bag Row
Best for: Sunny driveways, side yards, renters, temporary gardens.
Approximate 2026 cost: $15 to $60 per plant.
Difficulty: Easy, 20 to 45 minutes per plant.
Fabric grow bags are one of the most practical DIY tomato planter options because they drain well, air-prune roots, and store flat at the end of the season. Use 10-gallon bags for determinate tomatoes and 15- to 20-gallon bags for indeterminate varieties.
Set bags on pavers, a gravel strip, or a tray if they are near finished surfaces. A saturated grow bag can stain concrete, soften mulch areas, or keep a wood deck damp. For a clean row, run a drip line with one or two emitters per bag and connect it to a hose timer.
Failure prevention: Grow bags dry faster than rigid containers. Mulch the top and group bags where you can water efficiently.
3. Cedar Raised Tomato Box
Best for: Permanent patio planters, edible gardens near the house, homeowners who want a finished look.
Approximate 2026 cost: $75 to $200 before soil for a small one- to two-plant box.
Difficulty: Moderate, half day.
Cedar is a strong choice for tomato planter boxes because it handles outdoor exposure better than many untreated softwoods. A practical size is 24 inches wide by 48 inches long by 18 to 24 inches deep. That gives room for two tomato plants, a center trellis, and enough soil volume to buffer heat.
Use exterior-rated screws, corner blocking, and a bottom design that drains freely. If the box sits on a patio, elevate it slightly on feet or sleepers so water can move underneath. If you use a liner, keep it breathable or drainable. The goal is to protect the wood from constant wet soil without trapping water against it.
Failure prevention: Separate edible soil from questionable finishes. Avoid interior coatings that could break down into the growing mix.
Recommended Free Tools
4. Galvanized Stock Tank or Metal Raised Bed
Best for: Long service life, sunny yards, modern farmhouse landscapes.
Approximate 2026 cost: $60 to $260 for many raised-bed kits; deeper stock tanks may cost more.
Difficulty: Easy to moderate.
Galvanized tomato planters can look sharp and last for years. Metal raised-bed kits are common in the $60 to $260 range depending on height, gauge, size, and modularity. A stock tank is heavier and often more expensive, but it gives you a deep, durable planting vessel.
For closed-bottom tanks, drill drainage holes and set the tank where water discharge will not create a slick patio or stain a surface. For open-bottom metal beds, place them on soil, not on a deck, and fill with raised-bed mix.
Rank #2

- Sturdy Fabric Material: Our Non-Woven fabric grow bags are crafted using high-strength weaving technology, which allows the planting bags to remain lightweight while possessing an impressive ability to bear weight.
- Excellent drainage: It provides water drainage through the soil to eliminate over-watering and allows your plants to breath, translating to healthier and more vigorous growth.
- Easy to Use: Grow bags prevent circling root structures. Heavy-duty handles and rugged material means you can move bags full of soil and plants with ease.
- Versatile in function:The non-woven planting bag features space efficiency, excellent thermal insulation, and durability. These characteristics make it space-saving and root-protecting during storage, transportation, and use, while also extending its service life and enhancing overall planting efficiency.
- Your Great Gardening Partner – Land Guard is a customer-focused company committed to exceeding expectations in both quality and service. Since our inception, we've received excellent feedback. The garden grow bag is one of our flagship products, designed to enhance the gardening experience, and we are confident in its quality and performance. Happy Gardening!
Failure prevention: Metal heats up in full sun. In hot climates, use mulch and consider afternoon shade cloth.
Do these 3 things before closing this tab:
1Clear out junk files and repair common Windows errors2Scan for outdated or missing drivers - takes under a minute3Repair Windows errors before they cause bigger problems5. Self-Watering storage tote Planter
Best for: Hot summers, vacation watering, busy homeowners.
Approximate 2026 cost: $35 to $100 DIY.
Difficulty: Moderate, 2 to 3 hours.
A storage tote can become a productive self-watering tomato planter with a lower water reservoir, a wicking basket or perforated platform, a fill tube, and an overflow hole. The overflow hole is not optional. Without it, a storm can fill the reservoir and drown the root zone.
Use a sturdy tote, not a brittle bargain bin. Tomatoes are heavy once the mix is wet and the plant is mature. A 20- to 30-gallon tote works well for one large tomato or two compact plants. Add a rigid cage tied to the tote frame or a separate stake driven behind it.
Failure prevention: Do not rely on the tote lid alone to hold a mature tomato cage. Tie the support to something structural.
6. EarthBox-Style Wicking Planter
Best for: Consistent moisture, patios, repeatable growing systems.
Approximate 2026 cost: $40 to $90 for compact retail units, more for larger DIY systems.
Difficulty: Easy if purchased, moderate if built.
Wicking planters use a reservoir below the root zone so the plant pulls water upward as needed. This helps avoid the wet-dry swings that contribute to tomato stress. They are especially useful in regions with hot spells or watering restrictions.
For a DIY version, use a food-safe container, a stable platform above the reservoir, a wicking chamber packed with moist mix, a fill pipe, and an overflow. Use a potting mix designed to wick; dense soil will not perform correctly.
Failure prevention: Keep the overflow clear and check the fill tube every few days during peak fruiting.
7. Rolling Patio Tomato Planter
Best for: Patios with shifting sun, heat management, renters.
Approximate 2026 cost: $50 to $150 depending on planter, casters, soil, and support.
Difficulty: Moderate.
A rolling tomato planter is useful when you need to chase sun in spring and protect plants from extreme afternoon heat in midsummer. Build a low wood platform or box and use locking casters rated well above the expected load. A single 20-gallon planter with wet mix, plant, water, and hardware can easily become awkward to move.
Use four heavy-duty outdoor casters, preferably 3 inches or larger, and lock at least two of them. Keep the planter low and wide so it does not tip when the tomato cage catches wind.
Failure prevention: Do not put a tall indeterminate tomato in a narrow rolling base. The wheels make movement easier, but they do not solve top-heaviness.
What’s actually slowing this PC down?
Pick the symptom - the matching free tool is one click away.
8. ladder trellis Planter
Best for: Indeterminate tomatoes, small footprints, vertical growing.
Approximate 2026 cost: $75 to $200 depending on lumber and hardware.
Difficulty: Moderate.
A ladder trellis planter combines a deep box with a tall A-frame or back-mounted ladder support. Build the planter at least 18 inches deep, then attach the trellis to the frame with bolts or structural screws. For indeterminate tomatoes, plan on 6 to 8 feet of support height.
This design works well against a garage wall, fence line, or sunny side yard, but leave air space behind the plant. Tomatoes need airflow to reduce disease pressure.
Rank #3

- 300G THICKENED FABRIC, BUILT FOR MULTIPLE SEASONS — 300 g/m² non-woven fabric (vs. 200 g/m² or thinner on entry-level bags), so the walls hold their shape when filled and resist tearing at the seams. Each empty bag weighs 4 oz — 16 oz for the 4-pack. Fold flat and store indoors over winter and they are built to be replanted season after season 3.
- AIR-PRUNED ROOTS, NO ROOT ROT — Water drains through the whole fabric wall instead of pooling at one drainage hole, and air reaches the root ball from every side. Roots stop at the fabric edge and branch out instead of circling the pot, which is why plants in fabric bags build a denser feeder-root system than plants in plastic pots. Indoors, set the bags on a saucer or tray — the fabric drains from the base.
- DOUBLE-STITCHED HANDLES THAT DON'T RIP — Two woven webbing straps are sewn to the bag wall with a double-stitched box-X reinforcement (not cut from the same fabric as the bag body), tested to carry 180 LB. A filled 5-gallon bag of damp soil runs roughly 40–50 lbs, so the handles are the part that decides whether you can chase the sun across a patio — or not.Equipped with strong reinforced handles, easy to move the plants around your garden, patio or balcony, even when the bag is filled with soil.
- SIZED FOR HERBS, GREENS, STRAWBERRIES & FLOWERS — 12.2" across and 10.2" deep is the right root room for basil, mint, cilantro, rosemary, lettuce, spinach, strawberries, marigolds and compact peppers. Growing full-size tomatoes, potatoes or squash? Size up to our 7, 10 or 15 gallon bags instead — those crops need more depth than a 5-gallon bag can give.
- FOLDS FLAT — STORE THE WHOLE SET IN A DRAWER — Empty the soil, fold each bag flat, and all 4 stack down to about 1.96inch — they slide into a cupboard gap or under a shelf instead of taking up a corner of the balcony all winter. Rigid plastic pots can't do this, which is what makes fabric bags practical for apartments and small patios.
Failure prevention: Anchor the trellis to the planter frame and, if exposed to wind, to ground stakes behind the box.
Free tools Windows power users keep installed
One-click scans. No signup required.
9. Fence-Line Narrow Raised Bed
Best for: Side yards, small lots, long sunny fence runs.
Approximate 2026 cost: $120 to $300+ depending on length, material, and soil.
Difficulty: Moderate.
A narrow bed, 18 to 24 inches deep and 24 to 30 inches wide, can turn an unused fence line into a productive tomato row. Keep tomato plants about 24 to 36 inches apart depending on variety and pruning style. Use a cattle panel, wire trellis, or individual stakes set before planting.
Do not attach heavy tomato loads directly to a neighbor’s fence without permission. A loaded trellis can pull on aging fence rails, especially in wind.
Failure prevention: Check drainage direction. Beds near fences can trap water against posts and shorten fence life.
10. Recycled Barrel or Trash-Can Planter
Best for: Deep root zones, low-cost reuse, one large tomato plant.
Approximate 2026 cost: $20 to $80 depending on container source and support.
Difficulty: Easy to moderate.
A clean food-grade barrel, half barrel, or heavy-duty trash can can make a deep tomato planter. Cut to a practical height if needed, drill drainage holes, and use a stable base. For a full-depth container, soil cost can exceed the container cost, so plan the fill before you cut.
Closed containers for tomatoes still need enough high-quality root-zone mix. In very deep open-bottom beds, clean logs or branches can sometimes reduce soil volume, but in closed tomato containers, avoid filling the lower half with random debris that can hold water or rob nitrogen as it breaks down.
Failure prevention: Only reuse containers that held food-safe materials. Do not use barrels that stored chemicals, oils, solvents, or unknown liquids.
11. Stacked Crate Planter With Liner
Best for: Lightweight seasonal planters, small patios, decorative builds.
Approximate 2026 cost: $25 to $90.
Difficulty: Easy.
Stacked crates can work for compact tomatoes when they are lined correctly and reinforced. Use wood or heavy plastic crates, add landscape fabric or a food-safe liner with drainage openings, and fasten stacked layers together so they cannot shift.
This is better for determinate or patio tomatoes than large indeterminate plants. Add a separate stake driven into the ground or a cage tied to a rigid frame. The crate walls alone may not be strong enough for a mature plant.
Failure prevention: Do not let the liner block drainage. Cut or puncture drain paths before adding soil.
Free tools Windows power users keep installed
One-click scans. No signup required.
12. Masonry or Block Raised Tomato Bed
Best for: Permanent garden edges, durable backyard layouts, heat retention in cooler regions.
Approximate 2026 cost: $150 to $500+ depending on size, block type, base prep, and soil.
Difficulty: Moderate to advanced.
Rank #4

- DURABLE AND STURDY: Made of 300G thickened nonwoven fabric, Jorvila grow bags are wear-resistant, washable, easy to clean and reusable; At the end of use, you can simply clean it and fold it up for storage after drying
- LET ROOT GROW HEALTHIER: Aeration fabric pots provide excellent ventilation for plants, prevent root tangles and knots through Self Air Pruning, improve root structure and promote healthy plant development
- EXCELLENT DRAINAGE: Nonwoven material provides great drainage for the soil and reduces the effects of overwatering, which allows plants to grow in ideal growing conditions, warmer in winter and cooler in summer
- EASE OF MOVEMENT: The widened handle is made of high-density material and reinforced with X-stitches; The bottom and sides are double stitched and not easy to tear; You can move the planting bag to where it is needed
- WIDE APPLICATION: Raw materials high quality non-woven fabrics are food friendly materials; It is suitable for a wide range of vegetables and fruits, such as: potatoes, tomatoes, carrots, strawberries, onions and peppers
Concrete block, landscape block, or masonry-style tomato beds are durable and clean-looking, but they are closer to a construction project than a container project. A simple dry-stacked block bed can be DIY-friendly if it is low, level, and at grade. Once height, retaining pressure, drainage routing, or integrated hardscape enters the picture, it needs more planning.
Keep low beds around 12 to 24 inches deep for tomatoes. Use a compacted gravel base where appropriate, keep courses level, and provide drainage so water does not collect behind or inside the wall.
Failure prevention: When a planter starts retaining soil like a wall, local rules may treat it differently than a movable garden bed.
What’s actually slowing this PC down?
Pick the symptom - the matching free tool is one click away.
13. Elevated Waist-High Tomato Planter
Best for: Accessibility, reduced bending, patios, older homeowners.
Approximate 2026 cost: $120 to $300+ for DIY wood builds before premium hardware or irrigation.
Difficulty: Moderate to advanced.
Elevated planters are comfortable to use, but tomatoes make them structurally demanding. Wet soil is heavy, and a fruiting tomato adds leverage above the box. Use strong legs, cross bracing, exterior screws or bolts, and a bottom that supports the soil without trapping water.
For tomatoes, a waist-high planter should still provide at least 12 to 18 inches of soil depth. That means the structure must carry real weight. If the planter will sit on a deck, think through load and drainage before building.
Failure prevention: Do not build a tall, narrow elevated planter without diagonal bracing. It can rack, wobble, or tip once the plants are mature.
Windows Errors? Fix Them Before They Spread
Repair common Windows errors and clear accumulated junk for a smoother, more stable PC - no reinstall needed.Free scan · no reinstallCrashes, No Sound, or Screen Glitches?
Random freezes, missing sound and display glitches usually trace back to one bad driver. Find and replace yours safely.Free scan · under a minuteCost Comparison: Which Tomato Planter Makes Sense?
The cheapest planter is not always the best value. A 5-gallon bucket costs little upfront, but it can demand daily watering and may underperform with large tomatoes. A 20-gallon grow bag or self-watering tote costs more, but it gives the plant a better chance through heat, vacations, and heavy fruiting.
| Planter Type | Typical 2026 DIY Cost | Best Use | Watch-Out |
|---|---|---|---|
| 5-gallon bucket | $10-$35 per plant | Lowest-cost compact tomato setup | Small root volume and frequent watering |
| 10-20 gallon grow bag | $15-$60 per plant | Flexible patio or driveway garden | Dries quickly without mulch or Drip irrigation |
| Self-watering tote | $35-$100 | Consistent moisture in hot weather | Needs overflow and sturdy support |
| Cedar planter box | $75-$200 before soil | Finished one- or two-plant patio planter | Wood life depends on drainage and airflow |
| Galvanized bed or stock tank | $60-$260+ before soil | Durable raised growing area | Can heat up and gets heavy when filled |
| Masonry/block bed | $150-$500+ | Permanent garden feature | May raise drainage, wall, or permit questions |
For most homeowners, a 20-gallon grow bag, a self-watering tote, or a 24-by-48-inch cedar box gives the best balance of cost, yield, and build effort.
Drainage, Trellis, and Material Details That Matter
Drainage is non-negotiable. Containers need holes, fabric sides, or a purpose-built reservoir with an overflow. Set planters where runoff will not damage decking, stain concrete, or wash mulch into a drain. On finished patios, use saucers carefully; they protect surfaces but can also hold water around roots if they stay full.
Trellis support should be treated like a structural element. A tomato cage sitting loosely in potting mix is fine for a small determinate plant, but it is not enough for a 7-foot indeterminate tomato in a windy yard. Tie cages to the planter frame, bolt ladder trellises to the box, or drive separate stakes behind the planter.
For wood, design for drying. Cedar, redwood, and exterior-rated lumber perform better when water can drain and air can move. Avoid trapping wet soil against sealed wood. If you are building for edible plants, be conservative with finishes and liners. Keep questionable coatings away from the soil side of the planter.
For metal, watch heat and sharp edges. For masonry, think about base prep and water movement. For rolling planters, use casters rated for the load, not just the empty box.
Watering and Irrigation Plan
Tomatoes in containers need more consistent watering than tomatoes in the ground. During peak summer, a small container may need water every day. Larger 15- to 20-gallon planters may still need water several times a week, depending on temperature, wind, sun exposure, and plant size.
Best Value

- Thickened Nonwoven Fabric: Crafted from 300G thickened breathable nonwoven fabric, these grow bags for plants provide moderate permeability for root respiration; BPA-free material ensures food safety for organic vegetables
- Superior Drainage Performance: These fabric pots prevent excess water retention while allowing proper airflow; Promotes air pruning to stop root circling and encourages vigorous root ball development
- Reinforced X-Shaped Stitching: Heavy-duty handles with cross-stitched reinforcement make these plant grow bags strong enough to hold fully loaded soil; Prevents tearing during frequent moving and repositioning
- Enhanced Air Pruning Effect: Breathable structure of these aeration pots improves oxygen circulation; Prevents root swirling and builds a stronger, more fibrous root system
- Heavy Duty Gardening Solution: Durable garden planting bags designed for multi-season use; Washable and foldable for easy storage; Each 5 gallon grow bag measures 12.8" diameter × 10" height, ideal for growing tomatoes, peppers, cucumbers, potatoes, and larger flowering shrubs
Drip irrigation is the cleanest setup for rows of grow bags, cedar boxes, and raised beds. Use a hose timer, pressure regulator if needed, and one or two emitters per plant. For self-watering systems, check the reservoir often during fruiting. A full-size tomato can drink heavily in heat.
Do these 3 things before closing this tab:
1Fix the driver behind crashes, sound loss and screen glitches2Repair Windows errors before they cause bigger problems3Scan for outdated or missing drivers - takes under a minuteAdd 1 to 2 inches of mulch on top of the container mix. Straw, shredded leaves, pine fines, or clean compost can reduce evaporation and keep moisture swings under control. Keep mulch slightly back from the stem.
Permits, HOA Rules, and Patio Load
Small, movable tomato planters and low at-grade raised beds usually do not need building permits, but rules vary by city, HOA, historic district, drainage easement, and front-yard location. The line changes when a planter becomes a retaining wall, is built into a deck, changes drainage, blocks access, or becomes a permanent masonry feature.
Before building a large planter, check three things:
- Local rules: Especially for front yards, easements, setbacks, historic districts, and retaining structures.
- HOA guidelines: Many communities regulate visible garden beds, height, materials, irrigation runoff, and front-yard food gardens.
- Structural support: Decks, balconies, and elevated platforms may not be appropriate for large saturated planters without review.
As a construction company, we pay close attention to water and load. A planter that constantly drains against siding, sits over a weak deck bay, or leans on a fence can turn a garden project into a repair project.
When to DIY vs. When to Hire a Pro
DIY is a good fit for buckets, grow bags, tote planters, small cedar boxes, basic metal raised beds, and low open-bottom beds at grade. If you can keep the planter movable, low, well-drained, and independent from the house structure, most handy homeowners can handle it with basic tools.
Consider hiring a pro when the planter is built into a deck, tied into irrigation, made from masonry, placed on a slope, integrated with drainage, or designed as a permanent outdoor feature. Also bring in help if the planter will sit on a balcony or older elevated deck where saturated soil weight is uncertain.
Professional installation costs more, but it can make sense for finished outdoor living spaces where the planter needs to match hardscape, protect surfaces, manage runoff, and last for years. Recent 2026 cost benchmarks put DIY wood raised beds around $25 to $50 per square foot, while premium professionally installed wood beds can exceed $100 per square foot depending on materials, finish, access, and site work.
Best Overall DIY Tomato Planter Choices
If you want the lowest-cost experiment, build a 5-gallon bucket planter for a patio tomato. If you want the best practical container for most homeowners, use a 15- to 20-gallon grow bag with mulch, drip irrigation, and a strong cage. If you want a finished patio feature, build a cedar box about 24 inches by 48 inches by 18 to 24 inches deep for two plants. If watering consistency is your weak point, build or buy a self-watering planter with a proper overflow.
The best tomato planter is the one that gives the plant enough root space, gets water out when it rains, holds support when the plant is heavy, and fits the surface it sits on. Build those details in from the start and you will get a stronger plant, cleaner patio, and a better harvest.
Frequently Asked Questions
What size planter do tomatoes need?
Use at least 5 gallons for compact patio or dwarf tomatoes, 10 gallons for many determinate tomatoes, and 15 to 20 gallons or more for indeterminate tomatoes. A pot diameter of about 18 to 24 inches is a practical target for many container tomato plants.
Can you grow tomatoes in a 5-gallon bucket?
Yes, but choose compact, determinate, dwarf, or patio varieties. Drill several drainage holes, use potting mix, install support at planting, mulch the soil surface, and expect frequent watering during hot weather.
Do tomato planters need drainage holes?
Yes. Tomato containers need drainage holes unless they are fabric grow bags or true self-watering planters with an overflow hole. Poor drainage can cause root disease, nutrient problems, and weak plant growth.
Recommended Free Tools
How deep should a raised bed be for tomatoes?
A raised bed for tomatoes should generally be 12 to 24 inches deep. Deeper beds provide more root space and moisture buffer, but they also require more soil and become much heavier when wet.
How much does it cost to build a DIY tomato planter in 2026?
A basic bucket planter can cost about $10 to $35 per plant. Grow bag setups commonly run $15 to $60 per plant. DIY self-watering tote planters often cost $35 to $100, while cedar or galvanized tomato planters typically range from about $75 to $300+ before soil and upgrades.
Do tomato planters or raised beds need permits?
Small movable planters and low at-grade raised beds usually do not need permits, but rules vary. Check local codes and HOA rules for front-yard gardens, drainage easements, historic districts, permanent masonry beds, retaining-wall conditions, and planters built into decks or structures.
Quick Recap
Product prices and availability are accurate as of the date/time indicated and are subject to change. Any price and availability information displayed on Amazon at the time of purchase will apply.
The Tool Desk
Outbyte Driver Updater FREEFix the driver behind crashes, sound loss and screen glitchesFind Drivers →Outbyte PC Repair FREERepair Windows errors before they cause bigger problemsFix Now →
