Quick wins for a faster PC:
Repair Windows errors before they cause bigger problemsFix Now →Scan for outdated or missing drivers - takes under a minuteDriver Scan →Clear out junk files and repair common Windows errorsFree Scan →A DIY swamp cooler can work, but only if you treat it as a spot-cooling tool, not a whole-house air conditioner. In a dry climate, a small bucket or cooler-chest build can make air feel 10 to 20 degrees cooler at the outlet under favorable conditions. In humid weather, the same project may feel like a damp fan.
The short version: if your outdoor relative humidity is often below about 30% to 40%, a homemade evaporative cooler can help at a workbench, shaded patio, shed, or garage bay. If humidity is commonly above 50% to 60%, spend your time and money on a fan, dehumidification, a portable AC, or a properly designed HVAC solution instead.
On our job sites, we use evaporative cooling as a targeted comfort tool. It works best when the air is dry, the unit has enough wet pad area, the fan is not fighting a closed room, and the water side is kept clean. The build below follows that same logic: simple parts, serviceable layout, GFCI-protected power, and realistic expectations.


As an Amazon Associate I earn from qualifying purchases.
Recommended Free Tools
What a DIY Swamp Cooler Is Actually Doing
A swamp cooler is an evaporative cooler. It pulls hot, dry air through wet media. As water evaporates, it absorbs heat from the air. That cooled, moistened air is then blown toward the occupied area.
The cooling limit is not magic and it is not ice. It is the wet-bulb temperature. Dry-bulb temperature is the normal air temperature you see on a thermometer. Wet-bulb temperature reflects how much cooling is possible through evaporation. The larger the gap between dry-bulb and wet-bulb temperature, the better the cooler can perform.
#1 Best Overall
That is why Phoenix-style dry heat is a good candidate and Florida-style humid heat is not. If it is 100 degrees outside with very low humidity, an evaporative cooler may produce air roughly 15 to 20 degrees cooler at the discharge. If it is 88 degrees and muggy, there is much less room for evaporation, so the air may only feel slightly cooler while the room gets more humid.
A homemade unit is best used as a directional cooler. Aim it across your body, a workbench, a shaded seating area, or a small temporary workspace. Do not expect a 5-gallon bucket cooler to condition a 400-square-foot room, cool bedrooms overnight, or replace a code-compliant HVAC system.
Where DIY Swamp Coolers Make Sense
Evaporative cooling works best in hot, dry regions of the western and southwestern United States. It can be useful in parts of Arizona, Nevada, New Mexico, Utah, Colorado, inland California, west Texas, and similar dry climates. In transitional areas, it may work during dry spells and disappoint during humid weather. In much of the humid eastern and southeastern U.S., conventional air conditioning is usually the better tool.
Before buying parts, spend $10 to $25 on a basic digital thermometer and hygrometer. Measure outdoor humidity, indoor humidity, and the temperature coming out of the cooler once it is built. That little bit of measuring prevents a lot of guessing.
Good Uses
- Garage workbench cooling in dry weather
- Shaded patio or carport comfort
- Temporary cooling in a shed or small shop
- Spot cooling during dry construction or cleanup work
- Direct airflow over a person, bench, or tool area
Poor Uses
- Closed bedrooms with no exhaust path
- Humid climates where outdoor RH is commonly above 50% to 60%
- Rooms with existing moisture, mold, or condensation problems
- Whole-home cooling
- Any setup that requires hardwiring, duct modifications, roof penetrations, or permanent plumbing
DIY Swamp Cooler Cost in 2026
For most homeowners, the point of a DIY swamp cooler is low cost. A basic 5-gallon bucket build usually lands around $35 to $100 if you already own a drill and hole saw. A cooler-chest version with a larger fan, pump, tubing, and better media usually costs about $60 to $150.
By comparison, basic portable evaporative coolers often start around $100 to $300, while larger room or garage models commonly run several hundred dollars. A professional evaporative cooler installation is a different category: current 2026 U.S. estimates commonly run about $1,500 to $3,500 for many installations, with national figures ranging from roughly $400 to $5,800 depending on the unit, location, access, water line, electrical work, ducting, and roof or wall details. More complex high-end installs can exceed $5,800 to $7,000.
| Cooling Option | Typical 2026 Cost | Best For | Limitations |
|---|---|---|---|
| DIY 5-gallon bucket cooler | $35-$100 | Spot cooling at a bench, patio, shed, or garage bay | Small output, temporary use, needs frequent cleaning |
| DIY cooler-chest build | $60-$150 | Stronger portable spot cooling with more water capacity | Still not a whole-room HVAC system |
| Listed portable evaporative cooler | $100-$800 | Homeowners who want a tested appliance with rated airflow | Still climate-dependent and needs ventilation |
| Professional evaporative cooler install | $1,500-$3,500 common; higher for complex work | Whole-home or permanent cooling in dry climates | Permits, electrical, water line, ducting, roof access, and maintenance |
Materials and Tools
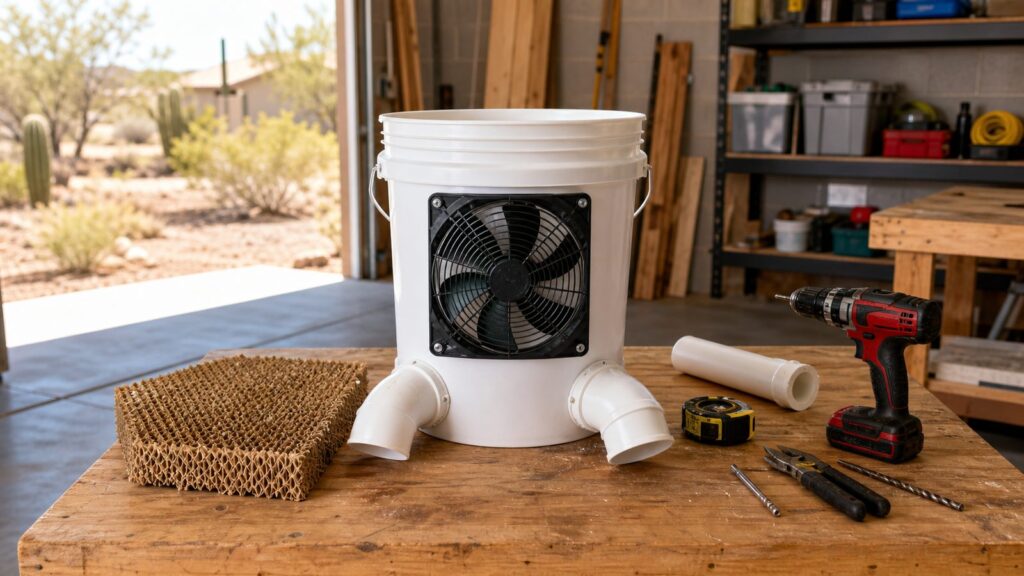
The simplest reliable build uses a 5-gallon bucket with a lid, a small listed fan, evaporative media, outlet elbows, and clean water. A pump is optional. Gravity-wetted pads are simpler, but a small recirculating pump gives more even water distribution if you build it carefully.
Basic 5-Gallon Bucket Build
- 5-gallon bucket with tight lid: $5-$10
- Small fan sized to the lid opening, usually 6 to 8 inches: $15-$50
- Evaporative pad, aspen pad, synthetic pad, or small rigid media section: $10-$30
- Three 1-1/2-inch to 2-inch PVC elbows, round vents, or duct collars: $5-$20
- Zip ties, stainless fasteners, or plastic-safe retaining clips: $3-$10
- Weather-resistant sealant or gasket tape for air leaks: $5-$12
- GFCI-protected outlet or GFCI extension cord: cost varies if you already have protection
Optional Recirculating Build
- Small submersible pump: about $10-$40 for many small replacement-style pumps, with larger pumps up to about $100
- Vinyl tubing, usually 1/4-inch to 3/8-inch inside diameter: $5-$15
- Small drip ring or drilled distribution tube: $3-$10
- Inline valve or clamp to tune flow: $3-$8
Tools
- Drill
- Hole saw sized for the fan and outlet elbows
- Utility knife
- Marker and tape measure
- Safety glasses
- Small file or sandpaper for smoothing plastic edges
Use a listed appliance fan, not an improvised motor assembly. Do not splice household wiring near water. Do not set a power strip where leaks, splashes, or condensation can reach it.
Recommended Dimensions and Layout
For a 5-gallon bucket cooler, keep the layout simple. Put the fan in the lid blowing into the bucket or pulling through the media, depending on your configuration. Cut outlet holes around the upper sidewall and aim the elbows toward the occupied zone. Keep the wet media inside the bucket where incoming air must pass through it before exiting.
A practical layout is:
- Bucket: standard 5-gallon plastic pail, roughly 12 inches in diameter and 14 to 15 inches tall
- Fan opening: 6 to 8 inches, matched to the fan housing
- Outlet openings: three 1-1/2-inch to 2-inch elbows spaced evenly around the upper bucket wall
- Water depth: 2 to 4 inches in the bottom, below electrical components and below outlet holes
- Pad height: 8 to 12 inches, depending on bucket height
- Clearance above water: enough that the pad can drain without sitting in stagnant water for days
If you use a cooler chest instead of a bucket, the same principles apply. Larger box, larger pad, cleanable reservoir, removable fan, and an easy drain. A chest-style build is better when you want more pad area and a wider air path. It is also easier to service because the lid opens fully.
Do these 3 things before closing this tab:
1Scan for outdated or missing drivers - takes under a minute2Clear out junk files and repair common Windows errors3Fix the driver behind crashes, sound loss and screen glitchesStep-by-Step: How to Build a DIY Swamp Cooler
1. Confirm the Climate First
Check outdoor humidity before you build. If relative humidity is under 40%, the project has a reasonable chance of helping. If it is above 50%, expect weak cooling. If it is above 60%, a DIY evaporative cooler is usually the wrong tool.
Write down three numbers: outdoor temperature, outdoor RH, and indoor RH. After the cooler runs for 15 minutes, measure outlet temperature and indoor RH again. If the air is cooler but the room humidity climbs fast, you need more exhaust air or a different cooling approach.
Rank #2

- The product is easy to use
- The product is highly durable
- The product is manufactured in United States
2. Cut the Fan Opening
Set the fan on the bucket lid and trace the opening. Cut a hole that supports the fan securely without letting it fall through. Many small builds use a 6-inch fan for a standard bucket. An 8-inch fan can work if the lid is strong enough and the bucket does not tip easily.
Keep the fan removable. You will need access for cleaning, drying, and pad replacement. If you fasten it down, use screws or clips that can be removed, not permanent adhesive.
What’s actually slowing this PC down?
Pick the symptom - the matching free tool is one click away.
3. Cut the Air Outlets
Mark three outlet holes around the upper side of the bucket. Keep them above the planned water line by at least 4 inches. Use a hole saw sized to your PVC elbows or vent collars. Smooth the cut edges so they do not tear the pad or catch your hands during service.
Angle the outlets slightly upward or outward. If the elbows point down, drips can end up on the floor. If you plan to use the cooler at a workbench, aim the outlets where people actually stand or sit.
4. Fit the Evaporative Media
Cut the evaporative pad so it lines the inside wall of the bucket without blocking the outlet elbows. More wet media area usually helps more than simply installing a bigger fan. Air needs contact time through evenly wetted pad material. If air finds a dry shortcut, performance drops sharply.
Aspen and fiber pads are inexpensive, often around $10 to $30 for small replacement pads. Rigid media costs more, with larger sets or rolls commonly in the $50 to $150-plus range, but it can hold its shape better and last longer when maintained. For a bucket build, inexpensive pad media is usually enough.
5. Add Water Distribution
The simplest version uses pre-wetted media and a shallow water reservoir. Wet the pad thoroughly, add 2 to 4 inches of clean water in the bottom, and let the fan pull air through the damp media. This is simple, but the pad can dry unevenly.
For better performance, add a small submersible pump. Run vinyl tubing from the pump to a ring or horizontal tube near the top of the pad. Drill small holes in the tube so water drips evenly across the media. Start with small holes, around 1/16 inch, then enlarge only if needed. Too much flow causes splashing. Too little flow leaves dry channels.
6. Control Leaks and Splashing
Before using the cooler indoors or near tools, test it outside for 20 to 30 minutes. Fill it to the planned water level, run the fan and pump, and check every seam, outlet, and cord path. The bucket should not sweat, drip, or throw water out of the outlets.
Do not overfill it. A 5-gallon bucket does not need 5 gallons of water. Most small builds are more stable and less messy with 1 to 2 gallons in the bottom. Mark a maximum fill line inside the bucket with a permanent marker.
7. Run It With Relief Air
A swamp cooler needs an exhaust path. Crack a window, open a garage side door, or create a path for air to leave the space. This is part of normal operation. If you run an evaporative cooler in a sealed room, humidity rises, evaporation slows, and comfort drops.
For a garage or workshop, place the cooler where it can pull the driest available make-up air and blow across the occupied zone. In a garage, that may mean near a shaded open door, aimed toward the bench, with another opening cracked for relief air. Do not try to cool the whole garage volume. Cool the person and the task area.
Electrical and Water Safety Rules
A DIY swamp cooler puts a fan, water, and people in the same setup. That means the build needs basic electrical discipline. Use GFCI-protected power every time. If you are outside, use an outdoor-rated extension cord and keep all connections elevated and dry.
Do not use cord splices, bare switches, exposed terminals, or non-rated motors. Do not mount a household power strip on the bucket. Do not run cords through wet holes or under the reservoir. The fan should be a complete listed appliance, positioned so water cannot spray into the motor housing.
The Tool Desk
Outbyte PC Repair FREEClear out junk files and repair common Windows errorsFree Scan →Outbyte Driver Updater FREEFix the driver behind crashes, sound loss and screen glitchesFind Drivers →Set the cooler on a stable, level surface. A full bucket with water is top-heavy once a fan is installed in the lid. If it can be bumped by kids, pets, vehicles, or job-site traffic, it needs a better location or a wider base. In a shop, keep it away from sawdust piles, extension-cord clusters, and anything that should not get damp.
Cleaning, Water Quality, and Health
Stagnant water is the part of evaporative cooling that homeowners underestimate. Public health guidance flags evaporative equipment and other water-holding devices as potential bacterial growth areas when water sits, warms, and becomes dirty. OSHA also addresses Legionnaires’ disease prevention around water systems, including the need to control stagnant water and biofilm.
For a DIY cooler, keep the maintenance routine simple and strict:
- Drain the reservoir after each day of use.
- Let the pad and bucket dry before storage.
- Rinse the reservoir with clean water every use cycle.
- Scrub visible slime, scale, or dirt before running the unit again.
- Replace pads that smell musty, shed fibers, clog with minerals, or stay stained.
- Do not store the unit wet in a garage corner for a week and then restart it.
Hard water also matters. Minerals clog pad fibers and leave crust on pumps and tubing. If your water is hard, expect more frequent pad replacement and pump cleaning. Small pads may last a season with light use, but in hard-water areas or dusty garages they may need replacement every few weeks of regular use.
Crashes, No Sound, or Screen Glitches?
Random freezes, missing sound and display glitches usually trace back to one bad driver. Find and replace yours safely.Free scan · under a minutePC Slower Than It Used to Be?
A free scan shows the junk files, broken settings and background clutter dragging Windows down - then fixes them in one click.Free scan · Windows 10 & 11A clean cooler should smell neutral. If it smells sour, earthy, or musty, shut it down, drain it, clean it, and replace the media if needed.
Independent reader supportYour contribution helps us test, update, and keep practical guides available for everyone.Common Mistakes That Make DIY Coolers Perform Poorly
Most weak DIY swamp coolers fail for one of five reasons: wrong climate, too little pad area, uneven water, no exhaust path, or dirty water. A bigger fan does not fix those problems. It usually just makes a louder damp breeze.
Rank #4

- Made in United States
Using Ice as the Main Cooling Strategy
Ice can provide a short burst of cooler air, but it is not the main event. Evaporation and airflow do the real work. A cooler that only works with a full bag of ice is closer to an ice-chest fan than a swamp cooler. It may be useful for a few minutes, but the operating cost and hassle add up fast.
Running It in a Closed Room
If air cannot leave, humidity climbs. As humidity climbs, evaporation slows. Crack a window or door. In a garage, create crossflow. In a shed, use a vent or partially open door. Relief air is not wasted air; it is how the cooler keeps working.
Using Materials That Stay Wet
Cardboard, untreated wood, fabric scraps, and porous homemade housings can absorb water and grow mold. Use plastic, metal, or cleanable cooler bodies. Make the pads removable. Make the reservoir drain fully.
Letting Water Channel Through the Pad
If water runs down one strip of pad while the rest stays dry, most of your air bypasses the cooling surface. Spread water across the full media width. In pump builds, use a drip tube or ring with several small holes rather than one open hose end.
When to DIY vs. When to Hire a Pro
DIY is reasonable when the unit is portable, cord-and-plug connected, filled by hand, drained by hand, and used for temporary spot cooling. Once you cross into permanent installation, the risk profile changes.
Call a professional if the project involves roof mounting, wall penetrations, duct connections, hardwiring, a new electrical circuit, permanent water supply, a float valve tied to plumbing, structural supports, or any work that changes the building envelope. Many jurisdictions treat installed evaporative coolers as mechanical equipment, and mechanical permits may apply. Some cities specifically include evaporative coolers in residential mechanical permit categories. Code requirements can also address equipment support, access, electrical connections, weather protection, ducts, combustion-air interactions, and water management.
Free tools Windows power users keep installed
One-click scans. No signup required.
Hire help immediately if you see recurring indoor condensation, swollen trim, musty odors, mold, wet insulation, roof leakage, or electrical nuisance tripping. Those are not normal swamp cooler side effects to ignore. They are signs that moisture, installation, or building conditions need a professional look.
DIY Swamp Cooler vs. Portable Unit vs. Installed System
A homemade cooler is cheap and repairable. A listed portable unit gives you a manufactured housing, rated fan, designed media, water controls, and usually better ergonomics. A professionally installed evaporative cooler is for homeowners in the right climate who want whole-home comfort and are ready to maintain a real mechanical system.
If you only need comfort while working in a garage for two hours, build the bucket cooler. If you want a cleaner appliance for a home office or living area, buy a portable unit. If you live in a dry climate and want to reduce reliance on refrigerated AC, talk with an HVAC contractor about a properly sized evaporative cooler, ducted system, or modern alternatives such as a mini-split.
Best Value

- These Are Complete Line Of Heavy-Duty Shop Products That Will Bring You Years Of Reliable Performance
For Bettesworth Construction clients, the deciding line is usually permanence. A portable DIY unit is a homeowner project. Cutting into a roof, tying into ducts, changing wiring, adding water supply, or supporting equipment on a structure belongs in a permitted, inspected scope of work.
Final Checklist Before You Run It
- Outdoor RH is preferably below 40%.
- Fan is a listed appliance with no exposed wiring.
- Power is GFCI protected.
- Water level is marked and below outlet holes.
- Pad is evenly wet and removable.
- Reservoir can drain completely.
- Unit has been leak-tested outside for 20 to 30 minutes.
- Window, door, or vent is open for relief air.
- Cooler is aimed at people, not expected to cool the whole building.
- Water will be drained and the unit dried after use.
A DIY swamp cooler is a good small project when you respect its limits. Build it clean, keep it dry between uses, give it exhaust air, and judge it with a thermometer and hygrometer instead of guesswork. In the right dry climate, that $35 to $150 build can make a garage or shaded work area noticeably more comfortable. In the wrong climate or as a permanent system, it is the wrong tool.
Frequently Asked Questions
Does a DIY swamp cooler actually work?
Yes, in dry air and for spot cooling. Under favorable low-humidity conditions, outlet air may feel about 15 to 20 degrees cooler. In humid air, the benefit drops quickly.
How much does it cost to build a DIY swamp cooler in 2026?
A basic 5-gallon bucket cooler usually costs about $35 to $100 in parts. A cooler-chest version with a pump, tubing, larger fan, and better media usually runs about $60 to $150.
Do I need to open a window when using a swamp cooler?
Yes. Evaporative coolers need relief air. Crack a window, door, or vent so humid air can leave and drier make-up air can enter.
Is it safe to use a fan and water together?
It can be safe if you use a listed fan, GFCI-protected power, dry cord connections, a stable reservoir, and no exposed wiring. Do not use improvised motors or cord splices near water.
Do I need a permit to install a swamp cooler?
A portable DIY cooler normally does not require a permit. Permanent installations involving roof work, ductwork, hardwiring, plumbing, or structural support may require mechanical, electrical, or plumbing permits.
When should I hire a professional instead of building one?
Hire a pro for whole-home cooling, roof penetrations, duct connections, new circuits, permanent water lines, structural supports, or any recurring indoor moisture problem.
Quick Recap
Product prices and availability are accurate as of the date/time indicated and are subject to change. Any price and availability information displayed on Amazon at the time of purchase will apply.
Recommended Free Tools

