Quick wins for a faster PC:
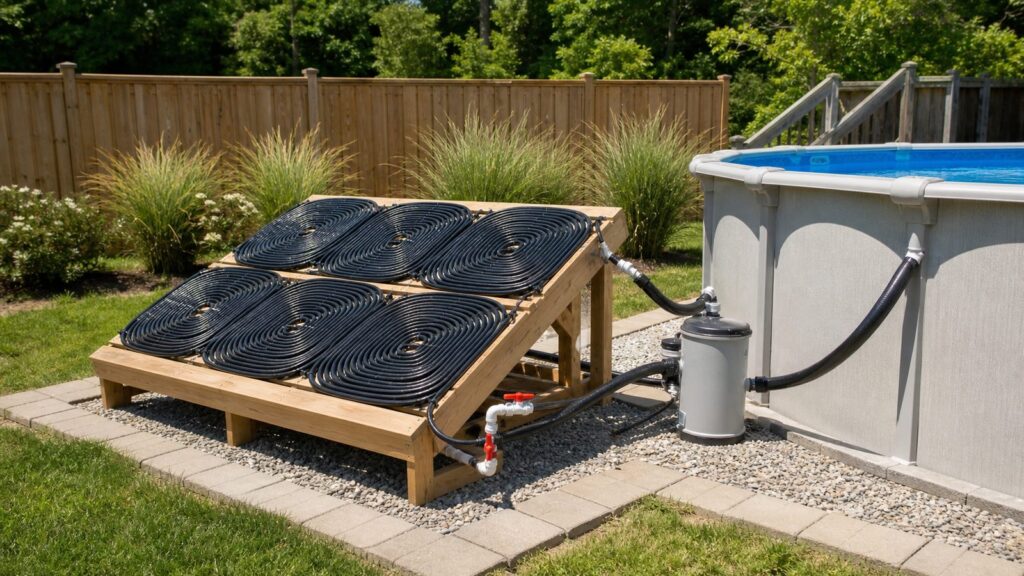
Scan for outdated or missing drivers - takes under a minuteDriver Scan →Repair Windows errors before they cause bigger problemsFix Now →A DIY pool heater can work, but only if you treat it as a small solar-assist system instead of a replacement for a real gas heater, heat pump, or professionally sized solar thermal array. The basic version is simple: move filtered pool water through black UV-rated tubing or a dark collector panel, let the sun warm it, and return it to the pool.
The honest part is sizing. A 10,000-gallon pool holds about 83,400 pounds of water. Since 1 BTU raises 1 pound of water 1 degree Fahrenheit, that pool needs roughly 83,400 BTUs just to gain 1 degree before accounting for wind, shade, evaporation, cool nights, and heat lost through the water surface. A 100-foot coil of black hose may feel hot at the outlet, but it will not heat a large inground pool quickly.
As an Amazon Associate I earn from qualifying purchases.
For small above-ground pools, plunge pools, shoulder-season help, or topping up a few degrees on sunny afternoons, a DIY solar pool heater can be worth building. On our job sites, we approach these projects the same way we approach permanent outdoor systems: keep the water path clean, protect the pump, allow service shutoff, avoid roof mistakes, and plan for drainage. The four-step build below keeps the project practical.
What a DIY Pool Heater Can and Cannot Do
A black-hose DIY pool heater is best understood as a solar booster. It can add useful heat during sunny weather, especially when paired with a properly fitted pool cover. It cannot deliver predictable spa-like heating, fast recovery after a cold night, or dependable performance in heavy shade.
#1 Best Overall

- HIGH-HEAT PERFORMANCE - SwimEasy solar pool heaters capture more heat from the sun with superior absorber technology. They also enable water to move effectively through the collector by removing flow barriers with its specially crafted over-molded header. These features combine to give SwimEasy solar pool heater panels extreme heating capabilities!
- SUPERIOR HEAT TRANSFER – SwimEasy’s manifold is molded directly around the absorber tubes, eliminating flow barriers and allowing water to freely exit the manifold into each absorber tube. Flow is one of the most important elements to a solar pool heater. The water flowing through the system is what transfers heat from the collector to your pool. The more water that flows through your panels, the more heat that’s transferred to your pool.
- EXTREME DURABILITY - SwimEasy solar pool heaters are manufactured in the US with high-grade materials and specialized U.V. stabilizers. SwimEasy solar pool heaters are built to withstand your rooftops’ extremely harsh conditions, in all types of weather, for 15-20 years!
- QUALITY FROM START TO FINISH - SwimEasy solar pool heaters use today’s most advanced technology to create a single-piece header. The result is a solid, one-piece panel with virtually no manufacturing variances. Solar pool heaters undergo tremendous stressors over the years, so the bond between the headers and riser tubes is extremely important for assuring leak-free operation for years to come!
- FULL DIY KIT + EXPERT SUPPORT – Connects to your existing pump & filtration system. Each kit contains all the hardware needed to mount the solar panels, connect the panels together, secure with tie-down strap, and connect to your supply & return plumbing. You’ll receive a comprehensive installation manual with step-by-step instructions and unlimited access to our expert installation specialists!
Professional solar pool heaters are usually sized by collector area, not by hose length. A common planning range is collector area equal to about 50% to 100% of the pool surface area, depending on climate, desired swim temperature, cover use, sun exposure, and season length. For a 15-by-30-foot pool with 450 square feet of surface area, that can mean 225 to 450 square feet of solar collector. A single coil on a board is nowhere near that.
That does not make DIY useless. It means the project has to match the pool. A 100- to 300-foot coil can be a reasonable experiment for a small above-ground pool. A larger DIY setup with 500 to 1,000 feet of UV-rated tubing, multiple panels, valves, unions, a thermometer, and a dedicated pump can help more, but it starts to approach the cost and complexity where commercial unglazed solar panels make more sense.
The biggest hidden variable is heat loss. Pool heat loss happens mainly at the water surface, especially through evaporation. A solar cover used at night and during windy periods often preserves more heat than another homemade coil adds. If the pool is uncovered overnight, daytime gains can disappear before morning.
DIY Pool Heater Cost in 2026
For a very small above-ground-pool setup, expect to spend about $75 to $300 in 2026. That usually covers 100 to 300 feet of black tubing, hose adapters, clamps, outdoor fasteners, a basic frame or backing board, and possibly a small pump.
A larger DIY solar-assist heater typically lands around $250 to $800 or more. That budget covers 500 to 1,000 feet of UV-rated tubing, multiple coils or panels, bypass valves, unions, a check valve, thermometers, better framing, weatherproof fasteners, and sometimes a dedicated pump.
For comparison, installed commercial solar pool heaters commonly run about $2,500 to $6,500 nationally in 2026, with many projects near $4,500. Higher-end or complicated installs can reach $7,500 to $9,500 or more. Gas heaters often install for about $1,500 to $6,000, while electric heat pump pool heaters commonly land around $2,000 to $8,000, with some California projects ranging closer to $4,000 to $10,000 depending on equipment size, electrical service, and site conditions.
| Pool heating option | Typical 2026 installed or project cost | Best use | Main limitation |
|---|---|---|---|
| Small DIY black-hose solar coil | $75 to $300 | Small above-ground pools and experiments | Modest heat gain and short material life if built cheaply |
| Larger DIY solar-assist setup | $250 to $800+ | Several sunny degrees with a cover and good flow control | More plumbing, head pressure, tuning, and winter drainage |
| Commercial solar pool heater | $2,500 to $6,500 typical; $7,500 to $9,500+ complex | Longer swim season with low operating cost | Needs collector area, sun exposure, and professional layout |
| Gas pool heater | $1,500 to $6,000 | Fast heating on demand | Fuel cost, venting, combustion air, gas line, and code requirements |
| Electric heat pump | $2,000 to $8,000; sometimes $4,000 to $10,000 | Efficient steady heating in suitable climates | Slower than gas and may need electrical upgrades |
Cost drivers include pool gallons, pool surface area, target temperature rise, local weather, wind exposure, collector type, roof versus ground mounting, pump capacity, plumbing size, distance from the equipment pad, permits, labor, and local utility rates.
Materials and Tools for a 4-Step DIY Solar Pool Heater
Use outdoor-rated materials. Ordinary garden hose, indoor fittings, non-UV zip ties, and weak plywood tend to fail under sun, chlorinated splash, and weather. If you want the heater to last more than a short season, spend money on UV-rated irrigation tubing or purpose-made solar pool tubing.
Recommended materials
- 100 to 300 feet of black UV-rated polyethylene irrigation tubing for a starter coil, usually 1/2 inch to 3/4 inch diameter.
- 500 to 1,000 feet of tubing for a larger DIY assist system, split into multiple coils or panels rather than one restrictive loop.
- Pressure-rated hose adapters, barbed fittings, stainless hose clamps, unions, and outdoor-rated valves.
- A treated-lumber frame, composite backing, or exterior-rated panel, typically 4 by 4 feet or 4 by 8 feet for a starter build.
- UV-rated pipe straps or outdoor fasteners. Leave air gaps between tubing runs instead of stacking hose.
- A bypass valve assembly if connecting after the pool filter, or a dedicated small pump if building a separate above-ground circuit.
- Two pool-safe thermometers: one before the collector and one after it.
- Optional check valve to prevent reverse flow where the layout calls for it.
- Drain plug or low-point disconnect for winterizing in freeze-prone states.
Tools
- Tape measure and marker
- Tubing cutter or sharp utility knife
- Drill and exterior screws
- Screwdriver or nut driver for clamps
- Adjustable wrench
- Bucket for leak testing and priming small pumps
- Infrared thermometer, optional but useful for checking collector surface temperature
For many homeowners, the best starter size is one 4-by-4-foot or 4-by-8-foot collector with 200 to 300 feet of tubing. Build one, measure performance for several sunny days, then decide whether to scale up. That is better than spending $800 on tubing before you know how your yard, pump, and pool respond.
Rank #2
- HIGH-HEAT PERFORMANCE - SwimEasy solar pool heaters capture more heat from the sun with superior absorber technology. They also enable water to move effectively through the collector by removing flow barriers with its specially crafted over-molded header. These features combine to give SwimEasy solar pool heater panels extreme heating capabilities!
- SUPERIOR HEAT TRANSFER – SwimEasy’s manifold is molded directly around the absorber tubes, eliminating flow barriers and allowing water to freely exit the manifold into each absorber tube. Flow is one of the most important elements to a solar pool heater. The water flowing through the system is what transfers heat from the collector to your pool. The more water that flows through your panels, the more heat that’s transferred to your pool.
- EXTREME DURABILITY - SwimEasy solar pool heaters are manufactured in the US with high-grade materials and specialized U.V. stabilizers. SwimEasy solar pool heaters are built to withstand your rooftops’ extremely harsh conditions, in all types of weather, for 15-20 years!
- QUALITY FROM START TO FINISH - SwimEasy solar pool heaters use today’s most advanced technology to create a single-piece header. The result is a solid, one-piece panel with virtually no manufacturing variances. Solar pool heaters undergo tremendous stressors over the years, so the bond between the headers and riser tubes is extremely important for assuring leak-free operation for years to come!
- FULL DIY KIT + EXPERT SUPPORT – Connects to your existing pump & filtration system. Each kit contains all the hardware needed to mount the solar panels, connect the panels together, secure with tie-down strap, and connect to your supply & return plumbing. You’ll receive a comprehensive installation manual with step-by-step instructions and unlimited access to our expert installation specialists!
Step 1: Size the Goal and Pick the Location
Start with the goal, not the hose. A DIY pool heater should have a measurable target such as adding 2 to 4 degrees during sunny stretches, extending comfortable swimming by a few weeks, or warming a small above-ground pool for weekend use. If the target is heating a 20,000-gallon inground pool from 68 degrees to 84 degrees on demand, this is not the right project.
Measure the pool surface area and estimate volume. A simple rectangular pool uses length times width for surface area. A 12-by-24-foot pool has 288 square feet of surface. An 18-foot round above-ground pool has about 254 square feet of surface. Professional solar design often uses collector area around 50% to 100% of pool surface area, so even that 18-foot round pool could justify 125 to 250 square feet of collector for meaningful seasonal heating. A DIY coil may have far less effective collection area.
Free tools Windows power users keep installed
One-click scans. No signup required.
Place the collector where it gets at least 6 hours of direct sun. In much of the United States, a roof-mounted collector generally performs best facing south, but ground racks, fences, sheds, and sunny patios can work if they avoid shade and trip hazards. We prefer ground or low structure mounting for DIY builds because it avoids roof penetrations, fall risk, wind uplift issues, and structural questions.
Slope the collector so it can drain. This matters in freeze-prone states, but it also helps with service. A flat coil that traps water can grow algae, freeze, split fittings, or become difficult to winterize. Even a slight pitch toward a drain point or union is better than a dead-flat panel.
Keep the water run short. Long tubing runs between the pool and collector add restriction and heat loss. Avoid sharp bends and kinks. If the pump struggles or the filter pressure rises sharply after you add the heater, the system is too restrictive or poorly valved.
Step 2: Build the Black Collector Coil or Panel
Lay out the tubing in a flat spiral or serpentine pattern on the backing board. Do not stack hose on top of itself. Overlapping tubing shades the lower runs and reduces performance. Leave small air gaps so sunlight reaches the tubing and air can move around it.
Do these 3 things before closing this tab:
1Clear out junk files and repair common Windows errors2Fix the driver behind crashes, sound loss and screen glitches3Repair Windows errors before they cause bigger problemsFor a starter panel, a 4-by-8-foot frame gives you 32 square feet of gross area. With 1/2-inch tubing, 200 to 300 feet can fit if the bends are gentle and the spacing is controlled. Larger tubing, such as 3/4 inch, reduces restriction but takes more space and costs more. If your pool pump is sensitive to head pressure, larger tubing and multiple parallel loops are better than one very long loop.
Fasten the tubing with UV-rated straps or outdoor fasteners. Do not pinch it tight. Tubing expands in the sun, and over-tight fasteners can create wear points. Paint or choose a dark backing surface if the material is not already dark, but do not rely on paint to fix poor sun exposure or undersized collector area.
On our crews, we look for serviceability before calling an outdoor installation done. That means unions or disconnects where the collector can be removed, valves that can isolate it, and a low point that can drain. A homemade heater that cannot be drained or bypassed will become a problem the first time a fitting leaks or temperatures drop.
Rank #3
- HIGH-HEAT PERFORMANCE - SwimEasy solar pool heaters capture more heat from the sun with superior absorber technology. They also enable water to move effectively through the collector by removing flow barriers with its specially crafted over-molded header. These features combine to give SwimEasy solar pool heater panels extreme heating capabilities!
- SUPERIOR HEAT TRANSFER – SwimEasy’s manifold is molded directly around the absorber tubes, eliminating flow barriers and allowing water to freely exit the manifold into each absorber tube. Flow is one of the most important elements to a solar pool heater. The water flowing through the system is what transfers heat from the collector to your pool. The more water that flows through your panels, the more heat that’s transferred to your pool.
- EXTREME DURABILITY - SwimEasy solar pool heaters are manufactured in the US with high-grade materials and specialized U.V. stabilizers. SwimEasy solar pool heaters are built to withstand your rooftops’ extremely harsh conditions, in all types of weather, for 15-20 years!
- QUALITY FROM START TO FINISH - SwimEasy solar pool heaters use today’s most advanced technology to create a single-piece header. The result is a solid, one-piece panel with virtually no manufacturing variances. Solar pool heaters undergo tremendous stressors over the years, so the bond between the headers and riser tubes is extremely important for assuring leak-free operation for years to come!
- FULL DIY KIT + EXPERT SUPPORT – Connects to your existing pump & filtration system. Each kit contains all the hardware needed to mount the solar panels, connect the panels together, secure with tie-down strap, and connect to your supply & return plumbing. You’ll receive a comprehensive installation manual with step-by-step instructions and unlimited access to our expert installation specialists!
Coil layout tips that matter
- Use several shorter loops in parallel for larger builds instead of one 1,000-foot restrictive coil.
- Keep bend radius gentle to avoid kinks that reduce flow.
- Leave space between tubing runs to reduce self-shading.
- Mount the panel securely against wind, especially if it is on a rack or shed roof.
- Avoid roof penetrations unless a qualified installer evaluates flashing, structure, and access.
If you are tempted to put a heavy water-filled collector on a house roof, stop and check the actual loads, attachment method, drainage path, fall protection, and local permit requirements. DIY roof work is where a simple pool project can become a building envelope problem.
What’s actually slowing this PC down?
Pick the symptom - the matching free tool is one click away.
Step 3: Plumb It With a Bypass or Separate Pump
The cleanest permanent-style connection is a filtered-water bypass after the pool filter. Water leaves the filter, part of the flow is diverted through the solar collector, and warmed water returns to the pool return line. Valves let you tune flow through the heater or shut it off completely when the water is already warm, the sun is down, the collector is leaking, or the pool needs normal filtration.
For many above-ground pools, a dedicated small pump is simpler. The pump pulls pool water through a screened intake, pushes it through the collector, and returns it to the pool. This keeps the DIY heater from starving the main pool pump or interfering with filtration. Use a pump rated for outdoor pool use and the head pressure of your tubing layout. Keep cords and connections out of splash zones and use properly protected outdoor GFCI power.
Do not connect improvised plumbing to gas, propane, line-voltage electrical systems, roof structure, or permanent pool plumbing unless the required licensed trade and local permit are involved. Also do not bypass the pool filter in a way that sends dirty water through small tubing. Debris clogs homemade collectors quickly.
Flow rate matters more than most DIY builds admit. Very slow flow can produce hot outlet water, but the total heat added to the pool may be small. Too much flow can lower the outlet temperature rise and create unnecessary head pressure. The goal is useful total heat gain, not the hottest trickle from the hose.
The Tool Desk
Outbyte PC Repair FREEClear out junk files and repair common Windows errorsFree Scan →Outbyte Driver Updater FREEScan for outdated or missing drivers - takes under a minuteDriver Scan →Install one thermometer before the collector and one after it. If the return water is only 1 or 2 degrees warmer but the flow is strong, that may be better than a 15-degree rise at a dribble. Track the whole pool temperature in the morning and evening for several sunny days. That tells you whether the pool is actually gaining heat.
Step 4: Test, Tune, and Protect the System
Before leaving the heater unattended, run it under supervision. Check every clamp, adapter, valve, union, and tubing bend for leaks. Watch the pool filter pressure gauge if the collector is tied into the main system. A major pressure increase is a warning that the collector is too restrictive, the bypass is set wrong, or a line is kinked.
Start with partial flow through the collector. After 15 to 30 minutes of sun, compare inlet and outlet temperatures. Adjust the bypass valve or pump speed if available. Then measure the pool water at the same location each morning and evening for three to five sunny days. A useful test log includes air temperature, pool temperature, weather, wind, cover use, pump run time, and inlet/outlet temperature.
Use a pool cover. This is not optional if you want results. A cover reduces overnight heat loss, evaporation, water loss, and chemical loss. In windy conditions, the cover may matter more than the collector. Many homeowners add more tubing when the real problem is that the pool gives up its heat every night.
Crashes, No Sound, or Screen Glitches?
Random freezes, missing sound and display glitches usually trace back to one bad driver. Find and replace yours safely.Free scan · under a minutePC Slower Than It Used to Be?
A free scan shows the junk files, broken settings and background clutter dragging Windows down - then fixes them in one click.Free scan · Windows 10 & 11Rank #4

- DEPENDABILITY: SunValue by Solar Pool Supply is built to be the perfect fit for residential homes looking for durability and dependability. SunValue’s improved, lighter weight build packs the same efficiency, reliability, and durability as the industry-leading Heliocol panel, but at a fraction of the price.
- DURABILITY: SunValue boasts innovative engineering to simplify installation and boost heating performance. Crafted with durable materials and cutting-edge manufacturing, SunValue panels are designed for longevity, with up to 20+ years of use. Plus, the SunValue solar pool heater DIY Kit offers maintenance-free effectiveness once installed, making electric and gas pool heating bills a thing of the past.
- COST-EFFECTIVE: Solar pool heating relies on free sunlight and has minimal to no increase on your current operational cost since it is powered by your existing filtration pool pump. SunValue simply ties into your existing filtration system and is compatible with both inground and above ground pools. Integration is easy and compatible with your existing pool equipment.
- QUICK RETURN ON INVESTMENT: With no expensive and re-occurring gas and electric utility rates, Solar Pool Heating usually pays for itself within the first 3 years when compared to heating your pool with gas or electricity because it’s a one-time up-front investment with minimal to no increase on your operational cost.
- EASY INSTALLATION: Easy-to-follow instructions, suitable for all skill levels: Whether you're a seasoned DIY enthusiast or a beginner, our kits are designed for you. Installation is typically straightforward and non-invasive. With SunValue, you can enjoy your pool up to 9-10 months a year with solar pool heating alone.
Plan shutdown. When the sun is off the collector, it can become a cooling loop. Turn off the dedicated pump or close the bypass when the panel is shaded, at night, or during cold weather. In freeze-prone states, drain the collector before hard freezes. Water trapped in tubing and fittings can split parts quickly.
Independent reader supportYour contribution helps us test, update, and keep practical guides available for everyone.Safety, Permits, and Code Notes
Small temporary above-ground solar coils may not trigger the same review as a permanent roof-mounted solar heater, but permit rules are local. The authority having jurisdiction decides what requires a permit. Electrical, plumbing, roof, mechanical, and pool barrier rules may all come into play depending on how the heater is installed.
Permit fees vary widely. One common range for local solar pool heating permits is about $80 to $280, but homeowners should verify with the local building department before buying materials. Roof-mounted systems, trenching, new electrical circuits, permanent plumbing changes, gas heaters, and heat pumps are more likely to require permits and licensed labor.
Pool and spa codes also care about safe circulation, suction entrapment, equipment access, electrical protection, and listed components. A homemade coil should not create a suction hazard, block required filtration, overload a pump, or introduce unsafe electrical connections near water.
Recommended Free Tools
California homeowners should be especially careful with current energy rules and pool heating requirements. Title 24 requirements have become more detailed around pool heating, equipment efficiency, and installation choices. If you are replacing or adding a permanent heater, verify the current local interpretation before assuming a DIY or like-for-like installation is allowed.
When to DIY vs. When to Hire a Pro
DIY makes sense when the pool is small, the collector can sit safely at ground level, the project is reversible, and expectations are modest. A good DIY candidate is a homeowner with a small above-ground pool who wants a few sunny-day degrees, already uses a cover, and is comfortable working with low-pressure water fittings.
Hire a pro when the pool is large, inground, shaded, expensive to repair, or expected to stay at a set temperature. Also hire a pro if the project touches gas, propane, permanent electrical work, roof structure, roof penetrations, automation, complex equipment pads, or buried plumbing. The cost is higher, but so is the performance and accountability.
Commercial unglazed solar pool panels are designed for higher flow, lower restriction, outdoor UV exposure, and longer service life. They also allow proper collector sizing. If your DIY material list is approaching $800 and you are considering roof mounting, it is time to price a professional solar design. Installed collector-area pricing is often quoted around $20 to $40 per square foot, with collector materials commonly running about $1,500 to $4,000 on typical systems and labor often around $1,000 to $4,000 nationally.
Gas and heat pump heaters solve different problems. Gas heats quickly and works well for occasional on-demand use, but fuel, venting, combustion air, emissions, and gas-line sizing matter. Heat pumps are efficient for steady heating in suitable climates, but they heat more slowly and may require electrical capacity upgrades. A DIY solar coil sits below both: lower cost, lower output, and more weather dependence.
Best Value

- HIGH-HEAT PERFORMANCE - SwimEasy solar pool heaters capture more heat from the sun with superior absorber technology. They also enable water to move effectively through the collector by removing flow barriers with its specially crafted over-molded header. These features combine to give SwimEasy solar pool heater panels extreme heating capabilities!
- SUPERIOR HEAT TRANSFER – SwimEasy’s manifold is molded directly around the absorber tubes, eliminating flow barriers and allowing water to freely exit the manifold into each absorber tube. Flow is one of the most important elements to a solar pool heater. The water flowing through the system is what transfers heat from the collector to your pool. The more water that flows through your panels, the more heat that’s transferred to your pool.
- EXTREME DURABILITY - SwimEasy solar pool heaters are manufactured in the US with high-grade materials and specialized U.V. stabilizers. SwimEasy solar pool heaters are built to withstand your rooftops’ extremely harsh conditions, in all types of weather, for 15-20 years!
- QUALITY FROM START TO FINISH - SwimEasy solar pool heaters use today’s most advanced technology to create a single-piece header. The result is a solid, one-piece panel with virtually no manufacturing variances. Solar pool heaters undergo tremendous stressors over the years, so the bond between the headers and riser tubes is extremely important for assuring leak-free operation for years to come!
- FULL DIY KIT + EXPERT SUPPORT – Connects to your existing pump & filtration system. Each kit contains all the hardware needed to mount the solar panels, connect the panels together, secure with tie-down strap, and connect to your supply & return plumbing. You’ll receive a comprehensive installation manual with step-by-step instructions and unlimited access to our expert installation specialists!
Common DIY Pool Heater Mistakes
The most common mistake is judging the heater by outlet temperature alone. A hot trickle feels impressive, but the pool only cares about total BTUs delivered. Flow rate multiplied by temperature rise is what matters. If the flow is too low, the collector may look successful while the pool barely changes.
The second mistake is skipping the cover. Evaporation can erase daytime solar gains overnight. If the budget is tight, buy a good pool cover before building a second coil.
Other avoidable mistakes include using non-UV tubing, cheap hose washers, indoor zip ties, unprotected lumber, kinked tubing, missing bypass valves, and plumbing the collector in a way that starves the main pump. We also see homeowners put coils on roofs without thinking through wind uplift, roof leaks, drainage, fall protection, or winter access.
Start smaller and measure. One well-built coil, a cover, and a five-day temperature log will teach you more than a pile of tubing installed blindly.
Bottom Line
You can make a DIY pool heater in four practical steps: size the goal and choose a sunny location, build a black collector coil or panel, plumb it with a bypass or separate pump, then test and tune the system with real temperature readings. For a small pool, the project can be useful and inexpensive. For a large pool, it is usually a supplement at best.
In 2026, a realistic DIY budget runs from about $75 to $300 for a small coil and $250 to $800 or more for a larger solar-assist setup. If you need dependable heating, automatic controls, roof-mounted collectors, or code-compliant permanent equipment, bring in a pool or solar professional and compare the DIY spend against a properly sized commercial system.
Frequently Asked Questions
Can a black hose really heat a swimming pool?
Yes, but modestly. Black tubing can warm water as it passes through the sunlit coil, especially on small above-ground pools. For large inground pools, one hose coil usually adds too little total heat to move the full pool temperature much.
What’s actually slowing this PC down?
Pick the symptom - the matching free tool is one click away.
How much does a DIY pool heater cost in 2026?
A small DIY black-hose solar coil usually costs about $75 to $300. A larger DIY solar-assist setup with UV-rated tubing, valves, unions, thermometers, framing, and a dedicated pump can cost $250 to $800 or more.
How many feet of black hose do I need for a pool heater?
For a starter build, 100 to 300 feet can help a small pool. Larger DIY setups may use 500 to 1,000 feet split into multiple loops. Pool surface area matters more than hose length; professional solar systems are often sized at roughly 50% to 100% of pool surface area.
Should I use my pool pump or a separate pump?
For integrated plumbing, use a filtered-water bypass after the filter with valves so you can tune flow and isolate the heater. For many above-ground pools, a separate outdoor-rated pump is simpler and avoids starving the main filtration system.
Do I need a permit for a DIY solar pool heater?
It depends on your local authority having jurisdiction. Temporary ground-level coils may be treated differently than roof-mounted or permanently plumbed systems. Electrical work, roof penetrations, gas equipment, heat pumps, and permanent plumbing changes are more likely to require permits.
Quick wins for a faster PC:
Scan for outdated or missing drivers - takes under a minuteDriver Scan →Repair Windows errors before they cause bigger problemsFix Now →What is better: a solar pool cover or a DIY pool heater?
For many homes, the cover is the better first purchase. A DIY heater can add daytime heat, but a cover reduces overnight evaporation and heat loss. The best low-cost setup is usually a cover plus a correctly built solar-assist coil.
Quick Recap
Product prices and availability are accurate as of the date/time indicated and are subject to change. Any price and availability information displayed on Amazon at the time of purchase will apply.