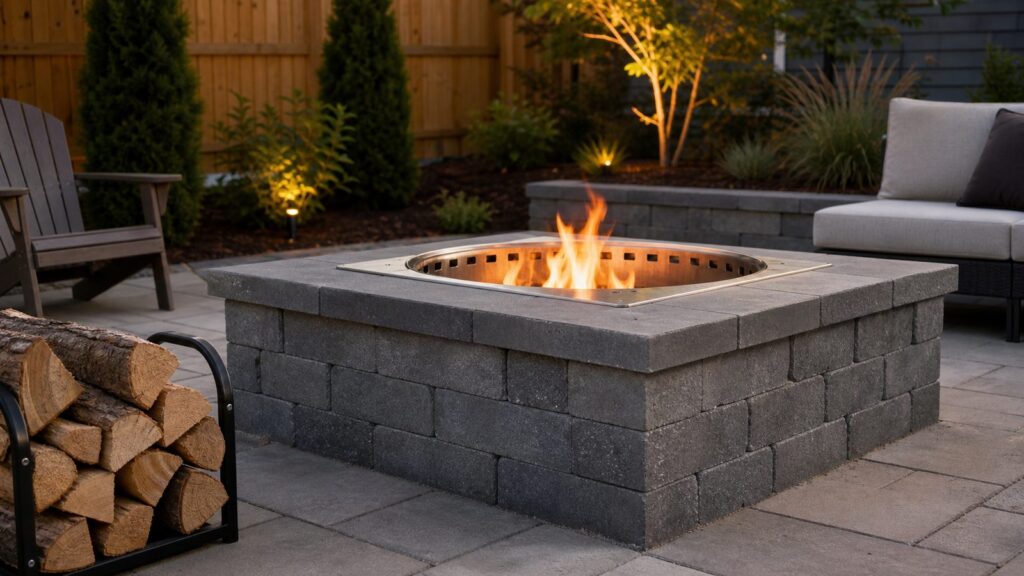
A DIY smokeless fire pit is not just a regular block fire ring with a few holes drilled in it. The pit has to pull air in low, warm that air in a side chamber, and feed it back into the flame near the rim so smoke particles burn before they leave the pit. When the proportions are right, smoke drops sharply after startup. When they are wrong, you get an expensive stone circle that still smokes.
For most homeowners, the best DIY version is a masonry ring with a steel smokeless insert. Budget about $250 to $900 for a homeowner-built pit in 2026, depending on size, block choice, insert quality, base materials, and whether you already own tools. A professional built-in fire pit often starts around $1,500 to $5,000, and full patio-integrated projects can run $3,000 to $8,000 or more.
As an Amazon Associate I earn from qualifying purchases.
On our job sites, the failures we see are usually not mysterious. The pit is too close to the fence, the base holds water, the liner fits too tightly, wet wood is being burned, or the first course was set on loose soil. This guide walks through the build the way a contractor would think about it: code first, layout second, air movement third, then materials, drainage, and long-term maintenance.
Outdated Drivers Are Slowing You Down
One free scan finds every outdated or missing driver and matches the right update for your exact hardware.Free scan · exact hardware matchWindows Errors? Fix Them Before They Spread
Repair common Windows errors and clear accumulated junk for a smoother, more stable PC - no reinstall needed.Free scan · no reinstallHow a Smokeless Fire Pit Actually Works
“Smokeless” does not mean smoke-free. Every wood fire smokes during startup, especially before the burn chamber is hot. A smokeless pit reduces visible smoke once the fire is established by creating a hotter, more complete burn.
#1 Best Overall

- Superior Strength Meets Premium Craftsmanship (Utility Patent Pending): This 36"heavy-duty steel fire pit ring is built tougher and thicker than standard models and other smokeless fire pit ring—delivering long-lasting durability and more impressive, smokeless flames. This 36"heavy-duty metal fire pit ring is a high-end centerpiece designed to elevate every outdoor gathering. [Utility Patent Pending]
- Smokeless Firepit Ring - Enjoy a Cleaner Burn: Say goodbye to smoky clothes and watery eyes. This fire ring for outside fire pit is engineered for efficient airflow and secondary combustion. For best results, add a rock base, maintain a 1"gap between the ring and wall, and leave air vents at the base to optimize smoke reduction and airflow.
- Permanent, Non-Portable Design for Long-Term Use: Crafted for fixed installation, this fire pit kit is ideal for those wanting a permanent metal fire pit ring feature in their yard. Whether placed above ground or sunk into a pit, this fire pit liner adds rustic charm and lasting function to any outdoor space. Please note: not intended for portable use or campground transport.
- Durable, Easy to Install Fire Pit Insert: Built from heavy-duty steel for long-term use, this firepit rings for outside installs easily and is perfect for weekend DIYers. Pair this smokeless fire pits for outside with weather-resistant rock or brick for a professional, polished finish. Use a weatherproof cover and high-heat paint for extended product
- Integrity in Service: Iron Forge Tools, a U.S. veteran-owned business, stands behind its fire rings for outside wood burning. We're here to help resolve any issues that you may have on your 36 inch fire pit.
The key is secondary combustion. The fire gets primary air from the bottom or lower side openings. At the same time, a second stream of air travels through a chamber between the outer masonry wall and the inner steel liner. That air heats as it rises. Near the top of the liner, small vent holes inject the hot oxygen back into the flame. The smoke gases ignite near the rim instead of drifting into the seating area.
A good DIY masonry smokeless pit normally has four working parts:
- Low intake openings: These feed oxygen to the lower burn zone and side chamber.
- A metal liner or insert: This protects the masonry and forms the inner wall of the air chamber.
- A 2 to 3 inch side air gap: This space lets air rise and preheat before reaching the upper vents.
- Upper vent holes: These release hot oxygen into the smoke stream near the rim.
If the liner is pressed tight against the stone, you lose the air chamber. If the lower openings are blocked by ash, mulch, or patio debris, the pit starves. If the logs sit above the rim, the smoke leaves before it reaches the secondary-burn zone.
Recommended Free Tools
Before You Build: Code, Setbacks, and Burn Rules
Check local rules before you buy materials. Backyard fire pit rules vary by city, fire district, HOA, county, and wildfire zone. A pit that is legal in one town may be too large, too close to a structure, or banned during dry weather in another.
Most jurisdictions treat this type of project as a wood-burning recreational fire feature. That means rules may cover size, fuel type, setbacks, attendance, extinguishing equipment, burn bans, and nuisance smoke. Many local codes limit recreational fires to around 3 feet in diameter and 2 feet high, though the exact number can differ. Some places require 25 feet from structures or combustibles. Others allow smaller listed appliances closer when used on noncombustible surfaces. Do not assume.
Permit and Safety Checklist
- Call the local fire marshal or building department before construction.
- Confirm maximum fire pit diameter and flame height.
- Ask about setbacks from the house, garage, fence, shed, deck, property line, easements, and overhanging trees.
- Check whether permanent masonry fire pits need a permit or inspection.
- Review HOA rules for open flames, smoke, and exterior changes.
- Ask whether burn bans, red flag warnings, or air-quality restrictions apply.
- Confirm that wood burning is allowed; some neighborhoods only allow gas fire features.
- Keep a hose, extinguisher, sand bucket, or other approved extinguishing method nearby.
We also recommend keeping the seating area noncombustible. A comfortable layout needs more than the pit diameter. Plan for several feet of stone, concrete, gravel, or paver surface around the fire so chairs can slide back without landing in mulch or grass.
2026 Cost to Build a DIY Smokeless Fire Pit
A basic DIY smokeless masonry fire pit typically lands between $250 and $900. The low end assumes a smaller pit, economical retaining wall blocks, a modest insert, and tools you already own. The high end is more realistic for a clean 30 to 36 inch insert, better capstones, delivered base material, tool rental, and safety accessories.
For comparison, national fire pit installation averages are around $850 in 2026, with broad typical installed ranges near $200 to $3,000 or $240 to $2,400 depending on project type and market. Custom hardscape work climbs quickly because excavation, patio integration, drainage, hauling, and finish labor dominate the cost.
| Fire Pit Option | Typical 2026 Cost | Best Fit |
|---|---|---|
| DIY masonry smokeless pit | $250-$900 | Hands-on homeowner with a level site and basic masonry comfort |
| Portable smokeless pit | $150-$2,000 | Renters, small patios, flexible layouts, simpler code path |
| Simple pro-built wood fire pit | $1,500-$5,000 | Homeowners who want a permanent, finished hardscape feature |
| Custom patio fire pit area | $3,000-$8,000+ | Integrated seating, drainage, pavers, walls, lighting, or premium stone |
| Custom gas fire pit or fire table | $3,500-$8,000+ | Low-smoke operation, convenience, permanent gas connection |
Hidden DIY costs matter. Add money for crushed stone delivery, paver base, a masonry blade or saw rental, plate compactor rental, fire-rated mortar, spark screen, poker, ash shovel, moisture meter, and a fire extinguisher. Thin steel liners can also burn out over time, so do not buy the cheapest insert if you plan to use the pit often.
Recommended Size and Layout
Most DIY masonry smokeless fire pits work best at 30 to 42 inches inside diameter. Smaller than that, standard firewood lengths become awkward. Larger than that, draft can become harder to control and local recreational-fire size limits may become a problem.
For a typical backyard, a good target is a 36 inch inside diameter pit with a finished outside diameter around 48 to 54 inches, depending on block thickness. Keep the wall height around 14 to 18 inches. That height contains the coal bed without making the fire hard to enjoy from a seated position.
The Tool Desk
Outbyte Driver Updater FREEScan for outdated or missing drivers - takes under a minuteDriver Scan →Outbyte PC Repair FREERepair Windows errors before they cause bigger problemsFix Now →Mock up the ring before digging. Set your blocks in a dry circle, place the insert inside, and measure the side chamber. You want a consistent 2 to 3 inch air gap between the outer face of the insert and the inner face of the masonry. The insert should sit slightly below the finished cap or have a lip that covers the stone edge cleanly.
Rank #2

- Easy Installation: The 8-piece fire pit ring insertion kit is easy to assemble and can be assembled in just a few minutes.Seamless design allows for easy installation and integration into your DIY fire pit project.Fixed with screws, it will not easily fall off during use. Let you have more time to enjoy the joy brought by flames.
- Top ventilation hole design: Add a circle of appropriately sized ventilation holes at the top to enhance airflow and oxygen circulation, promote thorough combustion of wood, improve combustion efficiency, and minimize smoke. This design allows you to fully participate in the gathering time around the fire pit and create a better gathering environment.
- DIY fire pit:When used as a fire pit lining, you can build a suitable fire pit with bricks or stones according to the diameter of the fire pit. As the fire pit ring does not have a bottom, it is recommended to place a layer of stones or sand underneath to protect the ground. When used alone, you can bury its bottom underground and surround it with soil to form an underground fire pit.
- Durable and heat-resistant:Our outdoor fire pit ring is made of high-quality steel that can withstand high temperatures and is durable. A safe barrier can be provided in gardens, backyards, and outdoors to prevent ash and debris from falling through gaps and ensure a clean environment. Maintain shape during long-term use, allowing you to enjoy warmth and relaxation with family and friends around the fire pit.
- Large internal space: Adequate internal space can accommodate more firewood and combustibles. The larger size provides a growing space for flames, ensuring better airflow to promote thorough combustion and ignite the campfire, thereby producing beautiful flames. Its durable and lightweight structure makes it an ideal choice for a range of outdoor activities such as camping, fishing, bonfire parties, etc. Provide a relaxed and comfortable atmosphere for your family or friends to gather together
Seating Clearance
A fire pit is not only the burn chamber. A useful fire pit area needs working space around it. Plan for at least 36 inches of clear noncombustible surface around the outside of the pit, and more if you are using deep lounge chairs. From the fire pit center, many comfortable seating layouts need a total diameter of 10 to 14 feet.
Keep traffic paths out of the hot zone. If people have to step between chairs and the fire to reach the yard, the layout is wrong. On professional patios, we aim for a clean circulation path behind the seating whenever the space allows it.
Materials That Belong Near Heat
The safest DIY approach is to use a commercial smokeless insert with a masonry surround. The insert gives you a tested vent pattern and reduces guesswork. The masonry gives you weight, appearance, and patio integration.
Do these 3 things before closing this tab:
1Scan for outdated or missing drivers - takes under a minute2Clear out junk files and repair common Windows errors3Fix the driver behind crashes, sound loss and screen glitchesUse these materials for the main build:
- Smokeless steel insert or liner: Stainless steel is preferred for durability. Galvanized or thin mild steel may cost less but can degrade faster under repeated heat.
- Retaining wall blocks or fire pit blocks: Use products intended for outdoor hardscape fire pit applications.
- Fire brick or refractory materials: Use them where masonry will face direct flame.
- Crushed stone or paver base: Use compactable angular material under the pit.
- Clean drainage stone: Use below or around the base where water needs to escape.
- Fire-rated mortar or refractory cement: Use only where mortar is needed near heat.
- Capstones: Choose stone or concrete units approved for the application and isolated from direct flame by the liner.
Avoid standard concrete blocks in the hot zone, river rocks, pea gravel inside the burn chamber, non-fire-rated construction adhesive near flame, and moisture-trapping stones. These materials can crack, spall, pop, melt, or trap heat. River rock is especially risky because trapped moisture can expand rapidly when heated.
Tools and Materials List
For a 36 inch DIY smokeless pit, your exact quantities will depend on block size, but this is a realistic planning list:
- 30 to 36 inch smokeless insert or liner
- Fire pit or retaining wall blocks, usually 36 to 60 units depending on block size and number of courses
- Capstones, usually 12 to 18 pieces
- Crushed stone or paver base, about 8 to 16 bags or bulk equivalent
- Drainage stone, about 4 to 10 bags or bulk equivalent
- Fire brick or refractory liner components if your insert does not fully protect the masonry
- Fire-rated mortar or refractory cement where required
- Landscape marking paint or stakes and string
- 4 foot level and torpedo level
- Tamper or rented plate compactor
- Shovel, rake, rubber mallet, tape measure
- Masonry saw, angle grinder, or rented block splitter if cuts are needed
- Drill and metal-rated bits if modifying a plain liner
- Spark screen, poker, ash shovel, metal ash bucket
- Moisture meter for firewood
Do not skip the ash bucket. Ash can hold heat for a long time after the fire looks dead. Use a metal bucket with a lid and keep it on a noncombustible surface.
Step-by-Step: Build a DIY Smokeless Fire Pit
1. Confirm the Location
Measure setbacks first. Keep the pit away from the house, fence, deck, shed, trees, utility equipment, and property lines according to your local rules. Also look up. Overhanging branches and low rooflines are common hazards.
Quick wins for a faster PC:
Repair Windows errors before they cause bigger problemsFix Now →Scan for outdated or missing drivers - takes under a minuteDriver Scan →Choose a level area with good drainage. If water naturally collects there after rain, move the fire pit or correct the grade before building. A smokeless pit performs poorly when the lower vents or base fill with water, mud, or ash slurry.
2. Dry-Fit the Ring and Insert
Place the blocks on the ground in the finished circle. Set the insert inside. Confirm three things before excavation: the pit diameter fits your code limit, the insert sits correctly below the cap or on the rim, and the side air chamber is consistent at 2 to 3 inches.
If the insert is too tight, do not force it. Increase the masonry diameter or choose a smaller insert. The air chamber is part of the combustion system, not leftover space.
3. Excavate the Base
Mark a circle at least 6 to 12 inches wider than the outside of the pit. Remove sod, roots, and organic material. For many mild-climate backyards, excavating 6 to 8 inches is enough for a small fire pit base. In freeze-thaw climates or soft soils, go deeper and use more compacted stone.
Compact the subgrade. Add crushed stone or paver base in 2 to 3 inch lifts, compacting each lift. Set the final base level side to side. A bad first course will telegraph through the whole ring.
Rank #3

- Unleash the Bonfire (Utility Patent Pending): Transform your backyard into a fiery oasis with our 42"heavy-duty metal fire pit ring. Engineered for durability and designed for mesmerizing flames, this firepit ring is the heart of unforgettable outdoor gatherings. [Utility Patent Pending]
- Heavy-Duty & Built to Last - Constructed from premium, thick-gauge steel with a high-temperature black paint finish, this fire pit insert resists rust and harsh weather conditions. Designed for long-lasting performance, it’s the ultimate solution for durable fire rings that withstand season after season of outdoor enjoyment.
- Easy DIY Fire Pit Kit - Assemble your custom fire pit with ease! This 4-piece fire pit kit is simple to put together, providing a sturdy foundation for your personalized outdoor fire feature. Create the perfect gathering spot with a fire pit insert that combines functionality and style.
- Spacious, Efficient Design - The generous 42"outer diameter and 36"inner ring offer ample space for a roaring fire while keeping logs securely contained. This smart design ensures efficient burning and reduces smoke, making your firepit ring the ideal choice for safe and enjoyable outdoor fires.
- Integrity in Service - Iron Forge Tools, a U.S. veteran-owned business, stands behind its smokeless fire pit ring. We're here to help resolve any issues that you may have.
4. Plan Drainage
The burn area should not become a bowl. Use free-draining stone below the pit and keep weep paths open where the insert and masonry design allow it. If the pit sits inside a larger patio, pitch the surrounding hardscape slightly away from the fire pit. A slope of about 1/8 inch to 1/4 inch per foot is typical for exterior hardscape drainage.
Do not pack pea gravel or decorative river stone into the burn chamber. Use drainage stone below the system, not loose moisture-holding stones where they will be exposed to direct flame.
5. Set the First Course
Set the first course of blocks on the compacted base. Check every block for level front to back and side to side. Use a rubber mallet and small base adjustments to get the ring true.
What’s actually slowing this PC down?
Pick the symptom - the matching free tool is one click away.
This is the slowest course and the most important. On our crews, we spend the time here because every correction later is harder. If the first course is wavy, the cap will show it.
6. Build the Intake Path
Follow the insert manufacturer’s layout if you are using a commercial smokeless system. If you are building the air system yourself, create low intake openings that feed the side chamber and lower burn area. These are usually placed near the base, not randomly throughout the wall.
Keep the intake path clean and intentional. Random gaps between blocks can leak draft in the wrong places and reduce the chimney effect that pulls air through the secondary chamber.
7. Install the Liner or Insert
Set the liner centered inside the masonry ring. Maintain the 2 to 3 inch side chamber. The top of the insert should align with the cap or sit slightly below it depending on the product. If the insert has a rim lip, it should cover the stone edge evenly.
If you are drilling upper vent holes into a plain liner, keep them evenly spaced near the upper inside wall. Undersized or sparse holes can starve the secondary burn. Oversized holes can cool the chamber and weaken draft. This is why a purpose-built insert is usually worth the money.
8. Add Upper Courses and Caps
Stack the remaining block courses according to the block system. Keep joints aligned as intended by the manufacturer. Use fire-rated materials where heat exposure requires it. Do not use ordinary construction adhesive near the burn chamber unless the product is specifically rated for that temperature and application.
Install capstones last. Check that the cap does not block the upper vent path of the insert. Leave the inside airflow system open and serviceable.
9. Test With a Small Fire
Start with dry kindling and a small load of seasoned hardwood. Expect some smoke at startup. Once the chamber heats, you should see stronger flame activity near the upper holes and a noticeable reduction in visible smoke.
Keep the wood below the rim. The upper combustion zone only works when smoke and gases pass through it before leaving the pit.
Rank #4

- Rust-Proof Steel Fire Ring You Can Rely On – Crafted from heavy-gauge steel with a high-temperature powder coating, this metal fire pit ring resists rust and chipping – even after repeated rain and high heat. A durable firepit ring that lasts season after season
- Smokeless Firepit Insert for Clean Burning – Dual ventilation holes maximize airflow for more complete combustion. This smokeless firepit insert delivers stronger flames with significantly less smoke – so your clothes won't smell like campfire the next day
- 36 Inch Fire Pit Ring with Ample Space – With a 36-inch inner diameter and 40-inch outer diameter, our fire pit ring provides generous space for firewood. The round fire pit insert design promotes better airflow for a hotter, more beautiful fire
- Easy Assembly Fire Pit Kit – Our 8-panel fire pit kit assembles in minutes with precision-aligned holes. Use it as a fire pit liner with bricks and stones, or bury it in the ground. A versatile fire pit kit for outside that adapts to any space
- Perfect for Any Outdoor Gathering – From backyard bonfires to camping trips, this fire rings for outside wood burning is your go-to choice. Lightweight yet sturdy, it creates a warm centerpiece for patios, gardens, and beach gatherings – seat 6–8 people comfortably
Fuel: The Part Homeowners Underestimate
Even a well-built smokeless fire pit will smoke with wet wood. Use dry, seasoned hardwood at or below about 20% moisture content. A cheap moisture meter is one of the best accessories you can buy for a wood-burning pit.
Split a log and test the fresh interior face, not the weathered outside. If the reading is high, the fire will waste heat boiling water out of the wood and will produce more smoke. Oak, maple, hickory, ash, and similar hardwoods are good choices when properly seasoned. Avoid painted wood, treated lumber, plywood, trash, leaves, and yard waste. A recreational fire pit is not a burn barrel.
Build the fire so it heats quickly. Start with dry kindling, then add small splits, then larger pieces after the draft is working. Overloading the chamber early is one of the fastest ways to make a smokeless pit smoke.
Free tools Windows power users keep installed
One-click scans. No signup required.
Troubleshooting a Smoky Smokeless Fire Pit
If the pit still smokes badly after 15 to 25 minutes, diagnose the system instead of adding more holes at random. Most problems come from fuel, airflow, or loading height.
| Problem | Likely Cause | Fix |
|---|---|---|
| Heavy smoke during startup | Normal cold chamber, oversized logs, weak kindling | Use dry kindling and small splits until the chamber heats |
| Smoke never improves | Wet wood or poor draft | Test wood moisture; clear ash from lower intake openings |
| Smoke spills from one side | Uneven air gap or wind exposure | Check insert centering and consider wind screening with proper clearances |
| Weak upper flame jets | Upper holes starved or side chamber blocked | Clean the chamber path and verify 2 to 3 inch air gap |
| Smoke increases after adding logs | Wood loaded above rim or too much fuel added at once | Keep logs below rim and add fuel gradually |
| Water and ash collect in pit | Poor base drainage or blocked weep path | Clear drains; improve stone base and surrounding pitch |
Wind also matters. No fire pit can fully overcome a strong crosswind. If your seating area is always smoky from one direction, the site may need a different location, a code-compliant windbreak, or a portable pit that can be moved.
Independent reader supportYour contribution helps us test, update, and keep practical guides available for everyone.Maintenance and Long-Term Durability
Remove ash regularly so it does not block lower airflow. A thin ash bed can help a wood fire, but a packed chamber reduces draft and traps moisture. Wait until ash is completely cool, then move it to a metal bucket with a lid.
Keep leaves, mulch, and patio debris away from the intake openings. Inspect the liner every season for warping, rust-through, loose fasteners, or blocked upper holes. If the liner is thin galvanized steel and the pit sees frequent use, plan for replacement sooner than you would with a heavier stainless insert.
In freeze-thaw climates, drainage is not optional. Water trapped inside masonry cavities expands when frozen and can move blocks, crack caps, or damage mortar. Keep the base open, avoid sealed cavities that hold water, and repair failed joints before winter.
Can You Make an Existing Paver Fire Pit Smokeless?
Sometimes. The existing pit needs enough diameter to accept a liner while still leaving a 2 to 3 inch air chamber. It also needs low intake openings and a way for air to reach the upper vent holes. If the current pit is a tight stack of pavers with no liner and no base drainage, retrofitting may be more work than rebuilding.
Start by measuring the inside diameter and wall height. Then price an insert that fits correctly. If adding the insert leaves less than 2 inches around the sides, the secondary air system will be weak. If the wall is made from non-fire-rated pavers exposed directly to flame, install proper heat protection or rebuild the hot zone.
Also check the base. Many older DIY fire rings sit directly on grass or dirt. If yours has settled, leaned, or collected water, take it apart and rebuild the base before adding smokeless components.
DIY vs Hiring a Pro
A DIY smokeless fire pit makes sense when the site is flat, access is easy, the pit is wood-burning, and the project is limited to a standalone ring or small gravel seating area. A careful homeowner can usually complete the work in a weekend: half a day for layout and shopping, one day for excavation and base prep, and one day for block, insert, caps, and cleanup.
Best Value

- Easy Installation: The 7-piece fire pit ring insertion kit is easy to assemble and can be assembled in just a few minutes.Seamless design allows for easy installation and integration into your DIY fire pit project.Fixed with screws, it will not easily fall off during use. Let you have more time to enjoy the joy brought by flames.
- Top ventilation hole design: Add a circle of appropriately sized ventilation holes at the top to enhance airflow and oxygen circulation, promote thorough combustion of wood, improve combustion efficiency, and minimize smoke. This design allows you to fully participate in the gathering time around the fire pit and create a better gathering environment.
- DIY fire pit:When used as a fire pit lining, you can build a suitable fire pit with bricks or stones according to the diameter of the fire pit. As the fire pit ring does not have a bottom, it is recommended to place a layer of stones or sand underneath to protect the ground. When used alone, you can bury its bottom underground and surround it with soil to form an underground fire pit.
- Durable and heat-resistant:Our outdoor fire pit ring is made of high-quality steel that can withstand high temperatures and is durable. A safe barrier can be provided in gardens, backyards, and outdoors to prevent ash and debris from falling through gaps and ensure a clean environment. Maintain shape during long-term use, allowing you to enjoy warmth and relaxation with family and friends around the fire pit.
- Large internal space: Adequate internal space can accommodate more firewood and combustibles. The larger size provides a growing space for flames, ensuring better airflow to promote thorough combustion and ignite the campfire, thereby producing beautiful flames. Its durable and lightweight structure makes it an ideal choice for a range of outdoor activities such as camping, fishing, bonfire parties, etc. Provide a relaxed and comfortable atmosphere for your family or friends to gather together
Hire a pro when the fire pit is part of a larger patio, the grade needs correction, drainage is complicated, retaining walls are involved, or the local jurisdiction requires drawings and inspection. Also hire licensed trades for permanent gas or electrical work. Do not casually convert a DIY wood-burning pit to gas. Gas fire features require listed burners, correct ventilation, line sizing, shutoff valves, ignition components, clearances, and permits where required.
From a value standpoint, DIY saves labor on a simple build. Professional work earns its cost when the fire pit has to integrate with a patio, seating wall, outdoor kitchen, lighting, or drainage plan. The expensive part is often not the ring. It is making the whole outdoor area function without settling, holding water, violating code, or looking like an afterthought.
Final Builder Notes
The best DIY smokeless fire pits are boring in the right ways: legal location, compacted base, open drainage, heat-safe liner, consistent air chamber, dry wood, and controlled loading height. Those details matter more than the exact brand of block or the shape of the capstone.
If you want the cleanest result, buy a quality smokeless insert first and design the masonry around it. Mock up the circle before digging. Keep the side chamber at 2 to 3 inches. Keep the wood below the rim. Use seasoned hardwood under 20% moisture. Add a spark screen even though the pit is smokeless. Reduced smoke does not eliminate embers.
Done correctly, a DIY smokeless fire pit is a practical backyard upgrade, not a science project. Done casually, it becomes a smoky maintenance problem built out of heavy materials. Build the airflow, drainage, and clearances with the same care you give the visible stonework.
Frequently Asked Questions
How does a smokeless fire pit work?
It uses a double-wall airflow system. Air enters low, heats as it rises through a side chamber, then exits through upper vent holes where it helps burn smoke gases near the rim. The pit may still smoke during startup or when wet wood is used.
How much does a DIY smokeless fire pit cost in 2026?
A homeowner-built masonry smokeless fire pit typically costs about $250 to $900 in materials and basic consumables. Premium blocks, a larger stainless insert, tool rental, delivery, and patio work can push the cost higher.
Do I need a permit for a backyard fire pit?
Possibly. Rules vary by city, county, fire district, HOA, and wildfire zone. Check local limits for fire size, setbacks, fuel type, burn bans, and whether permanent masonry fire pits require approval.
Why is my smokeless fire pit still smoking?
The most common causes are wet wood, a cold startup, blocked lower vents, an undersized side air chamber, too many logs added at once, or wood stacked above the rim. Use seasoned hardwood at 20% moisture or less and keep the airflow path clear.
Can I convert an existing paver fire pit to smokeless?
Sometimes, if there is enough room for a steel liner plus a 2 to 3 inch side air chamber and you can add low intake openings. If the pit lacks drainage, uses non-fire-rated materials in the hot zone, or has settled, rebuilding is usually the better choice.
Is a DIY smokeless fire pit better than a portable smokeless fire pit?
A DIY masonry pit looks permanent and can integrate with a patio, but it requires code checks, base prep, drainage, and heavier materials. A portable smokeless pit is often cheaper, movable, and simpler for small patios or renters.
Free tools Windows power users keep installed
One-click scans. No signup required.
Quick Recap
Product prices and availability are accurate as of the date/time indicated and are subject to change. Any price and availability information displayed on Amazon at the time of purchase will apply.

