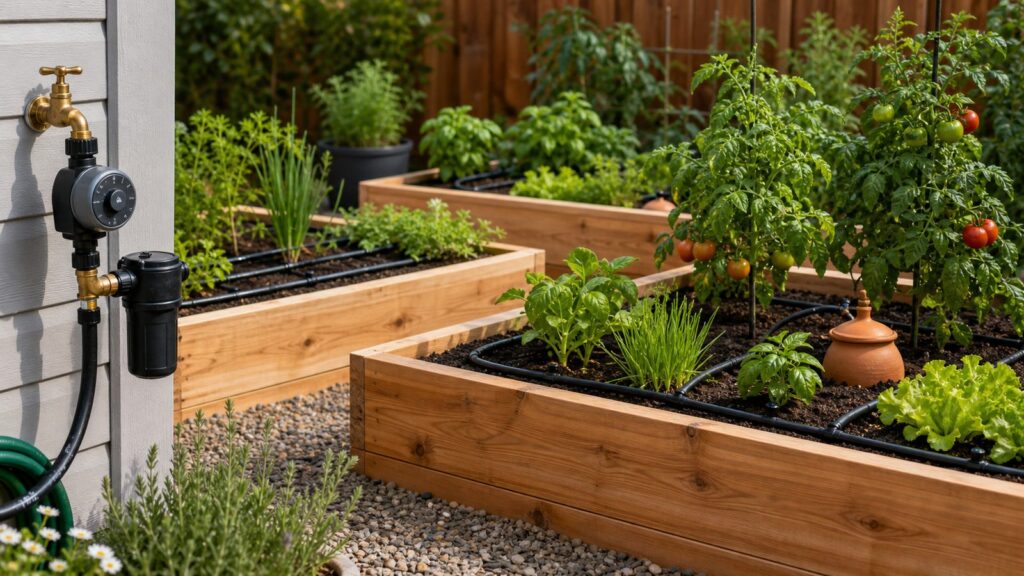
A good DIY self-watering plant system does one simple job: it gives roots steady moisture without drowning the plant, wasting water, or creating a plumbing problem. For a single patio pot, that may mean a $5 wick and reservoir. For raised beds, it may mean ollas, a wicking bed, or a $25 to $225 hose-end drip kit. For a permanent garden zone tied to a water supply, it may involve backflow protection, filtration, pressure regulation, permits, and a licensed installer.
The best choice depends on where the plants are, how long you need the system to run, and whether it connects to potable water. On our job sites, we treat irrigation like any other utility: measure first, build in shutoffs and service points, and do not bury problems where the homeowner cannot inspect them later.
As an Amazon Associate I earn from qualifying purchases.
Here is the practical version: use bottle and wick systems for pots and short trips, use ollas or self-watering planters for vegetables and containers, use drip irrigation with a timer for repeatable outdoor watering, and call a pro when the work touches buried lines, main plumbing, backflow assemblies, electrical controllers, commercial properties, rentals, or any permitted system.
Free tools Windows power users keep installed
One-click scans. No signup required.
Start With a Water Audit Before Buying Parts
Most failed DIY watering systems are not caused by bad parts. They fail because every plant gets treated the same. Tomatoes in full sun, herbs in a small clay pot, shrubs under mulch, and shade ornamentals do not need the same watering schedule.
#1 Best Overall

- [Instant 3/4" Connection & Fast-Plug] Start your irrigation project in seconds using the standard 3/4" faucet connector that fits most outdoor taps. Our innovative blue fast-plug technology ensures a tool-free, leak-proof connection; simply apply firm pressure to insert the tubing, or press the blue release ring to reconfigure your layout instantly.
- [Expandable 3-Zone Irrigation with Y-Diverter] Maximize your watering efficiency by using the included Y-shape diverter to split your water source. This setup allows the 2-zone water timer to manage two automated areas independently while providing an additional manual outlet, effectively creating a 3-zone irrigation network for your garden.
- [Precision Dual-Layer 150FT Tubing System] This professional kit features 150FT of specialized tubing, including 100FTof 1/2" high-flow mainline and 50FT of 1/4" distribution tubing. The heavy-duty 1/2" mainline maintains stable water pressure across long distances, ensuring every plant receives optimal hydration.
- [16PCS Precision Nozzle Set for Diverse Needs] Tailor your irrigation with 16 professional emitters: 8 Drip-Spray Integrated nozzles for flexible watering, 4 Ground-Stake Bubbler nozzles for deep saturation, and 4 8-Hole Stake nozzles for wide coverage. Each nozzle is adjustable, allowing you to fine-tune the flow and atomization volume to suit different plant types.
- [Advanced 2 Zone Timer with Rain Delay] The dual-outlet timer features a large LCD and supports 3 independent watering plans (P1/P2/P3) per zone. With an IPX5 waterproof rating and a 1-15 day rain delay mode, this system intelligently manages your agricultural or residential irrigation while preventing water waste.
Before buying tubing or reservoirs, walk the garden and group plants into water zones:
- High-demand plants: tomatoes, cucumbers, squash, annual flowers, hanging baskets, and shallow containers in full sun.
- Moderate-demand plants: peppers, herbs, perennials, raised beds with mulch, and mixed patio containers.
- Lower-demand plants: established shrubs, drought-tolerant perennials, native plantings, and shaded beds.
Also note sun, wind, soil, and container size. A 10-inch pot on a sunny patio can dry out in a day during hot weather. A 24-inch planter with a built-in reservoir may last several days. An in-ground bed with 2 to 3 inches of mulch can hold moisture much longer than bare soil.
The U.S. EPA estimates residential outdoor water use at nearly 8 billion gallons per day, mostly for landscape irrigation, and experts estimate up to 50 percent is wasted through overwatering and inefficient systems. That is the reason to design carefully. A self-watering system should reduce attention, not increase waste.
Do these 3 things before closing this tab:
1Fix the driver behind crashes, sound loss and screen glitches2Clear out junk files and repair common Windows errors3Scan for outdated or missing drivers - takes under a minuteDIY Self-Watering Options Compared
There is no single best self-watering system for every garden. The right choice changes with plant type, budget, water source, and how permanent the installation needs to be.
| System | Best Use | Typical 2026 Cost | Skill Level | Main Watchout |
|---|---|---|---|---|
| Bottle or wick reservoir | Houseplants, patio pots, weekend trips | $0-$10 per pot | Easy | Small reservoirs run dry quickly in heat |
| Terracotta spike or olla | Vegetable beds, large pots, herbs | $10-$40 per pot or bed zone | Easy to moderate | Needs buried contact with soil to work well |
| Capillary mat | Seed trays, seedlings, greenhouse benches | $10-$50 for small setups | Easy | Not ideal for large outdoor plants |
| Self-watering planter | Patio containers, balcony gardens | $20-$150+ per planter | Easy | Reservoir size must match plant demand |
| Rain-barrel gravity drip | Small beds near a barrel | $50-$250+ depending on barrel and kit | Moderate | Low pressure limits emitter choices |
| Hose-end drip kit with timer | Raised beds, containers, narrow planting beds | $15-$480 DIY kit range; common kits $25-$225 | Moderate | Needs backflow protection, filter, and pressure regulator |
| Installed drip irrigation | Larger gardens, multiple zones, permanent landscapes | Common range $310-$815; national average about $520 | Professional | Permits, backflow testing, trenching, and zoning |
If the system is not connected to a hose bib or potable water line, the risk is usually plant damage or a wet patio. Once it connects to household water, the risk changes. Backflow prevention, pressure regulation, filtration, and local code become part of the job.
Idea 1: Bottle Drippers for Pots and Short Trips
The cheapest DIY self-watering system is still the inverted bottle dripper. It is not elegant, but it works for many containers when sized correctly. Use a clean plastic bottle, drill or puncture one to three tiny holes in the cap, fill it with water, and invert it into damp soil near the root zone.
A 16-ounce bottle may only help a small pot for a day or two in hot weather. A 1-liter bottle can support a medium container longer, and a 2-liter bottle may buy several days for a larger patio pot. Test before relying on it for vacation watering.
Quick wins for a faster PC:
Clear out junk files and repair common Windows errorsFree Scan →Scan for outdated or missing drivers - takes under a minuteDriver Scan →How to Build It
- Water the pot thoroughly first. Bottle drippers do not rehydrate bone-dry soil evenly.
- Use a 16-ounce to 2-liter bottle based on pot size.
- Make one small hole first, then add more only if water releases too slowly.
- Push the neck 2 to 4 inches into the soil so the bottle is stable.
- Check after 12 and 24 hours to see how fast the reservoir drains.
This is a good setup for herbs, annuals, and temporary backup watering. It is not a substitute for irrigation in a full vegetable garden, and it can tip over in loose potting mix or windy areas. For better appearance, use terracotta watering spikes that accept wine bottles or standard bottles.
Idea 2: Wick Reservoirs for Houseplants and Patio Containers
A wick system uses capillary action to move water from a reservoir into the potting mix. It is simple, quiet, and low-risk because it does not use pressure. Typical cost is $0 to $10 per pot if you reuse jars, buckets, or food-safe containers and buy cotton or synthetic wicking cord.
The key is wick contact. One end must sit low in the reservoir, and the other must reach the root zone. For a small houseplant, one 1/4-inch wick may be enough. For a 12-inch patio pot, use two or three wicks spaced around the plant.
Where Wick Systems Work Best
- Indoor plants while traveling for a few days.
- Small patio containers protected from heavy rain.
- Seedlings that need gentle, consistent moisture.
- Plants that dislike wet leaves, such as many herbs.
Use opaque reservoirs or covered containers. Clear jars grow algae faster, and open buckets can collect debris or attract mosquitoes. If the reservoir is outside, cover the fill opening with a tight lid and a small hole for the wick.
Idea 3: Ollas and Terracotta Irrigation for Vegetable Beds
Ollas are unglazed clay vessels buried in the soil and filled with water. Moisture slowly moves through the porous clay as surrounding soil dries. For raised beds and vegetable gardens, this is one of the most forgiving self-watering methods because it puts water close to roots without spraying leaves.
Commercial ollas commonly cost $10 to $40 each depending on size and clay quality. DIY versions can be made from two unglazed terracotta pots sealed together, but use a non-toxic sealant and test for leaks before burying them near food crops.
Rank #2
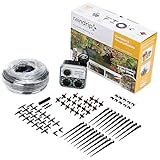
- Save Time and Effort: This Raindrip drip irrigation kit includes everything you need to create a drip watering system for potted plants and precisely water up to twenty plants, saving time and effort while keeping your garden healthy
- Install in 3 Easy Steps: 1) Connect the timer and tubing to your water source 2) Lay out the tubing 3) Use fittings to attach drippers, creating a customizable setup for your hanging basket watering system, potted plants, or planter beds
- Ideal for Any Level Gardener: Easy to customize, install, and operate, this automatic drip irrigation kit includes all the parts needed to set up a timer-controlled system for convenient, worry-free watering
- Easy to Connect: Screw threaded ends together and push barbed fittings and emitters into the tubing openings, compatible with most drip watering systems for quick, secure assembly
- Kit Includes: Water timer, 75 ft. of 1/4 in. supply tubing with 3/4 in. FHT adapter, 20 drippers, tubing hold-down clamps, barbed couplings, elbows, and tees—everything you need to build a complete raindrip drip irrigation kit
Basic Olla Layout
For small vegetables and herbs, place one medium olla every 2 to 3 feet. For larger plants such as tomatoes, cucumbers, or squash, use one larger olla between two plants or one per heavy-feeding plant. Bury the olla so only the neck or fill opening remains above soil, then mulch around it.
Ollas are excellent for weekend watering and for gardeners who prefer low-tech systems. They are less useful for freshly seeded beds because the water source is deeper than the germination zone. You may still need surface watering until seedlings establish roots.
The Tool Desk
Outbyte Driver Updater FREEFix the driver behind crashes, sound loss and screen glitchesFind Drivers →Outbyte PC Repair FREEClear out junk files and repair common Windows errorsFree Scan →Idea 4: Self-Watering Planters and Sub-Irrigated Containers
A self-watering planter has a reservoir below the soil and a wicking zone that pulls water upward. Store-bought versions typically cost $20 to $150 or more per planter. The price jumps with larger sizes, UV-resistant materials, casters, metal or wood finishes, and water-level indicators.
For vegetables, depth matters. Leaf lettuce can grow in a shallower box, but tomatoes, peppers, and cucumbers need more soil volume. As a practical rule, use at least 10 to 12 inches of soil depth for herbs and greens, 14 to 18 inches for peppers, and 18 inches or more for tomatoes when possible.
DIY Tote-Style Planter
A common DIY version uses a food-safe storage tote, a perforated false floor, a fill tube, and an overflow hole. The overflow hole is critical. Without it, heavy rain can flood the root zone and create anaerobic soil conditions.
Use a 1-inch to 1-1/2-inch PVC fill tube, drill an overflow hole just below the false floor height, and use a wicking basket or soil column that reaches the reservoir. Keep the reservoir covered and opaque to reduce algae and mosquito issues.
Idea 5: Capillary Mats for Seedlings and Starts
Capillary mats are best for seed trays, propagation benches, and small nursery pots. The mat sits over a shallow water source or on a wet tray, and containers absorb water through drainage holes. This keeps seedlings evenly moist without blasting delicate stems from above.
This system is inexpensive and quick to set up, but it is not a full garden irrigation system. It works best under controlled conditions: greenhouse shelves, indoor grow racks, or a sheltered potting bench. Outdoors, wind and heat can dry the mat quickly, and rain can make watering uneven.
Use clean trays, rinse mats between batches, and do not let seedling roots grow deep into the fabric. For disease prevention, let the surface dry slightly between cycles when the crop allows it.
Idea 6: Rain-Barrel Gravity Drip
A rain barrel can feed a small drip system, but gravity systems have limited pressure. A full barrel raised 2 to 3 feet above the garden creates modest pressure, not the 20 to 30 psi that many standard drip components expect. That means you need parts designed for low-pressure use.
What’s actually slowing this PC down?
Pick the symptom - the matching free tool is one click away.
Use larger-diameter supply tubing where possible, keep runs short, and avoid tiny emitters that clog easily. A simple on-off valve may work better than a complex timer if pressure is marginal. Always screen the barrel inlet and use a filter before the drip line.
Rain-barrel systems are best for nearby raised beds, not large landscapes. They also need an overflow route that drains away from the foundation. On our projects, we never direct overflow toward crawl spaces, basement walls, steps, or neighboring property.
Idea 7: Hose-End Drip Kits for Raised Beds and Containers
For most outdoor gardens, a hose-end drip kit is the sweet spot. It is still DIY-friendly, but it gives more predictable watering than bottles or wicks. DIY kit prices vary widely. Small kits can start around $15, common homeowner kits often run $25 to $225, and larger kits may reach $480 depending on coverage and components.
Rank #3

- 🔹 [Smart Timer Included – Hands-Free Watering, Fully Programmable | 2026 Upgraded]No more daily hose duty. The built-in automatic timer lets you customize watering schedules by time, frequency, and duration. Features Rain Delay Mode (1–15 days) to pause watering during rainy days and resume automatically, plus a Child Lock for added peace of mind. Note: Batteries are not included. Please follow the instructions to set watering schedules
- 🔹 [Heavy-Duty Build with Solid Brass Metal Connectors – Built to Last]Upgraded with solid brass metal connectors for enhanced durability and stable connections. Combined with UV-resistant tubing and reinforced seals, the system is designed to withstand outdoor conditions and long-term seasonal use
- 🔹 [360° Adjustable Sprayers with Bendable Tubing – Precise, Custom Coverage]Each sprayer rotates 360° and connects to flexible, bendable tubing that holds its shape. Easily direct water exactly where plants need it—ideal for gardens with complex layouts, raised beds, or potted plants
- 🔹 [Water-Efficient, Adjustable Flow – Smarter Watering Control]Each dripper offers adjustable flow output—from a gentle mist to a focused stream—allowing precise watering based on plant type and growth stage. Helps reduce water waste while maintaining consistent hydration.
- . 🔹 [60FT Complete DIY Irrigation Kit – Designed for All Garden Sizes]This 120FT all-in-one irrigation kit includes a smart timer, adjustable sprayers, bendable tubing, brass connectors, and installation accessories. Suitable for flower beds, vegetable gardens, lawns, greenhouses, and potted plants—an easy upgrade to efficient, worry-free watering.
A proper hose-end drip setup should include four pieces at the faucet: a backflow preventer or anti-siphon device, a pressure regulator, a filter, and an adapter to the main tubing. Rain Bird’s homeowner faucet connection kit is a good example of the category: it includes backflow protection, a 25 psi pressure regulator, a 150-mesh filter, and an adapter for 1/2-inch or 5/8-inch tubing. Drip systems commonly need about 15 psi minimum and 25 to 30 psi maximum. Clemson Extension notes that drip systems operate well around 20 psi and require both filtration and pressure regulation.
Do the Bucket Test First
Before laying out emitters, measure faucet flow. Put a 5-gallon bucket under the faucet, open it fully, and time how long it takes to fill. If it fills in 30 seconds, the flow is about 10 gallons per minute. If it takes 60 seconds, the flow is about 5 gallons per minute.
That number limits how many emitters can run at once. For example, twenty 1-gallon-per-hour emitters use 20 gallons per hour, or about 0.33 gallons per minute. That sounds low, but long tubing runs, pressure loss, elevation changes, and mixed emitter types can make watering uneven. When in doubt, split the garden into zones instead of forcing one oversized loop to do everything.
Basic Drip Layout
- Use 1/2-inch or 5/8-inch mainline tubing for the primary run.
- Use 1/4-inch tubing only for short branches to containers or individual plants.
- Install a flush point or removable cap at the end of each line.
- Run water through the tubing before installing final caps to clear installation debris.
- Use mulch over soil to reduce evaporation and shield tubing from UV exposure while keeping emitters serviceable.
For vegetables, use dripline or emitters spaced around the root zone rather than right against the stem. For containers, one emitter may be enough for a small pot, but large planters often need two or more emitters so one side does not stay dry.
Pressure, Filters, Backflow, and Permits
This is where many DIY articles under-explain the job. If the system connects to a hose bib or household water line, it needs protection. Soil, fertilizer, stagnant water, and garden chemicals must not be able to siphon back toward potable water.
Colorado State Extension describes a drip irrigation head assembly as a manifold with a backflow preventer, filter, and pressure regulator. Utah State Extension emphasizes filtration because emitters and micro-sprays have small openings; small filters commonly cost about $10 to $40. Clemson Extension states that drip irrigation systems require filtration and pressure regulation.
Local requirements vary. Some jurisdictions require permits or inspections for lawn irrigation systems. Some require approved backflow assemblies and periodic testing. Rules can be stricter for underground irrigation, automatic systems, commercial properties, multi-family properties, and systems connected beyond a simple hose-end device.
Use this practical rule: if you are screwing a temporary kit onto an outdoor faucet, use the manufacturer-specified backflow preventer, filter, and regulator. If you are tying into plumbing, burying permanent zones, adding an automatic controller, or installing a dedicated backflow assembly, check local code and bring in a licensed pro where required.
Smart Timers and WaterSense Controllers
A timer makes drip irrigation useful, but a bad schedule can waste water just as reliably as a bad sprinkler. EPA WaterSense-labeled irrigation controllers are designed to reduce overwatering by applying water only when plants need it. Some use weather data, soil moisture inputs, or seasonal adjustment features.
Outdated Drivers Are Slowing You Down
One free scan finds every outdated or missing driver and matches the right update for your exact hardware.Free scan · exact hardware matchWindows Errors? Fix Them Before They Spread
Repair common Windows errors and clear accumulated junk for a smoother, more stable PC - no reinstall needed.Free scan · no reinstallRebates can help offset the cost. In 2026, examples include up to $200 from Orlando Utilities Commission for eligible smart irrigation controller upgrades and up to $500 for eligible City of Tracy commercial and multi-family projects. Programs vary by address, funding, approved controller list, application deadline, and whether labor or tax is included, so check before buying.
For a small patio, a basic hose timer may be enough. For multiple planted zones, a WaterSense-labeled smart controller is worth considering, especially in hot climates or areas with watering restrictions.
Independent reader supportYour contribution helps us test, update, and keep practical guides available for everyone.How Much a DIY Self-Watering System Costs in 2026
The total cost depends less on the name of the system and more on scale. One pot is cheap. A whole landscape is not. Here are realistic 2026 U.S. ranges:
- Bottle or wick system: $0 to $10 per pot when reusing bottles, jars, cotton cord, or household containers.
- Olla or terracotta spike: $10 to $40 per pot or bed zone.
- Self-watering planter: $20 to $150+ per planter.
- DIY hose-end drip kit: $15 to $480 depending on area, with many common kits around $25 to $225.
- Professionally installed small drip project: about $310 to $815 commonly, with a national average around $520 and high-end projects up to about $2,850.
- Above-ground installed drip zones: about $1.50 to $4.50 per square foot or $300 to $1,200 per zone.
For comparison, a full lawn or garden sprinkler system is often cited around $2,500 to $3,500 nationally in 2026, with many homeowners paying $1,700 to $5,000 or more. That is why drip irrigation for beds and containers can be a smart targeted upgrade instead of irrigating the entire yard.
Recommended Free Tools
Cost drivers include number of zones, tubing length, emitter type, controller quality, smart controller upgrade, backflow device type, permit and inspection requirements, trenching, slope, water source distance, freeze protection, soil type, mulch, plant density, and local labor rates.
Rank #4

- [1/2" High-Flow Mainline for Stable Pressure] Featuring a professional-grade 1/2" (12mm) mainline hose, this kit solves the common issue of water pressure drop-off found in thin 1/4" tubes. The heavy-duty 12mm pipe ensures consistent and balanced water delivery to every plant, making it an ideal automatic watering system for expansive gardens and backyard landscaping.
- [Tool-Free Fast-Plug Installation] Designed for DIY simplicity, the TRJZWA kit features innovative fast-plug technology that requires no professional tools. Use the included pipe cutter to customize your 12mm layout and simply snap the connectors together for a leak-proof setup. Perfect for yards, vegetable plots, and agricultural irrigation scenarios.
- [Customizable Drip & Misting Nozzles] Our system comes with a variety of adjustable drip emitters and misting nozzles. You can easily rotate each head to control the water flow, switching between a gentle mist for greenhouse seedlings and a steady drip for flower beds, which can save more water.
- [Versatile Scheduling & Rain Delay] The intuitive smart controller provides flexible watering durations and frequencies. With the "Rain Delay" feature, you can temporarily pause your schedule during rainy days to prevent overwatering and conserve water. The built-in "Child Lock" also ensures your programmed settings are safe from accidental changes.
- [Smart 3-Plan Precision Digital Timer] The included digital timer features an oversized LCD screen and supports 3 independent watering schedules (P1/P2/P3) per day. Customize your routine—from a light morning mist to a deep evening soak. This reliable battery-powered controller keeps your plants healthy while you are on vacation or away from home.
Maintenance That Keeps the System Working
Self-watering systems are low-attention, not no-attention. Build maintenance into the design. Make filters reachable. Keep end caps accessible. Do not bury fittings so deeply that every repair becomes a digging project.
Seasonal Checklist
- Spring: inspect fittings, run a leak test, flush lines, and replace cracked tubing.
- Monthly during the season: rinse filters, check emitters, confirm timer settings, and look for dry spots.
- Midsummer: adjust schedules for heat, wind, plant size, and container demand.
- Before vacation: test the system for at least one week, measure reservoir drawdown, and inspect for leaks or clogs.
- Fall: drain hose-end systems, remove timers before freezes, and winterize permanent systems according to local climate and manufacturer guidance.
- Annually: reset smart controller schedules and review zones as plants mature.
Water deeply and less frequently once plants are established. Shallow daily watering can encourage weak roots and disease. Mulch helps by reducing evaporation, stabilizing soil temperature, and keeping the root zone more consistent.
When to DIY and When to Hire a Pro
DIY is a good fit when the system is visible, reversible, and limited in scope. Bottle drippers, wick reservoirs, ollas, self-watering containers, capillary mats, and small hose-end drip kits are reasonable homeowner projects. Expect to spend one to four hours for a small container or raised-bed system once materials are on hand.
Recommended Free Tools
Hire a pro when the work involves main-line tie-ins, buried irrigation zones, approved backflow assembly installation or testing, electrical controller wiring, complex slopes, large landscapes, rental properties, commercial properties, or any work your local jurisdiction permits and inspects.
Slopes deserve special attention. Gravity moves water, and pressure changes with elevation. Use pressure-compensating emitters where needed, and place emitters so water reaches the roots instead of running downhill from the plant. For large grade changes, separate zones are often cleaner than trying to force one line to behave.
A professional installation costs more upfront, but it can prevent expensive failures: flooded beds, dead plantings, blown fittings, contaminated water risk, failed inspections, and irrigation that has to be rebuilt after one season.
Best Practical Setup for Most Home Gardens
For a typical homeowner with patio pots and one or two raised beds, the most reliable setup is a hose-end drip kit with a timer, backflow preventer, 150 to 200 mesh filter, 25 psi pressure regulator, 1/2-inch mainline, 1/4-inch branches only where needed, and flushable line ends. Add mulch and check the system monthly.
For a balcony or small patio, use self-watering planters for the largest containers and wick reservoirs for backup. For vegetable beds where you want a low-tech approach, use ollas spaced every 2 to 3 feet, then supplement by hand during seed germination and heat waves.
The goal is not to make watering invisible. The goal is to make it predictable. A well-built self-watering plant system gives you healthier roots, fewer dry swings, lower water waste, and a garden that can handle a busy week without punishing you for missing one evening with the hose.
Frequently Asked Questions
What is the cheapest DIY self-watering system for garden plants?
The cheapest option is a bottle dripper or wick reservoir. If you reuse bottles, jars, or containers, the cost is often $0 to $10 per pot. These work best for houseplants, patio pots, and short trips, not large garden beds.
Do hose-connected garden watering systems need a backflow preventer?
Yes, a hose-connected drip or irrigation system should use backflow or anti-siphon protection. It helps prevent soil, fertilizer, stagnant water, or garden chemicals from siphoning back toward the potable water supply.
Quick wins for a faster PC:
Clear out junk files and repair common Windows errorsFree Scan →Scan for outdated or missing drivers - takes under a minuteDriver Scan →Repair Windows errors before they cause bigger problemsFix Now →How much does a DIY self-watering or drip irrigation system cost in 2026?
Small DIY bottle or wick systems cost about $0 to $10 per pot. Ollas usually run $10 to $40 each, self-watering planters cost about $20 to $150+, and DIY hose-end drip kits typically range from $15 to $480 depending on coverage.
Why do drip irrigation systems need a pressure regulator and filter?
Drip emitters have small openings that clog easily, so filtration is needed. Pressure regulation keeps household water pressure from damaging tubing, blowing fittings apart, or causing uneven watering. Many small systems run best around 20 to 25 psi.
Can I connect a rain barrel to a drip irrigation system?
Yes, but use low-pressure drip components and keep the layout short. A rain barrel raised a few feet above the garden does not create the same pressure as a household faucet, so standard emitters and timers may not work reliably.
When should I hire a pro instead of building a DIY watering system?
Hire a pro for main-line tie-ins, buried zones, backflow assembly installation or testing, controller wiring, complex slopes, large landscapes, rental or commercial properties, and any irrigation work that requires permits or inspection.
Quick Recap
Product prices and availability are accurate as of the date/time indicated and are subject to change. Any price and availability information displayed on Amazon at the time of purchase will apply.

