Some links on this page are affiliate links: if you buy through them we may earn a commission, at no extra cost to you.
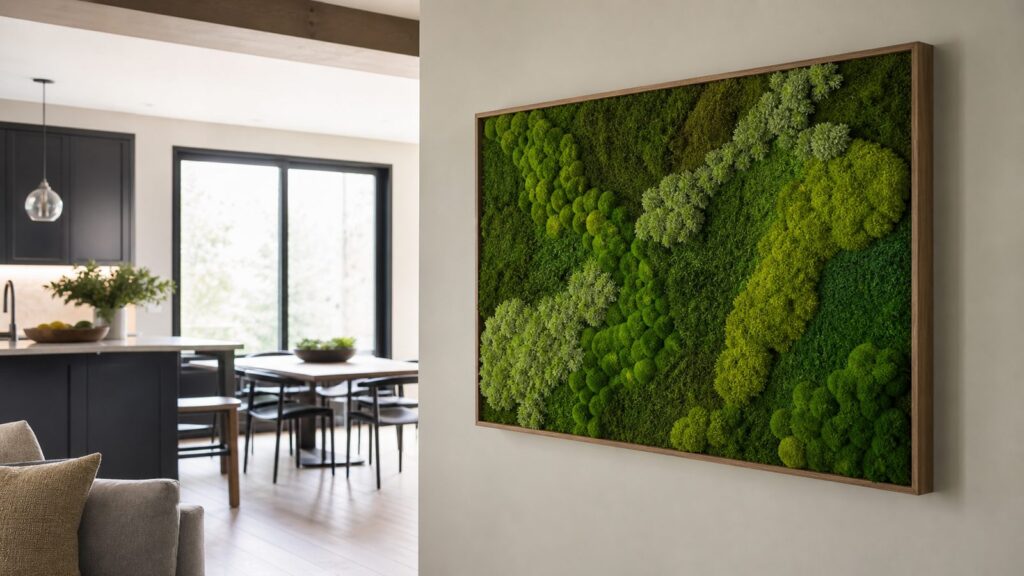
A DIY moss wall can be a smart, low-maintenance way to add texture to a room, but only if you build it like an interior finish instead of a craft project glued straight to drywall. For most homes, the right approach is a preserved moss panel: real moss that has been harvested and stabilized, usually with glycerin and dye, so it keeps a soft green look without being alive.
That distinction matters. Preserved moss does not need soil, watering, misting, grow lights, drainage, or irrigation. It also does not grow or produce oxygen the way a living plant wall does. Inside a home, especially near kitchens and bathrooms, preserved moss is usually the safer and more practical choice.
As an Amazon Associate I earn from qualifying purchases.
For a typical homeowner, a small framed piece can cost about $35 to $150 in materials. A polished 2 ft. by 3 ft. DIY panel usually lands around $120 to $350. A full 4 ft. by 8 ft. feature panel can run about $700 to $2,500 or more depending on moss density, frame quality, backer material, fire documentation, and whether you hire help to hang it.
On our job sites, we treat moss walls the same way we treat other decorative wall finishes: we think about substrate, moisture, fastening, fire classification, service access, and future removal before anyone opens adhesive. That is the difference between a moss wall that still looks good in five years and one that curls, fades, falls, or damages the drywall behind it.
Popular on Amazon

- Transformative Decor: Easily create stunning, lush wall art with our DIY moss kit. Perfect for adding a touch of nature and sophistication to any space.
- Complete Kit: Includes everything you need to craft your own moss masterpiece—premium preserved moss, adhesive, design templates, and detailed instructions.
- No Maintenance Required: Enjoy the beauty of moss without the hassle of watering or sunlight. Our preserved moss stays vibrant and fresh-looking with minimal upkeep.
- Customizable Design: Unleash your creativity with versatile moss types and design templates. Personalize your wall art to suit your unique style and space.
- Eco-Friendly Materials: Made with sustainably sourced moss and eco-conscious packaging, making it a great choice for environmentally-aware decorators.
Preserved Moss, Live Moss, or Faux Moss?
Most homeowners searching for a DIY moss wall are picturing a soft green feature wall that needs almost no maintenance. That is preserved moss, not live moss. Live moss can work in specialized bioactive systems, but it needs controlled moisture, drainage, air movement, and lighting. Without that, it can create mold, odor, dead patches, and wall damage.
Faux moss has its place too. It is usually plastic or fabric-based, so it can handle dry rooms and casual handling better, but it does not have the same organic texture as preserved moss. It may also look less convincing up close.
Recommended Free Tools
| Option | Best Use | Maintenance | Typical Risk | Cost Level |
|---|---|---|---|---|
| Preserved moss | Residential wall art, entries, offices, dining rooms, bedrooms, powder rooms | No watering; light dusting only | Sun, grease, high humidity, touching, heat | Moderate |
| Live moss wall | Specialty installations with irrigation, drainage, lights, and airflow | High; controlled growing conditions | Mold, leaks, wall damage, plant failure | High to very high |
| Faux moss | Budget decor, rental-friendly projects, high-touch areas | Low; can often be dusted more aggressively | Less realistic appearance, plastic sheen | Low to moderate |
If this is your first project, use preserved moss and build it as a framed removable panel. That gives you the look most people want without introducing water into the wall assembly.
Where a Moss Wall Works Best in a Home
The best location is a stable interior wall with indirect light, normal room humidity, and no heat or grease exposure. Good locations include living rooms, entries, stair landings, dining rooms, bedrooms, home offices, and well-ventilated powder rooms.
Riskier locations include walls directly over ranges, beside showers or tubs, above fireplaces, under supply or return vents, on exterior walls with condensation issues, and in direct sunlight. Preserved moss is decorative material. It is not a backsplash, shower surround, fireplace finish, or substitute for washable wall protection.
Ideal indoor humidity for preserved moss is commonly around 40% to 60% relative humidity. Below about 40%, the moss can become dry, brittle, or crunchy. Above 60% to 70%, it can become overly soft and more vulnerable to surface problems. That does not mean a single humid day ruins the wall, but chronic moisture is a problem.
Free tools Windows power users keep installed
One-click scans. No signup required.
Kitchen Placement
In kitchens, keep moss away from cooking grease, steam, and splash zones. A moss panel can look good on a breakfast nook wall, pantry door feature, dry bar wall, or the side wall of a dining alcove. It should not replace tile, stone, quartz, stainless steel, or another cleanable backsplash behind a cooktop or sink.
As a rule, keep preserved moss several inches away from heat sources and vents, and much farther from a range or hood discharge. Grease is hard to remove because you cannot scrub preserved moss without damaging it. If you want greenery near a sink or range, use a glass-fronted botanical frame, ceramic tile with a botanical pattern, or another cleanable surface.
Bathroom Placement
Bathrooms require more judgment. A powder room with an exhaust fan is usually fine. A primary bath with a large shower, poor ventilation, and fogged mirrors every morning is not. Keep moss outside the shower and tub splash zone, away from wet towel contact, and away from exterior corners where condensation collects.
If the room regularly sits above 60% to 70% relative humidity, use a framed piece behind glass or choose a different finish. In bathrooms, we prefer smaller framed art-style panels over full wall-to-wall moss coverage because they are easier to remove, inspect, and replace if humidity causes problems.
DIY Moss Wall Cost in 2026
The cost depends mostly on size, moss type, density, backing, frame finish, and whether you need help hanging it. Craft-style DIY can come in under $50 per square foot. A more polished DIY panel often lands around $40 to $100 per square foot. Professional custom preserved moss walls commonly start around $70 to $100 per square foot and can exceed $200 per square foot for complex work.
| Project Size | Approx. Area | DIY Material Cost | Best For |
|---|---|---|---|
| 12 in. x 12 in. to 16 in. x 20 in. | 1 to 2.2 sq. ft. | $35 to $150 | Small framed art, shelves, powder rooms |
| 2 ft. x 3 ft. | 6 sq. ft. | $120 to $350 | Entry, home office, dining nook, bedroom |
| 4 ft. x 8 ft. | 32 sq. ft. | $700 to $2,500+ | Large feature wall or commercial-style panel |
| Professional preserved moss wall | Varies | About $69 to $169+ per sq. ft.; specialty work can reach $100 to $300 per sq. ft. | Large, high-end, commercial, or code-sensitive installs |
Handyman help for hanging or building a framed panel commonly runs about $50 to $150 per hour in the US in 2026. Many markets have minimum trip fees, so even a one-hour hanging job may be billed as a two-hour visit. If your panel is larger than about 2 ft. by 4 ft., heavy, high on a stair wall, or going into masonry, hiring help can be worth it.
Order 10% to 20% extra moss. You will lose some to trimming, compression, sorting, and future repairs. Extra moss from the same batch also helps if you need to patch a damaged spot later; color can vary noticeably from one order to another.
Also popular on Amazon

- CREATE YOUR OWN LIVING ART: Unleash your creativity and design a unique moss wall art piece. This DIY kit includes everything you need to bring a touch of nature indoors.
- ALL-IN-ONE KIT: Includes a natural wood base (with built-in hanging hardware - screws not included), preserved moss in vibrant green hues, and a variety of natural accents like cork bark, walnut husks, leaves, and more. Each kit's natural accents are unique!
- ECO-FRIENDLY & SUSTAINABLE: Crafted with natural and sustainable materials, our moss wall art kit is a perfect choice for environmentally conscious individuals.
- EASY & FUN FOR ALL AGES: Whether you're a seasoned crafter or just starting your creative journey, this kit is designed for everyone. A fun and relaxing activity for individuals, families, or groups.
- UNIQUE & THOUGHTFUL GIFT: Surprise your loved ones with a one-of-a-kind, handmade gift. Perfect for birthdays, holidays, or any special occasion.
Materials and Tools
For a clean residential project, build the moss on a rigid backer first, then hang the finished panel. Do not glue moss directly to painted drywall. Direct-glue installations are hard to repair, hard to remove, and more likely to damage the wall finish.
What’s actually slowing this PC down?
Pick the symptom - the matching free tool is one click away.
Recommended Materials
- Rigid backer: 1/4 in. to 1/2 in. plywood, MDF, hardboard, or an acoustic panel rated for the weight and adhesive.
- Frame: wood frame, shadow box frame, metal frame, or simple edge trim.
- Preserved moss: sheet moss for broad coverage, reindeer moss for fluffy texture, mood/bun/pillow moss for mounded depth.
- Accents: preserved fern, bark, lichen, dried flowers, or preserved foliage.
- Adhesive: low-VOC construction adhesive, hot glue for small accents, or spray adhesive suited to porous materials.
- Primer or sealer: especially for wood backers near kitchens, baths, or exterior walls.
- Paint: dark green, black, or brown for the backer so tiny gaps disappear.
- Mounting hardware: D-rings for small panels, a French cleat for medium and large panels, and rated anchors or screws into studs.
Tools
- Tape measure and pencil
- Level
- Utility knife or shears
- Staple gun or brad nailer for frame assembly, if needed
- Drill/driver
- Stud finder
- Disposable gloves
- Drop cloth
- Respirator or good ventilation when using spray adhesive
For a 2 ft. by 3 ft. panel, plan on 3 to 6 hours of hands-on work depending on detail level, plus drying or curing time for paint, sealers, and adhesives. A small 16 in. by 20 in. piece can be finished in an afternoon. A 4 ft. by 8 ft. feature panel is usually a weekend project and is easier with two people.
Step-by-Step: Build a Preserved Moss Wall Panel
1. Choose the Size and Location
Start with the wall, not the moss. Measure the available space and check sight lines from the entry to the room. A 2 ft. by 3 ft. panel is a good first project because it is large enough to feel intentional but still manageable to build and hang.
Verify that the location avoids direct sun, strong HVAC airflow, grease, splash, and heat. Check for outlets, switches, thermostat sensors, security panels, and access panels. Do not cover anything that may need service.
2. Build or Buy the Backer
Cut the backer to size or buy a pre-made frame. For most residential panels, 1/4 in. plywood is adequate for small and medium pieces. For larger panels, 1/2 in. plywood or a reinforced frame keeps the panel flatter. If the panel is going over a sofa or bed, think seriously about weight and fastening. A finished 2 ft. by 3 ft. panel can easily weigh several pounds once the backer, frame, adhesive, and moss are included.
Do these 3 things before closing this tab:
1Repair Windows errors before they cause bigger problems2Fix the driver behind crashes, sound loss and screen glitches3Clear out junk files and repair common Windows errorsPrime or seal wood surfaces before installing moss. This reduces seasonal movement and helps prevent adhesive issues. Paint the face of the backer dark green, black, or brown. Small gaps are almost unavoidable, and a dark backing makes them disappear.
3. Dry-Fit the Composition
Lay the panel flat on a table or floor. Place the largest sheet moss zones first, then add bun or mood moss for depth, then fill with reindeer moss and preserved foliage. Do not glue yet. Spend the time to balance texture, color, and depth while everything is loose.
A common beginner mistake is using one flat green across the whole panel. Real landscapes have variation. Use two or three moss tones, and avoid perfectly even spacing. Group texture in larger masses, then taper the edges with smaller pieces. That makes the panel look designed instead of sprinkled together.
4. Glue in Layers
Work from the broadest material to the smallest accents. Apply adhesive to the backer and the underside of larger moss sheets as needed, then press gently. Do not crush the moss. For thick clumps, use adhesive at the base only and hold the piece until it grabs.
Use spray adhesive only with ventilation and only where overspray can be controlled. Many adhesives have VOCs and strong fumes while curing. Protect surrounding surfaces and follow the manufacturer’s temperature, ventilation, and cure-time instructions. In occupied homes, we prefer lower-odor, low-VOC products where possible.
5. Check Edges and Gaps
Stand the panel upright once the adhesive has set enough to hold. Look at it from across the room and from the side. Fill visible gaps, clean up loose fibers, and make sure the frame edges are tidy. If the panel will hang where people pass close by, avoid loose protruding pieces at shoulder height.
6. Let It Cure Flat
Let the panel cure flat according to the adhesive instructions. Do not rush this step. A panel that feels stable on the table can still shed material if it is hung before the adhesive has reached strength. For many adhesives, overnight curing is a sensible minimum.
7. Mount It Like a Finish, Not a Poster
For small panels, D-rings and appropriate wall anchors may be enough. For medium and large panels, use a French cleat. A French cleat spreads the load, keeps the panel flat, and is easier to level than picture wire on a heavy piece.
The Tool Desk
Outbyte PC Repair FREERepair Windows errors before they cause bigger problemsFix Now →Outbyte Driver Updater FREEFix the driver behind crashes, sound loss and screen glitchesFind Drivers →Also popular on Amazon

- Unique Handcrafted Design: Each piece is carefully handmade using preserved natural moss and wood, ensuring a one-of-a-kind rustic charm. The intricate craftsmanship creates a stunning focal point that adds warmth and elegance to any room.
- Maintenance-Free Beauty: Say goodbye to watering, trimming, and sunlight requirements. This moss wall art offers all the lush greenery of live plants without the hassle, providing effortless style and long-lasting vibrancy for your home.
- Versatile Wall Decor: Perfectly sized to complement living rooms, bedrooms, kitchens, or offices, this wall hanging enhances any space with its organic appeal. Its natural aesthetic fits seamlessly into modern, rustic, farmhouse, or minimalist decor.
- Eco-Friendly & Sustainable: Crafted with eco-conscious materials, this wall art uses preserved moss and wood, offering a sustainable alternative to live plants. It's a stylish way to bring nature indoors while supporting environmental responsibility.
- Thoughtful Gift Choice: Ideal for housewarmings, birthdays, or special occasions, this moss wall art is a unique and meaningful gift. It brings natural beauty and serenity to any space, making it a treasured addition to any home or office.
Whenever possible, fasten into studs. If studs do not line up, use anchors rated for the combined load of the panel and hardware, with a margin. For example, do not use two 20 lb. anchors for a 38 lb. panel and call it close enough. Use better anchors, more attachment points, or a cleat tied into framing.
Mounting Without Wrecking Drywall
Renters and homeowners who plan to remodel later should build a removable panel. The cleanest approach is a framed panel on a French cleat or two properly rated hangers. You will still make small fastener holes, but you avoid tearing off paper, paint, and gypsum with adhesive.
Adhesive strips can work for very small, lightweight frames, but they are not a dependable solution for textured, uneven, or heavy moss panels. Preserved moss adds thickness and creates leverage if someone bumps it. A fallen moss panel can damage furniture, floors, and the panel itself.
If you need a renter-friendly option, keep the panel small, use a lightweight backer, and mount it with hardware your lease allows. Another option is a freestanding frame or shelf-mounted piece that does not attach to the wall at all.
PC Slower Than It Used to Be?
A free scan shows the junk files, broken settings and background clutter dragging Windows down - then fixes them in one click.Free scan · Windows 10 & 11Crashes, No Sound, or Screen Glitches?
Random freezes, missing sound and display glitches usually trace back to one bad driver. Find and replace yours safely.Free scan · under a minuteFire Safety, Codes, and Permits
Most small residential moss art does not require a permit. But moss is still an interior finish or decorative material, and fire behavior matters. For large installations, high-end residential work, commercial spaces, restaurants, offices, multifamily common areas, or projects reviewed by an architect or inspector, ask for fire-test documentation before buying the moss.
The common documentation to look for is ASTM E84 or UL 723 flame spread and smoke developed information. The International Building Code addresses interior wall and ceiling finishes, and many jurisdictions use flame spread and smoke developed classifications when evaluating finish materials. For commercial or code-sensitive work, keep the product data and fire-test documentation with the project records.
Do not assume every bag of craft moss has acceptable fire documentation. Some craft moss is preserved, some is dyed, some is dried, and some may not have useful technical data at all. If the panel is large, public-facing, near a heat source, or part of a permitted project, use products with clear submittals and involve the designer, builder, or local code official as needed.
Also keep clearances in mind. Do not install preserved moss above fireplaces, near open flames, close to high-heat lighting, or where candles are commonly used. Low-voltage LED accent lighting can be attractive, but lights still create heat and wiring considerations. Use listed fixtures, leave ventilation space, and avoid burying electrical components in moss.
Kitchen and Bath Moisture Checklist
Kitchens and baths are where many DIY moss walls fail. The issue is not that preserved moss cannot ever be used there. The issue is that these rooms have moisture, grease, cleaning chemicals, and temperature swings that a living room does not.
| Location | Risk Level | Builder’s Recommendation |
|---|---|---|
| Powder room with exhaust fan | Low to moderate | Good candidate for a small framed panel away from the sink splash zone. |
| Primary bath outside shower area | Moderate | Use only with good ventilation and keep away from tubs, showers, wet towels, and exterior condensation corners. |
| Behind vanity sink | Moderate to high | Use tile, stone, glass, or another washable backsplash behind the sink; place moss higher or to the side. |
| Behind cooktop or range | High | Do not use moss as a backsplash. Grease and heat will shorten its life and make cleaning difficult. |
| Breakfast nook or dry bar wall | Low to moderate | Good location if it avoids steam, HVAC vents, and direct sun. |
Before installing in a bathroom, run the exhaust fan and watch how the room behaves after a hot shower. If mirrors, walls, and windows stay wet for long periods, solve ventilation first. A moss wall should not be used to hide moisture problems.
Independent reader supportYour contribution helps us test, update, and keep practical guides available for everyone.Maintenance and Lifespan
Preserved moss is low-maintenance, not no-consequence. Do not water it, mist it, fertilize it, or place it in soil. It is no longer growing. Added moisture can cause dye bleed, adhesive failure, odor, and surface issues.
Dust lightly with compressed air on a low setting or a soft duster. Do not vacuum aggressively, scrub, wipe with a wet rag, or use household cleaners. Keep hands off it as much as possible; repeated touching makes preserved moss flatten, shed, or darken.
Quick wins for a faster PC:
Fix the driver behind crashes, sound loss and screen glitchesFind Drivers →Clear out junk files and repair common Windows errorsFree Scan →Scan for outdated or missing drivers - takes under a minuteDriver Scan →In good indoor conditions, preserved moss walls commonly last 5 to 10 years or more. Sunlight, dry HVAC air, touching, grease, and moisture shorten that life. If a patch becomes damaged, remove the loose section carefully and glue in matching preserved moss. This is another reason to keep leftover material from the original order.
Also popular on Amazon
- Please do not water it! What we have is the maintenance-free preserved moss which is made with real, fresh moss. Preserved moss will keep green for many years without any maintenance or water use at all.
- Real moss and ferns, harvested from forest, are preserved using non-toxic food-grade ingredients. Since they are preserved, the moss do not wilt, do not require water, nor do they put out pollen or spores. The result is an ever-green artwork -- a "plant painting" -- that looks stunning and requires no maintenance whatsoever.
- Care instructions: The most important thing for caring is that please do not water it. The moss is dyed and if you water it, it will lose the green color. Secondly, please keep it away from the direct sunlight. After the long time exposure to the direct sunlight, it may shade slightly. It's best to be used for the indoor decoration and you do not need to care for it. You need the glue to adhere it.
- Care instructions: What we sell is the preserved moss. It's not the fresh moss. It's the "died" moss which we redyed it with other solutions to make it feel soft. So you don't need to water it or "plant" it with soil. It's just the decoratoin moss which will be green forever. You don't need a lid overtop. Actually people usually use the preserved moss with glue.
- Care instructions: You can glue it anywhere you need it to be. Some of our customers glue it on the stone as a piece of decoration. We suggest customers use the hot glue and glue gun. Please be attention, you cannot water it as it will lose the color if watered.
Common Mistakes to Avoid
The biggest mistake is building a live moss wall indoors without the system a living wall requires. Live moss needs moisture and environmental control. If that water has nowhere to go, the wall assembly takes the risk.
The second mistake is misting preserved moss. It may feel natural to water something green, but preserved moss is decorative. Treat it like a finish material, not a houseplant.
Another mistake is installing in the wrong place: direct sunlight, over a fireplace, beside an HVAC vent, over a range, or next to a shower. Heat, UV, airflow, grease, and humidity are the main reasons these walls fail early.
Windows Errors? Fix Them Before They Spread
Repair common Windows errors and clear accumulated junk for a smoother, more stable PC - no reinstall needed.Free scan · no reinstallCrashes, No Sound, or Screen Glitches?
Random freezes, missing sound and display glitches usually trace back to one bad driver. Find and replace yours safely.Free scan · under a minuteFinally, do not build directly on drywall with glue. A removable backer protects the wall, makes the piece easier to repair, and gives you the option to move it later. That one decision solves several problems before they start.
When to DIY vs. When to Hire a Pro
DIY is a good fit for small framed art, 2 ft. by 3 ft. panels, low-risk rooms, simple shapes, and homeowners who are comfortable measuring, cutting, gluing, and hanging wall decor. A careful DIYer can build a very good-looking panel for $120 to $350 at medium size.
Hire a pro when the wall is large, heavy, high, curved, built around outlets, part of a commercial space, or located in a kitchen or bathroom where moisture and cleanability need real planning. Professional installers usually build on a rigid backer, lay out the design before installation, use commercial adhesives, mechanically fasten to studs or rated anchors, and provide flame and smoke documentation where the project requires it.
For a large 4 ft. by 8 ft. feature, professional pricing may look expensive at $70 to $200+ per square foot, but that number often includes design, material sourcing, fabrication, delivery, installation, and documentation. If the wall is in a business, common area, or luxury remodel, that process can be worth more than the savings from trial-and-error DIY.
Do these 3 things before closing this tab:
1Fix the driver behind crashes, sound loss and screen glitches2Repair Windows errors before they cause bigger problems3Scan for outdated or missing drivers - takes under a minuteBottom Line
The best DIY moss wall for a home is a preserved moss panel built on a sealed rigid backer, composed flat on a work surface, mounted with proper hardware, and kept away from sun, grease, heat, splash, and unstable humidity. Treat it as an interior finish, not a plant project.
For kitchens and bathrooms, be selective. A framed moss panel in a dry, ventilated location can look sharp. Moss behind a range, beside a shower, or in a humid room with poor ventilation is asking too much from the material. Build it removable, buy extra moss, use varied textures, and mount it like something you expect to stay on the wall for years.
Frequently Asked Questions
Is a DIY moss wall made with live moss or preserved moss?
Most DIY moss walls should be made with preserved moss. It is real moss that has been stabilized so it stays soft and green without soil, water, drainage, or grow lights. Live moss walls need controlled moisture, airflow, and lighting, which makes them riskier inside homes.
How much does it cost to make a moss wall at home in 2026?
A small framed moss piece usually costs about $35 to $150 in materials. A 2 ft. by 3 ft. DIY panel typically costs about $120 to $350. A larger 4 ft. by 8 ft. feature panel can run about $700 to $2,500 or more depending on moss type, density, backer, frame, and installation help.
Can you put a moss wall in a bathroom or kitchen?
Yes, but only in the right spot. In kitchens, keep moss away from ranges, sinks, grease, steam, and backsplash areas. In bathrooms, keep it outside shower and tub splash zones and use it only where ventilation keeps humidity under control.
Do preserved moss walls need water or sunlight?
No. Preserved moss should not be watered, misted, fertilized, or placed in soil. It also should be kept out of direct sunlight because UV exposure can fade and dry the moss.
How long does a preserved moss wall last indoors?
In stable indoor conditions, preserved moss commonly lasts 5 to 10 years or more. Direct sun, dry HVAC air, touching, grease, moisture, and heat can shorten its lifespan.
Is preserved moss fire safe?
Fire performance depends on the specific product. For large residential, commercial, or code-sensitive installations, ask for ASTM E84 or UL 723 flame spread and smoke developed documentation and keep it with the project records.
Recommended Free Tools
Quick Recap
Product prices and availability are accurate as of the date/time indicated and are subject to change. Any price and availability information displayed on Amazon at the time of purchase will apply.

