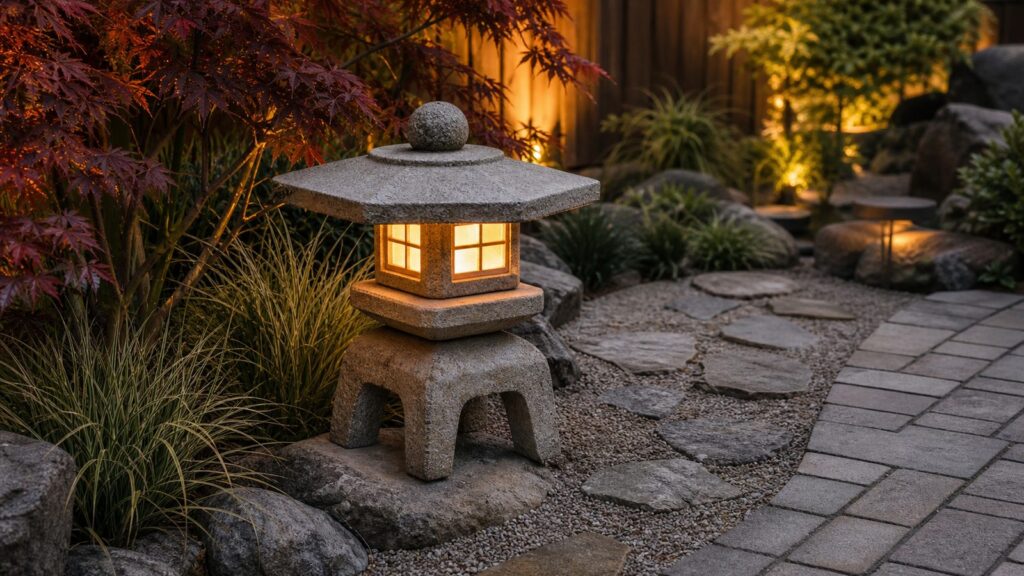
A Japanese-inspired garden lantern can be a simple weekend project, but the difference between a charming landscape feature and a short-lived craft comes down to the details: drainage, weight, weather-rated materials, glare control, and the right light source. For most U.S. homeowners, the safest DIY route is a non-hardwired lantern with a removable solar puck or battery LED. If you want the lantern tied into a larger low-voltage landscape lighting system, plan the electrical side before you build the lantern body.
On our job sites, we treat small garden features the same way we treat patios, paths, and retaining walls: water has to move, the base has to be stable, and service parts need to stay accessible. A lantern that looks good on day one but traps water, tips on mulch, or requires demolition to replace a $12 solar light is not a good build.
As an Amazon Associate I earn from qualifying purchases.
This guide covers three practical build paths: a 1-hour solar craft lantern, a weekend hypertufa or concrete lantern, and a contractor-grade low-voltage integration. It also explains what these projects cost in 2026, where to place the lantern, and when hiring a pro makes more sense than doing it yourself.
What a Japanese-Inspired Garden Lantern Is
Traditional Japanese stone lanterns include forms such as pagoda lanterns, yukimi or snow-viewing lanterns, kasuga-style lanterns, and smaller path lanterns. A DIY project made from wood, concrete, pavers, or a solar insert is best described as Japanese-inspired unless it is built with a clear understanding of those traditional forms and their context.
#1 Best Overall

- CLEAR PROTECTION FOR CONCRETE: This clear penetrating concrete sealer provides invisible, non-glossy protection for driveways, sidewalks, and patios without changing color or appearance.
- WATER REPELLENT TECHNOLOGY: Advanced silane siloxane concrete sealer bonds with surfaces to repel water, causing moisture to bead and roll off while allowing concrete to breathe naturally.
- DURABLE OUTDOOR DEFENSE: Protect your driveway from pitting, cracking, ice melt salts, chloride ions, freeze-thaw cycles, and efflorescence stains with this long-lasting concrete sealant.
- EASY APPLICATION AND COVERAGE: Clean concrete thoroughly before use. Apply with a low-pressure garden sprayer for even coverage. One gallon covers 90-150 sq. ft. for reliable outdoor sealing.
- BREATHABLE PENETRATING FORMULA: This siloxane concrete sealer penetrates deep into pores, blocking water infiltration without forming a surface film, keeping your driveway protected and breathable.
For a residential U.S. garden, the goal is usually not museum-level authenticity. The goal is a low, quiet focal point that works with stone, gravel, water, ornamental grasses, maples, mossy groundcovers, or a curved path. The best versions avoid exposed bright bulbs and instead create a soft pool of warm light.
Good target proportions for a small garden lantern are:
- Path lantern: 14 to 24 inches tall, 8 to 14 inches wide.
- Focal point lantern: 24 to 36 inches tall, 14 to 22 inches wide.
- Base pad: at least 4 to 6 inches wider than the lantern footprint on all sides.
- Light color: warm white, usually 2700K to 3000K.
- Finished elevation: slightly above surrounding mulch or soil so water drains away.
DIY Build Options and 2026 Cost Comparison
There is no single best way to build one. The right method depends on your tools, budget, weight tolerance, climate, and whether you want a decorative solar feature or a permanent lighting system.
| Build Type | Typical 2026 DIY Cost | Time Required | Best For | Main Tradeoff |
|---|---|---|---|---|
| Solar puck craft lantern | $10-$60 | 1-3 hours | Beginner-friendly accent lighting | Least durable unless materials are exterior-rated |
| Hypertufa or concrete lantern | $30-$120 | 1 weekend plus cure time | Stone look without full stone weight | Mold work, curing, and freeze-thaw details matter |
| Cedar or redwood lantern | $40-$175 | 4-8 hours | Clean lines and easier cutting | Needs sealing and periodic maintenance |
| Stacked paver or block lantern | $35-$150 | 2-5 hours | Heavy, stable, no-mold build | Can look bulky unless layout is clean |
| Purchased lantern with solar retrofit | $20-$350+ | 30 minutes-2 hours | Fastest finished look | Quality, weight, and winter durability vary |
| DIY low-voltage add-on | $100-$500 | Half day to full weekend | Better reliability and coordinated lighting | May trigger code, permit, or electrician requirements |
| Professional low-voltage system | $100-$150 per fixture commonly; $205-$328 per fixture in some estimating ranges; $2,000-$6,000 for many complete LED systems | Usually 1-3 days | Patios, paths, retaining walls, and full yard lighting | Higher upfront cost |
Material choice drives the budget. A small solar insert may cost $5 to $35 by itself. Budget solar path lights and garden lights often run under $20 each, and multipacks commonly fall around $20 to $50. A handmade concrete or limestone-style lantern from a marketplace can run roughly $120 to $350 or more before site prep or lighting upgrades.
If you are already building a patio, walkway, retaining wall, or drainage improvement, it is more efficient to coordinate the lantern with the hardscape layout. Running a low-voltage lighting plan after the patio is finished often means extra trenching, exposed cable decisions, or compromised fixture placement.
Choose the Light Source Before You Build
The light source determines the chamber size, access panel, roof design, wiring route, and maintenance plan. Do not build a sealed decorative object first and then try to force lighting into it.
Solar Puck or Solar Lantern Insert
This is the lowest-risk choice for most DIY homeowners. A small solar puck, solar path light head, or rechargeable garden lantern insert avoids trenching, transformers, permanent wiring, and most permit concerns. Plan for a removable roof or lift-out light chamber so you can replace the battery, clean the panel, or swap the insert when it fails.
Use solar when the lantern receives at least 4 to 6 hours of decent sun during the day. Avoid burying the solar panel under a deep roof overhang or placing the lantern where shrubs will shade it by midsummer.
Battery LED Candle or Puck
A weather-rated battery LED works well in shaded gardens where solar charging is unreliable. Use outdoor-rated LEDs only. Indoor flameless candles, paper shades, and craft-grade battery packs fail quickly outside because of moisture, UV exposure, and temperature swings.
Rank #2

- SUPERIOR PROTECTION: Our concrete sealer forms an invisible, filmless, hydrophobic barrier that shields concrete surfaces from water, salt, oil, stains, efflorescence, harsh weather, and other contaminants, ensuring long-lasting durability.
- WATER-REPELLENT: The waterproofer absorbs into unpainted and unsealed concrete surfaces to prevent damage from cracks caused by freeze-thaw cycles, water exposure, moisture, efflorescence, stains, and long-term deterioration.
- MULTI-PURPOSE USE: Ideal for indoor and outdoor surfaces, our concrete sealer protects the appearance of driveways, garage floors, pool decks, stamped concrete, walls, patios, walkways, and more with a natural, no-gloss finish.
- EXTENSIVE COVERAGE: Drying within 1 hour at 75°F (24°C), this waterproofer covers up to 200 sq.ft./gallon, depending on surface porosity. Apply 2 flood coats with a handheld pump sprayer. Clean-up is also easy; simply wash with water and soap once done.
- EFFECTIVE FORMULATION: Made in the USA, our water-based silane/siloxane concrete sealer offers up to 5 years of protection. Free from strong odors and VOCs, the water repellent is safe for people, pets, and plants.
For serviceability, design a 3- to 4-inch access opening or a roof that lifts off. If replacing batteries requires prying apart masonry adhesive, the design is wrong.
Low-Voltage Landscape Lighting
Low-voltage lighting gives better consistency, better brightness control, and a more professional result across a whole yard. A typical homeowner kit may cost $100 to $500 for a small run with transformer, cable, connectors, and fixtures. Professional installation costs are much higher, commonly around $100 to $150 per installed fixture in many 2026 cost references, with other estimating ranges around $205 to $328 per fixture and complete LED systems often landing around $2,000 to $6,000 depending on scope.
Before using low-voltage cable, check local requirements. Some low-voltage landscape systems are simpler than 120V work, but code rules, burial depth, transformer listing, conductor sizing, weatherproof connections, and permits can still apply. If the project needs a new exterior receptacle, 120V wiring, panel work, or a transformer location you are not comfortable with, hire a licensed electrician or qualified landscape lighting contractor.
Code-Safe Lighting Decision Tree
Use this simple decision tree before buying parts:
- Solar or battery LED with no permanent wiring: usually treated as decorative garden lighting. This is the simplest DIY path.
- Plug-in low-voltage transformer using an existing exterior GFCI-protected receptacle: check the transformer rating, cable burial instructions, local code, and whether permits apply.
- New receptacle, 120V wiring, buried line-voltage cable, or hardwired transformer: electrician and permit are likely the right call.
- Shared area, rental property, HOA-controlled exterior, or commercial site: confirm rules before installation.
Never run a household extension cord as a permanent outdoor lighting solution. Extension cords are temporary-use equipment, and outdoors they create trip, abrasion, moisture, and overload hazards when used as a substitute for proper wiring.
Build Path 1: A 1-Hour Solar Garden Lantern
This is the right project if you want a quick decorative lantern near a garden bed, pond edge, or patio container. Keep it modest: 12 to 18 inches tall is usually enough.
Materials
- One outdoor-rated solar puck or path light head, $5-$35.
- Exterior-rated container, cedar frame, resin lantern body, or small masonry shell.
- Frosted acrylic, polycarbonate, or textured glass diffuser.
- Exterior-rated adhesive or stainless fasteners.
- 1/2-inch drainage holes if the body can collect water.
- 3 to 4 inches of compacted gravel for the base.
Basic Steps
- Choose a lantern body with a removable top or accessible light chamber.
- Dry-fit the solar puck so the panel gets sun and the diode is hidden from direct eye view.
- Add a frosted diffuser if the LED appears harsh.
- Drill drainage holes in the lowest water-collecting point.
- Set the lantern on a compacted gravel pad, not loose mulch.
- Test it at night before making any adhesive permanent.
The most common mistake is making the lantern too bright. Japanese-style garden lighting looks better as a glow across stone, gravel, or planting texture than as a visible dot of light pointed at your eyes.
Free tools Windows power users keep installed
One-click scans. No signup required.
Build Path 2: Weekend Hypertufa or Concrete Lantern
Hypertufa is popular because it combines Portland cement with lightweight aggregate such as perlite. It is lighter than solid concrete and develops a weathered stone appearance that suits garden settings. For a first build, make a small test piece before casting the visible roof and body. That test tells you whether your mix is too wet, whether the mold release works, and how long the piece needs before demolding.
Recommended Size
A practical first lantern is 18 to 24 inches tall with a base around 10 by 10 inches and a roof around 14 by 14 inches. Bigger lanterns become heavy quickly, especially if you use sand-heavy concrete instead of hypertufa.
Materials
- Portland cement or exterior concrete mix.
- Perlite or sand, depending on desired weight and texture.
- Water, added slowly until the mix holds shape without slumping.
- Scrap wood, plastic tubs, foam, or containers for molds.
- Mold release such as cooking oil or commercial release agent.
- Exterior masonry sealer.
- Solar puck, battery LED, or low-voltage fixture insert.
- Gravel base material.
Practical Mix and Casting Notes
For a lightweight stone-look piece, many DIY builders start with roughly 1 part Portland cement to 1.5 to 2 parts perlite by volume, then adjust with water. The mix should feel like damp cottage cheese or stiff oatmeal, not soup. If it pours like pancake batter, it is too wet for many hand-packed hypertufa forms and may shrink or crack more than expected.
Rank #3

- WATERPROOFING STAIN – Bring out the beauty of your outdoors with Thompson’s WaterSeal Clear Multi-Purpose Waterproof Stain. Proven to waterproof concrete, brick, exterior wood and other exterior surfaces.
- CLEAR STAIN – This outdoor wood stain and sealer provides a clear finish. It will hide the grain, but still allow the texture to show. It provides complete protection while adding enhancing the natural color.
- FADE RESISTANT FINISH – The advanced polymers in this outdoor wood and deck stain deliver fade-resistant color so it stays looking great year-round. The coating resists UV damage, so you can apply with confidence.
- EASY TO USE – Whether you’re refinishing an existing fence or putting the finishing touches on a new patio, this concrete, brick, wood sealer is easy to apply. Clean the surface thoroughly prior to use for best results.
- THOMPSON’S – Protecting & maintaining all your exterior surfaces, can easily be simplified if you know where to start. Thompson’s WaterSeal is here to take the edge off, thanks to our one-coat products, informative how-to guides & decades of expertise.
Cast the lantern in modular pieces: base, pedestal, light chamber, and roof. Keep the roof removable unless the light source is wired and serviceable from below. Use a 3- to 4-inch opening for battery access and cleaning. Add drainage paths so water cannot sit in the light chamber.
Quick wins for a faster PC:
Fix the driver behind crashes, sound loss and screen glitchesFind Drivers →Repair Windows errors before they cause bigger problemsFix Now →Scan for outdated or missing drivers - takes under a minuteDriver Scan →Cure the pieces slowly. Keep them damp and shaded for the first several days, then let them continue curing before final assembly. A small piece may be handled carefully after 24 to 48 hours, but full strength develops over weeks. In cold climates, do not place uncured cement work outside during freezing weather.
Freeze-Thaw Details
Water pockets are the enemy. In freeze climates, trapped water expands and can crack concrete, pop corners, or corrode the light assembly. Elevate the lantern on gravel, slope internal ledges slightly, leave drainage holes open, and avoid saucer-like cavities under the roof. Where appropriate, use exterior mixes suitable for freeze-thaw exposure and consider air-entrained concrete for more durable outdoor work.
Build Path 3: Wood, Paver, or Purchased Lantern Retrofit
Wood Lantern
A wood Japanese-inspired lantern is easier to cut and modify than concrete. Cedar and redwood cost more than pine but hold up better outdoors. Expect to spend about $40 to $175 depending on lumber, diffuser material, stain, sealer, fasteners, and the light source.
Use stainless or galvanized fasteners, exterior glue, and a penetrating exterior stain or sealer. Keep the feet off soil with a gravel pad or small stone plinth. Leave a gap or weep hole at the bottom so condensation can escape.
What’s actually slowing this PC down?
Pick the symptom - the matching free tool is one click away.
Stacked Paver or Block Lantern
A stacked paver lantern is heavier and more stable, which can be useful around children, pets, wind, or mild slope. Costs usually run about $35 to $150 for pavers, cap blocks, masonry adhesive, gravel, and a solar puck.
Dry-stack the whole lantern before applying adhesive. Check sight lines from the patio, path, and house windows. If the lantern looks too bulky, reduce the height or widen the roof cap slightly so the proportions read intentionally.
Purchased Lantern Retrofit
Buying a concrete, resin, or ceramic lantern and upgrading the light is often the fastest route. Small decorative pieces may cost around $20 to $60, while larger handmade concrete or limestone-style pieces commonly run roughly $120 to $350 or more.
Inspect the piece before modifying it. Look for flat bearing surfaces, drainage, enough internal room for the light, and a way to remove the roof or access panel. Small resin or ceramic pieces that are not winter-rated should come indoors during hard freezes.
The Tool Desk
Outbyte PC Repair FREEClear out junk files and repair common Windows errorsFree Scan →Outbyte Driver Updater FREEFix the driver behind crashes, sound loss and screen glitchesFind Drivers →Rank #4

- SILANE SILOXANE DEEP PENETRATION: This penetrating concrete sealer uses a silane siloxane formula that soaks deep into porous surfaces instead of sitting on top, helping reduce water and moisture absorption on driveways, patios, sidewalks and other exposed concrete and masonry. Buyers sealing a 30-year-old driveway see water bead up after the first rain rather than soaking in.
- CLEAR, BREATHABLE NATURAL LOOK: This clear concrete sealant protects outdoor surfaces while preserving their original appearance. The breathable, vapor-permeable formula lets trapped moisture escape and does not create a heavy glossy wet look, so it suits concrete, pavers, brick and stone where you want the natural color to stay.
- FOR CONCRETE, BRICK, PAVERS & STONE: One versatile cement sealer for concrete and masonry covers porous exterior surfaces including driveways, patio pavers, walkways, pool decks and compatible stone. It also works as a garage floor sealer and driveway sealant on properly prepared surfaces. Not intended for glazed or non-absorbent surfaces.
- BUILT FOR OUTDOOR WEATHER EXPOSURE: Designed to help limit moisture intrusion from rain, snow and changing seasonal conditions while allowing trapped moisture vapor to escape. The siloxane concrete sealer resists deicing salts and chlorides that cause surface spalling, and helps protect against freeze-thaw damage on exposed concrete, brick, pavers and stone.
- EASY DIY APPLICATION, NO DILUTION: The low-viscosity liquid is ready to use and designed to penetrate rather than sit as a thick coating. Apply this concrete sealer spray with a low-pressure sprayer, roller or brush to a clean, dry, properly prepared surface. One gallon covers up to 200 sq ft depending on surface porosity; buyers report about 160 sq ft with a quarter left over.
Where to Place a Garden Lantern
Placement should feel intentional. A lantern works best when it anchors a view or marks a transition. Random middle-of-lawn placement usually interferes with mowing and looks disconnected from the landscape.
Good locations include:
- Near a curve in a garden path.
- At the edge of a pond, basin, or dry creek bed.
- Beside ornamental grasses where the light can graze the blades.
- Under or near a Japanese maple as a low focal point.
- At the edge of a paver patio where it supports the seating area without becoming a trip hazard.
- Near stone steps, but far enough away that it does not narrow the walking route.
Keep scale in mind. A 14-inch lantern disappears in a large open bed, while a 36-inch concrete lantern can overpower a narrow townhome path. For most residential garden beds, 18 to 30 inches tall is the useful range.
Build the Base Like a Small Hardscape
The base is where many DIY lanterns fail. Loose mulch, uncompacted soil, and uneven pavers allow the lantern to lean, settle, or tip. Before lighting anything, make the lantern stable.
For most small to medium lanterns, use this base method:
Recommended Free Tools
- Mark a pad at least 4 to 6 inches wider than the lantern base on all sides.
- Remove mulch, roots, and loose topsoil.
- Excavate 3 to 5 inches below finished grade.
- Add compactable gravel in 1- to 2-inch lifts.
- Tamp until firm and level.
- Set the lantern slightly above surrounding soil or mulch.
- Check stability from multiple directions before adding the light.
For heavy concrete pieces, slope, or areas where children and pets play, consider mechanical pinning, concealed dowels, or exterior masonry adhesive between stacked components. Do not rely on weight alone if the lantern can be bumped from the side.
Independent reader supportYour contribution helps us test, update, and keep practical guides available for everyone.Glare Control and Nighttime Appearance
The fixture should glow, not glare. Warm white LEDs around 2700K to 3000K usually look better in garden settings than cool blue-white light. Hide the diode behind frosted acrylic, textured glass, rice-paper-look outdoor diffuser material, or a stone opening that blocks the direct view of the bulb.
Aim light downward or across nearby gravel, stone, moss, or planting texture. If you can see the bare LED from a normal standing or seated position, adjust the diffuser or lower the light. Bright exposed bulbs make a small garden feel harsh and can distract from the rest of the landscape.
Maintenance Calendar
A garden lantern is not high-maintenance, but it is still an outdoor feature. A few minutes each season will extend its life.
Do these 3 things before closing this tab:
1Scan for outdated or missing drivers - takes under a minute2Clear out junk files and repair common Windows errors3Fix the driver behind crashes, sound loss and screen glitches| Timing | Maintenance Task |
|---|---|
| Monthly in growing season | Wipe solar panels, clear leaves from the roof, and confirm drainage holes are open. |
| Spring | Re-level the gravel base after freeze-thaw movement and inspect for cracks or loose joints. |
| Early summer | Trim plants that shade solar panels or block the intended light pattern. |
| Fall | Remove leaf buildup, check batteries, and inspect low-voltage cable after edging or aeration work. |
| Before hard freezes | Bring small non-winter-rated resin or ceramic lanterns indoors and make sure concrete pieces are not holding water. |
| Every 1-3 years | Refresh exterior sealer on wood or concrete as needed based on exposure. |
Common Mistakes to Avoid
- Using indoor materials outdoors: indoor LED candles, craft glue, untreated plywood, paper, and non-UV plastic usually fail after rain and sun exposure.
- Skipping drainage: trapped water causes corrosion, battery failure, algae buildup, and freeze-thaw cracking.
- Setting heavy pieces on mulch: mulch compresses and decomposes, which makes the lantern lean.
- Overlighting the garden: one bright diode can ruin the quiet effect. Use warm, shielded light.
- Sealing the light inside permanently: batteries, solar panels, and LEDs all eventually need service.
- Ignoring cable planning: if low-voltage lighting is part of the plan, route and protect the cable before final hardscape work.
When to DIY and When to Hire a Pro
DIY makes sense when the lantern is decorative, freestanding, non-hardwired, and small enough for you to place safely. A solar puck lantern, cedar frame lantern, hypertufa accent, or purchased lantern retrofit is well within reach for a careful homeowner with basic tools.
Best Value

- Siloxa-Tek 8500 is a water-based, silane/siloxane engineered to reduce water and moisture intrusion. Will not change the aesthetics, leaving your concrete, pavers, brick and stone with its original natural appearance. This low VOC formula is 100% breathable and non film forming (meaning it will never peel flake or delaminate).
- Siloxa-Tek 8500 is D.O.T (Department of Transportation) approved and resists surface damage caused by chlorides and deicing salts. It mitigates cracking, spalling and pitting and protects against surface degradation from freeze thaw damage.
- Siloxa-Tek 8500 is a supercharged penetrating sealer with 6x higher actives than any other water based concrete sealer on the market for long lasting protection that actually last. Resists wind driven rain.
- Siloxa-Tek 8500 is a commercial grade, impregnating sealer for commercial and residential applications. Its high actives formula is UV stable and will not break down from direct sunlight. There is no change to the surface profile ensuring a non slick surface. Siloxa-Tek 8500 is the next generation of impregnating sealers with smaller active particles for even deeper penetration for unrivaled protection.
- Excellent water beading effect, easy application with sprayer, roller or brush. Use on driveways, garages, basements, patios, pool decks. Covers up to 250 square feet per gallon per coat. If installed by certified applicator vertical applications can last up to 10 years before reapplication is required.
Hire a pro when the lantern is part of a larger outdoor living project, when drainage or grading is already a concern, when the feature is heavy enough to injure someone if it tips, or when you want it integrated with paver patios, retaining walls, steps, pathways, or a full lighting system.
Bring in a licensed electrician or qualified lighting contractor when the work involves new 120V power, a new exterior receptacle, buried line-voltage wiring, uncertain transformer placement, permit questions, or a large low-voltage system where voltage drop and fixture load need to be calculated. Permit and inspection fees vary by jurisdiction, but basic permit ranges around $50 to $300 are common in some 2026 cost guides where permits are required.
A well-built garden lantern is a small project with hardscape logic behind it. Build it on a stable drained base, use exterior-rated materials, keep the light warm and serviceable, and match the scale to the garden. Do that, and the lantern will feel like part of the landscape instead of a temporary decoration.
Windows Errors? Fix Them Before They Spread
Repair common Windows errors and clear accumulated junk for a smoother, more stable PC - no reinstall needed.Free scan · no reinstallOutdated Drivers Are Slowing You Down
One free scan finds every outdated or missing driver and matches the right update for your exact hardware.Free scan · exact hardware matchFrequently Asked Questions
Can I make a Japanese garden lantern without concrete?
Yes. Cedar, redwood, stacked pavers, cap blocks, resin lanterns, and purchased ceramic or concrete-look pieces can all work. Wood is easier to cut and service, while pavers are heavier and more stable.
What is the cheapest way to light a DIY garden lantern?
A removable solar puck or solar path light head is usually cheapest, often $5 to $35 for the light source. A simple DIY lantern using repurposed or inexpensive exterior-rated materials can total about $10 to $60.
Do solar garden lanterns need permits?
A freestanding solar or battery lantern with no permanent wiring usually does not need an electrical permit. Always check local rules for HOA, rental, commercial, or shared properties.
Can I run low-voltage landscape wire to a DIY lantern?
Yes, but plan it before building. Confirm transformer capacity, cable route, burial requirements, weatherproof connectors, voltage drop, and local code. If a new receptacle or 120V work is involved, hire a licensed electrician.
How do I keep a DIY lantern from cracking in winter?
Keep water out of pockets and cavities. Use drainage holes, elevate the lantern on compacted gravel, avoid loose mulch bases, use exterior-rated mixes or sealers, and bring small non-winter-rated resin or ceramic pieces indoors during hard freezes.
Where should a Japanese-style lantern be placed in a garden?
Place it near a path curve, pond edge, dry creek bed, ornamental grasses, stone steps, or beneath a Japanese maple. Avoid setting it randomly in the middle of the lawn where it interferes with mowing and feels disconnected.
Quick Recap
Product prices and availability are accurate as of the date/time indicated and are subject to change. Any price and availability information displayed on Amazon at the time of purchase will apply.

