Do these 3 things before closing this tab:
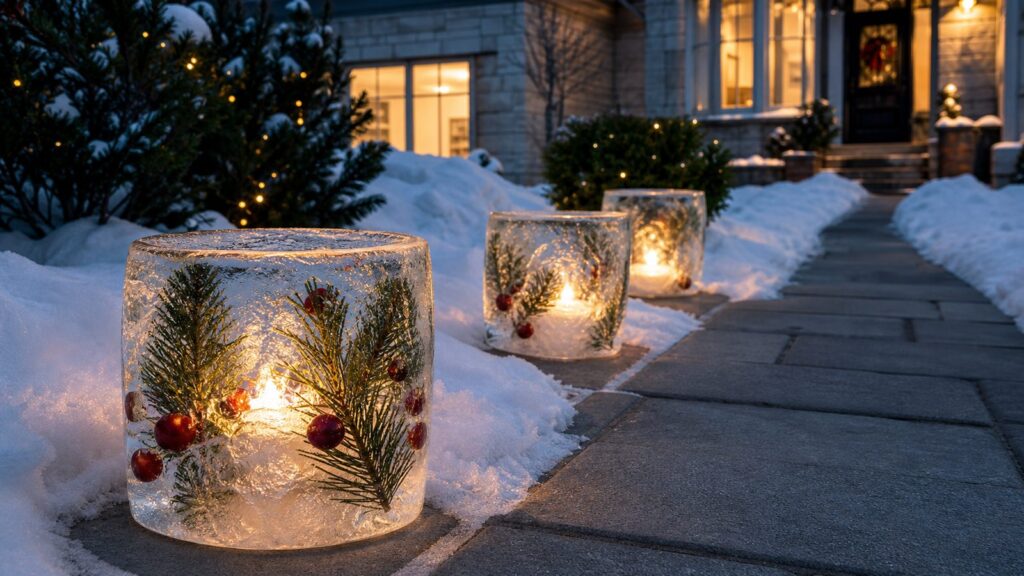
1Clear out junk files and repair common Windows errors2Scan for outdated or missing drivers - takes under a minute3Repair Windows errors before they cause bigger problemsDIY ice lanterns are one of the simplest winter garden projects that still look intentional when they are built well. The basic idea is straightforward: freeze water in a mold, leave a hollow cavity for a light, then set the lantern outside where it can glow through the ice. The difference between a pretty one-night craft and a display that works around a real house is planning for stability, drainage, walking paths, freeze-thaw weather, and safe lighting.
On our job sites, we treat temporary winter features the same way we treat temporary ramps, lighting, and walkway protection: they need a stable base, predictable water movement, and no surprises underfoot. That mindset makes ice lanterns safer and more durable, especially near entries, patios, porches, and garden paths.
As an Amazon Associate I earn from qualifying purchases.
For most homeowners, the best method is a bucket or bowl lantern with a battery-operated LED tea light. It costs about $0 to $5 per lantern if you use containers and greenery you already have, or about $2 to $8 each if you buy balloons, molds, and LED tea lights. A small display of 6 to 10 lanterns usually lands around $15 to $60 in 2026, depending on lights, molds, and decorative fill.
Best Conditions for Making Ice Lanterns
Ice lanterns need sustained freezing conditions, not just a quick overnight dip. The most reliable outdoor window is 8 to 24 hours below 32 degrees F, depending on the size of the lantern, the mold material, wind exposure, and how much water you are freezing. A small bowl lantern may set overnight. A 5-gallon bucket lantern can need a full day or longer, especially if you want a strong shell and a usable center cavity.
#1 Best Overall

- Great buys: if you need amounts of floating candles in glass, cylinder vase or mason jar for decor; and also hope it cheaper than real candles; adding them to your shopping cart, they are popular for weddings, parties, festivals, centerpiece, bathroom, restaurants
- Looks real and eligance: the color of these floating tealights are close to real flame; flickers like a real candle; adding a touch of romantic of your table centerpiece in one second.Product Dimensions 1.5"D x 1.5"W x 1.6"H
- Easy to use: battery include; free installation; water-activated; the light comes on when hitting the water and turn off when taking out; goodbye to the trouble of blowing out candles one by one
- Safe and long lasting: battery operated; no danger of fire; smokeless and unscented; the lights can be lasting 150+ hours(cr2032) and the battery is replaceable; don’t worry about the light will go out when you enjoy the happy hour
- WARNING: Button cell battery included. Keep out of reach of children. Please do not swallow or place it inside any part of the body! Please prevent children from getting tangled when close to the candles
If your area is sitting around 30 to 34 degrees F, be careful. The outside may look frozen while the inside is weak. That is when lanterns crack during unmolding or collapse on a sunny afternoon. In warmer regions, make them in a freezer and display them only during short cold snaps or for a single evening event.
For planning, use local frost and freeze forecasts rather than guessing from the calendar. NOAA’s current U.S. Climate Normals use 1991-2020 data, and local first and last freeze timing varies widely across the country. The USDA Plant Hardiness Zone Map was updated in 2023 and remains the practical 2026 reference for winter garden planning. It is based on average annual extreme minimum winter temperature, split into 10-degree zones and 5-degree half-zones. That helps with garden planning, but for ice lanterns, the immediate 24- to 48-hour forecast matters more.
Materials and Tools
You do not need specialized equipment. The best molds are common household containers that release easily and can tolerate water expansion. Avoid glass as the inner mold unless you are prepared to let it release naturally without forcing it. Ice expansion can crack glass, and broken glass inside an ice cavity is not worth the risk.
- Outer mold: plastic bucket, mixing bowl, plastic storage container, Bundt pan, or silicone mold.
- Inner mold: plastic cup, food container, weighted bottle, or jar-shaped plastic container to create the light cavity.
- Water: tap water is fine; distilled or boiled-and-cooled water can reduce cloudiness but will not guarantee perfectly clear ice.
- Weight or restraint: stones, canned goods, waterproof tape, or clamps to hold the inner mold in place.
- Decor: evergreen sprigs, holly, cranberries, citrus slices, pinecones, seed heads, or winter stems.
- Light: battery-operated LED tea light, preferably warm white for a candle look or cool white for a crisp ice sculpture effect.
- Base protection: tray, saucer, scrap paver, packed snow pad, or shallow pan to control meltwater.
- Release tools: warm water, towel, gloves, and a sink or utility area for unmolding.
For lanterns near doors or walkways, use a flat-bottom bucket or bowl. Save balloon luminaries for garden beds, snowbanks, and areas where rolling or breakage will not create a hazard.
Cost Guide for 2026
The project can be nearly free if you already have containers and yard clippings. The biggest cost variable is lighting. In 2026, common Walmart listings show 6-count LED tea light packs around $5.78 and 24-count packs roughly $10 to $13. Home Depot flameless candle listings vary widely, from about $10 to $100 across the category, with some 12-count sets around $16 to $17 and specialty 24-count sets costing much more.
| Display Size | Typical Materials | Estimated 2026 Cost | Best Use |
|---|---|---|---|
| 1-2 lanterns | Household bowls, tap water, yard greenery, existing LEDs | $0-$10 | Porch accent or table centerpiece outdoors |
| 6-10 lanterns | Reusable molds, 24-pack LED tea lights, clippings or simple decor | $15-$60 | Entry walk, patio edge, winter garden bed |
| Large statement lanterns | 5-gallon buckets, larger LED lights, premium greenery, trays | $8-$25 each | Driveway corners, garden focal points, wide porch areas |
| Safety supplies | Traction sand, play sand, pet-conscious deicer, trays | $6-$25 per bag or bucket | Areas near paths, steps, and hardscape |
Purchased cranberries, citrus, ribbon, pine sprigs, or floral picks commonly add $5 to $20 per batch. New 5-gallon buckets, silicone molds, or decorative pans typically add $5 to $25 each, though reusable molds bring the per-lantern cost down after the first batch.
Choose the Right Ice Lantern Method
Bucket or Bowl Lanterns
This is the most practical method for a home exterior. A bucket or bowl creates a lantern with a flat base, thicker walls, and a predictable footprint. That matters near porches, patios, and entries. A stable lantern is less likely to tip, roll, or shed broken ice into a walking line.
The Tool Desk
Outbyte PC Repair FREEClear out junk files and repair common Windows errorsFree Scan →Outbyte Driver Updater FREEScan for outdated or missing drivers - takes under a minuteDriver Scan →For most homes, use an outer mold that is 8 to 12 inches wide and 6 to 10 inches tall. The inner mold should create a cavity at least 3 inches wide and 3 to 5 inches deep. That gives you enough room to place and replace an LED tea light while wearing gloves. Narrow cavities look tidy in photos but become irritating outdoors.
Balloon Ice Luminaries
Balloon luminaries are faster and have a nice rounded glow, but they are fragile and can roll. They work best in snowbanks, garden beds, or low-risk display areas. They are not our first choice for stairs, narrow landings, driveway edges, or patios where people walk after dark.
If you use balloons, place each finished shell in a shallow depression in packed snow or on a tray. Do not set round ice directly on sloped pavers or porch boards.
Step-by-Step: Build a Stable Bucket Ice Lantern
1. Pick a Mold With a Flat Base
Choose a flexible plastic bucket, storage container, or mixing bowl. Avoid glass and brittle plastic. Water expands as it freezes, and rigid containers can split. If the lantern will sit near an entry, a flat-bottom mold is worth it. A 2- to 3-quart bowl makes a good small lantern. A 5-gallon bucket makes a large lantern, but it is heavy and needs longer freeze time.
Recommended Free Tools
2. Freeze a Strong Bottom First
Pour 1 to 2 inches of water into the outer mold and freeze it first. This creates a solid base so the finished lantern does not have a thin, weak bottom. For a small lantern, this base layer may freeze in 2 to 4 hours outdoors during cold weather. For a large bucket, allow 4 to 8 hours.
Rank #2

- 【Wide Application】Great when used for the centerpieces, vase, ponds, swimming pools, fish tanks, aquariums, ice buckets and so on. It is with a hanging hook on the bottom. You can use it for paper lanterns lighting as well.
3. Set the Inner Mold
Place the smaller container on the frozen base. Center it unless you want the light intentionally offset. Add stones, coins, or a canned good inside the inner container to hold it down. You can also tape across the top of the outer mold to keep the inner mold from drifting.
Leave at least 1 to 1 1/2 inches of ice wall thickness around the cavity. For large lanterns, 2 inches is better. Thin walls melt fast and crack easily during release.
4. Add Decorative Fill
Place evergreen sprigs, holly, cranberries, citrus slices, or winter stems around the inner mold. Do not pack the mold full. Overfilled decorations create weak spots and uneven freezing. Use enough material to frame the light, not so much that the ice has no continuous structure.
Free tools Windows power users keep installed
One-click scans. No signup required.
Before the final freeze, turn the best-looking side toward the direction people will view it from. Greenery floats and shifts, and you will not be able to fix that once the lantern is frozen.
5. Add Water in Stages
Fill around the inner mold slowly. If the decor floats, add 2 to 3 inches of water at a time and let each layer partially freeze before adding more. This takes longer, but the finished lantern looks cleaner and is less likely to have all the greenery trapped at the top.
For clearer ice, use distilled water or boiled water that has cooled fully before pouring. The bigger improvement comes from slow, directional freezing. An insulated cooler can help because it encourages the ice to freeze from one direction. Still, manage expectations: household freezers and backyard conditions usually trap bubbles and cloudy areas.
6. Freeze Until the Walls Are Solid
Small lanterns usually need 8 to 12 hours in sustained freezing weather. Medium lanterns often need 12 to 18 hours. Large bucket lanterns may need 18 to 24 hours or more. If the temperature is only slightly below freezing, add time.
Windows Errors? Fix Them Before They Spread
Repair common Windows errors and clear accumulated junk for a smoother, more stable PC - no reinstall needed.Free scan · no reinstallCrashes, No Sound, or Screen Glitches?
Random freezes, missing sound and display glitches usually trace back to one bad driver. Find and replace yours safely.Free scan · under a minuteCheck the top edge and wall thickness before unmolding. If the lantern flexes, sloshes, or sounds hollow in a weak way, give it more time.
7. Release With Warm Water
Use warm water, not boiling water. Run warm water over the outside of the mold for a few seconds at a time, then gently loosen the ice. Sudden heat can fracture the lantern. Remove the inner mold the same way. If it resists, add warm water into the inner container and wait.
Wear gloves. Finished lanterns can be slippery, sharp at the rim, and heavier than they look. A medium lantern can weigh several pounds; a large bucket lantern can be awkward enough to require two hands and a clear carrying path.
8. Add the Light
Use a battery-operated LED tea light for most residential displays. Warm-white LEDs give the closest candle effect. Cool-white LEDs make the ice look brighter and more sculptural. Remote-control lights cost more but are useful if you are placing several lanterns in a garden bed or along a patio edge.
Real candles can work inside ice, but they add fire, wax, smoke, and supervision problems. The U.S. Fire Administration and NFPA both emphasize candle fire risk, especially when candles are left unattended or placed near combustible materials. For a front entry, family gathering, or public-facing display, LEDs are the better default.
Rank #3

- Designed Specifically for Bambu Lab Users This waterproof RGB LED kit is specially designed to fit the mounting structure of the official KC020 for Bambu Lab, and is fully compatible with the KC020 model used on X1C,P1S,A1,A1mini,P2S,H2C, and H2D printers. The 3D-printed housing is not included—please download the matching model file from MakerWorld by searching for “LED light” or “KC020”.
- Customize Your Lighting Experience Pair it with a lamp shade you print yourself (light-colored PLA filament with good translucency is recommended) to add unique ambient lighting to your everyday space. Whether it’s a study corner, bedside area, storage shelf, dorm room, temporary outdoor shelter, or special occasion decor—from romantic holidays to themed parties—it easily adapts to create personalized atmospheres.
- 13 Colors + 2 Dynamic Modes – Full Remote Control This waterproof RGB LED light is controlled via infrared remote and offers 13 static colors and 2 dynamic lighting modes (breathing and gradient). A single remote can control multiple lights simultaneously, making it simple and flexible for various lighting needs. Whether for everyday decoration or showcasing your creations, it’s an ideal choice for setting the perfect mood.
- Up to 16-Hour Runtime with Replaceable Power Units for Easy Maintenance A single use delivers up to 16 hours of continuous illumination, thanks to its replaceable power design—ideal for extended operation. If the light stays red and doesn’t respond to the remote, it typically requires replacing two CR2032 units. If the issue persists, try replacing the CR2025 unit inside the remote. When not in use for extended periods, we recommend removing the power units or reinserting the insulating tab to protect the device.
- IP68 Waterproof – Safe for Submersion & Creative Decor Rated IP68 waterproof, this compact light (⌀30mm × 24mm) can be fully submerged in water—ideal for use in vases, fish tanks, pool decorations, or floating centerpieces. The infrared remote has a range of up to 3 meters and works reliably from dry areas outside the water. Note: the remote itself is not waterproof—do not submerge it.
Where to Place Ice Lanterns Safely
Placement matters more than decoration. An ice lantern is a temporary exterior feature that melts, sheds water, and can refreeze. Keep it out of the walking line.
Do not place lanterns on stair treads, ramps, narrow landings, driveway tire paths, or the center of a walkway. Keep them away from door swings, downspouts, and low spots where water already collects. If you are lining a path, place lanterns beside the path, not on it, and preserve a clear walking width. A good practical target is at least 36 inches of clear passage, with more room near doors and turns.
Use a tray, saucer, paver, or packed-snow pad under each lantern. That base does three things: it keeps the lantern level, makes meltwater easier to predict, and reduces direct exposure on concrete, brick, stone, or paver joints. On porches, avoid placing ice directly on wood boards where meltwater can sit against the finish.
Quick wins for a faster PC:
Clear out junk files and repair common Windows errorsFree Scan →Fix the driver behind crashes, sound loss and screen glitchesFind Drivers →Repair Windows errors before they cause bigger problemsFix Now →Think through the thaw before you set the display. If the forecast calls for sun or temperatures above freezing the next day, move the lanterns into a garden bed or drain-safe area before they soften. The dangerous period is often not the cold night when they look best; it is the following morning when meltwater refreezes as a thin slick layer.
Concrete, Pavers, Plants, and Deicer
Ice lanterns are mostly harmless when they are managed, but meltwater and deicer can be rough on exterior surfaces. New concrete, porous stone, brick, and paver joints deserve extra care. Repeated wetting and refreezing can accelerate surface wear, and deicers can add stress to concrete, metal, lawns, and shrubs when overused.
Use traction sand where possible instead of relying heavily on ice melt around the display. If you do use deicer, apply the minimum amount needed and keep it away from planting beds. University extension guidance warns that deicing products can damage concrete, metals, plants, and shrubs when overapplied. Rock salt is inexpensive, but it is not gentle on landscapes or masonry. Premium ice melt products cost more, often in the $6 to $25 range per bag or bucket depending on size and region, but no product should be treated as harmless.
For hardscape protection, the best move is simple: put each lantern on something sacrificial. A plastic plant saucer, metal tray, scrap paver, or compacted snow pad gives water a defined place to go.
Outdoor Lighting and Electrical Safety
Battery LED tea lights are the easiest and safest option. They avoid cords, outlets, and wet connections. If you are using adjacent string lights, spotlights, or corded decorations, use products rated for outdoor use. Do not use indoor extension cords outside.
Exterior receptacles should be GFCI-protected under modern residential electrical safety practice, and outdoor covers should be suitable for wet locations when a cord is plugged in. Keep cord connections elevated and out of puddles. Do not bury connections in snow or tuck them under ice lanterns where meltwater can collect.
If your display needs multiple corded lights, timers, or new exterior receptacles, that is no longer just a craft project. Bring in a qualified electrician or contractor who understands outdoor-rated equipment, GFCI protection, weatherproof covers, and safe routing.
Independent reader supportYour contribution helps us test, update, and keep practical guides available for everyone.Common Mistakes That Ruin Ice Lanterns
- Using real candles by default: Open flame needs supervision and creates avoidable fire and wax issues.
- Setting lanterns on steps: Meltwater can refreeze where people place their feet.
- Making the shell too thin: Thin lanterns collapse quickly in sun or marginal temperatures.
- Forcing glass molds: Glass can break inside the ice cavity.
- Overpacking greenery: Too much fill interrupts the ice structure and creates weak spots.
- Skipping the base layer: A thin bottom makes the lantern harder to move and more likely to fail.
- Using boiling water to release molds: Sudden heat can crack the ice.
- Ignoring drainage: A beautiful lantern in the wrong spot can create black ice by morning.
When to DIY vs. When to Hire a Pro
DIY is the right call for most ice lanterns. If you are decorating a patio, garden bed, porch edge, or backyard gathering space with battery LED lights, the work is simple and inexpensive. Keep the display small enough to move before a thaw, and use stable bases under each lantern.
Consider hiring a pro when the project becomes part of a larger exterior plan. That includes commercial entries, event walkways, HOA common areas, steep driveways, masonry steps, permanent outdoor lighting, or any situation where visitors will move through the display after dark. A contractor can help with temporary path lighting, drainage, traction control, hardscape protection, and safe power routing.
Rank #4

- Fantastic Waterproof: These floating tealights (D1.5" X H1.6") are completely waterproof. Put these LED tealight candles in your pool and vase or bowls filled with water to create a warm and romantic ambiance. The package includes 12 x floating tealights (batteries installed)
- Energy Saving and Convenient Operation: each waterproof flameless tea lights will come with pre-installed battery for your quick and convenient use; Water-activated, fun floating candles that work through the conduction of the water; Simply put it in/out water to control it; Note: please make sure that the bottoms are all tightened before use
- Safe For Kids, Pets, Seniors : These battery tea lights can be used without having to worry of flame, absolutely no fire hazards or burning risks, safe for families with pets or young children
- Warm Romantic: These flameless led tea light candles can create warm and romantic atmosphere and canbe widely used to decorate Home, Bars, Hotel, Parties, Birthday, Holidays, Wedding, ,Valentine's,Halloween, Bedroom,Tabletop,or other occasions
- Long Battery Life: Each LED flameless floating candles use a CR2032 button cell which is very efficient and easy to buy online or from local store. Last about 100 hours with a new battery. Batteries Included
For homeowners, the line is clear: if the lanterns are decorative objects sitting off the path, DIY is fine. If the display changes how people walk, park, enter the house, or use exterior power, get professional help.
Cleanup and Teardown
Plan teardown before the weather changes. Move lanterns while they are still solid enough to handle. Set them in a garden bed, gravel area, or drain-safe spot where meltwater will not cross a walking surface. Remove LED lights first so batteries and electronics do not sit in water.
Do not chip frozen lanterns off concrete with a metal shovel. You can scar the surface. Use warm water sparingly around the base if needed, then lift the lantern once it releases. Sweep up loose ice and add traction sand if any meltwater reaches a walking surface.
What’s actually slowing this PC down?
Pick the symptom - the matching free tool is one click away.
When the season is over, rinse reusable molds, dry them fully, and store LEDs without leaving batteries installed for months. That keeps the project cheap the next time cold weather rolls in.
Final Builder’s Advice
The best DIY ice lanterns are not complicated. Use a stable mold, build a thick enough shell, light it with LEDs, and place it like you would place any temporary exterior feature: off the walking path, on a predictable base, and away from areas where water can refreeze underfoot.
That combination gives you the look people want from winter garden decor without creating problems for the porch, pavers, plants, or guests. Done well, a few $2 to $8 lanterns can make a winter entry or garden bed feel finished for very little money.
Frequently Asked Questions
How long does it take an ice lantern to freeze?
Most small ice lanterns take 8 to 12 hours in sustained temperatures below 32 degrees F. Medium lanterns often need 12 to 18 hours, and large bucket lanterns may need 18 to 24 hours or more.
Can you make ice lanterns without freezing weather?
Yes. Use a household freezer, then display the lanterns outside during a short cold snap or for one evening. Use smaller molds that fit level in the freezer and allow extra time for thick walls.
Are real candles safe inside ice lanterns?
Battery-operated LED tea lights are the safer default. Real candles add fire, wax, smoke, and supervision concerns, especially near greenery, porches, children, pets, or unattended entries.
What is the best mold for DIY ice lanterns?
A flexible plastic bucket or bowl with a flat bottom is best for most homes. It creates a stable lantern that is easier to place near patios and entries. Balloon lanterns are attractive but more fragile and better for garden beds.
Can ice lanterns damage concrete or pavers?
They can contribute to surface wear if meltwater repeatedly soaks into joints and refreezes, especially on porous stone, brick, pavers, or newer concrete. Use a tray, saucer, scrap paver, or packed-snow pad under each lantern.
Where should you place ice lanterns?
Place them beside walkways, not on them. Avoid stair treads, ramps, narrow landings, driveway tire paths, door swings, downspouts, and low spots where meltwater can refreeze.
Quick Recap
Product prices and availability are accurate as of the date/time indicated and are subject to change. Any price and availability information displayed on Amazon at the time of purchase will apply.




