Free tools Windows power users keep installed
One-click scans. No signup required.
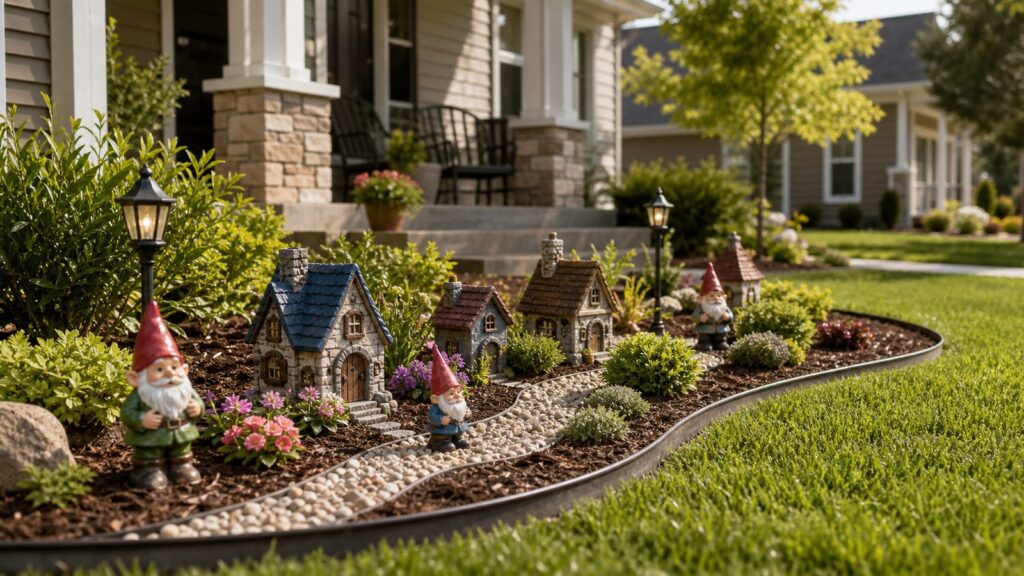
A DIY garden gnome village can be charming, but only if it looks intentional after the first rain, mowing day, and summer heat wave. The difference between a cute corner and a messy pile of miniatures is basic site work: a defined footprint, a stable base, drainage, weather-resistant materials, and enough clearance for maintenance.
For most homeowners, the sweet spot is a 2 ft. x 4 ft. to 4 ft. x 6 ft. display tucked into a border bed, around a tree, beside a walkway, or in a large planter. A realistic 2026 DIY budget is about $75 to $450 for a finished small village, depending on how many resin figures, plants, lights, edging, mulch, and gravel you buy. You can spend $25 to $100 with found stones and thrifted pieces, or $300 to $750 on a larger themed layout with several zones and lighting.
As an Amazon Associate I earn from qualifying purchases.
On our job sites, we treat even decorative lawn features as small landscape installations. That means we start with layout, grade, edging, material separation, and future maintenance before the fun pieces go in. The five garden gnome village ideas below are arranged from easiest to more involved, with practical dimensions, costs, and construction notes so the village still looks good a year from now.
Start With a Simple Site Plan
Before buying gnomes, decide how the village will sit in the yard. A strong layout needs four things: one focal point, one path, one gathering area, and one background element. That can be as simple as a 12-inch gnome house against a shrub, a 4-inch-wide pea gravel path, a small flat stone patio, and a few dwarf plants behind it.
#1 Best Overall

- 7 Unique Poses & Colors: Each gnome has a distinct pose and color, one set delivers 7 happy expressions to enliven your garden or home
- Premium Resin, Hand-Crafted: Made of high-quality resin, waterproof and rust-proof. Each gnome is hand-carved and polished with vivid details and lasting colors, suitable for both indoor and outdoor display
- Versatile for Any Scene: Compact 1.89*1.18inches size fits in fairy gardens, succulent pots, dollhouses, desktops, offices, and cake decorating. Suitable for theme parties and craft classes too
- A Meaningful Gift with Heart: The 7 dwarfs symbolize unity, kindness, courage, hard work, and optimism. Whether for family, friends, or colleagues, this uplifting set makes a warm and unique gift
- Hand-Painted with Expressive Faces: Each gnome is individually hand-painted with bright, saturated colors that resist fading. Whether smiling, focused, or playful, the 7 vivid faces each tell a story, turning a static figurine into a daily mood-booster
Keep the first build small. A 2 ft. x 4 ft. village is large enough for 2 or 3 figures, a miniature path, 3 to 5 small plants, and one house or bridge. A 4 ft. x 6 ft. village can support 5 or 6 gnomes, a split path, lights, edging, and a few zones, but it also needs more maintenance and a clearer mowing edge.
Use a garden hose, marking paint, or scrap lumber to outline the footprint. Stand back from the street, patio, kitchen window, and main lawn view. If the display reads as one organized feature from 20 to 30 feet away, it will usually work up close. If it only makes sense when you are kneeling next to it, simplify the plan.
Basic Construction Rules
Scrape sod where the village will go, especially under paths and houses. Do not just set miniatures into grass; turf will grow around them, string trimmers will hit them, and moisture will stay trapped at the base. For planted areas, use 2 to 4 inches of organic mulch, pulled back from plant crowns and tree trunks. For miniature walking paths, use a thin base of sand or compacted screenings under pea gravel, decomposed granite, or flat stones.
What’s actually slowing this PC down?
Pick the symptom - the matching free tool is one click away.
Edging matters. Plastic no-dig edging, steel edging, brick, stone, or a pressure-treated wood border keeps mulch and gravel out of the lawn. Leave a mower-width strip or hard edge wherever turf meets the display. If a mower wheel cannot pass cleanly, that edge will become a maintenance problem.
2026 Cost Guide for a DIY Gnome Village
Outdoor gnome decor has a wide price range. In 2026, common retail outdoor gnomes made from resin, polyresin, polystone, or metal often run about $24 to $79 each, with many 12- to 15-inch resin or polystone pieces landing around $35 to $55. Solar-lit figures and premium sets cost more. The base materials can cost as much as the figures if you use edging, gravel, plants, and lighting.
| Village Type | Typical Size | DIY Budget | Best For | Time Needed |
|---|---|---|---|---|
| Container village | 18 to 30 inch planter | $25-$150 | Patios, renters, small yards | 1-3 hours |
| Tree-base village | 3 to 6 ft. arc around trunk | $50-$250 | Shade gardens and mature trees | 2-4 hours |
| Raised-bed village | 2 ft. x 4 ft. to 4 ft. x 6 ft. | $100-$450 | Live plants and clean borders | 4-8 hours |
| Rock-path village | 3 ft. x 5 ft. to 5 ft. x 8 ft. | $150-$600 | Visible front-yard features | 1 weekend |
| Solar-lit village | 4 ft. x 6 ft. or larger | $200-$750 | Evening patios and walkways | 1 weekend |
Bulk mulch is commonly cited around $30 to $150 per cubic yard, with a national average near $75. A small gnome village usually needs only a few bags unless you are refreshing a larger bed at the same time. Decorative gravel can run higher, often around $80 to $300 per cubic yard depending on stone type and source. Bagged pea gravel is convenient for small paths but expensive by volume compared with bulk delivery.
Landscape fabric is tempting because 4 ft. x 100 ft. rolls are often around $32 to $60, with fabric and staple bundles around $43 to $67. Use it carefully. Fabric can be useful under gravel-only miniature paths, but we do not like it under living planting zones because it can interfere with soil improvement, root growth, and future bed maintenance. In planted areas, mulch over prepared soil is usually the better long-term choice.
Recommended Free Tools
Village 1: The Container Gnome Village
A container village is the easiest project and the best choice for renters, patios, balconies, small lawns, or homeowners who want a seasonal display they can move. Use a wide, shallow container at least 18 inches across and 8 to 12 inches deep. A 24- to 30-inch bowl planter gives enough room for one small house, 1 or 2 gnomes, a miniature path, and 3 small plants.
Choose a container with drainage holes. If it does not drain, drill holes if the material allows it or use it only as a decorative outer pot with a draining liner inside. Add potting mix for planted sections, not heavy garden soil. For a path, set a strip of landscape fabric or geotextile only under the gravel zone, then add 1/2 to 1 inch of pea gravel, aquarium stone, or small decomposed granite.
Shopping List and Budget
Plan on $25 to $150. A thrifted pot, found stones, twig fencing, and one small gnome can keep the cost low. A new frost-resistant planter, 2 resin figures, dwarf plants, miniature accessories, and solar fairy lights will push the cost toward the high end.
Good plant choices include creeping thyme, sedum, dwarf mondo grass, small hens-and-chicks, miniature hosta for shade, or compact annuals. Keep scale in mind. A plant in a 4-inch nursery pot can look like a tree next to a 5-inch gnome, so use fewer plants and prune them regularly.
Do these 3 things before closing this tab:
1Clear out junk files and repair common Windows errors2Fix the driver behind crashes, sound loss and screen glitches3Repair Windows errors before they cause bigger problemsRank #2

- Rich in Quantity: you will receive 19 pieces of gnome garden accessories, including miniatures gnomes, mushroom, bridge, lighthouse, water well, pond and so on (river not included), enough quantity and various styles to meet your fairy garden needs and replacements
- Reliable Material: these miniature gnome accessories for fairy garden are made of resin material, reliable and reusable, sturdy and waterproof, not easy to break or fade, which can serve you for a long time, and you can use them with confidence
- Cute and Vivid: our gnome supplies are cute in appearances, bright in colors, designed with miniatures gnome, mushroom, bridge, lighthouse, water well, pond and so on, which will create a realistic and adorable gnome, suitable for decorating your plant pots, terrarium and more, bringing much fun to you
- Widely Applications: the miniature gnome figurines are elegant and practical, which will brighten up your garden, plant pots, backyard, lawn, micro landscape, dollhouse, terrarium, you can also apply them as DIY crafts, gnome decorations, cake decorations and so on
- Compact Size: the tiny resin figures are small in size and will not take up too much space, suitable for gnome garden decorations, miniature landscapes, planters, etc., proper in size and light in weight, easy to attract the attentions of your guests
Build Notes
Set the tallest item toward the back and leave at least one open area of visible soil, gravel, or mulch so the container does not look crowded. Anchor lightweight houses with a short bamboo skewer, galvanized wire, or a dab of exterior-grade construction adhesive on a removable stone base. In freeze-thaw climates, avoid leaving porous ceramic pieces outdoors through winter. Resin and polystone tolerate weather better, but even those last longer if stored during hard freezes.
Village 2: The Tree-Base Gnome Village
A tree-base village can look natural, but it is also the easiest one to build wrong. The goal is to decorate the area around the tree without damaging bark, roots, or trunk flare. Do not nail doors into living bark. Do not screw bridges into roots. Do not pile mulch against the trunk. Do not cut roots to fit a path.
Use a partial arc rather than a full ring if the tree has exposed roots or a pronounced trunk flare. A 3- to 6-foot-wide crescent on the viewing side is usually enough. Keep all decor freestanding. A miniature door can lean against the trunk or be mounted on a small stake just in front of it. Bridges should sit on small stones, not on roots.
Base and Mulch
Remove weeds by hand and avoid deep digging. Add 2 to 3 inches of shredded bark or leaf mulch, tapering down to bare soil near the trunk. Keep mulch pulled back several inches from the bark. Around trees, the mulch should look like a wide, shallow saucer, not a mound.
Quick wins for a faster PC:
Clear out junk files and repair common Windows errorsFree Scan →Scan for outdated or missing drivers - takes under a minuteDriver Scan →If you want a path, use small flat stones set on the soil surface or a very shallow layer of pea gravel in a narrow strip. A 3- to 4-inch-wide miniature path is enough visually. Avoid compacting the root zone with heavy stone or thick gravel.
Best Materials
Use resin, sealed cedar, exterior-painted wood, metal, or stone. Twig fences and bark houses look great, but untreated wood sitting on damp mulch breaks down fast in humid regions. Elevate wood pieces slightly on flat stones so air can move underneath. In hot and dry climates, lighter mulch helps reduce heat buildup around shallow roots.
Budget $50 to $250 depending on how many figures and accessories you buy. This village is usually a 2- to 4-hour project because the installation is light, but the layout takes patience. The most natural tree-base villages use fewer pieces and more negative space.
Village 3: The Raised-Bed or Border Village
This is the most balanced option for many homes. A raised-bed or border village gives you clean edges, live plants, mulch, and enough structure that the display feels designed. Use an existing foundation bed, walkway border, mailbox bed, or a new 2 ft. x 4 ft. to 4 ft. x 6 ft. area along the lawn.
For a new bed, scrape the sod, loosen the top few inches of soil in planted areas, and install edging before adding decor. Grade the bed slightly away from the house, patio, fence posts, or shed. You do not need a dramatic slope; even a small pitch helps keep water from sitting against structures.
Planting Plan
Use plants that stay small or tolerate pruning. Good choices include dwarf conifers, boxwood cuttings kept small, creeping Jenny where it is appropriate and not invasive, sedum, thyme, ajuga, dwarf grasses, miniature hosta, coral bells, and compact annuals for color. Put taller plants in the back, spreading groundcovers near the village edges, and leave access to each gnome so you can clean and reset pieces.
Apply 2 to 4 inches of organic mulch in planted areas. Around small perennials, stay closer to 2 inches and keep mulch off crowns. Around open bed areas, 3 inches is a practical target. Too much mulch can bury miniatures, trap moisture against wood decor, and smother small plants.
Rank #3

- Garden Gnome Statues: Includes 7 delightfully detailed small garden gnomes in vibrant colors plus one large tree ent with a wise, expressive carved face, mustache, and beard. Perfect whimsical addition to any garden landscape.
- Premium Resin Construction: Made of high-quality, weather-resistant resin that withstands outdoor elements like sun, rain, and snow. Durable enough for year-round display while maintaining vibrant colors and fine details.
- Intricate Details & Personality: Each gnome features unique accessories including a welcome sign, flowers, lantern, book, and tools. The majestic tree has realistic bark texture and lush green foliage, creating a captivating focal point.
- Versatile Outdoor & Indoor Decor: Ideal for gardens, lawns, patios, porches, flower beds, or as indoor shelf and mantel decor. The perfect gift for gnome collectors, gardeners, and fairy garden enthusiasts.
- Easy to Display & Family-Friendly: Lightweight yet sturdy design with stable bases. Safe, non-toxic materials suitable for families. Creates an instant enchanted garden scene that brings smiles and joy to your outdoor space.
Layout That Looks Finished
Use one main house or feature, not five competing centerpieces. A 4 ft. x 6 ft. bed can handle one village square, one path, 4 to 6 figures, 5 to 9 plants, and a background shrub or fence panel. A 2 ft. x 4 ft. bed should have 1 to 3 figures and one small structure.
Budget $100 to $450 for a standard DIY raised-bed village. The lower end assumes existing edging and some reused materials. The higher end covers new edging, 3 to 6 resin gnomes, bagged mulch, small plants, outdoor adhesive, landscape staples, and a few solar lights.
Village 4: The Dry-Creek or Pea-Gravel Path Village
A rock-path village works well in front yards because it reads clearly from a distance. It also handles rain better than a loose collection of miniatures in bare soil. The idea is to build a small dry-creek scene or winding pea-gravel path with gnomes placed along the route.
For a 3 ft. x 5 ft. feature, keep the path 6 to 10 inches wide. For a larger 5 ft. x 8 ft. feature, a 12-inch path can work. Excavate only the path area 1 to 2 inches deep, set edging or stone borders, add a thin leveling layer of sand or screenings, then install gravel. Use landscape fabric under the gravel if the path is not planted. Cut it cleanly and keep it out of planting pockets.
Drainage and Stone Selection
Do not create a bathtub. If the surrounding soil drains poorly, a gravel path can hold water unless it has an outlet or slight pitch. Grade the path so water moves away from the house and toward a lawn, garden bed, or existing drainage route. For tiny displays, this is usually a matter of shaping the base by hand before gravel goes in.
Pea gravel is easy to place but scatters into turf if it is not edged. Flat stepping stones are more stable near mowing zones. River rock looks natural in a dry-creek layout, but larger stone can overwhelm miniatures. For scale, mix 3/8-inch pea gravel with a few 1- to 3-inch accent stones.
Anchoring the Details
Wind, kids, pets, and string trimmers move small decor. Use landscape staples, small stakes, hidden galvanized wire, or exterior adhesive where appropriate. For figures set on gravel, place a flat paver or stone under the gravel as a hidden footing. That gives the statue a stable platform and reduces tipping.
Budget $150 to $600. Gravel, edging, and stone are the cost drivers. If you already have leftover pavers or fieldstone, this project can be inexpensive. If you buy decorative rock by the bag and add premium resin figures, costs climb quickly.
Village 5: The Solar-Lit Evening Village
A solar-lit village is the most dramatic version, especially near a patio, front walk, or garden bench. Use self-contained solar lights for a low-risk DIY project. Small solar path lights, solar fairy lights, and solar-lit gnome figures avoid the complexity of wired electrical work.
The Tool Desk
Outbyte Driver Updater FREEScan for outdated or missing drivers - takes under a minuteDriver Scan →Outbyte PC Repair FREEClear out junk files and repair common Windows errorsFree Scan →Plan lighting before placing decor. Use 3 lighting layers: one soft backlight behind the main house, 1 or 2 path markers, and one small highlight on the gathering area. Too many lights make the display look scattered. Warm white usually looks better than cool blue-white in a garden setting.
Practical Lighting Specs
Choose outdoor-rated solar fixtures with replaceable rechargeable batteries when possible. Place panels where they get 6 to 8 hours of sun, not under dense shrubs. If the village is under a tree, use a solar light with a remote panel on a short lead so the panel can sit in a sunnier spot.
Rank #4

- Assorted Gnome Figurines:This set includes 40 mini gnome statues with assorted designs, including gnomes holding sunflowers, watering cans, and potted plants. Each gnome features vibrant colors and charming details, adding a whimsical touch to any outdoor space. With multiple styles, you can create a diverse display in your garden, patio.they come in 4 styles, each style for 10 pieces
- Durable Resin Construction:Crafted from high-quality resin, these gnomes are built to withstand outdoor elements. The sturdy material ensures they resist fading, cracking, and chipping, even in harsh weather conditions. Unlike fragile ceramic figurines, these resin gnomes are lightweight yet durable, making them perfect for long-term outdoor use
- Versatile Decor Options: these miniature gnome figurines are ideal for a variety of outdoor decor applications; Use them to decorate your fairy garden, flower beds, patio, or yard; They also make great additions to indoor decor, such as shelves, desks, or mantels; The compact size allows you to place them anywhere, adding a touch of whimsy to any space
- Charming Garden Theme Designs:Each gnome features unique garden-themed designs, including sunflowers, watering cans, and potted plants. The vibrant colors and intricate details bring these gnomes to life, creating a playful and inviting atmosphere in your garden. Whether you're a fan of fairy gardens or simply love whimsical decor, these gnomes are sure to delight
- Ideal Gift for Garden Lovers:These gnome figurines make a perfect gift for gardeners, fairy enthusiasts, or anyone who loves whimsical decor. The set comes in a variety of designs, ensuring there's something for everyone. Whether for a birthday, holiday, or housewarming, these gnomes are sure to bring a smile to the recipient's face
Expect solar batteries to fade over time. A yearly refresh should include cleaning panels, replacing failed rechargeable batteries, and resetting lights that have shifted. In snowy regions, bring delicate solar pieces inside for winter or raise them above expected snow depth.
When Wired Lighting Changes the Project
Low-voltage landscape lighting can look more polished, but it changes the scope. Once you add transformers, buried cable, exterior outlets, timers, or hardwired fixtures, follow local electrical rules and manufacturer instructions. Many homeowners hire a pro for integrated lighting because troubleshooting outdoor electrical systems is not the same as placing solar decor.
Budget $200 to $750 for a solar-lit village depending on size and fixture quality. A professional landscape add-on with finished edging, mulch or stone, and integrated lighting can run $500 to $2,500 or more. Broader landscape projects are much higher, with common 2026 professional landscaping averages ranging from roughly $1,400 to $1,660 for common services, around $3,516 for a standard lot, and $3,300 to $13,200 for larger projects. Major renovations can reach $15,000 to $50,000 or more.
Materials That Hold Up Outdoors
Outdoor-rated resin, polyresin, polystone, powder-coated metal, sealed cedar, stone, concrete, and exterior-painted wood are the safest material choices. Resin and polystone gnomes are common because they give good detail without the weight of concrete. They still fade in sun, so place the most colorful pieces where they get some afternoon shade or plan to reseal them periodically.
Avoid unsealed indoor craft wood, porous ceramics in freeze-thaw regions, paper-based accessories, and thin plastic pieces that become brittle in UV exposure. If you paint your own houses, use exterior primer, exterior acrylic paint, and a clear outdoor-rated sealer. Let coatings cure fully before setting pieces in mulch or soil.
For adhesives, use exterior-rated construction adhesive, waterproof epoxy, or outdoor silicone depending on the material. Do not glue items directly to living trees, irrigation heads, utility boxes, siding, or masonry you may need to service later. When in doubt, attach decor to a removable stone, stake, or small base.
PC Slower Than It Used to Be?
A free scan shows the junk files, broken settings and background clutter dragging Windows down - then fixes them in one click.Free scan · Windows 10 & 11Crashes, No Sound, or Screen Glitches?
Random freezes, missing sound and display glitches usually trace back to one bad driver. Find and replace yours safely.Free scan · under a minuteSafety, Permits, and HOA Boundaries
Most small gnome villages do not need a permit. A movable container, small mulch bed, freestanding figures, and solar lights are usually ordinary yard decor. The project can cross into permit or code territory when it becomes hardscape, electrical work, water features, retaining walls, patios, landings, stairs, or accessory structures.
Check local rules before building anything structural. Permit thresholds vary by city and county, but common triggers include new electrical circuits, significant retaining walls, permanent patios or landings, drainage changes, fences, decks, plumbing, and larger accessory structures. Some municipalities exempt small decorative work while still regulating hard surfaces, grading, and electrical connections.
HOAs may care even when the building department does not. Front-yard displays, lighting brightness, seasonal decor timelines, and visible lawn ornaments can be restricted by neighborhood covenants. If your village faces the street, review the rules before buying a dozen figures.
Child and Pet Safety
Use non-toxic plants, avoid sharp metal edges, and skip glass marbles or tiny loose accessories where young children or pets play. Anchor taller figures so they cannot tip onto a foot or paw. Keep electrical cords out of walking and mowing paths. If dogs use the yard, choose washable resin or stone over delicate painted wood.
What’s actually slowing this PC down?
Pick the symptom - the matching free tool is one click away.
When to DIY vs. When to Hire a Pro
DIY makes sense when the village is decorative, small, removable, and built with mulch, gravel, edging, plants, and solar lighting. A careful homeowner can build most 2 ft. x 4 ft. to 4 ft. x 6 ft. villages in a day or weekend with hand tools: shovel, trowel, level, utility knife, gloves, pruners, rubber mallet, and garden rake.
Best Value

- 🦄Magical World - In order to meet the needs of our customers, we consider more about the variety, practicality and quality of the products. There are virous of high quality mini animals, lakes, bridges and ancient tiny houses etc to create the miniature gnome figurines kindom. The outdoor statues are vivid and rich colors, inspiring the imagination and creativity, bring you endless fun.
- 🐫Reliable Material - Tardigrade's 200pcs fairy garden accessories are made of enviormental resin which has passed the critical lab test. They are durable, waterproof and long lasting. Because of the high-temperature baking paint colouring process, the fairy garden supplies are not easy to fade off or deform compared with others.
- 😺Wide Range of Use - These adorable mini figurines are vibrantly shaped, which are suitable decoration for fairy garden, miniature gardens, succulent gardens, flower pot, terrarium, potted plant, bonsai, aquarium decoration. And these fairy garden figurines can be applied as desk decor, cake decorations, learning tools, home decoration, party and festival accessories, halloween ornaments and so on.
- 🎁Amazing Gift - Our fairy garden supplies are attractive gift for men, women, parents, lovers, friends and colleagues. And this garden fairy are suitable for all kinds of festivals or occasions like Valentine's Day, Mother's/Father's day, halloween, Chritsmas, Birthday and Anniversary etc.
Hire help when the display ties into a larger landscape plan, needs grading corrections, requires stonework, includes wired lighting, affects drainage near the house, or sits on a slope. A handyman or landscaper may be enough for edging, bed prep, mulch, and gravel. Use licensed trades where electrical, structural, or drainage work requires it.
The cost difference is real. A DIY village often lands between $75 and $450. A professional add-on can run $500 to $2,500 or more, especially if the crew builds a finished display bed, installs edging, refreshes mulch or stone, and integrates the feature into existing landscaping. That is still modest compared with broader landscaping, but it is more than a craft project.
Yearly Maintenance Checklist
Plan on one serious refresh each year and small touch-ups during mowing season. In spring, wash resin figures with mild soap and water, check for cracked paint, reseal painted wood, replace broken stakes, and reset pieces lifted by frost heave. Top up mulch or gravel where it has thinned. Prune plants before they swallow the miniatures.
During summer, pull weeds by hand before roots lock into gravel. Keep mulch away from plant crowns and tree trunks. After storms, check lightweight houses, bridges, and solar lights. In fall, remove leaves from paths and store fragile pieces before hard freezes. In humid climates, lift wood decor occasionally so the underside can dry.
A gnome village should make the yard easier to enjoy, not harder to maintain. Build it with the same discipline you would use for any small landscape feature: defined edges, correct materials, drainage, access, and a plan for weather. Do that, and the whimsy looks intentional instead of temporary.
Frequently Asked Questions
How much does it cost to build a DIY garden gnome village in 2026?
Most small DIY garden gnome villages cost about $75 to $450. A budget version using found materials may cost $25 to $100, while a larger themed village with resin figures, edging, gravel, plants, and solar lights can cost $300 to $750.
Do I need a permit for a garden gnome village?
Usually no, if it is a small removable display with mulch, plants, freestanding decor, and solar lights. Check local rules if the project includes wired electrical work, water features, retaining walls, patios, grading changes, stairs, or permanent structures.
Outdated Drivers Are Slowing You Down
One free scan finds every outdated or missing driver and matches the right update for your exact hardware.Free scan · exact hardware matchPC Slower Than It Used to Be?
A free scan shows the junk files, broken settings and background clutter dragging Windows down - then fixes them in one click.Free scan · Windows 10 & 11Can I build a gnome village around a tree?
Yes, but keep it removable and protect the tree. Do not nail, screw, glue, or cut into living bark or roots. Use freestanding doors and bridges, keep mulch pulled back from the trunk, and avoid deep digging in the root zone.
Should I use mulch, gravel, or landscape fabric?
Use organic mulch in planted areas, typically 2 to 4 inches deep. Use gravel for miniature paths or dry-creek scenes. Landscape fabric is best limited to gravel-only paths and should generally be avoided under living planting zones.
What materials last longest outdoors?
Outdoor-rated resin, polyresin, polystone, powder-coated metal, stone, concrete, sealed cedar, and exterior-painted wood hold up best. Avoid unsealed craft wood, paper accessories, and porous ceramics left outside through freeze-thaw winters.
How do I keep garden gnomes from blowing over?
Set figures on flat stones or hidden paver bases, then anchor lightweight items with landscape staples, small stakes, galvanized wire, or exterior-rated adhesive where appropriate. Keep decor clear of mower and string-trimmer paths.
Quick Recap
Product prices and availability are accurate as of the date/time indicated and are subject to change. Any price and availability information displayed on Amazon at the time of purchase will apply.

