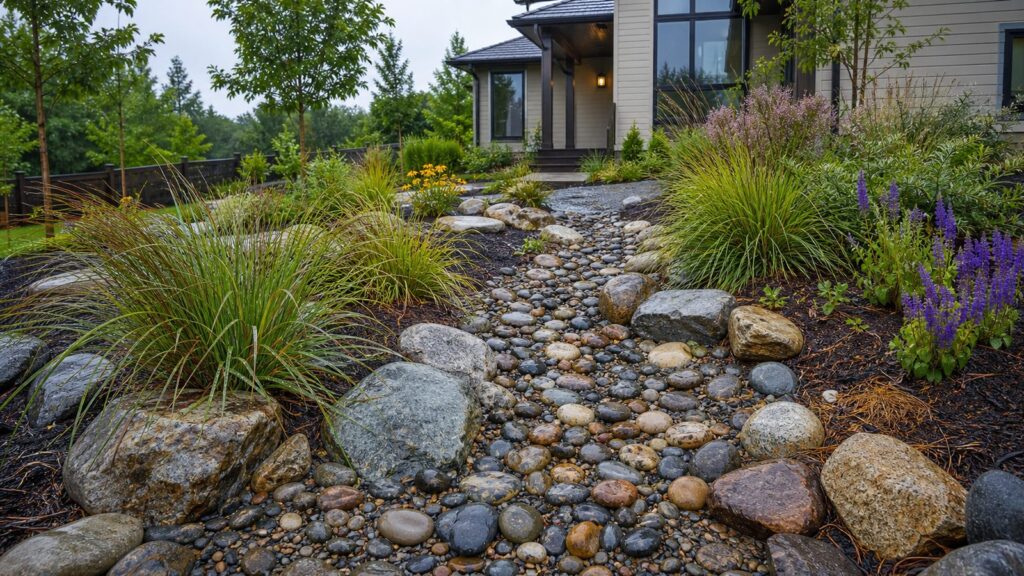
A DIY dry creek bed is a shallow, rock-lined drainage swale that looks like a natural streambed when dry and carries stormwater when it rains. Built well, it solves common yard problems: downspout washout, mulch floating out of beds, shallow ruts across a lawn, and light to moderate surface runoff.
Built poorly, it becomes a stone-filled trench that moves water faster, dumps it in the wrong place, or overflows during the first hard storm.
As an Amazon Associate I earn from qualifying purchases.
On our job sites, we treat a dry creek bed as drainage first and landscape second. The shape should look natural, but the function depends on grade, outlet, soil, rock size, and enough channel capacity. Most residential DIY dry creek beds are about 2 to 4 feet wide and 6 to 12 inches deep. Small decorative projects may cost $300 to $1,500 for 20 to 50 linear feet. Functional drainage beds commonly run $800 to $3,500 for 40 to 100 linear feet when you include bulk stone, fabric, pins, outlet protection, plants, and rented tools.
What’s actually slowing this PC down?
Pick the symptom - the matching free tool is one click away.
The most important rule is simple: know where the water starts, where it wants to go, and where it is legally allowed to end.
#1 Best Overall

- Heavy Duty and High Strength Material: Features 8oz tough and durable density, PP non-woven, 350N tensile strength, our weed barrier fabric features erosion-proof, damp-proof, tear-proof, and durable material compared with other woven ground covers.
- Easy to Install and Setup with Hassle-Free: This landscape fabric is super easy to carry, install or cut into single piece or exact dimensions, just roll down and put it in the preferred area.
- Exclusive Permeability & Soil-Friendly: The excellent permeability of this weed fabric barrier ensures better gravel filtration, water drainage, and air penetration to retain soil nutrients. Besides, this drainage design can filter gravel to work as a liner.
- Non-Woven Needle Punched Fabric: This heavy duty geotextile fabric is needle punched, keeping stable yet soft and flexible, meanwhile, this garden fabric can also be used for weed control to keep soil moisture by blocking the sunlight and reducing water evaporation.
- Versatile Uses: Our landscaping fabric is durable and high-quality. Suitable for many occasions, such as greenhouse, ground & road stabilization, landscaping, french drains, driveway or path, flower bed, bridge maintenance, gravel, underlayment, construction projects, erosion control, and farming/gardening application.
What a Dry Creek Bed Can and Cannot Fix
A dry creek bed is best for visible surface water. That includes runoff from a downspout, sheet flow crossing a slope, erosion beside a walkway, or a low swale where water already moves during storms. It is also useful where mulch repeatedly washes into the lawn or driveway.
It is not a cure for every wet yard. If water stands for days because of high groundwater, saturated clay, subsurface pressure against a basement wall, or a low spot with no outlet, a rock-lined swale may only decorate the problem. Those conditions often need regrading, a French drain, catch basin, dry well, sump discharge strategy, or engineered stormwater design.
Think of the dry creek bed as a controlled path for water that is already moving across the surface. It can slow that water, reduce erosion, and direct it to a better outlet. It does not automatically make water disappear. In sandy or well-draining soils, some water may soak in along the route. In compacted clay, assume most of it will keep moving until it reaches an outlet.
Start With the Outlet, Not the Stones
The outlet determines whether the project works. Before digging the first foot of channel, decide where the water will discharge. Acceptable outlets vary by property and local rules, but common options include a street gutter where allowed, an approved storm inlet, a rain garden, a dry well, an existing drainage easement, or another stable on-site infiltration area.
Do not aim runoff at a neighboring property, fence line, sidewalk, driveway, foundation, septic field, or slope that is already eroding. That creates drainage liability and can make the original problem worse.
During a storm, watch the yard. Take photos or mark the water path with flags. Look for where water enters, where it gathers speed, and where sediment drops out. If the water is coming from a roof, estimate the contributing roof area. A 500-square-foot roof section receiving 1 inch of rain sheds about 312 gallons of water. That volume needs a stable path and a stable endpoint.
A Simple Outlet Decision Check
If the bed can discharge to a street gutter or storm inlet allowed by your municipality, keep the outlet armored with larger stone so it does not scour. If the yard has room for infiltration, consider ending the creek bed in a rain garden or shallow basin planted with moisture-tolerant perennials. If the soil is heavy clay and the outlet is unclear, get professional drainage help before you build. Clay can hold water at the surface and turn an undersized creek bed into a wet stone trough.
The Tool Desk
Outbyte PC Repair FREERepair Windows errors before they cause bigger problemsFix Now →Outbyte Driver Updater FREEFix the driver behind crashes, sound loss and screen glitchesFind Drivers →Planning the Size, Slope, and Shape
For small residential drainage projects, a practical starting point is 2 to 4 feet wide and 6 to 12 inches deep. A decorative creek bed beside a patio might be 18 to 24 inches wide. A functional swale carrying downspout water across a side yard may need 3 to 4 feet of width, especially where the slope flattens.
Width matters because water spreads. If the channel is too narrow, water overtops the edges and cuts around the stone. Depth matters because shallow channels fill with sediment and leaves quickly. For most DIY work, avoid digging a deep trench with steep sides. A broad, shallow profile is safer, easier to maintain, and more natural-looking.
Slope matters more than appearance. Too flat, and sediment collects. Too steep, and water scours the stone. On steeper yards, use larger cobble, embedded boulders, check-dam stones, and planted edges to slow velocity. Bends, downspout entry points, steep sections, and outlets should always get larger rock because those are the places where water has the most energy.
Make It Meander, But Keep Capacity
A natural dry creek bed should not look like a straight utility trench. Use a slight meander and vary the width by 25% to 50% in places. For example, a 3-foot-wide bed might pinch to 2 feet in a short section and widen to 4 or 4.5 feet at a bend or basin. That makes it look established while giving water room to slow down.
Do not create tight turns that force water into the bank. A sweeping bend with larger stone on the outside edge performs better than a sharp decorative curve.
2026 Cost Guide for a DIY Dry Creek Bed
Most homeowners underestimate stone quantity and handling time. River rock is heavy, delivery access matters, and hand-carrying stone through a narrow side yard can double the labor. In 2026, general river rock pricing commonly ranges from about $100 to $800 per ton depending on type, size, color, polish, and availability. More basic bulk river rock may price around $45 to $130 per ton or $50 to $160 per cubic yard in some markets, while riprap can be closer to $20 to $60 per ton.
Bulk delivery usually beats bagged rock for anything beyond a small decorative bed. A delivered 7-ton truckload of river rock may run roughly $350 to $980 before local fees and access conditions. Landscape fabric is usually a smaller line item, often around $0.20 to $0.24 per square foot for material, with big-box rolls commonly around $30 for 3 feet by 100 feet and around $60 for heavier 4 feet by 100 feet rolls.
| Project type | Typical size | 2026 budget range | What drives the cost |
|---|---|---|---|
| Small decorative bed | 20 to 50 linear feet | $300 to $1,500 DIY | Bagged or small bulk stone, fabric, edging, basic hand tools |
| Functional drainage bed | 40 to 100 linear feet | $800 to $3,500 DIY | Stone tonnage, excavation, delivery, outlet protection, plants, rentals |
| Simple professional install | Small to moderate yard run | $15 to $40 per linear foot | Labor, access, excavation, stone placement, grading |
| Larger drainage-focused install | Clay, slope, heavy runoff, or complex outlet | $4,000 to $12,000+ | Engineering judgment, equipment, boulders, tie-ins, erosion control |
Labor variance is significant. Landscaping labor often runs about $50 to $100 per hour, while construction or hardscape crews may land around $50 to $120 per hour depending on region and specialization. Tight access, roots, clay excavation, hand-carrying stone, boulder placement, and slope stabilization all push bids upward.
Recommended Free Tools
Materials That Perform Well
A good dry creek bed uses mixed rock sizes. One uniform size looks artificial and often performs poorly. Small gravel alone can wash away. Large stone alone leaves voids, traps debris, and can be hard to walk near. A mixed gradation locks together better and looks more like a real streambed.
Rank #2

- MEDIUM DUTY – 4 Ounce Heavy Duty Geotextile – Don’t settle for lighter weights, the 4 ounce is tough and durable, non-woven fabrics are produced to be high-strength
- EASY TO INSTALL – Save time and money, we stock many sizes to cut down on scrap, one single piece cut to exact dimensions
- MADE TO LAST – Will last many years and stands up to the toughest conditions, Superior strength, dimensionally stable, UV/rot resistant
- MANY USES – Can be used for many different projects including Landscaping, Retaining walls, French drains, Underlayment, Erosion Control, Gardening, Riprap filter fabric, Pond underlayment, Construction Projects and More
- SUPERIOR QUALITY – Super Geotextile offers the highest quality products
For most residential beds, use larger cobble or angular stone at high-energy locations and smoother river rock through the center. A common approach is 1- to 3-inch river rock for the main bed, 3- to 6-inch cobble at bends and inlets, and larger 8- to 18-inch accent stones or boulders set partly below grade. Do not just place boulders on top. Key them into the soil so one-third to one-half of the stone sits below the finished surface. That makes the bed look established and helps resist movement.
Use permeable landscape fabric under the stone to separate soil from rock. Do not use plastic sheeting. Plastic traps water, blocks soil function, can create odor, and undermines nearby plants. Fabric is not magic, and weeds can still grow from windblown seed in sediment that collects on top, but fabric helps keep soil from migrating up into the stone layer.
Plant the Banks
Plants soften the stone and stabilize the edges. Choose native or climate-adapted plants that tolerate occasional runoff and dry periods between storms. Depending on your region, good candidates may include sedges, rushes, switchgrass, blue flag iris, carex, ferns, and rain-garden perennials.
Quick wins for a faster PC:
Fix the driver behind crashes, sound loss and screen glitchesFind Drivers →Clear out junk files and repair common Windows errorsFree Scan →Keep maintenance in mind. Avoid placing the bed directly under heavy leaf-dropping shrubs unless you are prepared to clean it often. A dry creek bed that disappears under wet leaves every fall can clog, hold sediment, and lose capacity.
Step-by-Step: How to Build a Dry Creek Bed
1. Watch a Storm and Mark the Route
Do not design from dry conditions alone. Watch the yard during a real rain. Mark the water path with flags, stakes, or photos. Identify the entry points, low spots, erosion marks, and natural outlet. If water comes from a downspout, note whether the downspout is concentrated into one hard jet or spread across the ground.
2. Call 811 Before Digging
Call 811 before any excavation, even shallow landscape work. Dry creek beds often follow low spots where prior owners may have installed irrigation, lighting, drain lines, or utilities. Hand digging does not eliminate the risk.
3. Lay Out the Bed
Use marking paint, rope, or a garden hose to lay out the creek bed. Start at the outlet and work uphill. If the endpoint is wrong, the whole feature is wrong. Keep the curves broad and vary the width. A 30-foot bed that stays exactly 36 inches wide the whole way will look mechanical. A bed that shifts from 30 inches to 48 inches while maintaining enough capacity will look more natural.
Outdated Drivers Are Slowing You Down
One free scan finds every outdated or missing driver and matches the right update for your exact hardware.Free scan · exact hardware matchWindows Errors? Fix Them Before They Spread
Repair common Windows errors and clear accumulated junk for a smoother, more stable PC - no reinstall needed.Free scan · no reinstall4. Excavate a Broad, Shallow Channel
For typical DIY projects, dig 6 to 12 inches deep with gently sloped sides. Remove sod, roots, loose organic material, and soft pockets. Keep the bottom graded toward the outlet. Avoid humps that trap water unless you are intentionally creating small check pools or infiltration areas.
If the bed crosses a steep section, plan for larger stone and check-dam stones. These are larger rocks placed across the channel to slow water and reduce scour. They should be set firmly, not sprinkled on top.
5. Compact and Shape the Subgrade
Firm the soil before fabric goes down. A hand tamper is enough for many small projects. The goal is not concrete-level compaction; it is a stable base that will not settle unevenly under stone. Shape the sides so water stays inside the bed during normal storms.
6. Install Fabric and Pin It Well
Roll permeable landscape fabric along the bed and overlap seams by at least 6 to 12 inches. Pin it every few feet and more tightly on curves or slopes. Run the fabric up the sides so soil does not wash into the stone from the banks. Trim only after stone is placed.
Free tools Windows power users keep installed
One-click scans. No signup required.
7. Place Larger Rock First
Set boulders, cobble, inlet protection, bend armor, and outlet stones before filling with smaller rock. At downspout entries, create a splash area or small forebay with larger stone so roof runoff does not blast directly into pea gravel or small river rock.
8. Fill With Mixed Stone
Place the main river rock layer 3 to 6 inches thick for decorative beds and heavier where flow is stronger. Blend stone sizes by hand around visible bends and edges. Keep the center slightly lower than the banks so water has a defined path.
9. Stabilize the Outlet
The outlet is where failures often show up. Use larger stone at the discharge point and spread the flow where possible. If the bed ends in a rain garden, transition into planted amended soil. If it connects to a storm inlet or curb outlet, confirm that connection is allowed and protected from sediment movement.
10. Inspect After the First Storms
After the first heavy rain, walk the bed. Look for displaced stone, sediment bars, water cutting around edges, or overflow marks. Add larger stone where water is moving too fast. Widen shallow sections if water escapes. Remove leaves and sediment before they reduce capacity.
Permits, Drainage Rules, and Neighbor Issues
Permit triggers vary by city, county, and state. Many small landscape features do not need a permit, but drainage work can cross into regulated territory when it changes discharge points, disturbs a larger area, ties into public stormwater infrastructure, affects slopes, or redirects runoff. Some jurisdictions regulate land disturbance at thresholds such as several hundred or several thousand square feet. Others focus on grading, erosion control, right-of-way work, or stormwater connections.
Before building, check local rules if the project will move water toward a street, storm inlet, easement, retaining wall, steep slope, neighbor, or environmentally sensitive area. Also check HOA rules if visible front-yard stonework or drainage changes are involved.
The practical construction standard is this: you are responsible for where your water goes. A dry creek bed should not collect roof water and send it across a property line in a concentrated flow. It should not discharge onto a sidewalk where it can create ice in winter. It should not send water toward a foundation, driveway, or septic area.
Rank #3

- Large Roll for Outdoor Projects: This 3 ft x 180 ft landscape fabric roll is suitable for garden beds, flower beds, walkways, gravel paths, mulch areas, greenhouses, and driveway base layers, making it a practical choice for home and landscaping projects.
- Helps Reduce Weed Growth: Dense weed barrier fabric helps limit sunlight exposure to reduce unwanted weed growth, creating a cleaner and lower-maintenance base layer for gardens, planting areas, and outdoor landscapes.
- Water & Air Permeable Design: Non-woven geotextile fabric allows water and air to pass through, helping support soil moisture and root respiration while keeping the surface neat under mulch, rocks, soil, or gravel.
- Heavy Duty Outdoor Ground Cover: Made from durable polypropylene material, this weed control fabric offers good tear resistance and tensile strength for outdoor use in yards, gardens, paths, flower beds, and gravel areas.
- Easy to Cut & Install: Simply roll out the garden fabric, trim it to the needed size or shape, place it over prepared soil, and secure with landscape staples as needed. Great for use under mulch, gravel, pavers, rocks, and artificial turf.
When to DIY and When to Hire a Pro
A dry creek bed is a reasonable DIY project when the runoff is light to moderate, the route is obvious, the outlet is legal and stable, excavation is shallow, and you can move stone safely. A 30- to 60-foot project may take a homeowner one long weekend or two to three weekends depending on soil, access, and help. Stone handling is the hard part. One cubic yard of rock can weigh roughly 2,400 to 3,000 pounds depending on material and moisture.
Hire a professional when water threatens the house, the yard has saturated clay with no clear outlet, the slope is steep, the project needs a storm drain connection, or the runoff comes from a large roof or uphill property. Also hire help when erosion is already cutting channels more than a few inches deep. At that point, the issue is not just appearance; it is site drainage.
A professional crew should evaluate grade, roof area, soil type, outlet options, municipal discharge rules, and whether a dry creek bed should be paired with a French drain, catch basin, rain garden, dry well, or regrading. In higher-cost markets and clay or slope conditions, larger drainage-focused dry creek bed projects commonly run $4,000 to $12,000 or more because the work includes excavation, stabilization, hauling, boulder placement, and drainage judgment.
Dry Creek Bed vs. French Drain
A dry creek bed manages surface runoff. A French drain manages subsurface water. They can work together, but they are not the same system.
| Feature | Dry creek bed | French drain |
|---|---|---|
| Primary job | Moves visible surface water | Collects and moves underground water |
| Typical materials | Fabric, river rock, cobble, boulders, plants | Trench, perforated pipe, drain rock, fabric |
| Best for | Downspout washout, mulch erosion, shallow swales | Soggy soil, subsurface seepage, water near foundations |
| Visible finish | Decorative landscape feature | Usually hidden under soil, turf, or stone |
| Common mistake | No lawful outlet or undersized channel | No slope, clogged fabric, wrong pipe outlet |
If your problem is water running across the lawn during rain, start by evaluating a dry creek bed. If the lawn stays wet long after rain or water presses against the foundation, evaluate subsurface drainage.
Do these 3 things before closing this tab:
1Fix the driver behind crashes, sound loss and screen glitches2Clear out junk files and repair common Windows errors3Scan for outdated or missing drivers - takes under a minuteMaintenance Checklist
A dry creek bed should be inspected after major storms and seasonally. Remove leaves, sticks, and sediment from the channel. Check downspout entry points for displaced stone. Look at bends and outlets for scour. Pull weeds before roots establish in the sediment layer. Re-pin fabric if edges become exposed. Add larger rock where flow is moving material.
Most failures reveal themselves early. If the first two or three heavy rains pass without overflow, stone movement, or outlet erosion, the bed is probably close. Keep it clean and do not let plantings narrow the channel over time.
The Bottom Line
A dry creek bed can be one of the best yard upgrades because it combines drainage, erosion control, and landscape design. The difference between a useful one and a decorative trench is planning. Start with the outlet, size the channel for real runoff, use mixed stone, protect high-energy areas, and respect local drainage rules.
For a small surface-flow problem, a careful DIY build can cost under $1,500 and deliver a clean, durable improvement. For clay soils, steep lots, heavy roof runoff, or water near the house, bring in a drainage professional before stone gets delivered. It is much cheaper to design the route correctly than to rebuild a beautiful creek bed that sends water to the wrong place.
What’s actually slowing this PC down?
Pick the symptom - the matching free tool is one click away.
Frequently Asked Questions
How much does a DIY dry creek bed cost in 2026?
A small decorative DIY dry creek bed usually costs about $300 to $1,500 for 20 to 50 linear feet. A functional drainage bed often costs $800 to $3,500 for 40 to 100 linear feet, depending on stone quantity, delivery, fabric, outlet stabilization, plants, and tool rental.
How deep and wide should a dry creek bed be?
Most residential dry creek beds are about 2 to 4 feet wide and 6 to 12 inches deep. Small decorative beds can be narrower, while drainage-focused beds need enough width and depth to carry runoff without overtopping.
Will a dry creek bed fix standing water?
Only sometimes. A dry creek bed is best for surface runoff that already moves across the yard. Standing water caused by high groundwater, saturated clay, poor grading, or subsurface pressure may need regrading, a French drain, catch basin, dry well, or engineered drainage plan.
Do you need landscape fabric under a dry creek bed?
Yes, in most cases. Permeable landscape fabric separates soil from stone and helps keep the rock from sinking into the subgrade. Do not use plastic sheeting because it traps water and can create drainage and plant health problems.
Where should a dry creek bed drain to?
It should drain to a lawful, stable outlet such as an approved street gutter, storm inlet, rain garden, dry well, drainage easement, or on-site infiltration area. Do not discharge concentrated runoff toward a neighbor, foundation, sidewalk, driveway, or septic area.
What is the difference between a dry creek bed and a French drain?
A dry creek bed manages visible surface runoff and remains part of the landscape. A French drain collects subsurface water through buried perforated pipe and drain rock. Some drainage problems need one, the other, or both.
Quick Recap
Product prices and availability are accurate as of the date/time indicated and are subject to change. Any price and availability information displayed on Amazon at the time of purchase will apply.

