Do these 3 things before closing this tab:
1Repair Windows errors before they cause bigger problems2Fix the driver behind crashes, sound loss and screen glitches3Clear out junk files and repair common Windows errorsSome links on this page are affiliate links: if you buy through them we may earn a commission, at no extra cost to you.
A good DIY bird feeder is not just cute. It stays dry, drains after rain, comes apart for cleaning, resists squirrels as much as the budget allows, and hangs or mounts without damaging your house. Most weekend bird feeder projects fail for the same reasons small outdoor construction details fail: trapped water, weak fasteners, poor access, and the wrong material in the wrong location.
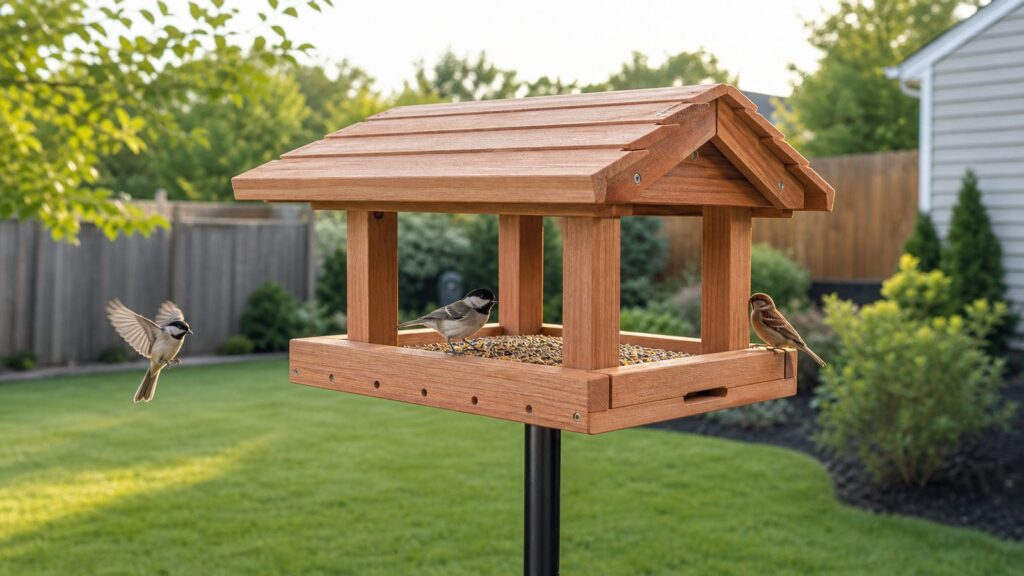
For a first build, we like a cedar platform or small hopper feeder with a removable tray, 1/8-inch to 1/4-inch drainage holes, a roof overhang of 1 to 2 inches, exterior-rated screws, and a hanging chain or pole mount. That design is simple enough for a Saturday, usually costs $20 to $75 in 2026 materials, and can be cleaned without taking the whole feeder apart.
As an Amazon Associate I earn from qualifying purchases.
Crashes, No Sound, or Screen Glitches?
Random freezes, missing sound and display glitches usually trace back to one bad driver. Find and replace yours safely.Free scan · under a minuteWindows Errors? Fix Them Before They Spread
Repair common Windows errors and clear accumulated junk for a smoother, more stable PC - no reinstall needed.Free scan · no reinstallBelow are 45 DIY bird feeder ideas we would actually consider for a backyard, patio, deck, classroom garden, or weekend family project. Each one includes practical notes on cost, difficulty, maintenance, and where it belongs.
Before You Build: The Details That Make a Feeder Last
On our job sites, outdoor details live or fail by water management. Bird feeders are no different. Seed that sits wet in a corner will mold. A roof that stops 1/8 inch short of the seed opening will not protect anything in wind-driven rain. A beautiful glued-up feeder with no cleanout becomes a disposable object after the first messy season.
Popular on Amazon

- Unique Design: Our Ottsuls bird house stand is purpose-built with an included wooden mounting board, specially designed to solve compatibility issues for most bird houses and bird feeders. With this dedicated board, you never have to worry about fit problems when setting up your bird house or feeder.
- Easy Assembly & Customizable Height Adjustment Set up your bird house or feeder in just 5 minutes with our simple, tool-free assembly. This stand reaches a maximum 109-inch (279cm) height, with 6 16.5-inch (42cm) extension poles and a 5-prong base for reliable stability. The segmented design lets you adjust height easily to fit your needs, the sharp 5-prong base slides smoothly into ground to hold the stand firmly, and the full process from unboxing to setup is quick and hassle-free.
- Waterproof and Sturdy: Our versatile bird feeder plate with thickened metal pipes and waterproof surface allows you to enjoy bird watching and add color to your outdoor garden and yard. It is also an ideal gardening gift for bird lovers, children, and the elderly.
- Easy to Assemble and Height Adjustment: Our birdhouse pole comes in sections, enabling you can easily adjust the height to meet your specific needs. The 5-prong stake design allows our bird feeding rod to be inserted effortlessly into the ground. It takes 5 minutes to assemble and is hassle-free.
- 100% Satisfaction Guaranteed: After receiving the product, please check whether the packaging is in good condition and if the accessories are missing. If you have any questions or suggestions, please contact us via Amazon email, our team will give you professional answers within 24 hours. We offer a 12-month replacement warranty to ensure your complete satisfaction.
Use untreated cedar, redwood, or pine for wood feeders. Cedar is our preferred backyard choice because it handles weather better than pine and does not need heavy finishing. A 1 in. x 6 in. x 8 ft. cedar board commonly runs around $19 in some 2026 U.S. markets, so the old $4 cedar feeder estimate is no longer realistic unless you are using offcuts. Avoid pressure-treated lumber where seed touches the feeder. If you seal pine, keep finish on exterior surfaces only, or use a removable tray where seed contacts the feeder.
For hardware, use exterior screws, stainless screws, coated deck screws, eye bolts, small hinges, and chain rated for outdoor exposure. Skip drywall screws. They rust, snap, and stain the wood. Drill drainage holes in trays, slope flat surfaces when you can, and sand any sharp edges around feeding ports.
Cleaning matters as much as construction. Standard seed feeders should be fully cleaned at least every two weeks. Hummingbird feeders need cleaning every 3 to 5 days, and more often in heat. Disassemble, wash with hot water, use a dilute bleach solution no stronger than 1 part bleach to 9 parts water when needed, rinse thoroughly, and let every part dry before refilling. Remove moldy seed immediately.
2026 DIY Bird Feeder Cost Guide
Bird feeders are inexpensive only if you already own tools, scrap material, and seed. If you are buying cedar, acrylic, exterior hardware, chain, suction cups, baffles, and quality feed, the price changes quickly. Use this table to pick the right project before you start cutting.
| Feeder type | Typical DIY cost in 2026 | Build time | Best use | Maintenance level |
|---|---|---|---|---|
| Pinecone, citrus, tube, or carton feeder | $0-$20 | 15-45 minutes | Kids, quick seasonal feeding, low-risk testing | High; replace often |
| Simple scrap-wood tray feeder | $8-$25 with scraps; $20-$45 if buying materials | 1-3 hours | First woodworking project, cardinals, doves, jays | Medium; easy to scrub |
| Cedar hopper feeder with roof | $35-$75 | 3-6 hours | Durable backyard feeder for mixed seed or sunflower | Medium; needs cleanout access |
| Window feeder | $15-$45 | 2-4 hours | Close viewing, apartments, kitchens, classrooms | Medium-high; clean glass and tray often |
| Suet cage or log feeder | $5-$35 | 30 minutes-2 hours | Woodpeckers, nuthatches, winter feeding | Medium; watch for heat spoilage |
| Pole-mounted station with baffle | $30-$90 basic; $100-$275+ premium | 2-5 hours | Squirrel control, open yards, multiple feeders | Medium; ground cleanup required |
Easy 30-Minute Bird Feeder Ideas
1. Pinecone Seed Feeder
Difficulty: Easy. Time: 15 minutes. Cost: $0-$10. Maintenance: Replace after wet weather. Tie twine to a large pinecone, press in peanut butter or suet, roll it in seed, and hang it from a small branch. This is best as a short-term feeder, not a permanent station.
2. Citrus Half Feeder
Difficulty: Easy. Time: 20 minutes. Cost: $2-$10. Maintenance: High. Use a hollowed orange or grapefruit half as a temporary cup for seed or fruit. Punch three evenly spaced holes near the rim and hang it level. Compost it before it softens or molds.
Recommended Free Tools
3. Toilet Paper Tube Feeder
Difficulty: Easy. Time: 15 minutes. Cost: $0-$8. Maintenance: Single-use. Coat a cardboard tube with peanut butter, roll in seed, and slide it onto a branch. Use this only in dry weather because cardboard collapses fast in rain.
4. Apple Ring Garland
Difficulty: Easy. Time: 20 minutes. Cost: $3-$12. Maintenance: High. String apple slices, cranberries, and plain popcorn on cotton twine. Hang it where you can remove leftovers within a day or two.
5. Egg Carton Seed Tray
Difficulty: Easy. Time: 20 minutes. Cost: $0-$10. Maintenance: Replace often. Cut a paper egg carton in half, punch four corner holes, and suspend it level. It works for one dry weekend, but it is not weatherproof.
6. Clean Tin Can Feeder
Difficulty: Easy. Time: 30 minutes. Cost: $5-$15. Maintenance: Medium. Use a smooth-edge can, drill small drainage holes in the bottom, add a dowel perch, and hang it horizontally. Sand or cover every cut edge.
7. Mesh Produce Bag Suet Holder
Difficulty: Easy. Time: 10 minutes. Cost: $3-$10. Maintenance: Medium. A clean onion-style mesh bag can hold suet in cold weather. Do not use fraying plastic mesh where birds can snag feet; replace at the first sign of wear.
8. Teacup and Saucer Feeder
Difficulty: Easy-moderate. Time: 45 minutes. Cost: $5-$20. Maintenance: Medium-high. Bond a teacup to a saucer with exterior-rated adhesive, let it cure fully, and hang from a chain. It is charming but fragile, so keep it low and out of wind.
Scrap Wood and Cedar Feeders
9. Basic Cedar Platform Feeder
Difficulty: Beginner. Time: 1-2 hours. Cost: $20-$45. Maintenance: Low-medium. Build a 10 x 12 inch tray from cedar with 1-inch sides, a removable mesh or drilled bottom, and four hanging chains. Drill 1/8-inch to 1/4-inch drainage holes every 2 to 3 inches if using a solid bottom.
10. Roofed Platform Feeder
Difficulty: Beginner. Time: 2-3 hours. Cost: $30-$60. Maintenance: Medium. Add a simple gable roof over the tray with a 1 to 2 inch overhang on all sides. This is a strong first-timer build because birds can see the food and you can remove the tray for cleaning.
Quick wins for a faster PC:
Clear out junk files and repair common Windows errorsFree Scan →Fix the driver behind crashes, sound loss and screen glitchesFind Drivers →11. Small Hopper Feeder
Difficulty: Moderate. Time: 4-6 hours. Cost: $35-$75. Maintenance: Medium. Build a cedar box with two angled acrylic panels that feed seed down into a tray. Include a hinged roof or lift-off top, plus a cleanout door at the bottom. Keep the seed reservoir small in humid climates.
12. Fence Board Feeder
Difficulty: Beginner. Time: 2 hours. Cost: $8-$25 with leftovers. Maintenance: Medium. A leftover cedar fence picket can become a simple tray feeder. Cut away cracked or treated sections, predrill screw holes, and use exterior screws.
13. Modern Slat Feeder
Difficulty: Moderate. Time: 3-5 hours. Cost: $30-$70. Maintenance: Medium. Use vertical cedar slats around a small seed tray with a flat or low-slope roof. Leave enough spacing for airflow, but avoid gaps that spill seed everywhere.
Also popular on Amazon

- 【1‘’ Diameter Premium Quality&Size 】The total height of the bird house pole is 79 inch, include the 10 inch 5-prongs base, each pole section is about 16.5 inch.The 1 inch diameter outdoor birdhouse pole is made of premium metal material, which is thicker and stronger than other birdhouse poles, and is coated with black anti-rust coating can be used outdoors for a long time.
- 【New Version Heavy Duty Perfect Design】Our bird house pole includes a 5-prongs base, 4 pole sections, a mounting platform, and 8 mounting screws, the birdhouse is NOT included in the package.It allows you to assemble the bird feeder on the top or the side of the mounting platform.Tip: lf your smart birdhouse never matches the mounting holes of the plate, try bridging the two with a wooden board.
- 【Easy to Install & Use】The bird house pole is with a threaded connection, which means you can adjust the height of the bird feeder pole to suit your needs. Without using any tools, first fix the 5-prongs base, then step into the ground with your feet, screw on each pole section in turn to the appropriate height, finally fix the top mounting platform. You can install your lovely bird house or bird feeder on it. Beautiful birds will make your yard more wonderful.
- 【Ideal Gift&Close to Nature】 The bird house pole adopts 5-prongs, and is more stable and durable. Don't worry about strong winds and bad weather. Protecting and caring for wild birds is what we should do to protect nature. For bird lovers, the joy and satisfaction of feeding hungry birds is priceless. So it's not only a gift for friends, but also a gift for wild birds.
- 【Customer Care】 Gtongoko provides quality products and efficient after-sales service. If you have any question about quality or instructions during use, please contact us, we will provide you with a solution as soon as possible.
14. Lean-To Roof Feeder
Difficulty: Beginner-moderate. Time: 2-4 hours. Cost: $25-$55. Maintenance: Medium. A single-slope roof is easier than a gable and sheds water well if pitched at least 15 degrees. Extend the high side enough to protect the seed tray from sideways rain.
15. Removable Tray Feeder
Difficulty: Moderate. Time: 3-5 hours. Cost: $35-$65. Maintenance: Low. Build the frame once, then slide in a shallow tray lined with perforated aluminum, acrylic, or sealed removable wood. This is one of the best designs for homeowners who will actually clean the feeder.
16. Post-Cap Bird Feeder
Difficulty: Moderate. Time: 2-4 hours. Cost: $25-$60. Maintenance: Medium. Build a feeder that sits over a 4×4 post like a cap, but do not rely on a decorative wood post for squirrel control. If squirrels are a concern, use a smooth metal pole and baffle instead.
17. Covered Cardinal Tray
Difficulty: Beginner. Time: 2-3 hours. Cost: $25-$55. Maintenance: Medium. Cardinals prefer a stable landing surface over tiny perches. Build a wide 12 x 16 inch tray with a roof 6 to 8 inches above the seed surface and open sides.
18. Rain-Screen Seed Feeder
Difficulty: Moderate. Time: 4-6 hours. Cost: $45-$85. Maintenance: Medium. Use a double-roof detail: a small inner hopper roof plus a wider outer cap with an air gap. It is overbuilt for mild climates but useful in wet areas.
What’s actually slowing this PC down?
Pick the symptom - the matching free tool is one click away.
Mason Jar, Glass, and Acrylic Feeders
19. Mason Jar Gravity Feeder
Difficulty: Beginner-moderate. Time: 1-2 hours. Cost: $10-$30. Maintenance: Medium. Fit a clean mason jar into a wood base so seed drops into a shallow tray. Make the jar removable for washing and keep the tray drained.
20. Mason Jar Platform Combo
Difficulty: Moderate. Time: 2-4 hours. Cost: $20-$45. Maintenance: Medium. Pair a jar reservoir with a cedar platform and small roof. This gives you better rain protection than a jar mounted on an exposed saucer.
21. Acrylic Window Box Feeder
Difficulty: Moderate. Time: 2-4 hours. Cost: $15-$45. Maintenance: Medium-high. Use clear acrylic, outdoor suction cups, and a removable seed tray. Window feeders should sit directly on the glass, which helps reduce high-speed collision risk compared with feeders placed several feet away from a window.
22. Cedar and Acrylic Hopper
Difficulty: Moderate. Time: 4-6 hours. Cost: $45-$80. Maintenance: Medium. Acrylic side panels let you see seed level, while cedar handles the structure. Avoid sealing acrylic permanently into grooves that trap dirty water; make at least one panel removable.
The Tool Desk
Outbyte Driver Updater FREEFix the driver behind crashes, sound loss and screen glitchesFind Drivers →Outbyte PC Repair FREERepair Windows errors before they cause bigger problemsFix Now →23. Glass Bottle Feeder
Difficulty: Moderate. Time: 2-3 hours. Cost: $10-$35. Maintenance: Medium. Invert a clean glass bottle into a wood base with a controlled seed gap. Use a stable hanger because glass adds weight.
24. Test Tube Finch Feeder
Difficulty: Moderate. Time: 2-4 hours. Cost: $15-$40. Maintenance: Medium. Small tubes can hold nyjer or fine seed for finches. Drill small ports cleanly, sand edges, and keep capacity low so seed does not sit too long.
Bottle, Carton, and Upcycled Feeders
25. Plastic Bottle Seed Feeder
Difficulty: Easy. Time: 30-45 minutes. Cost: $0-$12. Maintenance: Medium-high. Use a clean bottle, two dowel perches, and small seed ports. Add drainage at the lowest point and replace the bottle when it clouds, cracks, or traps grime.
26. Milk Carton Feeder
Difficulty: Easy. Time: 30-60 minutes. Cost: $0-$15. Maintenance: High. Cut openings into a clean carton, punch drainage holes, and hang it from the top. Treat this as a temporary project, especially after rain.
27. Wine Bottle Wall Bracket Feeder
Difficulty: Moderate. Time: 2-4 hours. Cost: $15-$45. Maintenance: Medium. Build a cedar wall bracket that holds an inverted bottle above a tray. Mount the bracket to a freestanding post or fence, not directly into siding unless you understand the water barrier behind it.
28. PVC Tube Feeder
Difficulty: Moderate. Time: 1-3 hours. Cost: $15-$35. Maintenance: Medium. Use 3-inch or 4-inch PVC with removable caps and drilled ports. It is durable, but make the bottom cap easy to remove because long tubes can hide spoiled seed.
29. Coffee Can Platform Feeder
Difficulty: Easy. Time: 45 minutes. Cost: $0-$15. Maintenance: Medium. Mount a clean metal or plastic coffee can horizontally with a small perch. Drill drainage holes and use it in sheltered spots.
30. Hanging Basket Seed Tray
Difficulty: Easy. Time: 30 minutes. Cost: $5-$25. Maintenance: Low-medium. Repurpose a wire hanging basket with a shallow removable tray. It drains well and works best with larger seed types, not fine mixes that spill through.
Free tools Windows power users keep installed
One-click scans. No signup required.
Also popular on Amazon

- Stable 5 Prong Base Ground Mounting: Equipped with a heavy-duty 5 pronged base , this bird feeder pole stays firmly in place, preventing leaning or toppling due to wind, animals, or daily use. Holding a large birdhouse or feeder up to 8 lbs
- Universal Compatibility: The 4” × 4” top mounting plate is designed to fit most birdhouses and feeders. The birdhouse feeder pole kit comes with all necessary mounting hardware, making it easy to attach your existing birdhouse or switch to a new one without compatibility concerns
- Rustproof Outdoor Pole: Coated with a corrosion-resistant finish, this bird house pole is designed to withstand rain, snow, and sun exposure, ensuring long-lasting performance. Ideal for use in backyards, courtyards, gardens, patios, lawns, flower beds, weather stations, or any outdoor area
- 3 - Way Mounting: You have a choice of a bottom or side mount by simply screwing onto the top portion of the pole. Or mounting the birdhouse on the wall, in the tree. If the birdhouse does not align with the pre-drilled holes, you may need to drill new holes in the birdhouse or use a wooden board for a secure connection
- 102" Height Adjustable: Designed with multiple splicing sections - 15” per section, this pole allows you to adjust the height to suit your needs. Whether you want to place it high for better visibility or lower for easy maintenance, it offers flexible options for various outdoor setups
Suet, Log, and Winter Feeders
31. Drilled Log Suet Feeder
Difficulty: Beginner. Time: 1 hour. Cost: $5-$20. Maintenance: Medium. Drill 1-inch to 1-1/2-inch holes into an untreated log section and pack them with suet. Hang with an eye bolt and chain. This is excellent for woodpeckers and nuthatches in cold weather.
32. Cedar Suet Cage Frame
Difficulty: Beginner-moderate. Time: 1-2 hours. Cost: $10-$30. Maintenance: Low-medium. Build a simple cedar frame around a wire suet cage. Add a small roof to slow rain and snow, but leave sides open for airflow.
33. Upside-Down Suet Feeder
Difficulty: Moderate. Time: 2 hours. Cost: $10-$35. Maintenance: Medium. Mount hardware cloth on the underside of a small cedar box so clinging birds feed from below. This can discourage some larger nuisance birds.
34. Peanut Wreath Feeder
Difficulty: Easy. Time: 30-60 minutes. Cost: $10-$30. Maintenance: Medium. Use stiff wire or a wreath frame for whole peanuts in the shell. Hang it securely and watch ground waste because peanuts can attract rodents if overused.
35. Winter Wind-Shelter Feeder
Difficulty: Moderate. Time: 3-5 hours. Cost: $35-$75. Maintenance: Medium. Build a roofed tray with one solid back panel to block prevailing wind. Keep drainage open so melting snow does not pool in the tray.
Platform, Deck, and Railing Feeders
36. Clamp-On Deck Tray
Difficulty: Beginner-moderate. Time: 1-3 hours. Cost: $20-$50. Maintenance: Medium. Build a tray that attaches to a clamp-on bracket instead of drilling into the railing. This is smarter for renters, condos, and HOA homes.
37. Freestanding Patio Feeder Stand
Difficulty: Moderate. Time: 3-5 hours. Cost: $30-$90. Maintenance: Medium. Use a weighted base, metal pole, and removable tray or hook. Make the base wide enough to resist tipping in wind, especially on pavers or concrete.
38. Low Ground Platform Feeder
Difficulty: Beginner. Time: 1-2 hours. Cost: $15-$40. Maintenance: High. A low tray can attract ground-feeding birds, but it also attracts squirrels, rodents, and moisture. Use it only where you can clean spilled seed daily.
PC Slower Than It Used to Be?
A free scan shows the junk files, broken settings and background clutter dragging Windows down - then fixes them in one click.Free scan · Windows 10 & 11Crashes, No Sound, or Screen Glitches?
Random freezes, missing sound and display glitches usually trace back to one bad driver. Find and replace yours safely.Free scan · under a minute39. Railing Hook Feeder
Difficulty: Easy-moderate. Time: 1 hour. Cost: $15-$40. Maintenance: Medium. Attach a removable hook to a railing and hang a lightweight feeder. Avoid heavy multi-feeder arms that twist railings or loosen fasteners over time.
40. Covered Porch Feeder
Difficulty: Beginner. Time: 1-2 hours. Cost: $15-$45. Maintenance: Medium. A porch gives weather protection, but spilled seed can stain decking and attract pests. Use a catch tray and sweep as needed.
Independent reader supportYour contribution helps us test, update, and keep practical guides available for everyone.Pole-Mounted and Squirrel-Resistant Feeders
41. Smooth Metal Pole Station
Difficulty: Moderate. Time: 2-4 hours. Cost: $30-$90. Maintenance: Medium. Use a smooth metal pole with an auger base or ground sleeve, then hang one feeder at a reachable height. Place it at least 10 feet from shrubs, fences, roofs, and other launch points when squirrel pressure is high.
42. Pole Feeder With Baffle
Difficulty: Moderate. Time: 2-5 hours. Cost: $50-$140. Maintenance: Medium. Add a cone or cylinder baffle below the feeder. Many add-on baffles cost about $20-$50, which is cheaper than rebuilding the whole station later.
The Tool Desk
Outbyte PC Repair FREEClear out junk files and repair common Windows errorsFree Scan →Outbyte Driver Updater FREEScan for outdated or missing drivers - takes under a minuteDriver Scan →43. Multi-Hook Feeding Station
Difficulty: Moderate. Time: 3-5 hours. Cost: $75-$275+. Maintenance: Medium-high. A multi-hook pole can hold seed, suet, and water, but every added feeder increases ground mess. Use a sturdy pole and do not overload lightweight garden hooks.
44. Weather Guard Upgrade
Difficulty: Easy-moderate. Time: 30-90 minutes. Cost: $15-$50. Maintenance: Low. Add a clear dome or roof above an existing feeder. This is often the fastest way to improve a feeder that works well but gets soaked in rain.
45. Modular Feeder Body
Difficulty: Moderate. Time: 3-6 hours. Cost: $35-$90. Maintenance: Low-medium. Build the feeder body separately from the mount. Use the same feeder with a chain, pole hook, or bracket so you can move it later or add a baffle without rebuilding.
Placement, Seed, and Bird Safety
Place feeders where birds have escape cover nearby, but not so close that squirrels can jump straight onto the feeder. In many yards, that means the feeder is visible from shrubs or trees but still about 10 feet from obvious launch points. A smooth metal pole with a baffle beats a decorative wooden post when squirrels are part of the neighborhood.
Do these 3 things before closing this tab:
1Clear out junk files and repair common Windows errors2Fix the driver behind crashes, sound loss and screen glitches3Repair Windows errors before they cause bigger problemsThink about windows before you hang anything. A feeder mounted directly to the glass can reduce high-speed impact because birds are not building up flight speed. For other feeders, place them far enough away from windows or use window treatments, exterior screens, or decals designed to make glass visible to birds.
Seed choice controls bird traffic and cleanup. Black oil sunflower is one of the best broad-use seeds for common backyard birds. Sunflower hearts and no-waste blends cost more upfront but reduce hull piles, weeds, and pest attraction. Cheap filler-heavy mixes often leave a mess under the feeder, which is where rodents, mold, and complaints start.
In humid or rainy climates, use small-capacity feeders, open trays, roofed hoppers, mesh suet cages, and quick-dry designs. In hot climates, use shade and clean more often, especially for nectar or suet. In winter climates, keep refill height reachable, use wind-stable mounts, and check that snow is not blocking drainage holes.
Also popular on Amazon

- Universal Fit with Custom Wooden Board:Our birdhouse frame includes a custom wooden board, which works seamlessly with most mainstream bird feeders and birdhouses, effectively avoiding size and model mismatch issues
- Durable Construction: Made from high-quality metal and treated with an electro-coating process, this bird house pole is built to last in any weather. Its excellent rust-resistant properties and robust structure ensure that your birdhouse remains secure and stable
- Easy Installation: Equipped with a sturdy 5-pronged ground stake, this bird feeder pole provides enhanced stability when inserted into the soil. With clear instructions, assembly is quick and effortless, taking only a few minutes
- Ideal Choice: Create a welcoming haven for birds in your yard with this bird house pole. Attract a variety of beautiful birds and enjoy their company up close. This product is perfect for birdwatchers and nature lovers
- Complete Solution: The XDW-GIFTS bird house pole is not just a functional tool but also an ideal way to enhance your yard's beauty. Whether used as a bird feeder pole or simply to hang a birdhouse, it adds joy to your outdoor life
Maintenance Calendar for DIY Feeders
Weekly: Check for wet seed, cracked parts, loose screws, frayed rope, rust, sharp edges, and seed buildup on the ground. Sweep or rake hulls as needed.
Every two weeks: Empty seed feeders, disassemble removable parts, wash, sanitize when needed, rinse, dry completely, and refill. Do this sooner during warm, wet weather.
Every 3 to 5 days: Clean hummingbird feeders. In hot weather, nectar can spoil faster, so shorten the interval.
Seasonally: Inspect hanging chains, eye bolts, suction cups, pole anchors, and baffles. Tighten fasteners and replace degraded plastic, rope, or cardboard parts.
When to DIY vs. When to Hire a Pro
Most bird feeders are safe DIY projects because they are small, non-structural, and inexpensive. Build your own when the feeder hangs from a tree, sits on a freestanding pole, clamps to a railing, or mounts to a simple garden post away from the house. Keep the project modular so the feeder body can move if the first location creates mess, squirrel problems, or window strikes.
Get professional input when the project touches the building envelope or becomes a structural attachment. Drilling into siding, stucco, masonry veneer, balcony framing, deck rails, or roof fascia can create water intrusion or code issues if done casually. Heavy balcony-mounted feeding stations, permanent deck attachments, and anything over public space deserve more caution than a weekend craft project.
Permits are rarely needed for small removable bird feeders, but local rules can apply to accessory structures, exterior attachments, wildlife feeding, bear areas, multifamily balconies, and HOA communities. Some jurisdictions treat larger freestanding yard structures differently once they exceed local size or placement thresholds. When in doubt, keep the feeder removable, lightweight, and independent from the house.
Do not DIY electrical heated feeders unless you are using a listed outdoor-rated product exactly as designed. Electricity, weather, seed dust, and wildlife are not a good place for improvised wiring.
The Best Weekend Build for Most Homeowners
If we were building one feeder for a homeowner who wanted a durable first project, we would build a small cedar roofed platform feeder. Use a 10 x 12 inch tray, 1-inch tray sides, 1/8-inch to 1/4-inch drainage holes, a removable bottom liner, a simple gable or lean-to roof with 1 to 2 inches of overhang, and stainless or coated exterior screws. Hang it from four points with chain, or mount it to a smooth metal pole with a baffle.
Quick wins for a faster PC:
Fix the driver behind crashes, sound loss and screen glitchesFind Drivers →Repair Windows errors before they cause bigger problemsFix Now →Scan for outdated or missing drivers - takes under a minuteDriver Scan →Expect to spend $35-$75 if buying decent cedar, screws, eye bolts, chain, and seed. The build fits into one afternoon, needs only basic tools, and solves the big problems: rain protection, drainage, cleanout access, stable feeding space, and future squirrel upgrades. That is the difference between a feeder that looks good for a weekend and one that earns its place in the yard.
Frequently Asked Questions
What is the easiest DIY bird feeder to build?
A pinecone, citrus half, or cardboard tube feeder is easiest, but the best first durable build is a small cedar platform feeder with drainage holes, a removable tray, and a simple roof.
How much does it cost to make a bird feeder in 2026?
Simple recycled feeders can cost $0-$20. A basic wood feeder usually costs $20-$45 if buying materials, while a better cedar feeder with roof, tray, cleanout, and hanging hardware often costs $35-$75.
What wood should I use for a DIY bird feeder?
Untreated cedar is the best practical choice for most homeowners. Redwood and untreated pine can also work. Avoid pressure-treated lumber where seed touches the feeder.
How often should I clean a bird feeder?
Clean standard seed feeders at least every two weeks, sooner in wet or hot weather. Hummingbird feeders should be cleaned every 3 to 5 days, and more often during high heat.
How do I make a DIY bird feeder more squirrel resistant?
Use a smooth metal pole, add a properly sized baffle, and place the feeder at least 10 feet from fences, shrubs, roofs, and other launch points. Planning for a baffle from the start is cheaper than fixing squirrel problems later.
Can I attach a bird feeder to my deck or siding?
Use clamp-on or freestanding mounts when possible. Drilling into railings, siding, stucco, fascia, or balcony framing can create water damage or structural problems, especially in rentals, condos, and HOA homes.
Quick Recap
Product prices and availability are accurate as of the date/time indicated and are subject to change. Any price and availability information displayed on Amazon at the time of purchase will apply.

