
A dishwasher installation looks simple from the aisle at the appliance store: remove the old machine, slide in the new one, connect three lines, and run a cycle. On our job sites, we treat it as a small kitchen systems project. Water supply, drainage, electrical protection, cabinet clearance, countertop anchoring, and leak testing all have to work together. When one of those pieces is wrong, the result is usually a soaked cabinet floor, a dishwasher that will not drain, a tripped breaker, or a door that rubs every time it opens.
For a straightforward like-for-like replacement with existing compliant hookups, many U.S. homeowners pay roughly $150 to $350 for labor only in 2026. When the appliance, labor, removal, parts, and typical project costs are combined, a common installed range is about $900 to $1,700. First-time installations or problem replacements can exceed $2,000 when new plumbing, electrical work, cabinet modifications, countertop drilling, or code upgrades are needed.
As an Amazon Associate I earn from qualifying purchases.
This guide explains how dishwasher installation works, what to check before you buy, where DIY makes sense, and where a plumber or electrician should take over.
The Tool Desk
Outbyte PC Repair FREERepair Windows errors before they cause bigger problemsFix Now →Outbyte Driver Updater FREEScan for outdated or missing drivers - takes under a minuteDriver Scan →Start With the Opening, Not the Appliance
Most built-in residential dishwashers are 24-inch undercounter units. Compact models are commonly 18 inches wide, and panel-ready or integrated dishwashers may need more exact cabinet and door-panel coordination. Before choosing a model, measure the actual rough opening, not just the old dishwasher front.
#1 Best Overall

- DISHWASHER INSTALLATION KIT: Includes a stainless steel braided supply line measuring 6 ft. in length with 3/8 in. compression x 3/8 in. compression connections, designed for compatibility with most standard dishwashers
- WHAT IS INCLUDED: Kit contains (1) 6 ft. braided water supply line, (1) 3/4 in. female hose 90 degree elbow, (1) 3/8 in. male iron pipe (MIP) 90 degree elbow, (1) 3-prong straight power cord, (3) wire nuts, (1) Teflon tape, (1) hose clamp, and (1) Romex connector
- DURABLE BUILD: Water line features a PVC core, braided nylon reinforcement, clear vinyl outer shell, and stainless steel exterior to help reduce kinking and crimping
- EASY TO INSTALL: Drop-in kit includes all components required for new or replacement installations—no soldering, glue, or crimping needed
- RELIABLE PERFORMANCE: Suitable for potable water use with a maximum working pressure of 125 PSI and temperature range of 40 to 160 degrees F; UPC approved and CSA certified
Measure width at the top, middle, and bottom of the opening. Measure height from finished floor to underside of countertop. Measure depth from the cabinet face to the back wall or obstruction. Then measure the path from the exterior door to the kitchen, including turns around islands, door casings, and refrigerator handles.
The height measurement is where many replacements go sideways. If new flooring was installed after the old dishwasher went in, the finished floor may be higher than the floor under the appliance. That can trap the old unit below the countertop. We have seen replacements turn into countertop, flooring, or cabinet work because no one checked this before delivery.
Also check the door swing. Dry-fit or confirm dimensions so the dishwasher door clears adjacent drawers, oven handles, cabinet pulls, toe kicks, and face frames. A technically correct installation is still a bad installation if the door cannot open fully or the lower rack hits the cabinet across from it.
Recommended Free Tools
Dishwasher Installation Cost in 2026
Dishwasher installation cost depends on whether this is a replacement or a first-time install. A replacement with existing water, drain, and electrical connections is usually a short project. A new dishwasher location can require trades, permits, cabinet work, and finish repairs.
| Project type | Typical 2026 cost | What is usually included |
|---|---|---|
| Basic labor-only replacement | $150-$350 | Remove old unit from opening, connect new dishwasher to existing compliant hookups, level, anchor, and test |
| Marketplace basic install average | About $194, often $144-$264 | Simple replacement where parts and site conditions are uncomplicated |
| Installed project with appliance | About $900-$1,700 | Dishwasher, labor, basic parts, and standard installation |
| Common professional install total | About $1,000-$1,500 | Typical replacement with midrange appliance and professional labor |
| Replacement range with wider variables | $540-$2,175 | Budget to premium appliances, removal, parts, and varying site conditions |
| First-time installation | Often $2,000+ | New electrical, water supply, drain routing, cabinet cutting, countertop work, and finish repair |
The dishwasher itself commonly costs about $400 to $1,200 for many residential models. Budget units can cost less. Quiet premium models, integrated controls, custom panels, stainless interiors, and high-end brands can push the appliance cost and installation complexity much higher.
Small parts can also change the number. A new braided stainless supply line, 90-degree elbow, hose clamps, strain relief, wire connectors, power cord, junction box, shutoff valve, air gap, or drain hose may each be modest on its own. Combined with labor and access issues, they can materially change the final invoice.
Tools and Materials You Usually Need
A typical replacement requires a dishwasher installation kit compatible with the model. That usually means a braided stainless steel water supply line, a 90-degree elbow fitting, hose clamps, and sometimes a power cord or strain relief for hardwired connections. Follow the manufacturer’s installation manual for the exact fitting size and electrical method.
Common tools include an adjustable wrench, channel-lock pliers, screwdrivers, nut drivers, level, tape measure, flashlight, bucket, towels, utility knife, voltage tester, drill or driver, and painter’s tape or cardboard to protect the floor. For hardwired units, electrical work must be done with the circuit off and verified dead before any conductors are touched.
We normally replace low-cost wear items during installation rather than gambling on old ones. A corroded supply line, questionable drain hose, worn hose clamp, frozen shutoff valve, or old compression ferrule is not worth saving if it can cause a leak inside a finished kitchen.
Plumbing, Drain, and Electrical Checks Before Installation
Water Supply
Most dishwashers connect to the hot water line under the kitchen sink. Many manufacturer instructions call for hot water around 120 degrees Fahrenheit at the dishwasher, with some models allowing up to 140 degrees. Always verify the appliance manual, because water temperature and pressure limits can vary. A common model range for water pressure is roughly 15 to 145 psi, but the manual controls.
There should be an accessible shutoff valve serving the dishwasher supply. If the valve does not close fully, is badly corroded, or leaks when touched, stop and replace it before installing the appliance. A dishwasher is not the place to rely on a half-working valve.
Crashes, No Sound, or Screen Glitches?
Random freezes, missing sound and display glitches usually trace back to one bad driver. Find and replace yours safely.Free scan · under a minuteWindows Errors? Fix Them Before They Spread
Repair common Windows errors and clear accumulated junk for a smoother, more stable PC - no reinstall needed.Free scan · no reinstallDrain Connection
The dishwasher drain usually connects to a garbage disposal dishwasher inlet or to a sink tailpiece. If the drain hose connects to a new garbage disposal, the disposal’s dishwasher-inlet knockout plug must be removed. Forgetting that plug is one of the most common reasons a brand-new dishwasher will not drain after installation.
The drain hose should run smoothly, without kinks, sags, sharp bends, or contact with sharp cabinet edges. Whirlpool and other manufacturers emphasize high-loop routing where local code permits it, because the hose routing helps reduce siphoning and backflow risk. In some jurisdictions, an air gap is required instead of relying only on a high loop. The correct answer is local code plus the appliance manual.
Electrical Supply
Many dishwashers require a grounded 120-volt, 15- or 20-amp electrical supply. Some are cord-and-plug connected. Others are hardwired into a junction box. Current code cycles increasingly require GFCI protection for dishwashers, including in some cases hardwired appliances, depending on what code your state or city has adopted.
Rank #2

- DISHWASHER INSTALLATION KIT: Includes a stainless steel braided supply line measuring 6 ft. in length with 3/8 in. compression x 3/8 in. compression connections, designed for compatibility with most standard dishwashers
- WHAT IS INCLUDED: Kit contains (1) 6 ft. braided water supply line, (1) 3/4 in. female hose 90 degree elbow, (1) 3/8 in. male iron pipe (MIP) 90 degree elbow, (1) 3-prong angled power cord, (3) wire nuts, (1) Teflon tape, (1) hose clamp, and (1) Romex connector
- DURABLE BUILD: Water line features a PVC core, braided nylon reinforcement, clear vinyl outer shell, and stainless steel exterior to help reduce kinking and crimping
- EASY TO INSTALL: Drop-in kit includes all components required for new or replacement installations—no soldering, glue, or crimping needed
- RELIABLE PERFORMANCE: Suitable for potable water use with a maximum working pressure of 125 PSI and temperature range of 40 to 160 degrees F; UPC approved and CSA certified
Do not assume an older installation is compliant just because it worked for 15 years. If you see open splices, no junction box cover, damaged cable, no strain relief, questionable grounding, aluminum branch wiring, repeated breaker trips, or no GFCI protection where required, bring in a licensed electrician.
How to Install a Dishwasher: Replacement Overview
The exact sequence depends on the model, but a standard replacement usually follows this process.
1. Shut Off Power and Water
Turn off the dishwasher circuit at the breaker. If the unit is plugged into an outlet, unplug it after confirming the outlet is not live. Use a non-contact voltage tester or meter to verify power is off before touching wiring. Then shut off the dishwasher water supply valve under the sink.
Run the sink faucet to relieve pressure. Keep towels and a shallow pan nearby because the supply line and drain hose will usually hold some water.
2. Remove the Toe Kick and Mounting Screws
Remove the lower access panel or toe kick from the dishwasher. Open the door and locate the mounting brackets at the underside of the countertop or along the side cabinets. Remove the screws while supporting the unit so it does not shift suddenly.
Quick wins for a faster PC:
Scan for outdated or missing drivers - takes under a minuteDriver Scan →Repair Windows errors before they cause bigger problemsFix Now →Photograph the existing bracket locations, plumbing, drain routing, and wiring before disconnecting. Those photos are useful when you are trying to understand what was changed, especially in older kitchens where the last installer may have improvised.
3. Disconnect Drain, Water, and Electrical
Disconnect the drain hose at the disposal or sink tailpiece and place the end in a bucket. Disconnect the water supply line at the dishwasher valve or elbow. For hardwired units, open the junction box only after power has been verified off, then disconnect the wiring and strain relief.
If the unit uses a plug, avoid yanking the cord while pulling the appliance forward. Confirm the cord path first so it does not snag behind the cabinet.
4. Slide Out the Old Dishwasher
Protect the finished floor with thin hardboard, cardboard, or another suitable floor protector. Lower the leveling legs if needed. Pull the dishwasher forward slowly, watching the supply line, drain hose, and electrical cable so none of them catch, pinch, or tear.
If the old dishwasher will not clear the countertop because of raised flooring, do not force it. The solution may involve removing adjustable feet, lifting the countertop slightly if possible, trimming flooring at the opening, or choosing a shorter replacement model. Forcing the appliance can damage the floor, cabinet face, or countertop edge.
5. Prepare the New Dishwasher
Install the 90-degree elbow fitting, drain hose, power cord or strain relief, and side-mount brackets as directed by the manufacturer. Do this before the unit is in the opening, when access is easier. Use thread sealant only where the instructions call for it. Do not overtighten plastic or brass fittings.
If the countertop is granite, quartz, marble, or another solid surface, use the approved side-mount kit rather than drilling into stone unless the appliance manufacturer and countertop fabricator allow that method. Top-mounting into stone can crack the material or fail to hold.
Rank #3

- DISHWASHER CONNECTOR KIT: Includes a 5 ft. stainless steel braided supply line with 3/8 in. compression x 3/8 in. compression ends for standard dishwasher installations
- WHAT IS INCLUDED: Kit contains (1) 5 ft. braided water supply line, (1) 3/8 in. male iron pipe (MIP) 90 degree elbow, and (1) 3/4 in. female hose thread (FHT) 90 degree elbow
- DURABLE: Hose construction includes a PVC core, nylon braid reinforcement, clear vinyl shell, and stainless steel exterior
- EASY TO INSTALL: Elbows and nickel-plated brass nuts support easy connections in tight spaces without soldering, glue, or crimping
- RELIABLE PERFORMANCE: Rated for potable water use; maximum working pressure 200 PSI and temperature range 15 to 158 degrees F; UPC approved and CSA certified
6. Route Lines and Slide the Unit Into Place
Feed the water line, drain hose, and electrical connection through the cabinet opening as the dishwasher slides in. Keep the drain hose high where required, avoid kinks, and make sure the supply line is not pinched under a leveling foot.
Take your time here. Many slow leaks and drainage problems are created during the final 12 inches of the slide-in, when a hose gets folded behind the tub or a supply line gets trapped against the frame.
7. Level, Align, and Anchor
Level the dishwasher side-to-side and front-to-back. Check the door reveal against the cabinet faces. The door should open smoothly, latch cleanly, and stay aligned without rubbing. Racks should roll without drifting hard to one side.
Once the unit is square, anchor it to the countertop or side cabinets using the manufacturer’s brackets. Skipping this step allows the dishwasher to tip forward when the loaded door is open. Using the wrong fasteners or wrong mounting location can damage cabinets or countertops.
8. Connect and Test
Reconnect the water supply, drain, and electrical. Turn water on slowly and check the shutoff valve, supply connection, and elbow fitting. Restore power only after panels and wiring covers are properly secured.
Free tools Windows power users keep installed
One-click scans. No signup required.
Before starting the test, run the sink faucet hot so the dishwasher receives hot water faster. Start a cycle and inspect during fill, wash, and drain. Place a dry paper towel under each water fitting during the first fill and again after the first hot cycle. A tiny leak that is hard to see will show quickly on dry paper.
Do not reinstall the toe kick until you have watched the machine fill, wash, drain, and sit for several minutes. A quick rinse is not enough. A proper test includes the first hot cycle because heat and pressure can reveal leaks that do not appear immediately.
Air Gap vs. High Loop: What Homeowners Need to Know
A dishwasher drain needs protection against dirty sink or disposal water flowing backward into the appliance. Two common methods are an air gap and a high loop.
An air gap is the small fitting often mounted on the sink deck or countertop. The dishwasher drain hose connects to it, then a second hose runs from the air gap to the disposal or sink drain. It provides a physical break in the drain path. In many areas, this is the required method.
What’s actually slowing this PC down?
Pick the symptom - the matching free tool is one click away.
A high loop routes the drain hose up high under the sink cabinet before it drops to the disposal or tailpiece. Manufacturers commonly show high-loop routing where allowed, and it can reduce siphoning risk when installed correctly. However, a high loop is not universally accepted as a substitute for an air gap.
From a contractor’s standpoint, this is not a preference question. It is a code question. Check your local plumbing code, local inspection requirements, and the dishwasher manual. If an air gap is required, skipping it can create a failed inspection and a sanitation risk.
Rank #4
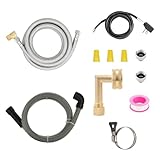
- 【UNIVERSAL FIT】All adapters included.Provides everything you need in installing almost any brands of dishwashers to household water supply.
- 【COTENT】1PC 6 ft stainless steel dishwasher supply line with 3/8" Comp x 3/8" Comp connections,1pc 3/8 in MIP elbow connector adapter,1pc 3/8" Comp x 3/4 in FHT elbow,3pcs yellow plastic wire nuts,2pcs 1/2" adapters and 1pc universal 3-wire power cord and 1 teflon tape.1 PC 6ft drain hose and 1 PC of clamp.
- 【DURABLE】Dishwasher Hose is Made of premium grade 304 stainless steel.It prevents corrosion, kinking, and crimping.Use good PVC core, brass nuts and brass inserts.Drain hose is made of good quality plastic.
- 【SAFE】North America Quality Insurance.AB-1953, NSF-61 certification and UPC/CUPC approved.
- 【EASY TO USE】Include everything you need and easy to install.
Energy and Water Performance
New dishwasher installation is also a good time to look at operating cost, not just purchase price. ENERGY STAR criteria currently in effect for dishwashers set limits of 240 kWh per year and 3.2 gallons per cycle for standard models. Compact models are limited to 155 kWh per year and 2.0 gallons per cycle.
A certified modern dishwasher can use less than half the energy of handwashing and may save about 8,400 gallons of water per year compared with washing dishes by hand. Those savings depend on how the household uses the appliance, but the direction is clear: a properly installed efficient dishwasher is usually better than handwashing for both water and energy.
Do these 3 things before closing this tab:
1Clear out junk files and repair common Windows errors2Fix the driver behind crashes, sound loss and screen glitches3Repair Windows errors before they cause bigger problemsFor best performance, scrape dishes instead of pre-rinsing heavily, use the right detergent, keep the filter clean, and make sure the hot water supply is within the manufacturer’s recommended range.
When to DIY and When to Hire a Pro
A careful homeowner can often handle a like-for-like dishwasher replacement if the existing opening, valve, drain, and electrical connection are in good condition and code-compliant. The key phrase is “good condition and code-compliant.” A simple swap is only simple when the system behind it is already right.
DIY may be reasonable when:
- The new dishwasher is the same size and style as the old one.
- The old unit slides out without flooring or countertop conflicts.
- The water shutoff valve works and does not leak.
- The drain route is clear, smooth, and accepted by local code.
- The electrical connection is accessible, grounded, protected as required, and matches the appliance instructions.
- You are comfortable verifying power is off before handling any electrical connection.
Hire a plumber, electrician, or installer when:
- This is a first-time dishwasher installation.
- A cabinet bay must be cut or modified.
- The dishwasher needs a new water supply, shutoff valve, drain connection, or air gap hole.
- The electrical circuit needs GFCI protection, a new outlet, a junction box, or wiring repair.
- The unit is hardwired and you are not qualified to do electrical work.
- The old dishwasher is trapped by raised flooring.
- The countertop is stone and needs special anchoring.
- Local rules require a permit or inspection.
In many jurisdictions, replacing an appliance with existing hookups may not require a permit, while new electrical, new plumbing, or drain modifications may. Local rules vary. For a permitted kitchen remodel, the dishwasher installation is often inspected as part of the broader plumbing and electrical scope.
Independent reader supportYour contribution helps us test, update, and keep practical guides available for everyone.Common Dishwasher Installation Mistakes
The most serious mistake is failing to shut off and verify electrical power before touching wiring. Breaker labels are often wrong. Test before contact.
Quick wins for a faster PC:
Fix the driver behind crashes, sound loss and screen glitchesFind Drivers →Repair Windows errors before they cause bigger problemsFix Now →Scan for outdated or missing drivers - takes under a minuteDriver Scan →The second is reusing worn connection parts. Old compression fittings, corroded braided lines, stiff hoses, and weak clamps are common sources of slow leaks. A $20 to $40 part can prevent hundreds or thousands of dollars in cabinet and flooring damage.
Drain mistakes are also common. A sagging hose, missing high loop, skipped air gap where required, kink behind the appliance, or forgotten garbage disposal knockout plug can cause poor drainage, odor, standing water, or immediate failure after the first cycle.
Another frequent issue is poor leveling. An unlevel dishwasher can leak at the door, fail to latch, rub the cabinet, leave water in the tub, or make the racks slide awkwardly. Leveling is not cosmetic; it affects operation.
Finally, many installers do not test long enough. We want to see fill, wash, drain, and the first hot cycle before calling the job complete. The toe kick goes back on only after the base, valve, elbow, drain connection, and cabinet floor are dry.
Crashes, No Sound, or Screen Glitches?
Random freezes, missing sound and display glitches usually trace back to one bad driver. Find and replace yours safely.Free scan · under a minutePC Slower Than It Used to Be?
A free scan shows the junk files, broken settings and background clutter dragging Windows down - then fixes them in one click.Free scan · Windows 10 & 11Troubleshooting After Installation
The dishwasher will not drain
Check the garbage disposal knockout plug first if the dishwasher drain was connected to a new disposal. Then check for a kinked drain hose, clogged air gap, blocked tailpiece, sagging hose, or incorrect drain routing.
Best Value

- UNIVERSAL FIT - TT FLEX universal dishwasher installation kit provides everything you need in installing almost any brands of dishwashers to household water supply.All adapters included.
- COMPLETE INSTALLATION KIT - Our dishwasher install kit universal includes 1pc 6 ft stainless steel dishwasher supply line with 3/8" Comp x 3/8" Comp connections,1pc 3/8 in MIP elbow connector adapter,1pc 3/8" Comp x 3/4 in FHT elbow,3pcs yellow plastic wire nuts,2pcs 1/2" adapters and 1pc universal 3-wire power cord.
- DURABLE - This dishwasher hose is made of premium grade 304 stainless steel.It prevents corrosion, kinking, and crimping.Use best PVC core, brass nuts and brass inserts.
- LEAD FREE - North America Quality Insurance.AB-1953, NSF-61 certification and UPC/CUPC approved.
- 10-YEAR WARRANTY - Please purchase with confidence,if you have any issue with our dishwasher hose kit 6ft, simply email us.
Water appears under the front
Confirm the dishwasher is level front-to-back and side-to-side. Check that the door gasket is seated, the spray arm is not blocked, and the unit is not overloaded in a way that deflects water toward the door.
The breaker trips
Stop using the appliance and call an electrician or qualified appliance technician. A tripped GFCI or breaker can indicate moisture, damaged wiring, an appliance fault, or an overloaded circuit.
The door rubs or will not latch
Recheck leveling legs, side clearance, mounting brackets, and cabinet alignment. A dishwasher can be level but still twisted in the opening if one rear foot or side bracket is pulling the frame out of square.
Final Installation Checklist
- Opening width, height, and depth match the dishwasher requirements.
- Floor path and finished-floor height are verified before removal.
- Power is shut off and verified before electrical work.
- Water shutoff valve operates and does not leak.
- New or sound supply line and fittings are installed correctly.
- Drain hose is smooth, high, unkinked, and code-compliant.
- Disposal knockout plug is removed when applicable.
- Dishwasher is level front-to-back and side-to-side.
- Door clears cabinets, drawers, appliances, and toe kick.
- Unit is anchored to approved brackets or side cabinets.
- Connections are inspected during fill, wash, drain, and after the first hot cycle.
- Toe kick is reinstalled only after leak testing is complete.
A dishwasher installation is manageable when the existing kitchen systems are sound. The right approach is to measure carefully, replace suspect wear parts, respect local code, and test the appliance under real operating conditions. If the job exposes bad wiring, a failed shutoff valve, missing GFCI protection, questionable drain routing, or cabinet conflicts, that is the point where professional labor is cheaper than repairing water or electrical damage later.
Frequently Asked Questions
Can I install a dishwasher myself, or do I need a plumber?
You can DIY a like-for-like replacement if the opening, shutoff valve, drain, and electrical connection are already code-compliant and in good condition. Hire a plumber or electrician if you need new hookups, valve replacement, air gap work, circuit changes, hardwiring, or cabinet modifications.
How much does dishwasher installation cost in 2026?
A basic labor-only dishwasher replacement commonly runs about $150 to $350. Installed project totals including the appliance often fall around $900 to $1,700, while first-time installations or jobs needing plumbing, electrical, or cabinet work can exceed $2,000.
Do dishwashers need GFCI protection?
Many current code cycles require GFCI protection for dishwasher outlets or circuits, and some adopted codes extend that requirement to hardwired appliances. Requirements vary by jurisdiction, so check local code or ask a licensed electrician.
Do these 3 things before closing this tab:
1Repair Windows errors before they cause bigger problems2Fix the driver behind crashes, sound loss and screen glitches3Clear out junk files and repair common Windows errorsIs a dishwasher air gap required, or is a high loop enough?
It depends on local plumbing code. Some areas require a countertop or sink-mounted air gap. Other areas allow a properly installed high loop. Follow local code and the dishwasher manufacturer’s installation instructions.
Why will my new dishwasher not drain after installation?
The most common causes are a garbage disposal knockout plug that was not removed, a kinked drain hose, a clogged air gap, incorrect high-loop routing, or a blocked sink tailpiece or disposal inlet.
What size opening do I need for a built-in dishwasher?
Most standard built-in dishwashers are designed for a 24-inch undercounter opening, while compact models are commonly 18 inches wide. Always verify the exact width, height, depth, and side-clearance requirements in the manufacturer’s installation manual.
Quick Recap
Product prices and availability are accurate as of the date/time indicated and are subject to change. Any price and availability information displayed on Amazon at the time of purchase will apply.
Recommended Free Tools

