The best home theater is not defined by the most expensive projector, largest screen, or highest channel count. It is a coordinated room in which seating, display, speakers, acoustics, lighting, wiring, ventilation, and calibration work together. Design in this order: room and seating first, display second, speaker layout third, equipment fourth.
A correctly positioned 5.1.4 system in a controlled room can outperform a far more expensive system installed around poor seating, reflective surfaces, excessive light, or incorrectly placed speakers.
As an Amazon Associate I earn from qualifying purchases.
Choose the right type of theater
Start by deciding how the room will actually be used. Dolby recognizes that a home theater may be a dedicated cinema, living room, or compact bedroom setup. See its home theater setup guide for configuration examples.
What’s actually slowing this PC down?
Pick the symptom - the matching free tool is one click away.
- Dedicated home cinema: A purpose-built room with controlled light, fixed seating, surround speakers, acoustic treatment, concealed wiring, and extensive ventilation or sound isolation. It suits frequent movie viewing and major renovations.
- Media room: A multipurpose space for movies, sports, games, and family use. It usually works best for most households because it balances performance, flexibility, and construction cost.
- Living-room theater: A large TV paired with a soundbar or compact surround system. It requires little construction and can still dramatically improve on built-in television audio.
Write down the primary uses, number of viewers, preferred content, daytime viewing requirements, and whether the room must remain useful for other activities. Those answers will determine nearly every later decision.
#1 Best Overall
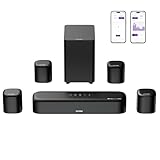
- 7.1ch Dolby Atmos Surround Sound System for TV: This 7.1ch sound bar features 3 main channels for crisp dialogue and 4 surround speakers. Power the rear right surround speaker to pair it wirelessly with sound bar. The setup delivers an immersive surround sound audio experience, making you feel fully engaged in the action. Note: Recommended for space of 108 to 270 ft².
- 4 Surround Speakers for Home Theater Sound System: The Aura A60 Pro soundbar for tv comes with 2 wired front surround speakers and 2 wired rear surround speakers, positioned to create a wide, room-filling soundstage. The rear speakers connect wirelessly with the soundbar, minimizing cable clutter and optimizing space efficiency.
- Dolby Atmos Delivers an Immersive 3D Soundscape: This 7.1ch dolby atmos soundbar enhances your listening experience with multidimensional audio that surrounds you from every direction, upgrading your home theater with powerful, dynamic sound that brings each scene to life.
- 5.25-inch Wired Subwoofer with BassMX Technology: The Aura A60 Pro sound bar comes with a 5.25" wired subwoofer powered by BassMX technology to boost low-frequency performance. An optimized magnetic structure and diaphragm produce deep, powerful bass. Enjoy enhanced low-end sound and experience the impact of every beat.
- Precision Audio Tuning Redefined: Customize your audio experience with the Ultimea App, designed for precise sound control. It provides 121 professionally tuned EQ presets across styles such as Bass, Pop, Classical, and Rock, along with 10-band control and 6 tailored EQ modes including Movie, Music, Voice, Sport, Game, and Night. Using the advanced “Customize” option, you can adjust audio details to suit your personal taste, ensuring every sound is tuned exactly how you prefer.
Measure the room before buying equipment
Record the interior length, width, ceiling height, door and window locations, HVAC registers and return paths, outlets, lighting, construction materials, ceiling obstructions, network access, and neighboring bedrooms or shared walls. Also identify a possible equipment-rack location and the projector’s potential throw distance.
Favor a rectangular room that is long enough for the desired seating and screen distance, wide enough for symmetrical speakers, and tall enough for comfortable viewing and overhead speakers. A dark, quiet room is helpful, but do not rely on a supposedly perfect length-to-width-to-height ratio. Room modes depend on construction, furnishings, boundaries, speaker locations, and subwoofer positions; serious dedicated rooms benefit from acoustic modeling.
Do not choose the largest possible screen until you have confirmed seating, sightlines, speaker locations, projector placement, HVAC noise, and access behind the seats.
Free tools Windows power users keep installed
One-click scans. No signup required.
Plan seating and the main listening position
Seating is the foundation of the design. Establish the primary seat—the main listening position or MLP—on the room centerline, but avoid placing it at the exact center of the room or directly against the rear wall where possible. Leave room behind the listener for rear-surround speakers, bass treatment, walking access, and maintenance.
Face the screen directly and keep viewers as close to its centerline as practical. Dolby recommends symmetrical speaker pairs around the primary listening position; its guidance is available in the home theater setup guide.
| Seating | Advantages | Trade-offs |
|---|---|---|
| Sofa | Flexible and family-friendly | Less consistent head position and acoustics |
| Theater recliners | Predictable positions and comfortable viewing | Require depth and may obstruct rear-speaker paths |
| Two rows | More capacity and a cinema appearance | Needs room depth, a riser, and careful sightlines |
| Bar behind a sofa | Efficient capacity | Rear viewers may receive inferior sound and viewing angles |
Every seat will not sound identical. Multichannel systems are optimized around a listening area, with the MLP receiving the most precise imaging and timing. If you build multiple rows, raise the second row enough to see over the first and verify sightlines before constructing the riser.
Choose the screen size and display type
Screen size should follow viewing distance, content, resolution, viewer preference, seating width, projector brightness, and ambient light. Dolby gives these useful starting examples: a 75-inch display at approximately 112.5 inches—about 9.4 feet—and an 85-inch display at approximately 127.5 inches—about 10.6 feet. These are not mandatory limits. Measure from the viewer’s eyes to the image surface, tape the proposed image to the wall, and sit in every planned row. Check subtitles, game text, and sports graphics before committing.
Rank #2

- Simplified 5.1ch Dolby Atmos Setup: Enjoy immersive 4D sound with real Dolby Atmos and 5.1-channel audio. Five built-in speakers, including two side-firing drivers, create wide surround without rear speakers. Precision DSP ensures <0.5 ms latency for smooth, theater-like sound. Setup takes less than 1 minute.
- Voice Clarity Enhancement: VoiceMX technology uses advanced DSP algorithms to isolate and enhance vocal frequencies in real time. Dialogue remains crisp and easy to follow by separating speech from background effects and music, even at low volumes or during intense scenes.
- 300W Output with 6-Driver System: Featuring five precision-tuned full-range drivers and a dedicated wired wooden subwoofer, the system delivers up to 300W of peak power for bold, room-filling sound. With a frequency response of 45 Hz–18 kHz and a maximum SPL of 99 dB, it reproduces everything from subtle nuances to explosive cinematic effects.
- 18 mm High-Excursion Driver: Powered by BassMX technology, the wired wooden subwoofer features a 18 mm high-excursion driver, a 5.3L tuned cabinet, and a high-density magnetic circuit. This design delivers deeper, tighter bass with greater air displacement and enhanced low-frequency performance—bringing more realism to every scene.
- HDMI eARC for True Dolby Atmos: HDMI eARC supports up to 37 Mbps of bandwidth, unlocking the full potential of lossless Dolby Atmos 5.1-channel audio. Compared to standard ARC, eARC delivers richer surround effects and greater detail. CEC integration allows the TV and soundbar to work together with unified control.
THX has referenced a 36-degree viewing angle from the farthest seat in its certified-screen-placement guidance. That is a THX screening-room recommendation, not a universal requirement for every home theater. See THX’s screen-placement guidance.
TV or projector?
| Choose a large TV when… | Choose a projector when… |
|---|---|
| The room has windows or uncontrolled light | A very large image is the priority |
| Gaming latency, HDR brightness, and daytime use matter | The room can be darkened |
| Viewing distance is short or moderate | There is enough distance for a large image |
| You want simpler installation | You accept more complex installation and maintenance |
| The desired image is below roughly 100 inches | A dedicated cinema aesthetic matters |
A projector design must account for throw distance, lens shift, ceiling mounting, screen gain, viewing cone, fan noise, ventilation, HDMI distance, light-source service, and actual brightness on the selected screen. Laser projectors generally reduce lamp-maintenance concerns, but they do not eliminate installation, heat, noise, or image-quality trade-offs. Ultra-short-throw projectors need precise furniture placement and a compatible screen. Ambient-light-rejecting screens can narrow the viewing angle or create artifacts.
As a dated U.S. pricing illustration, Sony’s catalog displayed home-cinema projectors from $5,999.99 to $35,999.99 and above when checked in August 2026. Prices, promotions, and availability change; consult the current Sony projector catalog before budgeting.
Screen height matters as much as size. The image must clear furniture without forcing viewers to tilt their heads upward. An acoustically transparent screen allows the center speaker to sit behind the image, improving dialogue localization. A conventional screen usually requires the center speaker above or below it, with compromises in height and aiming.
The Tool Desk
Outbyte PC Repair FREERepair Windows errors before they cause bigger problemsFix Now →Outbyte Driver Updater FREEFix the driver behind crashes, sound loss and screen glitchesFind Drivers →Select the audio configuration
Consumer notation describes ear-level channels, subwoofer channels, and height channels. 5.1 means five main channels and one subwoofer channel. 7.1 adds two more ear-level channels. 5.1.2 means five ear-level channels, one subwoofer channel, and two height channels; 5.1.4 uses four height channels; 7.1.4 uses seven ear-level channels and four height channels.
The notation does not guarantee a particular number of independently controlled subwoofers; receiver capabilities vary. Use Dolby’s configuration-specific placement guides rather than generic illustrations.
- Entry level: A soundbar or 5.1 package with a large TV and minimal wiring.
- Strong all-purpose system: 5.1.2 or 5.1.4 with an AV receiver, matched front speakers, one or more subwoofers, and basic treatment.
- Dedicated enthusiast system: 7.1.4 or larger, an acoustically transparent screen, multiple subwoofers, purposeful treatment, a dedicated rack, and professional calibration where justified.
More speakers can improve object placement, but Dolby Atmos content can play across different configurations. Four height speakers can improve front-to-back movement when correctly positioned, but a properly placed 5.1.4 system is preferable to a poorly placed 7.1.4 or 9.1.6 system.
Rank #3

- Your purchase includes: 1 AV receiver, 5 speakers, 1 Sub-Woofer and Speaker wire.Waterproof : No
- Dimensions: AV Receiver – 17” W x 6” H x 12” D | Four Speakers (each) – 4” W x 6” H x 4” D | Center speaker – 10” W x 4” H x 4” D | Subwoofer – 11” W x 11” H x 13” D
- Technical specs: HDMI – 4 | Standby Power Consumption – ≤ 0.2 W | Frequency Response – 28Hz/25kHz
- Bluetooth for streaming all your favorite music and podcasts. No wireless functionality
- Easy setup with Yamaha YPAO room optimization and flexible speaker placement options, including virtual cinema front
Place speakers around the room
Front stage
Place the left and right speakers symmetrically around the screen, with the center speaker aligned as closely as possible with the screen’s acoustic center. Match the tonal character of the three front speakers. Toe-in depends on the speaker’s dispersion pattern. Avoid enclosing speakers in cabinetry unless resonance and ventilation have been addressed.
Surrounds and height speakers
Side surrounds belong beside or slightly behind the listening area according to the selected Dolby layout. Rear surrounds require meaningful space behind the seats; placing every surround immediately behind a sofa is not a substitute for a proper layout.
In-ceiling speakers provide direct overhead effects when installation is practical. Up-firing Atmos speakers depend heavily on ceiling height, reflectivity, texture, speaker aiming, and listener position. Sloped, vaulted, absorptive, or unusually high ceilings can make them unreliable. Use Dolby’s Atmos speaker setup guidance and downloadable layout diagrams.
Subwoofers
Bass is less directional than midrange and treble, so a subwoofer can be placed in many locations. That does not mean every position will produce smooth bass. Room modes can create a strong response in one seat and a null in another.
Use a subwoofer crawl as a starting point: place the subwoofer temporarily at the MLP, play bass-heavy material, and identify locations where bass sounds smooth and even. Then move the subwoofer to one of those locations. In larger rooms or rooms with several seats, two subwoofers can improve seat-to-seat consistency—not merely maximum output—when properly placed and calibrated. Account for electrical requirements and structure-borne vibration, especially in apartments and rooms above bedrooms.
Quick wins for a faster PC:
Scan for outdated or missing drivers - takes under a minuteDriver Scan →Repair Windows errors before they cause bigger problemsFix Now →Fix the driver behind crashes, sound loss and screen glitchesFind Drivers →Treat the acoustics—and understand sound isolation
Acoustic treatment improves sound inside the room by controlling early reflections, flutter echo, reverberation, imaging, dialogue clarity, and bass problems. Useful measures include thick broadband absorption panels, bass traps, ceiling clouds, selective diffusion, rugs, curtains, upholstered seating, and fabric-wall systems. Dolby also recommends soft treatments such as curtains, wall hangings, and acoustic panels to reduce reflections and echo.
Sound isolation reduces sound entering or leaving the room. It may require decoupled walls or ceilings, additional drywall layers, acoustic sealant, solid-core doors, perimeter seals, isolated flooring, HVAC silencers, and carefully managed penetrations. Thin decorative foam, carpet, and wall panels do not soundproof a room or stop deep bass from reaching neighbors.
Rank #4

- An all-in-one home theater package - The YHT-4970U comes with a Dolby Atmos AV Receiver (Yamaha RX300A), a 5.1 speaker package (two front channel speakers, a center channel speaker, two surround channel speakers, and a powered subwoofer), plus a subwoofer cable and speaker wire all in one box.
- Step into lifelike sonic worlds - Dolby Atmos and DTS Virtual:X for deeply dimensional, lifelike sound that draws you into every moment of your favorite entertainment, plus crystal-clear dialogue so you can hear every word.
- Stunning visual realism - Supports ultra-high definition 4K/120 and 8K/60 video, high-performance HDMI switching, advanced Dolby Vision and HDR10+ dynamic range technologies, HDMI eARC/ARC and next-gen gaming features like ALLM and VRR.
- Room Correction - Experience perfect sound in any room. An included setup microphone measures your room’s acoustics and speaker characteristics, allowing the receiver to automatically optimize sound performance.
- Easy streaming with Bluetooth Multipoint - Stream all your favorite music, podcasts and audiobooks wirelessly. Built-in Bluetooth Multipoint lets you pair two source devices and instantly switch between them.
Common mistakes include covering every surface with thin foam, treating only the front wall, making the room excessively dead, ignoring the ceiling, placing treatment without considering reflection points, and installing diffusion where there is insufficient distance for it to work. Determine speaker and seating geometry before finalizing treatment.
Control light and design the room
Projector rooms need blackout shades or curtains and low-reflectance finishes. Use dimmable lighting divided into zones: screen-area lights, seating lights, entry or path lighting, and cleaning lights. Avoid fixtures in the projector’s optical path and glossy trim near the screen. Smart scenes such as “movie,” “pause,” and “cleaning” can improve convenience.
Windows Errors? Fix Them Before They Spread
Repair common Windows errors and clear accumulated junk for a smoother, more stable PC - no reinstall needed.Free scan · no reinstallCrashes, No Sound, or Screen Glitches?
Random freezes, missing sound and display glitches usually trace back to one bad driver. Find and replace yours safely.Free scan · under a minuteA black room maximizes image contrast, but a multipurpose room may be better served by dark finishes near the screen and more conventional finishes elsewhere.
Independent reader supportYour contribution helps us test, update, and keep practical guides available for everyone.Plan wiring, power, networking, and ventilation before drywall
Pre-wire for the front three speakers, side and rear surrounds, four or more height speakers, one or more subwoofers, projector power and signal, screen controls, Ethernet, control keypads, and future upgrades. Install conduit with pull strings where possible. Test high-bandwidth cables before closing walls, label both ends, avoid tight bends, and keep signal wiring separated from high-voltage wiring where practical.
HDMI should be selected for the required resolution, refresh rate, HDR format, distance, and installation method—not simply for a “premium” label. For long runs, consider certified active or optical HDMI cables and verify the complete signal chain, particularly for 4K/120 gaming.
Use a dedicated rack when there are many components. Provide service access, ventilation, removable panels, spare conduit, and labeled connections. Receivers, amplifiers, projectors, consoles, and media servers produce heat; a sealed cabinet can cause thermal shutdowns and shorten component life.
Consult a licensed electrician for new circuits, receptacles, projector outlets, grounding, recessed boxes, code compliance, fire blocking, and the separation of high- and low-voltage wiring. Surge protection and adequate electrical capacity are fundamental; an expensive power conditioner is not automatically necessary.
Best Value

- 5.1.2ch Surround Sound System: A 5.1.2-channel system featuring up-firing speakers, surround sound, and a powerful subwoofer creates lifelike, multidimensional audio. Feel the Sky Around You—raindrops falling from above, helicopters circling overhead, thunder rumbling in all directions. Sound isn’t just around you, it engulfs you, as if the ceiling disappeared. This is Dolby Atmos: not just heard, but felt.
- Up-Firing Drivers with Neodymium Core: The up-firing channels use neodymium internal magnets and 18-core large voice coils to enhance height precision and vertical throw. This aerospace-grade configuration ensures better high-frequency dynamics, delivering focused and elevated sound images that unlock the true potential of Dolby Atmos.
- 360° SurroundX Audio: SurroundX technology combines two rear surround speakers and dual up-firing Atmos drivers to build a true 360° sound field. Powered by intelligent spatial algorithms, the system precisely positions audio around and above you—enhancing Dolby Atmos with a more natural, three-dimensional soundstage. Note: Not compatible with DTS.
- Lossless Audio Transmission: Unlock full Dolby Atmos performance with HDMI eARC, supporting up to 37Mbps bandwidth for lossless 5.1.2-channel audio. Compared to regular ARC, eARC delivers richer detail and better surround effects with no compression. With CEC, your TV and soundbar work as one—power, volume, and input sync automatically for effortless control.
- Advanced App Control: Customize every detail of your audio experience with the Ultimea App. Fine-tune your surround sound with 13-step level adjustment (-6 to +6), optimize with a 10-band graphic EQ, and choose from 121 preset sound settings. Enjoy seamless OTA updates that unlock new features and keep your system performing at its peak.
Choose the receiver and sources
Select an AV receiver or processor based on required channels, independent subwoofer outputs, HDMI inputs and outputs, resolution and refresh-rate support, HDR and copy-protection compatibility, room correction, preamp outputs, zones, network control, and upgrade plans.
Dolby gives rough power guidance of 50–100 watts per channel below 200 square feet, 80–150 watts for 200–500 square feet, and at least 100–150 watts above 500 square feet. Treat those figures as broad guidance only: speaker sensitivity, impedance, listening distance, room gain, and the receiver’s measurement conditions matter. Advertised wattage is not directly comparable between brands unless the number of driven channels, test frequency, distortion limit, impedance, and continuous-versus-peak method match.
As a dated U.S. example, Denon’s catalog displayed AV receivers from $649 to $7,199 on August 18, 2026, including intermediate models at $1,849, $2,799, and $3,799. Check the current Denon catalog for current pricing and inventory.
Recommended Free Tools
Plan sources such as streaming boxes, UHD Blu-ray players, consoles, PCs, cable boxes, and network media servers around Atmos support, HDR compatibility, 4K/120 gaming, HDMI switching, eARC, CEC reliability, network stability, and remote-control simplicity. Format support varies by country, subscription tier, device, and software version.
Install and calibrate the system
- Confirm speaker polarity and every cable connection.
- Set the receiver to the actual speaker layout.
- Measure or enter speaker distances from the MLP.
- Run the receiver’s room-correction routine.
- Verify crossover settings, channel levels, and subwoofer integration.
- Check video resolution, refresh rate, HDR, and color mode for every source.
- Save a baseline configuration and test from multiple seats.
- Recalibrate after moving speakers, seating, or major furniture.
Place the calibration microphone at ear height, remove nearby obstructions, silence HVAC and other noise, and follow the manufacturer’s specified microphone pattern. If calibration fails, check wiring and polarity, confirm that the subwoofer is powered and connected, set its volume to the recommended starting point, and disable unnecessary processing. If automatic setup remains unreliable, use manual distances and levels or hire a measurement-based calibrator.
Automatic correction can improve response, levels, and timing, but it cannot fix fundamentally wrong speaker locations, severe room nulls, clipping, poor projector focus, noisy HVAC, or inadequate sound isolation. Dolby explains automatic and professional calibration in its Atmos setup guidance.
Where to spend first
- Room layout, seating, and sightlines
- Display size and placement
- The three front speakers, especially the center channel
- Subwoofer placement and bass integration
- Acoustic treatment
- Receiver, HDMI, networking, and control
- Surround and height expansion
- Automation, decorative finishes, and accessories
This order prevents a common mistake: spending on a flagship receiver or projector while leaving the room, center speaker, bass response, and wiring unresolved.
When to hire a professional
Professional help is worthwhile for structural changes, sound isolation, electrical work, multiple seating rows, complex projector geometry, vaulted or irregular rooms, expensive systems, difficult bass, and final calibration. Ask installers about relevant construction and electrical qualifications, insurance, service access, and measurement-based commissioning. A THX installer directory is available through the THX installer finder, but directory inclusion does not establish pricing, licensing, workmanship, or suitability for your project. THX training covers room design, acoustics, ventilation, cabling, and calibration; training is not the same as a construction license or a guarantee of a particular installation.
Quick Recap
Final home theater checklist
- Room dimensions and obstructions recorded
- Primary seating and MLP established
- Screen size tested from every row
- TV or projector chosen for light, distance, and use
- Center speaker aligned with the image
- Surround and height positions verified against the selected Dolby layout
- Subwoofer locations tested for smooth bass
- Acoustic treatment separated from sound-isolation planning
- Blackout and dimmable lighting installed
- Speaker wire, conduit, Ethernet, HDMI, power, and service access planned
- Rack ventilation and equipment cooling confirmed
- Electrical work completed to local code
- Every source tested at its required resolution and audio format
- Automatic calibration verified with manual listening and measurements
- Walking paths, steps, egress, child safety, and accessibility addressed
Product prices and availability are accurate as of the date/time indicated and are subject to change. Any price and availability information displayed on Amazon at the time of purchase will apply.




