Do these 3 things before closing this tab:
1Repair Windows errors before they cause bigger problems2Fix the driver behind crashes, sound loss and screen glitches3Clear out junk files and repair common Windows errorsDo not assume the cracked carport caused the rubbing door. Inspect the slab and the door as two separate faults first. A tight, unchanged crack may need observation rather than filler, while a door that rubs is often sagging because hinge screws or hinge holes have loosened. A crack that is widening, passes through the slab, leaves one side higher than the other, or is accompanied by crumbling concrete and water requires a more careful assessment than a surface patch can provide.
What the symptoms do—and do not—tell you
A photograph or a crack’s apparent width cannot establish its depth, activity, or cause. The crack may be a shallow surface defect, a crack through the slab, or a sign that the concrete or its support has moved. Likewise, a rubbing door may simply have loose hinges; it does not prove that the carport slab has shifted.
As an Amazon Associate I earn from qualifying purchases.
Start by documenting each problem independently. Photograph the entire carport, then take close images of the crack, its edges, nearby spalling, and any place where water collects or enters. For the door, note exactly where contact occurs: at the hinge-side jamb, latch-side jamb, head, floor, or threshold. Record the date and repeat the observations after rain or over several weeks. A change over time is more informative than a single measurement, and no residential crack-width or displacement cutoff is established by the sources used here.
The Tool Desk
Outbyte PC Repair FREERepair Windows errors before they cause bigger problemsFix Now →Outbyte Driver Updater FREEScan for outdated or missing drivers - takes under a minuteDriver Scan →How to classify the concrete damage
The Federal Highway Administration (FHWA) describes crack and repair concepts for highway pavement, not residential carports. Its guidance is useful for understanding why depth and movement matter, but it is not a home-slab engineering diagnosis.
#1 Best Overall

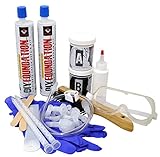
- FIX FOUNDATION WALL CRACKS EASILY: Our Concrete Crack Repair Kit offers a reliable solution for foundation crack repair injection kit and concrete crack repair. Homeowners can address concrete cracks and cement crack filler issues efficiently, preventing water infiltration and protecting the basement from potential water damage. Whether you’re facing rainstorms or just trying to maintain your basement, it provides a hassle-free solution, saving you the cost and trouble of hiring professionals.
- LONG-LASTING WATERPROOF PROTECTION AND SEALING: Our Hydra Stop 300 Polyurethane Foam expands to fill cracks, acting as a concrete crack filler that creates a durable, waterproof concrete sealer barrier. This foam sealant gap filler helps prevent moisture entry, providing long-lasting protection concrete patch to your basement and foundation. Homeowners worried about water damage and basement flooding can rely on this effective solution.
- PRESERVE YOUR HOME’S VALUE AND STRUCTURAL INTEGRITY: In addition to offering a practical foundation cement crack filler solution, our kit helps maintain the structural integrity of your foundation. Sealing cracks with concrete crack sealer reduces the risk of foundation cement crack repair issues, helping to protect your home from further damage and providing lasting concrete crack repair. With an easy-to-apply system, this kit allows DIY homeowners to feel confident in their repair work.
- INCLUDES COMPLETE REPAIR SOLUTION: Our concrete crack filler and sealer kit includes 2-Hydra Stop 300 Polyurethane Foam, 2-Poxy Paste crack sealant, 15-surface ports, caulk gun, 2 pairs nitrile gloves, safety glasses, drop cloth, 10-wooden sticks, 10-corner ports, wire brush and a flexible injection hose assembly. This simplifies foundation cement crack filler repairs, making it easy for DIY homeowners to handle large cracks with the help of clear instructions and video tutorials.
- WHY CHOOSE APPLIED TECHNOLOGIES: Applied Technologies has been a trusted name in waterproofing and foundation repair solutions for over two decades. Our Hydra Stop 300 Polyurethane Foam provides effective foundation crack repair and concrete crack filler performance, ensuring a reliable seal. With easy-to-follow instructions for concrete crack sealer application and durable cement crack filler materials, we offer products designed to help protect your home and provide lasting results.
| What you observe | What it may indicate | Prudent response |
|---|---|---|
| Tight hairline crack that appears stable and does not visibly continue through the slab | A limited surface crack is possible; appearance alone cannot prove that it is harmless. | Clean and document it, then monitor for change. FHWA notes that tight cracks not reaching the bottom may need no special treatment in its pavement context. |
| Localized chipped or spalled concrete confined to the surface | Shallow deterioration may be present. | A conditional shallow repair may be considered only after sound concrete is exposed. FHWA’s partial-depth concept is limited to distress in the top third of a pavement slab. |
| Chipping that extends deeper, or visible reinforcement or dowel bars | The damaged zone is deeper than a surface repair. | Do not keep enlarging a patch blindly. FHWA says to move to a full-depth repair approach when deeper removal is needed or dowels are exposed. |
| Crack that appears to pass through the slab, continuing widening, broad breakup, water entry, or one edge higher than the other | A working crack, movement, loss of support, or more extensive deterioration is possible. | Arrange an on-site assessment by an experienced concrete contractor or an appropriate structural professional before selecting a repair. |
“Cosmetic” is not a reliable label based on a photograph or width alone. A crack extending through a slab can behave like a working joint, while a narrow crack can still deserve attention if the edges move, the surrounding concrete breaks away, or water reaches the base.
Choosing a repair for the carport slab
When observation may be enough
If the crack is tight, dry, level, and unchanged, the least disruptive option can be to leave it alone temporarily and keep a dated record. In its highway-pavement framework, FHWA says a tight hairline crack that does not reach the bottom may need no special treatment. That statement should not be converted into a guarantee for a residential carport: the slab thickness, reinforcement, soil, drainage, climate, and loads may differ.
Do not fill a stable-looking crack merely to make it disappear if you have not checked whether it is active. A filler can hide evidence that would help diagnose later movement, and it cannot restore a slab that has separated or lost support.
When a shallow patch is a reasonable possibility
A localized spall limited to the upper portion of otherwise sound concrete may fit the partial-depth repair concept described by FHWA. The highway guidance limits that method to damage in roughly the top third of the pavement slab. For a home carport, treat that depth as a conceptual boundary, not as permission to chisel to a particular measurement without knowing the slab construction.
Rank #2
- Drill-Free Injection: Repair basement wall cracks effortlessly without drilling, ensuring minimal disruption to your home's structure.
- Simple Application: Use a standard caulking gun to inject the low-viscosity, 2-component urethane, making the process accessible for any homeowner.
- Effective Hairline Crack Repair: Seal even the smallest cracks permanently with the specialized urethane, preventing further water seepage and damage.
- Interior Repair Advantage: Save on costly excavation by repairing cracks from inside your basement, maintaining exterior aesthetics and structural integrity.
- Comprehensive Protection: This solution not only protects against water but also acts as a barrier against radon and soil gases, safeguarding your basement environment.
Before any patch, remove loose material only far enough to expose sound concrete, clean the area, and determine whether the deterioration continues below the surface. If the concrete keeps breaking away at depth, reinforcement or dowels are exposed, or the surrounding slab is moving, stop treating it as a small patch.
When full-depth work or an assessment is needed
FHWA describes full-depth pavement repair as removing concrete down to the base, repairing any disturbed base, and replacing the concrete. That is a substantial construction process, not a tube of surface filler. A residential contractor must also consider how the slab is supported, how new concrete will meet the existing work, drainage, reinforcement, and the load from vehicles.
Seek an on-site opinion before repairing if you see vertical offset, progressive widening, extensive breakup, persistent water, or uncertainty about the soil beneath the slab. The available guidance does not provide a residential threshold that tells you exactly when a crack becomes structural, so the decision depends on inspection rather than a universal number.
What soil and frost guidance can—and cannot—explain
HUD’s residential construction guide explains that a slab placed on uncompacted soil can settle and recommends compacting soil beneath a new slab. For an attached garage or carport, it also says footings must extend to the local frost line. Those are design and construction principles for new work; they do not diagnose an existing crack or prove that settlement or frost caused yours.
Rank #3

- FAST & EASY CRACK REPAIR: Quickly seal leaks with this advanced 10' foundation crack repair injection kit designed for fast results and minimal effort. Sets rapidly and helps homeowners fix structural cracks in minutes without waiting hours or calling professionals
- COMPLETE ALL-IN-ONE REPAIR KIT: This premium concrete crack filler includes everything you need, such as urethane foam, injection ports, adhesive, gloves, and tools, so you can start immediately. Offers more material than standard kits for better coverage and value
- NO SPECIAL TOOLS REQUIRED: Designed for easy DIY foundation repair, this system works with a standard caulking gun; no drilling or special equipment needed. Quick and effective concrete crack repair, making it a hassle-free solution for homeowners
- DURABLE WATERPROOF SEAL: The expanding urethane creates a durable barrier that blocks water intrusion and prevents future damage. Excellent for foundation leak repair and reliable concrete wall leak repair, ensuring your basement stays dry and protected over time
- FIX, SEAL & PREVENT FUTURE DAMAGE: Engineered to restore structural integrity, this solution seals existing cracks and helps prevent future leaks, protecting your home's foundation for the long term
If the carport is attached to the house, ask the assessor to look at the connection, drainage, and supporting elements as well as the visible slab. Do not excavate around footings or alter drainage without understanding where water is supposed to go. Redirecting runoff toward the foundation can create a new problem even if the crack itself is unrelated.
A safe concrete inspection sequence
- Map the crack. Mark its route on a sketch or photograph. Note whether it ends within the slab, reaches an edge, crosses a joint, or branches.
- Check the edges. Look for a height difference, loose flakes, hollow-sounding areas, exposed steel, and fresh fragments. Do not pry aggressively on sound concrete.
- Look for activity. Compare dated photographs and observations after wet and dry weather. Record any new water path, widening, or change in level instead of relying on memory.
- Check the surroundings. Note ponding, blocked drainage, soil washout, erosion at an edge, or a gap where the slab meets another structure.
- Select the least extensive justified action. Observation may suit a stable, tight crack; a conditional shallow repair may suit localized surface spalling; deeper or moving damage warrants an assessment and potentially full-depth work.
- Keep the repair reversible in your thinking. Do not cover a suspected movement joint or active crack with a cosmetic coating before its behavior is understood.
Diagnosing a door that rubs
Find the contact point first
Close the door slowly and watch where the clearance disappears. Contact at the hinge-side jamb often accompanies a sagging door. Contact at the latch side can also result from a door hanging out of square. Rubbing at the head points to reduced top clearance, while contact at the floor or threshold may involve the threshold, the door, or a change in alignment.
Open the door. Hold the knob and gently lift or move the door up and down while watching the hinges and the gap at the jamb. The government home-repair guide identifies loose hinges as a cause of a door sagging and rubbing. Its problem statement reads: “Edge of door is crushing against jamb on hinge side; or door is rubbing on latch side because hinges are loose.”
What’s actually slowing this PC down?
Pick the symptom - the matching free tool is one click away.
Tighten and retest the hinges
- With the door supported and the correct screwdriver, tighten each hinge screw at the door and jamb. Do not force a screw until the head strips or the wood splits.
- Close the door and check the reveal around all sides. Open and close it several times to see whether the rubbing has stopped.
- If a screw turns without gripping, remove it and inspect the hole. The government guide recommends filling a loose hole with a wooden plug or using a longer screw that reaches sound framing, where appropriate.
- Retest after each hinge adjustment so you know which change affected the alignment. Confirm that the latch engages without forcing the door.
Verify the screw’s length, head style, and compatibility with the existing hinge and frame before replacing hardware. A longer screw is useful only when it can enter solid framing without striking wiring, plumbing, or other hidden services.
Rank #4
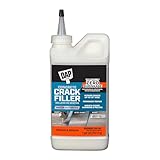
- Concrete crack filler repairs horizontal cracks in concrete, stone and other masonry materials
- Water activated dry powder repairs cracks up to 1/2”W x 1/2”D a single pass
- Ready for light foot traffc in 4 hours, return to full service (including vehicles) within 48 hours
- Ready to use formula, no shaking or mixing: prep surface, fill crack and mist
- DAP Concrete Crack Filler resists shrinkage, UV fading, and cracking
If the hinges are secure but the door still binds
Secure hinges do not rule out a distorted door, a shifted frame, a changed threshold, or another clearance problem. The cited guide does not establish which of those conditions is present. Avoid immediately planing or cutting the door, especially if the slab, jamb, or adjacent wall appears to be moving. Removing material can conceal the underlying alignment change and leave an excessive gap when conditions stabilize.
If the door is required for weather protection, security, or fire separation, use a qualified door or building professional when adjustment does not restore consistent clearance. A professional can check the frame, fasteners, threshold, and surrounding structure before making an irreversible alteration.
Could the slab crack and the door rubbing share a cause?
The available evidence does not show that the carport crack caused the door to rub. Diagnose them separately unless an inspection establishes common movement. It is possible for a shared foundation or frame movement to affect both, but that possibility cannot be confirmed from coincidence or from the crack’s appearance.
Free tools Windows power users keep installed
One-click scans. No signup required.
Compare the timelines. If the door began rubbing at the same time that a slab edge rose, a joint opened, or water began washing out support, tell the assessor. If the door improved after hinge screws were repaired while the crack remained unchanged, that supports two independent problems. Conversely, a door that repeatedly goes out of alignment after hinge repairs deserves a look at the frame and adjacent structure rather than repeated screw tightening.
When to stop DIY work and call a professional
- The concrete edges are at different heights, the crack is changing, or the slab is breaking into several pieces.
- Concrete deterioration extends below the surface, exposes reinforcement or dowels, or leaves a soft or washed-out area beneath an edge.
- Water enters through the crack, collects against the structure, or is accompanied by erosion or drainage failure.
- The carport is attached and you are unsure how its footings, frame, or connection to the house are supported.
- Hinge screws will not hold, the door remains out of alignment after tightening, or the frame itself appears to move.
- You cannot determine whether a proposed repair addresses a stable surface defect or an active movement problem.
Bring dated photographs, notes about weather and changes, and the results of the hinge test to the appointment. That information helps a contractor distinguish a localized repair from a support or alignment investigation.
A practical order of work
- Make the area safe. Keep vehicles and people away from loose concrete, sharp spalls, and a door that can catch unexpectedly.
- Document both conditions before altering them. Photograph the crack, water paths, slab levels, door gaps, and hinge movement.
- Repair the simple door cause first. Tighten sound hinge screws, or correct stripped holes with a suitable wooden plug or longer screw, then retest.
- Monitor the slab rather than masking it. If it is tight and stable, observe it. If it is active, displaced, deep, or deteriorated, obtain an on-site assessment.
- Address drainage and support as part of the repair. A surface patch cannot correct settlement, a disturbed base, or water that continues to undermine the slab.
- Recheck operation after concrete work. Once any slab or surrounding work is complete, verify the door’s clearances again; adjust the door only after the supporting conditions are stable.
Bottom line
Fill a carport crack only after determining that it is a suitable, shallow, stable surface defect. FHWA’s partial- and full-depth concepts explain why deeper deterioration needs a different repair, but they come from highway pavement guidance and must not be treated as a residential specification. For the rubbing door, test for hinge movement, tighten loose screws, and repair stripped holes with a wooden plug or an appropriately long screw. If either problem is changing, displaced, water-related, or unexplained after these checks, get an on-site assessment instead of trying to make both symptoms disappear with filler or aggressive door trimming.
Quick Recap
Product prices and availability are accurate as of the date/time indicated and are subject to change. Any price and availability information displayed on Amazon at the time of purchase will apply.

