The Tool Desk
Outbyte Driver Updater FREEFix the driver behind crashes, sound loss and screen glitchesFind Drivers →Outbyte PC Repair FREERepair Windows errors before they cause bigger problemsFix Now →Some links on this page are affiliate links: if you buy through them we may earn a commission, at no extra cost to you.
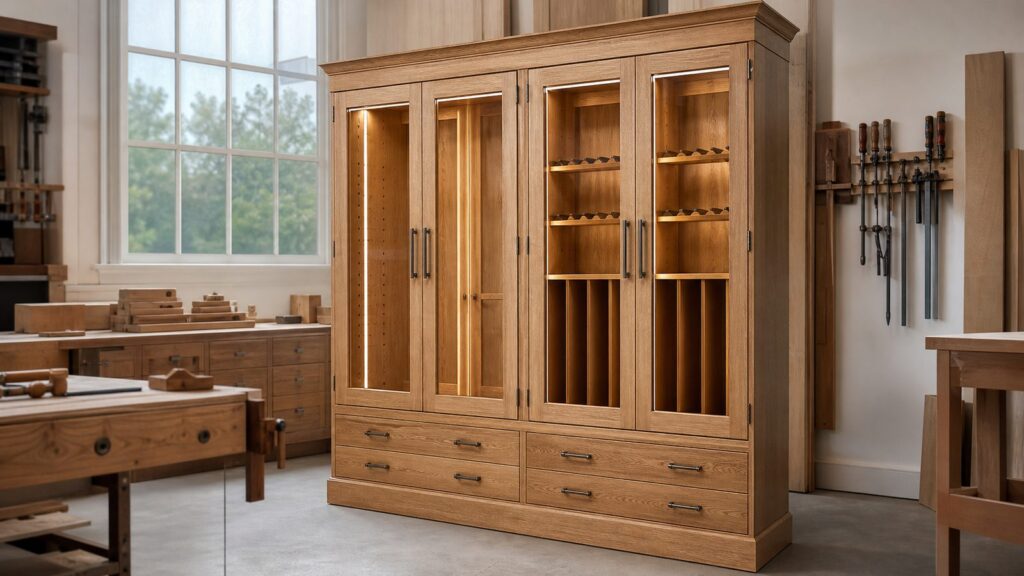
A convertible display and gun cabinet should be designed as fine cabinetry first and firearm storage second. That means square joinery, stable materials, good doors, controlled lighting, real anchoring, and removable firearm supports that can later come out without wrecking the cabinet. A wood gun cabinet can organize and display firearms, but it is not a rated gun safe and should not be treated as burglary-proof or fire-rated storage.
For a quality 2026 build, expect a DIY material budget of about $600 to $2,500 depending on wood species, glass, locks, lighting, and finish. A professionally built custom cabinet usually lands around $500 to $1,200 per linear foot installed, and premium handcrafted gun cabinets commonly run from about $1,835 to $8,845 before custom site work. The plan below is built around a practical full-height cabinet that can hold long guns today and convert into a curio, trophy, collectible, or book display later.
As an Amazon Associate I earn from qualifying purchases.
Recommended Cabinet Size and Layout
For most homes, the best starting size is a tall cabinet about 42 inches wide, 16 to 18 inches deep, and 78 to 84 inches high. That gives enough height for rifles and shotguns, enough width for controlled spacing, and enough depth for optics, slings, angled stock rests, and door clearance. A narrower 30-inch cabinet works for 4 to 5 long guns. A 48-inch cabinet can handle 8 to 10 long guns if spacing is planned carefully.
On our job sites, we do not lay out a gun cabinet by firearm count alone. We measure the actual firearms, including barrel length, optic height, bolt handles, sling swivels, recoil pads, and stock width. A scoped rifle may need 4 1/2 to 5 inches of horizontal spacing, while a slim shotgun may need closer to 3 1/2 inches. If you guess, the cabinet usually looks fine empty and becomes awkward as soon as real contents go inside.
Popular on Amazon

- Large Capacity Biometric Fingerprint Gun Cabinet:The large gun safe easily accommodates 14-15 firearms of various types (such as rifles, shotguns, and other long guns). The removable racks allow you to adjust according to the height of your guns, ensuring each one is stored securely and in an organized manner. The safe can store firearms (with or without scopes) up to a maximum height of 45.5 inches. Please note: If a firearm exceeds 45.5 inches in height, the interior shelves and hanging cabinet must be removed; otherwise, the gun cannot be stored properly.
- Quick Access Gun Safe: Emergency Key + Biometric Fingerprint + Digital Keypad. Utilizing advanced biometric fingerprint scanning technology (capable of storing 30 fingerprints) and a backup digital keypad, this safe ensures fast and reliable access. It guarantees that only authorized users can open the safe, effectively preventing children, intruders, and unauthorized individuals from accessing firearms.
- Multi-Function Gun Cabinet: The gun safe rifle interior features removable gun racks for flexible firearm positioning, plus an overhead storage compartment for compact handguns and accessories. Door interior hooks and ammo storage boxes keep everything organized—from scopes to cleaning tools.
- Sturdy and Anti-Theft Structure:Built with heavy-duty 15-gauge cold-rolled steel, this gun safe effectively prevents unauthorized access and provides comprehensive protection for your firearms. Its rugged design ensures long-term reliability, making it a trusted choice for home defense and secure firearm storage.
- Simple Assembly: Simple design for easy setup—no complicated installation! This gun safe features a user-friendly, easy-to-assemble structure and comes with clear instructions and all necessary parts. Upon receiving the product, please inspect both the item and the included accessories to ensure everything is intact and undamaged. Should you have any questions about the product, feel free to reach out to us via email at any time.
A strong general-purpose layout is:
- Overall size: 42 inches wide by 18 inches deep by 82 inches high.
- Upper display bay: about 42 inches wide by 54 to 60 inches high.
- Lower lockable storage: 16 to 22 inches high for ammunition, accessories, documents, or removable shelves.
- Door style: two glass upper doors and two solid lower doors, or full-height glass doors with a locked lower drawer bank.
- Interior long-gun spacing: 4 inches minimum center-to-center, 4 1/2 to 5 inches for scoped rifles.
- Back panel: 3/4-inch captured plywood or a 1/2-inch back reinforced with concealed rails.
- Anchoring: French cleat, concealed ledger, or through-back fasteners into wall studs.
If the cabinet may become a general display cabinet later, keep the interior grid flexible. Use shelf-pin holes, threaded inserts, removable barrel combs, removable stock blocks, and reversible panels instead of glued-in firearm-specific parts.
What It Costs to Build in 2026
Material costs have stayed high enough that this is not a scrap-pile project if you want furniture-grade results. Cabinet-grade plywood costs much more than construction plywood. A 2026 hardwood plywood sheet price can put 3/4-inch 4-by-8 white oak plywood around $137 to $160 per sheet, with specialty quarter-sawn or rift-sawn panels above $150 per sheet. Larger 4-by-10 A1 white oak panels can approach $197 to $220 per sheet. Hardwood plywood producer prices also remain elevated, with the hardwood plywood producer price index reported at 162.830 in June 2026 where December 2012 equals 100.
Crashes, No Sound, or Screen Glitches?
Random freezes, missing sound and display glitches usually trace back to one bad driver. Find and replace yours safely.Free scan · under a minuteWindows Errors? Fix Them Before They Spread
Repair common Windows errors and clear accumulated junk for a smoother, more stable PC - no reinstall needed.Free scan · no reinstallFraming lumber is not the main ingredient in fine cabinetry, but it still affects shop overhead, blocking, delivery, and broader construction pricing. In late July 2026, framing lumber pricing was up 1.4% week over week, 3.1% higher than a month earlier, and slightly lower year over year. Benchmark lumber was about $615 per 1,000 board feet on July 31, 2026, down about 11.6% year over year.
| Cabinet Type | Typical 2026 Cost | What You Usually Get |
|---|---|---|
| Basic DIY cabinet | $300-$800 | Paint-grade plywood, pine or poplar trim, simple lock, basic glass or acrylic, no integrated lighting. |
| Better DIY hardwood cabinet | $900-$2,500+ | Oak, maple, cherry, or walnut face frame; cabinet-grade plywood; tempered or laminated glass; quality hinges; LED lighting; padded rests; better finish. |
| Professional custom cabinet | $500-$1,200 per linear foot installed | Shop-built casework, fitted doors, finished panels, trim, delivery, installation, scribing, and site anchoring. |
| Retail handcrafted gun cabinet | $1,835-$8,845 | Furniture-grade display cabinet, often with hardwood, glass doors, locks, and finish options. |
| Glass door upgrade | $75-$500+ per door | Retrofit inserts at the low end; fully custom installed glass cabinet doors at the high end. |
For the 42-inch by 82-inch plan, a realistic premium DIY budget looks like this: $350 to $650 for plywood, $250 to $900 for hardwood face frames and doors, $200 to $800 for glass, $100 to $300 for hinges and locks, $75 to $250 for LED lighting, $75 to $250 for lining materials and firearm supports, and $150 to $350 for stain, topcoat, sandpaper, fasteners, and shop supplies.
Materials That Make the Cabinet Stable
The cabinet box should be built from 3/4-inch cabinet-grade plywood, not framing lumber and thin paneling. Plywood gives a flatter case, better screw holding, and more predictable door alignment. Use veneer-core plywood for traditional woodworking, MDF-core plywood when you need very flat painted or veneered panels, and Baltic birch or similar multi-ply panels for drawer boxes, jigs, and small support parts.
Good hardwood choices include white oak, red oak, maple, cherry, walnut, and ash. White oak is durable and takes stain well. Maple is clean and hard but can blotch if stained poorly. Cherry darkens naturally and looks excellent with a clear finish. Walnut is expensive but gives a premium furniture look with less stain work. Poplar is a sensible paint-grade choice for face frames and trim, but it is not usually the first choice for a stain-grade gun display cabinet.
Recommended Free Tools
Recommended Material List
- Two to three sheets of 3/4-inch cabinet-grade plywood for the case, shelves, partitions, and back.
- One sheet of 1/2-inch plywood if using a reinforced back instead of a full 3/4-inch captured back.
- Hardwood for face frame, door frames, crown, base, barrel combs, and trim.
- 1/4-inch plywood or veneered panel for reversible interior back panels.
- Tempered or laminated glass for doors.
- European concealed hinges or quality butt hinges rated for the door weight.
- Cam lock, cabinet lock, or concealed lock hardware appropriate to the access plan.
- Warm white LED tape or bars, diffuser channel, low-voltage driver, and accessible service location.
- Felt, cork, leather, neoprene, or closed-cell foam for padded contact points.
- Threaded inserts, shelf pins, figure-eight fasteners, screws, glue, finish, and wall anchors or structural screws.
For a stain-grade cabinet, buy more material than the cut list says. Matching grain on visible door rails, stiles, face frames, and panels matters. A 10% waste allowance is light; 15% to 20% is more realistic when the cabinet will sit in a finished room.
The Convertible Interior Plan
The heart of this project is the interior system. The cabinet should not be locked forever into one use. Build the gun-specific parts as removable modules that screw into threaded inserts or concealed cleats. That way the cabinet can become a display case without exposed glue scars, torn felt, or patched screw holes all over the back.
Also popular on Amazon

- PORTABLE SIZE AND SPACE:The space of this gun safe can store 2 standard size pistols.It also can store valuables such as jewelry. The light and small size can also let you put it in the car, or the bedside table, drawer and other places, which is convenient to carry
- BIOMETRIC ACCESS: The pistol safe is a biometric access/PIN access portable metal . gun safes for pistols is ideal for Pistols, cash and other valuable items. Top of the line biometric chips brings high security and access control system together and makes it safe and user friendly
- HIGH-QUALITY MATERIALS AND PRACTICAL INNER: The shell of the biometric gun safe for handgun is made of hard carbon steel, built-in strong spring steel, the coating is made of metal paint, thick and does not fall off. When on the night the biometric safe is opened, there will be light inside the gun safe , and you can clearly see the contents of the gun safe
- PREMIUM CARBON STEEL MATERIALS & BUILT-IN LED LIGHT : The high-quality carbon steel used makes the safe exceptionally sturdy and secure, and highly resistant to impact and forced entry,Features a soft LED light for clear visibility in low light, fitting seamlessly as a nightstand safe in bedrooms or drawers
- THE BILLCONCH ADVANTAGE: Worry-free One Year Warranty, Reliable 24-hour response service. If you have any concerns or advice, please feel free to contact us directly. We’ll offer a friendly customer service
Long-Gun Display Mode
Use an upper barrel comb mounted 48 to 54 inches above the stock rest, depending on the firearms being stored. For many rifles and shotguns, a 50-inch vertical distance between stock pocket and upper comb works well. Cut the comb from 3/4-inch hardwood, then line the notches with felt, leather, or thin closed-cell foam. Keep each notch wide enough to avoid pinching barrels or fore-ends. A 1 1/4-inch to 1 1/2-inch wide notch with softened edges works for many long guns, but measure your actual pieces before cutting.
The lower stock rest can be a continuous padded rail, individual padded blocks, or a shallow removable tray. We prefer a removable tray because it catches dust and makes later conversion easier. Leave at least 2 inches of front-to-back play so different stock shapes sit naturally without leaning hard against the glass.
Quick wins for a faster PC:
Repair Windows errors before they cause bigger problemsFix Now →Fix the driver behind crashes, sound loss and screen glitchesFind Drivers →Display Cabinet Mode
For conversion, remove the barrel comb and stock tray, then install adjustable shelves on shelf pins. If you drill two vertical rows of shelf-pin holes on each side during the original build, the cabinet can accept glass shelves, wood shelves, or a mix of both. Use 1/4-inch shelf pins for ordinary display loads and heavier standards or reinforced shelves for books, trophies, or dense collectibles.
A reversible back panel is worth the extra planning. One side can be felt-lined for firearm display. The other side can be finished wood, painted panel, beadboard, leather-look material, or fabric for curio use. Capture the panel with small removable battens or hidden screws so it can be flipped without tearing the cabinet apart.
Glass, Locks, and Security Limits
Use tempered or laminated glass, not ordinary window glass. Tempered glass is safer when broken because it breaks into small pieces instead of long sharp shards. Laminated glass tends to hold together better after impact because of its inner layer. For a display cabinet where visibility matters and the door is large, 1/4-inch glass is a common practical thickness. For smaller door lites, 3/16-inch may be acceptable, but door frame design and glass supplier guidance matter.
Glass adds real cost. In 2026, glass cabinet door work can run about $75 to $200 for retrofit inserts, $150 to $250 for stock replacement doors, $250 to $400 for semi-custom doors, and $400 to $500 or more for fully custom installed glass doors. The more secure and refined the door, the more important the frame becomes. A thin frame with a lock in it can rack, split, or expose the latch. Use wide enough stiles for hardware, usually at least 2 1/4 inches, and reinforce lock areas as needed.
Do these 3 things before closing this tab:
1Clear out junk files and repair common Windows errors2Scan for outdated or missing drivers - takes under a minute3Repair Windows errors before they cause bigger problemsA lockable wood and glass cabinet is controlled-access furniture. It can discourage casual handling and help keep contents organized, but it should not be described as a gun safe. If burglary resistance, fire resistance, or certified secure storage is the goal, use a rated safe. If the cabinet will hold firearms in a home with children, tenants, guests, or shared access, check state and local storage laws before finalizing the lock design.
Best-practice firearm storage guidance is consistent: firearms should be locked and unloaded, with ammunition stored separately and preferably locked. Some state rules are changing. California SB 53 took effect January 1, 2026 and requires firearms in residences to be securely stored when not carried or under direct control. Illinois also has 2026 safe-storage requirements when children are present. Your cabinet design should be conservative enough to support those kinds of obligations, but you should verify the law where the cabinet will be used.
Also popular on Amazon

- Spacious Interior & Smart Organization - Main compartment offers 2.3 cu ft capacity to store documents, cash, and valuables; removable shelf allows customizable storage for items up to 44 inches in height. Note: Please check interior dimensions for fit.
- Quick-Access Digital Keypad + 2 Backup Keys - Programmable code entry with 180° full-open door swing; built-in storage pockets and compartments keep everything within reach for bedroom, garage, or living room.
- Heavy-Duty All-Steel Construction - Pre-drilled for floor or wall mounting with included bolts. Fully assembled out of the box—fits closets, corners, or garage in minutes. No tools needed.
- Audible Alarm + Interior LED Light - Alarm activates after 3 incorrect code attempts to deter unauthorized access; bright LED ensures clear visibility of your valuables in low-light conditions.
- GRS-Certified Recycled Steel + Complete Kit – SGS-verified, made with ≥50% recycled material (Cert. No. TE-00339222). Includes keys, removable racks, mounting hardware & manual—ready to use immediately
Anchoring and Tip-Over Protection
A tall cabinet with glass doors and heavy contents must be anchored. This is not optional on our installations. A 42-inch-wide cabinet that is 82 inches tall can become front-heavy when both doors are open, especially if the floor is out of level or the cabinet sits on carpet. Children may also pull on doors or shelves. Treat anchoring as part of the woodworking plan, not an afterthought.
The cleanest approach is a concealed French cleat or ledger tied into wall studs. Use a 3/4-inch plywood or hardwood cleat across the upper back, beveled at 45 degrees if using a French cleat. Fasten the wall cleat into at least two studs with structural screws. The cabinet-side cleat should be glued and screwed into the cabinet sides or captured back structure. For built-ins, blocking, side scribes, face-frame returns, and top attachment can all work together, but the load path still needs to reach framing.
If the cabinet is freestanding, use adjustable levelers in a recessed toe base. Levelers let you correct uneven floors before setting door gaps. A square cabinet sitting on an uneven floor will twist, and twisted cases create uneven reveals, rubbing doors, and locks that do not line up. Set the cabinet plumb, level, and tight to the wall before installing the final glass doors.
Lighting and Electrical Planning
Plan lighting before cutting panels. If you decide on lights after assembly, you will end up with visible wires, awkward holes, or LED tape stuck where it casts glare into the glass. Route wire chases in the side panels, back, or face-frame returns. Leave an accessible pocket for the low-voltage driver. Use diffuser channels so you see smooth light instead of individual LED dots reflected in the glass.
Warm white lighting in the 2700K to 3000K range usually looks best on oak, cherry, walnut, and stained maple. Cooler light can make warm wood look flat or gray. Install vertical LED strips near the front inside corners when you want even display lighting. Install top-down lighting when the cabinet will hold glass shelves and decorative objects. For firearms, avoid harsh light aimed directly at optics, polished metal, or glass door reflections.
Freestanding furniture with a plug-in low-voltage lighting system usually does not require a building permit by itself. Built-ins are different. New outlets, hardwired drivers, wall penetrations, concealed wiring, or structural attachment may trigger electrical or building inspection requirements. Electrical codes also update over time, and the 2026 National Electrical Code cycle includes changes that local jurisdictions may adopt on their own schedules. Check with the local building department before opening walls or adding hardwired lighting.
Joinery and Build Sequence
For a serious cabinet, use dadoes, rabbets, pocket screws where hidden, confirmat screws where appropriate, and glue blocks where they will not interfere with conversion. A simple butt-jointed plywood box can work for shop storage, but a display cabinet with glass doors deserves better. The case must stay square for the doors, locks, and glass to behave.
Build Sequence
- Make a full-size story stick showing total height, lower cabinet height, shelf locations, barrel comb height, lock centerlines, hinge locations, lighting channels, and sightlines through the glass.
- Cut the side panels, top, bottom, fixed shelf, and back. Mark inside faces clearly.
- Drill shelf-pin holes before assembly if the cabinet will convert to display use.
- Route shallow wire chases or drill controlled wire paths for LED lighting.
- Cut dadoes or rabbets for the fixed shelf and captured back.
- Assemble the cabinet square on a flat surface, checking both diagonals.
- Install the face frame, keeping stiles straight and door openings consistent.
- Build lower doors, drawers, or accessory storage as required.
- Build glass door frames with strong mortise-and-tenon, cope-and-stick, dowel, or floating-tenon joinery.
- Dry-fit locks, hinges, barrel combs, stock rests, and shelf hardware before finishing.
- Sand, stain, and finish parts before installing glass and padding.
- Install lighting, glass, door hardware, locks, and removable interior modules.
- Set levelers, anchor the cabinet, adjust doors, and test lock operation.
Expect 35 to 70 shop hours for a careful DIY build, depending on door complexity and finish. A professional shop can move faster because of tooling, spray finishing, and repeatable cabinet methods, but lead time may still be 4 to 10 weeks depending on material availability, finish schedule, and installation calendar.
Also popular on Amazon

- LONG GUN STORAGE: Holds up to 5 scoped rifles or shotguns; built with an adjustable shelf to organize your long guns without removing optics
- DUAL ACCESS POWER SYSTEM: Digital illuminated keypad, backup keys and external AA battery port; avoid lockout risk when internal battery runs out
- HEAVY-DUTY ANTI-PRY SAFETY: Thickened solid steel construction with seamless edges and 3 deadbolts; zero gap design blocks prying to secure firearms from kids and intruders
- SILENT & LOW-LIGHT OPERATION: Silent mode mutes keypad beeps for discreet nighttime access; interior LED light improves visibility in dark spaces
- SECURE INSTALLATION: Pre-drilled mounting holes and included anchor bolts; mount safely to walls, floors or cabinets for garage, basement and hunting cabin use
Freestanding Cabinet vs Built-In Millwork
A freestanding cabinet is the better DIY choice when you want furniture that can move, convert, or be sold later. It also limits wall work. The cabinet still needs anchoring, but it can be built and finished in the shop before final placement. Use a finished back if it may ever be seen, and use a recessed toe or furniture base that keeps the piece stable.
A built-in cabinet is better when the room already has matching millwork, when you want a full wall display, or when the cabinet should look permanent. Built-ins require more site work: scribing to uneven walls, dealing with baseboards and crown, tying into studs, managing outlets, and protecting floors and finishes during installation. They also raise more permit and electrical questions if wiring or wall modification is involved.
| Choice | Best For | Main Caution |
|---|---|---|
| Freestanding furniture cabinet | DIY builds, future relocation, easier conversion, lower site disruption. | Must still be anchored and leveled so it cannot tip or rack. |
| Built-in cabinet | Finished rooms, matching trim, custom libraries, trophy rooms, permanent displays. | More labor, scribing, electrical coordination, and possible permit concerns. |
When to DIY and When to Hire a Pro
DIY makes sense if you have a table saw or track saw, router, clamps, hinge jigs, finishing space, and enough patience to build square doors. This is a good project for an experienced woodworker who has already built bookcases, cabinets, or furniture with frame-and-panel doors. It is not a good first cabinet project if you plan to use expensive walnut, inset glass doors, built-in lighting, and a furniture-grade finish.
Hire a professional cabinetmaker or finish carpenter if the cabinet is built-in, needs to match existing millwork, requires large custom glass doors, includes hardwired lighting, or must be scribed tightly to walls and floors. A pro is also the better choice when the cabinet will sit in a high-visibility room where door reveals, finish quality, and trim transitions need to look intentional from 6 feet away and from 6 inches away.
The cost difference is real, but so is the risk. A DIY hardwood version may run $900 to $2,500 in materials. If the doors twist, the finish blotches, or the glass openings are out of square, rebuilding parts can erase the savings quickly. Professional custom cabinetry at $500 to $1,200 per linear foot installed buys layout help, shop accuracy, finish control, delivery, installation, and accountability for the final fit.
Common Mistakes to Avoid
The first mistake is designing only for the number of firearms. Measure the real contents. Long barrels, optics, wide stocks, slings, bolt handles, and muzzle spacing all change the interior. Build a story stick and test the layout before cutting expensive hardwood.
The second mistake is using weak glass and assuming the lock solves security. A lock on a thin wood-and-glass door is only one part of controlled access. Use appropriate glass, stronger door frames, better latch engagement, and conservative storage habits. For true burglary or fire protection, use a rated safe.
The third mistake is skipping anchoring. Tall display cabinets are tip-over risks, especially with glass doors open. Use a French cleat, concealed ledger, or structural screws into studs.
Also popular on Amazon

- Recent product optimization: Improved packaging and materials, with thicker protective padding to lower the risk of transit damage
- Pre-assembled & user-friendly smart unlock system: This biometric rifle safe is fully pre-assembled for direct use after unpacking, with no complex assembly steps needed. It is fitted with a fingerprint recognition access system to support keyless opening. The system is equipped with a wrong-entry reminder function, which activates after multiple consecutive incorrect input attempts to reduce invalid access behaviors and protect internal stored items
- Premium metal construction & long-lasting finish: Adopting heavy-duty metal frame structure, this gun safe for rifles and pistols features good scratch resistance, enabling easy daily cleaning and maintenance. The smooth and sturdy surface withstands daily friction and stains, keeping a neat appearance for long-term use. Equipped with 20mm thick solid locking bolts, the safe strengthens the structural firmness and improves the resistance to external prying and breaking behaviors
- Flexible interior layout & large capacity storage: With overall dimensions of 13.8"W × 11.8"D × 57"H, the gun cabinet provides spacious classified storage space, capable of storing 5 rifles and 3 handguns. It is matched with height-adjustable gun racks, which can be adjusted according to firearm specifications and daily storage demands to adapt to different placement needs. The built-in night light improves internal visibility, facilitating item access in low-light environments
- Wall-mountable design for enhanced safety: Reserved mounting holes and supporting expansion screws are equipped for wall installation. The fixed wall-mounted structure limits the displacement of the rifle safe and avoids overall theft of the equipment. The pre-reserved hole design simplifies the installation process, requiring no additional drilling or matching accessories for installation
The fourth mistake is ignoring wood movement. Solid-wood panels need room to expand and contract. Wide doors need proper joinery. Plywood panels need edge treatment. Do not glue solid floating panels into door frames, and do not build wide solid shelves without considering seasonal movement.
The fifth mistake is adding lighting too late. Lighting affects wire paths, shelf positions, back panels, driver access, and reflections. Decide before assembly where the wires, switches, diffuser channels, and serviceable parts will go.
Free tools Windows power users keep installed
One-click scans. No signup required.
Final Plan Notes
A well-built convertible gun and display cabinet should look like it belongs in the room even when it is empty. Keep the case square, use stable plywood, spend money on good doors and glass, anchor it properly, and make firearm-specific parts removable. The best version is not a novelty cabinet. It is a serious piece of millwork that can serve one purpose now and another purpose later.
For most homeowners, the sweet spot is a 42-inch-wide by 18-inch-deep by 82-inch-tall hardwood cabinet with two upper glass doors, a lockable lower section, warm LED lighting, a captured structural back, removable barrel and stock supports, and adjustable shelf holes for future conversion. Built carefully, it can work as controlled firearm display today and become a curio cabinet, trophy case, bookcase, or collectible display without looking like a repurposed compromise.
Frequently Asked Questions
How much does it cost to build a wood gun cabinet in 2026?
A basic DIY version usually costs about $300-$800 in materials. A better hardwood and plywood version with quality glass, locks, lighting, and finish typically runs $900-$2,500 or more. Professionally built custom cabinets commonly cost $500-$1,200 per linear foot installed.
Is a wood gun cabinet considered a gun safe?
No. A wood gun cabinet is display and controlled-access furniture. It can help organize firearms and limit casual handling, but it is not a rated burglary-resistant or fire-rated gun safe.
What’s actually slowing this PC down?
Pick the symptom - the matching free tool is one click away.
What glass should be used for a locking gun display cabinet?
Use tempered or laminated glass. Tempered glass is safer when broken, while laminated glass tends to hold together better after impact. For many cabinet doors, 1/4-inch glass is a practical choice, but final sizing should match the door frame and glass supplier guidance.
How do you make a gun cabinet convertible?
Use removable barrel combs, removable stock trays, adjustable shelf-pin holes, reversible back panels, and threaded inserts instead of glued-in firearm supports. That lets the same cabinet convert into a curio, trophy, book, or collectible display cabinet.
Do I need a permit for a built-in gun cabinet?
Freestanding furniture usually does not require a building permit. Built-ins, wall penetrations, new outlets, hardwired LED lighting, or structural changes may require local permits or inspections. Check with the local building department before starting wall or electrical work.
Should firearms be stored loaded or unloaded in a display cabinet?
Best-practice guidance is to store firearms locked and unloaded, with ammunition stored separately and preferably locked. State storage laws vary and are changing, so verify the rules where the cabinet will be used.
Free tools Windows power users keep installed
One-click scans. No signup required.
Quick Recap
Product prices and availability are accurate as of the date/time indicated and are subject to change. Any price and availability information displayed on Amazon at the time of purchase will apply.

