A concrete road is an engineered pavement system, not just a thick strip of concrete. The slab shares traffic loads with the prepared ground and any base or subbase beneath it. Its thickness is calculated for the expected traffic, climate, materials, support and design life, so there is no single “standard” thickness for every road. Planned joints give unavoidable shrinkage and movement controlled locations, while curing protects fresh concrete so it can develop the required strength and durability.
The practical answer to “How thick is a concrete road, and why does it have joints?” is therefore project-specific: the contract drawings and pavement design establish the slab and joint layout, and the specifications establish curing, saw-cutting and opening requirements.
As an Amazon Associate I earn from qualifying purchases.
What a concrete road is designed to do
Concrete pavement is usually called rigid pavement because its slab has substantial flexural stiffness. When a wheel passes over it, the slab spreads the load over a wider area than a flexible surface would. That action reduces the stress reaching the underlying soil, but it does not eliminate the need for a carefully prepared support system.
Designers consider the slab, the layers below it and the subgrade as one structure. A strong slab on weak, poorly drained support can still perform badly; a well-prepared foundation can improve load distribution, drainage and construction consistency. The exact build-up depends on the road agency, traffic, soil, drainage, available aggregates, climate and contract requirements.
#1 Best Overall

- Advanced Moisture Retention Formula - This professional concrete curing compound acts as an effective moisture barrier for fresh concrete. Our curing and sealing liquid locks in water to ensure proper hydration, maximize strength development, and prevent early cracking on new slabs and driveways.
- Dual-Action Cure & Seal Protection - Apply this efficient cure and seal for concrete to new surfaces. It forms a protective concrete curing membrane that retains crucial moisture while providing a temporary sealing layer to shield against stains and weather during the critical initial curing period.
- Integrates Corrosion Inhibiting Benefits - Formulated with a built-in corrosion inhibitor, this concrete treatment helps protect embedded steel rebar and metal from rust. This contributes to longer-lasting durability for your concrete structures, driveways, and patios.
- Easy Spray-On Application & Coverage - This ready-to-use liquid concrete sealer is designed for easy spray or roller application. One gallon covers approximately 50-80 sq ft, making it a user-friendly solution for DIY projects and professional concrete finishing alike.
- Promotes Optimal Strength & Durability - By significantly reducing moisture loss, this concrete curing aid promotes proper cement hydration. This results in a harder, more durable concrete surface with increased abrasion resistance and reduced dusting for a superior final finish.
The layers beneath a concrete road
The following cross-section is an orientation example, not a universal specification:
- Concrete slab: The riding surface and primary load-spreading element. Its thickness, strength, mixture and joint layout are designed together.
- Base or subbase, where specified: A layer that can improve uniform support, drainage, construction access and resistance to erosion or pumping. Some projects use one layer, some use both, and some rely on a different engineered support arrangement.
- Prepared subgrade: The compacted or otherwise treated soil beneath the pavement system. Its stiffness, moisture condition and uniformity affect how the slab responds to traffic.
- Drainage and edge details: The design may include features that move water away from the pavement or protect vulnerable edges. Their form is project-specific.
Because these layers work together, a drawing that shows a particular base thickness or material should not be copied to another road without the responsible engineer’s design. FHWA rigid-pavement material supports treating both structure and slab thickness as design variables rather than fixed universal dimensions.
How slab thickness is determined
There is no defensible single thickness for all concrete roads. A pavement engineer selects thickness to keep stresses, deflections and cracking within the limits assumed for the project. The decision commonly reflects:
Do these 3 things before closing this tab:
1Repair Windows errors before they cause bigger problems2Fix the driver behind crashes, sound loss and screen glitches3Clear out junk files and repair common Windows errors- Expected axle loads, traffic volume and heavy-vehicle repetitions over the design period.
- Subgrade and foundation support, including seasonal moisture and uniformity.
- Concrete properties, temperature behavior and aggregate characteristics.
- Drainage, freeze-thaw exposure and other climate effects.
- Joint spacing and the way the slab is divided into panels.
- Construction tolerances, available equipment and the road authority’s acceptance criteria.
Thickness and joint spacing are related choices. A thicker slab may tolerate higher loading, but panel dimensions, support conditions and concrete behavior still influence cracking. FHWA’s historical rigid-pavement design appendix discusses these choices together to minimize transverse cracking; it does not prescribe a current value for every road.
One numerical value sometimes encountered in FHWA material is 3.7 m (12 ft) for joint spacing. In that document it is an input to a specific sensitivity-analysis pavement structure published in 2006, not a universal recommendation. Treating it as a standard spacing would remove the design context that gives the number meaning.
Rank #2

- Mix with water at a 9:1 ratio; Covers 2000-4000 sq ft per gallon after mixing
- Reduces surface moisture loss by approximately 80% in windy conditions and 40% in direct sunlight
- Keeps surface plastic and "finishable" for a longer time
- Will not interfere with the adhesion of subsequent curing and sealing compounds
- Leaves no surface finish
Why concrete roads have joints
Fresh concrete loses moisture, cools after heat from hydration and responds to daily and seasonal temperature changes. Those movements create tensile stresses. If a large, unjointed slab is restrained, cracking may occur at random locations. A planned joint creates a deliberate line of weakness or separation so movement and cracking are managed where the designer can inspect, seal or maintain it.
Joint spacing is a design decision
In jointed plain concrete pavement, the design objective is to provide sufficient slab capacity and a joint pattern that limits uncontrolled transverse cracking. Spacing depends on the pavement system’s structural characteristics, slab thickness, concrete behavior, support and environmental exposure. It is not a universal rule measured from the road’s lane width alone.
Design layout versus field saw-cutting
Plans identify the joint locations and details. During construction, saw cuts are made when the concrete is strong enough to cut cleanly but before uncontrolled cracking develops. The acceptable window depends on mixture, weather, equipment and the project specification. Cutting too early can cause raveling or the cut to widen; cutting too late can allow a crack to form beside the intended joint. A generic hour-after-placement rule cannot replace the contract requirement.
What joints must accomplish in service
Joints divide the slab into manageable panels, accommodate movement and help transfer or control loads at panel boundaries according to the design. Their performance also depends on accurate alignment, clean construction, suitable joint filling or sealing where specified, and protection from water and incompressible debris. The details vary by pavement type and agency standard.
Construction sequence from ground preparation to opening
Exact operations differ, but the engineering logic follows a recognizable sequence:
Rank #3
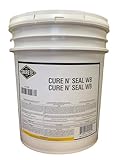
- Cure and seal surfaces
- Interior or exterior applications, new or existing applications
- Concrete, masonry, terrazzo, brick, stone, masonry, and other cementitious materials
- Commercial and residential applications
- Seal many types of resilient floor coverings and porous ceramic tile
- Verify the design and site conditions. Confirm the approved slab thickness, support layers, joint plan, drainage details, concrete mixture, curing method and opening criteria before work starts.
- Prepare and inspect the subgrade. Remove unsuitable material, bring the formation to line and level, and compact or treat it as specified. Correct soft spots and confirm the required uniformity and moisture condition.
- Place and check the base or subbase. Where the design includes these layers, construct them to the specified thickness, density, smoothness and drainage requirements. Protect the finished surface from contamination and damage before concrete placement.
- Set the placement controls. Establish forms, paving equipment guidance, elevations and the joint layout. Check that the planned panel dimensions can be built accurately and that embedded or edge details shown on the drawings are in position.
- Place, spread and finish the concrete. Maintain the specified mixture, workability, thickness and surface profile. Avoid adding uncontrolled water or finishing practices that can weaken the surface.
- Start curing immediately using the approved method. Fresh concrete must be protected from rapid moisture loss, damaging temperature differences, rain, traffic and other specified hazards.
- Execute joints at the specified locations. Form or saw joints using the equipment and timing accepted for the project. Inspect edges for raveling, random cracks and alignment problems.
- Complete acceptance checks before opening. Confirm curing, strength or maturity evidence, joint condition, surface quality and any temperature or load restrictions required by the agency.
What curing does to fresh concrete
Curing is deliberate control of moisture and temperature within prescribed limits. It gives cementitious materials time to hydrate and lets the concrete develop its intended strength, stiffness and durability. It also reduces early damage caused by drying, thermal gradients and premature loading.
Recommended Free Tools
FHWA-HRT-05-038, Chapter 1, states: “The objective of all curing operations is to maintain a condition of moisture availability and temperature sufficient to allow development of physical properties before the structure is subjected to loading, abrasion, and excessive drying.”
Pavements are particularly exposed: they have a large surface area relative to their volume and are placed outdoors, where wind, sun, low humidity and temperature swings can rapidly change the surface condition. For that reason, a road is not exempt from curing simply because it is broad, thick or placed on a prepared foundation.
Final-curing methods and when they are selected
FHWA groups final curing into three broad categories. The choice depends on the concrete materials, weather, equipment, labor, surface geometry and the project specification.
| Method category | How it controls early-age conditions | Selection considerations |
|---|---|---|
| Curing-compound methods | A membrane-forming material reduces moisture loss from the exposed surface. | Application rate, coverage, timing, compatibility and product acceptance are controlled by the project requirements. |
| Water-added methods | Water is supplied to keep the concrete surface moist during the required curing period. | Reliable water supply, labor, temperature control and protection from drying between applications are important. |
| Water-retentive methods | Materials such as coverings retain moisture against the concrete surface. | Continuous contact, secure edges, wetness and protection from wind or displacement must be maintained. |
A curing compound is therefore a method category, not an automatic product recommendation. The agency or contract documents determine which products are approved, how they are applied and how coverage is verified.
Quick wins for a faster PC:
Clear out junk files and repair common Windows errorsFree Scan →Scan for outdated or missing drivers - takes under a minuteDriver Scan →Repair Windows errors before they cause bigger problemsFix Now →Rank #4

- Spray or roller applied***
- Eliminating the need for water curing***
- Ready-to-use, milky white color dries to clear satin finish***
Curing has stages, not just a start date
1. Protect freshly placed concrete
Immediately after finishing, protect the surface from rapid evaporation, rain, vibration, temperature shock and unintended traffic. The required measures depend on weather forecasts, concrete temperature and the site’s exposure.
2. Apply and maintain the final-curing system
Use the specified method continuously and repair damaged or missed areas. Inspect exposed edges, joints and transitions because these locations can dry or cool differently from the middle of the slab.
3. End deliberate curing only when requirements are met
Curing does not end merely because a calendar period has elapsed. The project may require evidence based on developed properties, concrete strength, maturity, temperature history or other acceptance checks. Follow the current plans and specifications rather than an archived generic schedule.
Opening the road to traffic
Opening criteria are construction and acceptance matters. They can include a required strength or maturity value, a minimum curing condition, surface and joint inspections, temperature limits, and restrictions on construction or public vehicles. Saw-cut timing and opening timing are separate decisions: a pavement may need joints cut before it is eligible for traffic, and eligibility may depend on more than strength alone.
PC Slower Than It Used to Be?
A free scan shows the junk files, broken settings and background clutter dragging Windows down - then fixes them in one click.Free scan · Windows 10 & 11Crashes, No Sound, or Screen Glitches?
Random freezes, missing sound and display glitches usually trace back to one bad driver. Find and replace yours safely.Free scan · under a minuteFHWA construction review checklists are useful for understanding field sequencing, but they do not replace the applicable agency specification, contract documents or engineer’s design. On a live project, the approved documents control.
Best Value

- Great tools at a great price
Common failure modes and the design or construction response
Random cracks beside the planned joints
Possible contributors include late saw-cutting, excessive panel dimensions, insufficient curing, restraint, thermal gradients or nonuniform support. The response is to verify the joint schedule and cutting window, examine weather and concrete records, and determine whether the crack is structural, shrinkage-related or a construction defect before selecting repairs.
Raveled or broken joint edges
Cutting before the concrete has enough strength, unsuitable blades or poor equipment settings can damage the joint. Stop and correct the cutting procedure under the project’s quality plan; do not widen every joint arbitrarily.
Surface drying, dusting or scaling
Rapid evaporation, inadequate curing, finishing bleed water into the surface or exposure to freezing and deicing conditions can contribute. Review curing coverage and timing, weather data, mixture records and surface-finish operations. Repairs should follow an engineer’s assessment because shallow defects and deep durability damage are different problems.
What’s actually slowing this PC down?
Pick the symptom - the matching free tool is one click away.
Uneven support or pumping
Weak or wet subgrade, poor drainage, erodible support or construction damage beneath the slab can cause movement at joints and slab edges. Investigation should include drainage, layer thickness and support uniformity rather than focusing only on the visible concrete.
How to read a concrete-road specification
Before judging whether a road is “too thin” or has “too many joints,” identify the controlling documents and ask:
- What pavement type and design traffic were assumed?
- What slab thickness and support-layer arrangement are shown for this location?
- Which joint types, spacing, depth, width and load-transfer details are required?
- What concrete mixture, curing method and application rate are approved?
- What weather limits and protection requirements apply during placement?
- What evidence is required before construction traffic or public traffic is allowed?
- Which inspection records document thickness, curing, joint timing and defects?
Archived FHWA curing guidance from 2005 and its 2006 follow-up explain the principles, but current project specifications govern actual work. Local agencies may update materials, testing and opening rules after those publications.
Quick Recap
Product prices and availability are accurate as of the date/time indicated and are subject to change. Any price and availability information displayed on Amazon at the time of purchase will apply.
The Tool Desk
Outbyte Driver Updater FREEScan for outdated or missing drivers - takes under a minuteDriver Scan →Outbyte PC Repair FREEClear out junk files and repair common Windows errorsFree Scan →
